A headscarf (headdress) is necessary in the summer heat, especially for children. Nowadays this accessory is available in a huge assortment on store shelves; there is one for every taste and color. But you can easily sew it yourself according to your own design and in the desired color.
Today I will show you how to sew a summer scarf with an elastic band with your own hands, easily and simply.
We will sew a scarf with an elastic band for a child 1.5 - 2 years old (head circumference 56 cm).
- We cut out two rectangles from fabric (preferably cotton) 21x35 cm and 10x18 cm.
- Processing the edges: fold the larger edges on both sides of the main rectangle twice, 0.5 cm each, iron and stitch on a machine.
3. Fold the small rectangle in half lengthwise (right side inward). Machine stitch from the edge. Turn right side out. Iron.
If the elastic band is narrow, then do the following with this part:
Make a line along the center of the workpiece, retreating 2 cm from the edges, on each side. As in the photo below.
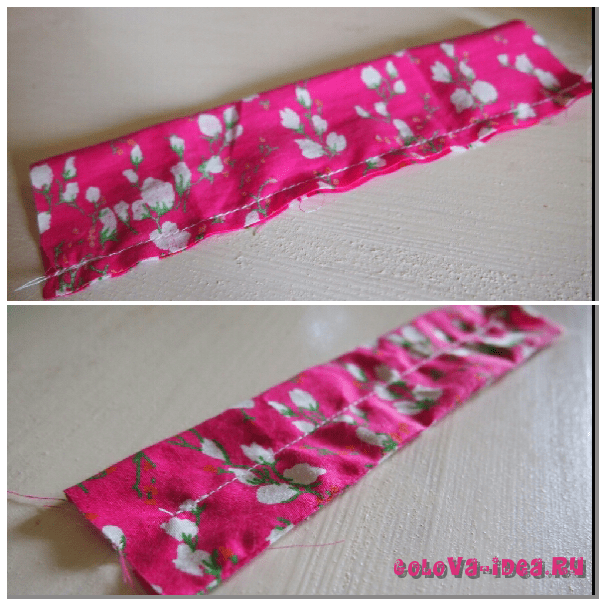
If the elastic is wide, then we skip this step, that is, we do not make a stitch in the middle, but simply insert the elastic.
4. Using a pin, we insert an elastic band of the required length (depending on the size of the head) into each “corridor”, tightening the part. We fix it with a machine stitch, departing 1.5 cm from the edges of the part (the same thing if there is only one elastic band).

We cut off the excess. You should get a pocket like this.
5. Fold the resulting pocket edges of this elastic band inward and insert the large piece gathered from the raw edges into them. We baste or secure with needles and sew on a machine.
Scarf with elastic band
http://www.liveinternet.ru/users/3564006/post281108212/#
We cut three parts.My daughter has a head volume of 54 cm.
I cut:
One piece 42x25 cm
Two parts 18x5 cm
I hem both long edges of the large piece.

Place two small pieces facing each other and stitch along the long sides.

Turn it inside out, iron it and turn both short sides inward by 2 cm.

We sew the resulting part in the middle, without reaching the edges
1.5 cm.

We ended up with two departments.Next is the elastic band. We need two cuts of 10 cm each.We'll trim off the excess later.And we pass it into each department.We attach the ends of the elastic bands, also retreating 1.5 cm from the edge.Before sewing the second edge of the elastic, stretch it and gather the fabric.Trim off the excess elastic.You should get something like this.

Now gather the short edges of the large piece into beautiful folds and sew them into the open edge of the elastic.
Please note that the folds on both sides lie in the same direction.

Kerchief
A summer scarf with an elastic band is an indispensable accessory on the beach and in hot weather.
It is also very convenient for small children, as it does not slip and you can adjust the scarf to the child’s head.
In order to make a scarf, we will need:
1) Fabric, preferably cotton.
2) Elastic band 2.5 cm wide and 16 cm long.
3) Sewing machine
5) Scissors
1) Prepare the fabric
Cut two pieces of fabric measuring 6x40 cm and 26x38 cm
The larger piece is our headscarf itself, the smaller piece is the elastic band that holds it on the head.
2) Let's start sewing
Take a smaller piece of fabric, fold it in half and sew along the long edge.
Turn the resulting part right side out.
We insert an elastic band inside it (we select the length depending on the volume of the head) and gather the fabric to the length of the elastic band. We fasten the ends of the fabric and elastic with pins.
Fold and stitch the long edges of the large piece
We form the smaller edges of the large piece into folds. As a result, the width of the smaller edge should be equal to the width of the piece with the elastic band
Preparation details for assembling the scarf:
3) Assembling the scarf
For greater strength, first sew the folds of the scarf to the elastic:
Now, tucking the raw edges of the fabric with elastic, we sew all the parts together:
Small detail:
That's it, our scarf is ready, now you can go to the beach and enjoy sea fun
How to sew a scarf with an elastic band
Perhaps you will also like a scarf with an elastic band. It doesn't need to be tied, it's easy to put on, and it stays on your head well. In addition, it comes with a set children's panties from the previous master class. We offer a description of sewing a headscarf with step-by-step photographs of the process.

The cut of the scarf is simple:
Rectangle (the scarf itself) with sides 20x44 cm for the scarf
Rectangle (with elastic band) 7x14cm
Elastic band 2x7cm
We made the shape of the scarf as shown in the photo. The length, width and shape of this part may vary depending on the size of your head and your preferences.

The edge of the scarf along the long sides must be processed in any available way:

Gather the ends of the scarf into an assembly or fold it into folds (as we did).

Place the end of the scarf into the folded drawstring under the elastic, leaving an allowance for hem of the drawstring of 0.8 cm, and secure it in this position with tailor's pins or a running stitch. Then machine stitch. 
Repeat the same with the second end of the scarf.

Turn the elastic drawstring out and sew a fastening stitch 1 cm from the fold, stretching the elastic to the length of the drawstring.

Fold the sections inside the drawstring and sew up the hole, after stretching the elastic.
This is what the finished scarf looks like!

Sew and wear with pleasure!
On the eve of the hottest time of the year, I will be sewing such a necessary summer item as a hat. If you want to learn how to sew a headband for a girl quickly and easily, welcome to my master class.
This is an easy-to-sew item that even beginners in sewing can succeed in. I will show you how to sew a headband for a girl, head circumference 51 - 53. If you want to sew exactly the same one for an adult, you need to increase the width by 5 - 6 cm. Also, such scarves can be combined with any things by choosing the fabric in tone
 Muslim swimsuit - burkini and headband - headscarf
 What I needed to sew a headband for a girl:
- fabric staple - 30 cm.
- threads in color
- tailor's tools: scissors, measuring tape, pins, chalk
- elastic band wide 2 cm - length 27 cm.
How to sew a head scarf for a girl step by step
1. I cut out two rectangles measuring 37*24 and 33*6. The first is the scarf itself, the second is for the elastic.

2. I overcast the edges of a large rectangle using an overlocker, using a zigzag stitch.

3. I take a small rectangle that will serve as a cover for the elastic, fold it in half lengthwise, and stitch the edges on a sewing machine. I leave a 6 cm hole exactly in the middle so that an elastic band can be threaded inside.


4. I fold the fabric for the scarf with an accordion or folds until the edges are even, as in the photo. I fix the folds first with tailor's pins, then with machine stitching.

5. I put the “belt” on the scarf as shown in the photo, put an elastic band on top and secure it with a pin.

6. Machine stitching

7. I turn the “belt” inside out, the elastic remains inside in the case

Hello, friends.
In the summer, when nature is fragrant with beauty, you want variety in clothes and...
A baseball cap or a brimmed hat goes better with one outfit. Another, a light headscarf with a visor will decorate and add zest.
This headdress looks impressive, serves its purpose well and can add variety to your summer wardrobe.
Especially suitable for those who love non-standard things or transformable things
Let's look at how to sew a scarf with a visor for the summer, a simple pattern of which will make the work of a beginner or an experienced tailor easier. Text and video formats await you.
To sew a scarf with a visor you will need:
- Material cut 60-70 cm;
- Duplicate material approx. 10 cm
- Threads matching the color;
- Chalk/soap/marker for marking;
- Tape measure;
- Ruler;
- Pins;
- Scissors;
- Sewing machine;
- Iron;
Choosing a scarf material
Choose lightweight, well-draped materials.
It is better if these are fabrics containing cotton, linen and viscose. Although, a little synthetics and elastane will not affect wearing comfort.
Advice: If you have a scarf in a matching fabric that you don't wear, you can sew it into a scarf and breathe new life into it.
For rigidity, we will strengthen the visor.
Medium-hard duplicating materials are suitable: non-woven fabric, dublerin, serpyanka, etc.
Note: If your cushioning material is not thick enough, glue it in two or three layers.
Uncover
Prepare the fabric: iron with steam or pre-wash and dry.
Using the suggested pattern, make a visor pattern.

For the base of the scarf, fold a piece of fabric 60-70 cm wide and long in half and cut diagonally. So that you get two identical triangles.

Cut out the visor from the remaining fabric. You will get two parts. Remember the direction of the grain thread. It coincides with the line of the middle of the part.
Preparing to sew
Set up sewing machine.
Duplicate both parts of the visor.
Sewing a scarf with a visor

The scarf is ready. You can safely walk the streets even on the sunniest days. 
You can sew a small neckerchief from the remaining fabric. Finish the edges with a Moscow stitch, edging or zigzag stitch. The new accessory is ready to make a stylish set with things in your summer wardrobe.
See the video for sewing details:
We looked at how to sew a headscarf with a visor. Surely, having sewn one such thing, you will want more. After all, the headdress protects from the sun, looks beautiful and is easy to sew.
If you have any questions, ask.
I wish you good luck, Elena Krasovskaya
- French scarf - transformer. How…
- How to sew a fashionable beanie hat with lining...
- Fashion trends spring-summer 2017. Sew...
I want to talk about my own experience: my mistakes and some nuances. I have already sewn quite a few scarves like this))) I’m even thinking about making my beloved one happy with such a scarf;) Well... it’s a very necessary thing at the dacha.
But today I will sew a scarf for my two-year-old daughter.
1. So, choose the fabric. For this MK I chose this fabric - our scarf will be bright and festive)))

2. Take measurements.
I did NOT measure the child's head circumference. I immediately measured the required length of the scarf without an elastic band. Those. I applied a measuring tape from the ear to the other ear. Like this:

And here is an important point: when measuring the length of the product, pay attention that the seam that we get when sewing the main part of the scarf and the elastic does not fall on the ear. This is exactly what happened in my first scarf. Those. this became my #1 mistake. And it’s not very comfortable for my little one to wear that headscarf, because... the seam still puts pressure on the ears (sometimes to the point of redness).
Therefore, I make a reserve of another 2-3 cm on each side. It would be better if the scarf is larger and the elastic is smaller. (And don't forget about seam allowances - 1 cm on each side will be enough).
Now we decide on the width of the scarf. It’s all at your discretion: you can make a narrow stripe bandage, or you can make a wide scarf that covers almost the entire back of the head. I need the second option.
3. So, I need to cut out a rectangle measuring 43 cm by 25 cm. This is the main part of the scarf.
We lay out the fabric and cut the edge. I do the cutting exactly like this: the side narrow sides - along the lobe, and the wide sides - along the weft (so that during use the scarf stretches a little). Cut it out... admire it)))

Now we cut out a small rectangle in which our elastic band will hide. Its width = 2 * elastic band width + seam allowance. The length is almost arbitrary (within reason). To determine the length, I placed the main part of the scarf on the model’s head, measured how long the elastic would be needed and added 4-5 centimeters to get a beautiful gather and could be put on the head “easily and naturally.”

And now it’s time to tell you about my mistake No. 2. When I first sewed it, I chose a wide elastic band. I thought (naively) that it would be more convenient. But... the elastic band turned out to be VERY tight. This is mega-inconvenient, especially when you are trying to put it on a two-year-old child! So now I use 2 strips of narrow elastic for my panties. If you have a wide elastic band that stretches well, you're lucky (I'm not lucky yet). (Therefore, in my formula for calculating the width of a small strip, I take not 2 widths of elastic, but 4, because I have 2 strips of thin elastic).
My small rectangle measures 12 cm by 6 cm.
4. We work with a large rectangle. First, let's start processing the long sides: one side - just a straight stitch, but I processed the second using a decorative stitch (like it;)


5. Next up is a small rectangle. Fold it in half face to face and stitch along the long side.

Turn it inside out. Let's iron.

Insert 2 strips of elastic. First we fix it on one side. Now let's carefully gather our strip of fabric... and fasten it on the other side. Here we have such a beautiful rubber band.

You can, of course, make a separate tunnel for each elastic band... but why complicate your life?)))
6. Let's start assembling our headscarf. There are a lot of options for how to make folds: starting from elementary ones - just gathering them on a thread and ending with all sorts of “counter-transverse” folds. I like the option I'm talking about best.
We lay out the fabric and make a lapel, which is equal in size to the width of our elastic (you can see in the photo; the elastic is next to it - so that you understand how wide the lapel is).

Now we put our elastic in place: it should be inside this lapel, we join the sections.

Now we turn up the lower part of our scarf. Like this:


In the process, we align the cuts and make sure that the folds are the same size (well, at least approximately;). Collected.

Let's go to the machine and make a line. I swept it with a regular zigzag stitch. One side is ready.

 The rule for forming the past tense in German")


