We all decorate our Christmas trees for the New Year, and everyone, of course, wants it to be the most beautiful in the world, and to please all the guests of your home and yourself. So, today we will make a beautiful toy from modules. We will create it from 300-400 parts, at your discretion. 100 green modules and 200-300 white modules. Also, the craft can be much smaller, depending on what kind of Christmas tree you have. So, the master class is called how to make a ball from modules with your own hands using a diagram and step-by-step instructions.
Let's get to work. For this we need:
1. Modules – green and white.
2. PVA glue.
3. Thread.
4. A lollipop stick, you can also use a toothpick or a regular match.


The first row is 14 white modules. It is advisable to glue it with PVA glue so that it does not fall apart.

We assemble the second row in the same way. On the third row we begin to add 14 modules and alternate colors. We will get 28 modules. We put a new module on each corner of the previous row. We alternate 2 through 1 (2 white, 1 green).

Fourth row – 28 modules. We shift each module by 1 corner in any direction, and so continue until the 11th row.

We take 10 white modules and put them on 3 corners of the previous row. Look at the photo.

The thirteenth row – 10 white modules, put on according to the usual pattern.

We take a thread of any size and color at your discretion and tie it to sticks (toothpicks or matches)

We thread it through ours and tie it.

Now we give our toy the shape of a ball. And our toy is ready.

Now you can hang it on yours and it will make everyone happy. You can also give it to your class teacher or school. And it will delight not only you, but also all your friends and will decorate the festive evening. You can make the toy in any color you like, or choose a different pattern.


Hello dear masters and craftswomen. I present to your attention a master class on making such an origami swan, and I called it “Swan in Pink”. How to make an origami swan? We will make a pink drawing, highlight the swan with pink modules around the perimeter and place it on a round stand, and also glue small eyes. Please watch this video on making an origami swan. IN […]
Hello dear masters and craftswomen! Today I bring to your attention a master class on making a tricolor Swan from triangular modules. It would seem that what else can you come up with, what other options are there for making Swans using the modular origami technique. But it turns out there are still options and this is not the last thing in my arsenal. The tricolor swan is so simple […]
Hello dear masters and craftswomen! I bring to your attention a new master class on making a Swan in black from 3D modules. In the last lesson we made a Swan in red, but now I decided to change the style a little and make a Swan in black. The scheme is not complicated and will suit anyone, even a beginner in modular origami. Specially […]
Hello dear masters and craftswomen! I bring to your attention a new master class on making a Swan in red shades. On the Internet you can find a huge number of different schemes and master classes on making Swans using the modular origami technique. I'm sure you've never seen a swan like this before. This scheme is quite simple and even [...]
Swan in blue. Video tutorials and diagram. Part 3. In the third part of the master class, I offer you two video lessons and a detailed origami diagram of how to make a swan. The first video shows how to make a swan's neck and how to make a small stand. The second video talks about how to glue a swan better and faster. Lesson 6 (neck and […]
Swan in blue. Video tutorials and diagram. Part 2. In the second part of the “Swans in Blue” tutorial we finish making the body. I have prepared for you two video tutorials and a detailed diagram of an origami swan from modules. To assemble a swan you will need 1438 modules of 1/16 size, of which: 317 - purple modules 471 - blue modules 552 - blue […]
Swan in blue. Video tutorials and diagram. Part 1. I bring to your attention a new master class on making an origami swan from paper from 3D origami modules. The design is quite unusual and the appearance of the wing is not quite classic. In the photo you can see small through holes and a mesh pattern. I'll be honest - the scheme is quite complicated! Especially for this scheme I […]
“Rainbow Swan” diagram and video tutorials (part 3). The third part of the “Rainbow Swan” master class consists of three video tutorials on assembling the stand. And I also decided that a video tutorial on gluing the “Rainbow Swan” would be very useful for you. Lesson 5 (stand part 1) Lesson 6 (stand part 2) Lesson 7 (stand part 3) […]
At a fairly early age, we flew paper airplanes and made boats. But in fact, they are origami toys.
Important! With the help of this type of needlework, you can please your child with a new toy, as well as diversify not only his, but also your leisure time.

Origami New Year's toy
Many sites show videos on making origami toys or show a master class on how to make an origami toy.
In this article we will show you the best crafts that an inexperienced adult and a child of any age can make.

Let's figure out how to make an airplane first.
Cartoon origami toys

You need to have a sheet of white paper for work. By the way, you can use colored paper.
Paper airplane

First, fold the upper corners of the sheet towards the center of the paper. Then we bend the resulting triangle downwards. We repeat the action: bend the upper corners to the middle, but so that the triangle remains at the bottom. Grab the bent corners and turn the craft over. Let's bend it in the opposite direction and bend the wings of the airplane down. Let's fold back the wings. The airplane is ready!
Origami - airplane
Ship from childhood

You need a piece of white paper. We bend the leaf in half. Then we bend it vertically. The upper corners bend towards the middle. We bend the flaps on opposite sides of the sheet. Then we turn them back to their original position. Fold the bottom corners up. Pull the central bend points and rotate the craft. The lapels also need to be folded. Then we pull the edges and stretch it. Ready!
Paper boat
You can make quite a lot of paper origami toys with your own hands. In most cases these are animals.
horse
- The scheme according to which we will make an origami toy will be as follows. We will need:
- black and brown paper;
- scissors;
- glue;
ruler.
Fold one strip in half, 3 cm from the edge, and bend it on both sides.

Preparing and folding strips
We also fold the second strip in half, retreating 7cm from the edge.

Folding the second strip
Then we take one strip and insert it into another. Glue them together.

Gluing strips
If the craft does not have stability, then the hind legs are equal.

Trimming the hind legs

Mane preparation
Your origami horse is ready!

Ready horse
Rose
A flower can also be an origami toy. It is done quite easily. The process of its creation itself is incredibly exciting. All you need is a red piece of paper, which will be colored on both sides.
First, fold the sheet in half. Then we bend it again. We open the top layer. Turn the craft over. Flip through the square. We bend 2 corners upward. We bend the triangles and draw lines. Opening the triangles. We bend the pockets that we have made downwards. The second side of the craft is done the same way. Bend the top corner. The bottom of the craft should open up. Pull the triangles and turn the craft over. Then we turn the craft over and raise the triangles again. Bend the bottom square diagonally. Turn the product over and repeat the previous step. Next comes the most interesting part. Place the piece on your hand and turn it clockwise to get a rose.
Advice! The petals can be curled with a pen or felt-tip pen.
Rose is ready!

Origami craft - rose
How to combine origami and applique?
To make a house, you will need to purchase:
- colored paper;
- black and brown paper;
- glue.

Origami applique
Cut out a square from colored paper. Fold it in half. The result is a rectangle. We bend it in half. We denote the center. We bend the resulting rectangles into the center of the craft. The result is a square. Then we unfold the craft. First, carefully unfold one part of the house, and then the other part. To ensure that the house has a stable position, we will unfold the side walls. Now the fun begins for the child!
Advice! You can glue windows from other paper, you can paint it with flowers, you can shade the roof.
In general, the house will turn out the way the child wants. This will make a good origami toy!
Butterfly
Another origami paper toy that we will tell you about in this article is a butterfly.
Make a square from a sheet of paper. Then fold it in half to form a triangle.
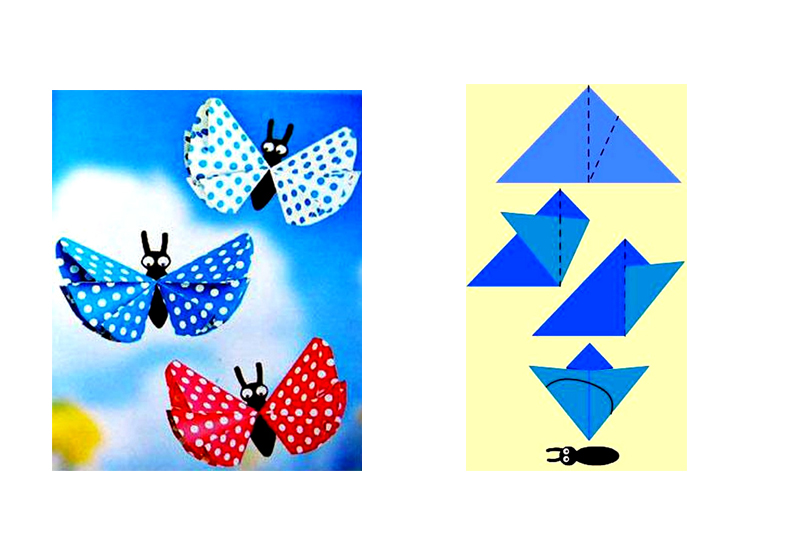
Scheme for making paper butterflies
The beauty of this craft is that it can be made in any color, hung on a thread, placed on a flower, decorated with a Christmas tree and much more.
Cut out the butterfly wing as shown in the photo above. Cut out the body of the butterfly from black cardboard. This will make the origami toy look more realistic. We make the butterfly's eyes out of paper or glue ready-made ones. We collect all the parts to get a complete butterfly.

Origami - butterflies
Modular origami
Assembling a modular origami toy is an activity that requires patience, perseverance and attentiveness from you. However, the effort spent will not disappoint you, but will give you another reason to be proud of yourself. This origami toy is proof of this.
Chinese dragon
Modular origami is quite difficult to perform also because it requires preparing a huge number of small figures. Their numbers range from several hundred to a thousand. Then these elements are put together like a construction set, forming a craft. Toys made from origami modules are a rather difficult task that requires certain skills.
In order to make a beautiful and stable craft, you need to choose high-quality paper that can bend well and hold its shape. Think about the color of the future craft right away, so that you don’t simply waste time.

Another New Year's craft using the modular origami technique from Lyudmila Prishchenko. This work embodies an amazing combination of an element from classic triangular modules and elements from the basic modules of Sakura kusudama. The result is a fantastic blooming paper snowflake.
New Year's toy “Snow Flowers”
This master class is intended for leaders of the Origami circle and all fans of modular origami. This toy can be hung on a Christmas tree, decorate the interior of a room or classroom, and can also be given as a gift to family and friends.
Goal: to teach how to fold a snowflake from triangular modules and simple flowers using the origami technique.
This work can be performed by children 9-10 years old.
Modular origami is a type of origami in which products are assembled from individual triangles (modules). Modules are connected by nesting them inside each other. And when folded, the friction force prevents them from falling apart, but glue can also be used.
To make a snowflake, we will need to prepare 444 white modules.
We begin to assemble rows 1 and 2. We take two triangles (hereinafter we will say modules) and put one triangle (module) on the adjacent corners. This can be clearly seen in the photograph:

We assemble the same number of modules in rows 1 and 2.
1 row – 6 modules
2nd row – 6 modules

In the next row you need to add 6 modules. We put one module on each corner of the module. In total there will be 12 modules in row 3. This is also clearly visible in the photo.

In the 4th row we put on the modules in the same way as in the 2nd row: we put on 1 module on 2 adjacent corners.

In the 5th row we add 12 modules, as in the 3rd row, and we get 24 modules in the row.

In the 6th row we put on 24 modules.
In the 7th row we add 24 modules, and we get 48 modules.

We won't add any more. Let's just make our snowflake bigger. To do this, we will assemble 3 rows of 48 modules each, that is, row 8 – 48 modules, row 9 – 48 modules, row 10 – 48 modules.

The base for the snowflake is ready. Now we make the rays of the snowflake. There will be 8 of them. Each ray starts with 6 modules. And the ray is assembled according to the following principle: 6 - 5 - 4 - 3 - 2 - 1.
It turned out to be 1 ray.

We also collect the remaining 7 rays. And the snowflake is ready.

Now let's start making flowers. For 3 flowers we will need 15 squares of 9x9 cm blue.
Take a square and fold it diagonally.

Raise the bottom corners to the top corner.
Take the right triangle and fold it in half (flatten it), then take the left triangle and also fold it in half.
We bend the upper corners of the flattened triangles towards ourselves.
Fold the left and right triangles in half.

We connect and glue.

We make 4 more such modules and connect them together. It turns out this wonderful flower:

We make 2 more flowers and glue them onto our finished snowflake. Decorate with paper strips wrapped around a pencil.
Our snow flowers are ready.

I wish you success in making the New Year's toy “Snow Flowers”.
I present to you my new paper craft using the technique modular origami: ball for Christmas tree.
You will never find such a toy in a store, but making it yourself is simple and interesting.
Materials:
- White modules – 80 pieces
- Color modules – 420 pieces (7 colors, 60 modules each)
- Satin ribbon narrow and medium
- Toothpick
- Cocktail straw
So, first we assemble the modules, the choice of color for the colored modules is at your discretion. I used green, blue, cyan, yellow, orange, pink and red modules.
We begin the assembly by simultaneously assembling 3 rows of white modules, 14 modules per row. Please note that the modules of the first row are located on the short side, and the subsequent rows are located on the long side.
We close the modules into a ring.
In the fourth row, colored modules are used, which we put on 1 corner of the module of the previous row. We arrange the colors in the order you like, the main thing is to stick to it in the future.
We also have the next rows of colored modules, alternating them as in the previous row, shifting them by 1 corner.
As we assemble, we give the ball its shape; in total, we need to lay out 15 rows of colored modules.
Dear craftswomen - take a short break from your work and look at the interesting service salesscanner.ru
I discovered this service some time ago and I hope that it will be useful to you too. The main idea is that it collects sale items from top online stores on the Runet in one place, that is, it allows you to buy quality goods at a significant discount instead of paying full price.
We put on the last row of white modules in the usual way and shape it into a ball.
Now take a toothpick, tie a narrow satin ribbon or thread to it, and form a loop.
Place a toothpick in a cocktail tube and pass the tube through the entire ball.
We stick out the toothpick and remove the tube. We trim the ends of the toothpick quite a bit and hide them in the modules of the first row. Due to this, our ball will have a loop. And the structure itself will not be damaged.
On top you can decorate the ball with a satin ribbon bow. This is the master class: the origami modular ball for the Christmas tree is over. Until next time, and don’t miss the new article - a snowflake using modular origami technique.


