Original crafts for school create an opportunity to captivate children with independent creativity. Of course, at the initial stage you need the help of adults (parents or teachers), but then this can give a real impetus to this type of activity. Making crafts is useful for acquiring certain labor skills, and if the work is properly organized, it creates the prerequisites for aesthetic education. If they have practical value, then the child will also feel the usefulness of his work.
Crafts for elementary school
It is especially important to form creativity and imagination in children of primary school age (7-10 years old), when, by praising the results of work, the competitive principle. The making of various crafts can be carried out at home with the participation of parents, in labor lessons under the guidance of a teacher, or in clubs with the help of specialists. It is not the place where they are done that is important, but the child’s interest.
An adult should suggest an idea for a craft for a primary school student, and it is better when the advice is unobtrusive, and the child seems to have come up with this option himself. Of course, the work should be carried out exclusively voluntarily, but interest in it must be aroused. In this direction, the following ways can be distinguished: getting a good grade; participation in the exhibition; utility; use as a gift; surprise at its originality. It is best when the work itself gives the child pleasure, and the result of the work receives an approving assessment from peers and teachers.
The material for the craft plays a special role. It is difficult to call a thing assembled from ready-made elements a craft. This will already be a “constructor”. Natural materials, improvised means, waste from “parental hobbies” (carpentry, sewing, knitting, etc.), easy-to-process materials (wood, paper, cardboard, plastic, plasticine), unnecessary household materials are suitable for original, original creativity. rubbish" and old rags, containers, etc. Natural ornamental raw materials are especially valued in crafts. You can use branches and driftwood, straw, cones, leaves and pine needles, flowers, plant fruits (acorns, nuts, fruit seeds), vegetables and fruits.
The child is interested in doing some little thing that is most relevant at a given time. The most common direction is to coincide with a holiday or some important event. Look especially attractive - New Year, March 8, Christmas, Maslenitsa, Easter, Victory Day, Cosmonautics Day, Teacher's Day. Seasonality should also be taken into account. For this purpose, spring, summer, autumn and winter crafts are distinguished, which have their own specifics.
What requirements should be considered when choosing crafts for elementary school? First of all, they must be easy to manufacture. All basic operations must be carried out by a child who does not have the skills to do the work. You need to rely on simple and standard tools - scissors, jigsaw, pliers, screwdriver, burning device, hacksaw, file. Even a sharp knife should be used under control and sparingly. Safety is the most important element of work organization. The craft itself should be bright, durable enough, without the use of harmful materials.
Crafts for school from natural materials

Nature provides an opportunity to maximize a child’s imagination and talent. A variety of crafts can be made from natural raw materials, which can be found in the garden, forest, on the banks of reservoirs, in the field. The best time to collect material is autumn. Such a variety of shapes and an impressive palette that nature gives is very difficult to find in a store. She can also suggest an original idea for a craft. You can use fallen leaves as an ornamental material; pine, spruce, cedar cones; pine needles; ash and maple seeds; nuts (walnuts and hazelnuts); watermelon, pumpkin, melon seeds; sunflower seeds; acorns; original stones. Trees can give a variety of elements - branches, roots, bark, fruits. It is worth taking a closer look at moss, reeds, dried flowers, and shells. It's very difficult to list everything. You just need to walk through a park or forest, using your imagination.
Here are some ideas for elementary school students:
- Web with a spider. This craft is made in the following order. First, two branches are fastened with a strong thread in the center to form a cross. Then thin branches are fixed in a radial direction, and a white thread is stretched between them, forming cobweb cells. A spider can be made by cutting a chestnut fruit in half and attaching small branches with a break to form insect legs. A small leaf is attached to the center of the web, and a “spider” is glued to it.
- Dragonfly. This craft is more suitable for girls. For one dragonfly you will need a small twig 4-5 cm long, any round fruit with a diameter of 8-12 mm and 4 maple lionfish, as well as sparkles. 2 lionfish are glued to the branch on different sides, and a round head is attached to the end. The “wings” are thickly coated with glue and sprinkled with glitter.
- Three-dimensional picture. If in the summer you managed to visit the seashore and collect rapana shells, then you can collect a very beautiful picture. The base can be thick cardboard. Shells of different sizes are attached to it using glue and wires. A sailboat, for example, looks impressive. Its layout begins with a fairly large shell that forms the body. It is usually fixed using plasticine. Masts can be “built” from sticks, and sails can be formed from shells, decreasing in size as they are laid out upward. You can simply paint the sea with gouache, but an uneven surface imitating waves looks more original. For this, tinted semolina and a thick layer of glue are used.
- Figures on sticks. You can create entire compositions on durable twigs. At the ends, beetles, spiders, and butterflies look original. Small fruits of plants of different shapes are suitable for their production, for example, prickly seeds of burdock, string, and buttercup. Dried boxes of poppy, snapdragon, physalis, and nigella make beautiful flower bouquets. They are fixed along the length of the twig, and between them you can place linden, maple or ash wings, small leaves or oblong leaves of reeds, and sedges.
- Figures made of driftwood and branches. Among such raw materials, if you look closely, you can find bizarre shapes reminiscent of various animals and even people. As a rule, you need to work with them a little with a knife, bringing them to complete imitation. If you varnish the finished figurine, it will be preserved for a long time and will look noble.
Crafts from leaves for school

The bright colors of autumn leaves make your imagination turn on, and you want to do something to preserve this beauty. For crafts for school, you can offer the following options:
- Bouquet of roses. Flowers are made from fresh leaves when they can be easily bent. Maple leaves work best. Each flower will require 7-10 leaves, depending on the planned size. First, the core of the rose is formed. The sharp ends of the leaf are bent inward, and then it twists along the axis of the cutting. The formed bud should be fastened with thread to simplify further operations. Other leaves are folded over the core, and the sharp ends are also bent on them. After reaching the required flower size, the folded leaves at the bottom are fastened with thread or narrow tape. A composition or bouquet is created from such flowers. In the first case, roses are attached to a base, which can be decorated with unfolded leaves. To obtain a bouquet, each flower is fixed on twigs (twigs), preferably green. It is worth attaching small green leaves to them. Several roses are collected in a bouquet. Using this method, you can make roses of different colors - from yellow-green to dark brown. The most impressive colors are bright, yellow, red, and orange.
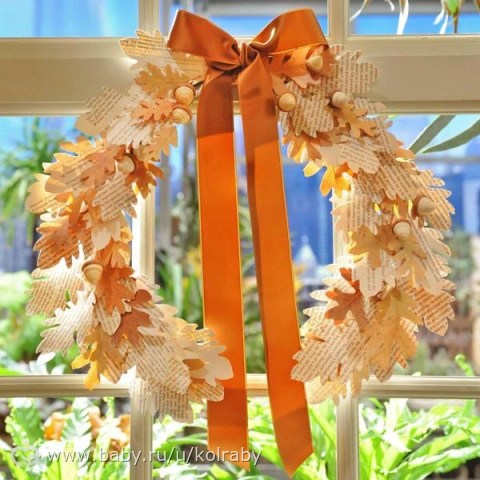
- Wreath of leaves. A plastic plate is used as a base, in which the middle is cut out, i.e. a ring is prepared for attaching the leaves. For reliable fastening, wire and a stapler are used. Leaves are selected in different colors, sizes and from different species of trees and shrubs. The first layer is formed from the largest elements, and they partially extend beyond the border of the base and are fixed with a stapler. Then, another 2-3 layers are laid with a gradual decrease in size. A certain decor is provided by a narrow ribbon that imitates the tying of a wreath, i.e. located spirally.
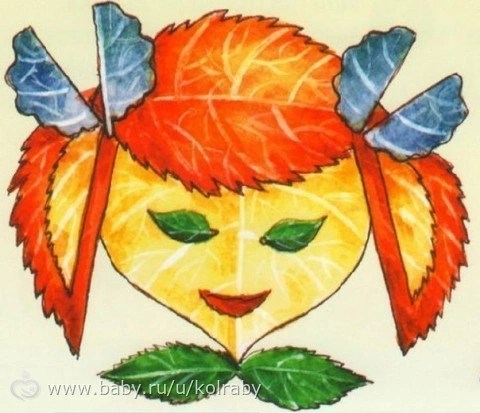
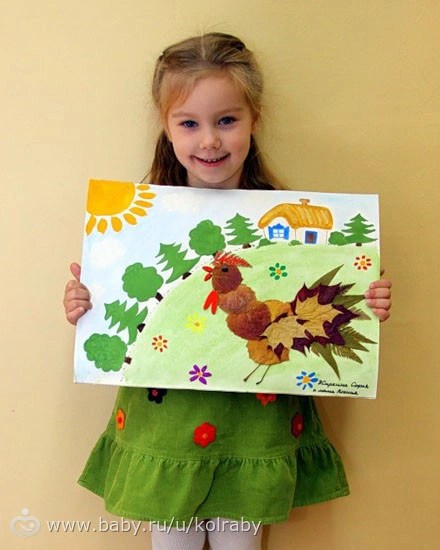
- Applications. The most common type of crafts made from leaves is appliqués. By choosing colors you can create a rather complex pattern. Various animals (including fabulous ones) are especially popular - fish, birds (especially parrots), hedgehogs, butterflies, peacocks, roosters, turtles and many other animals. Still lifes with fruits, flowers, as well as magnificent landscapes are often created.
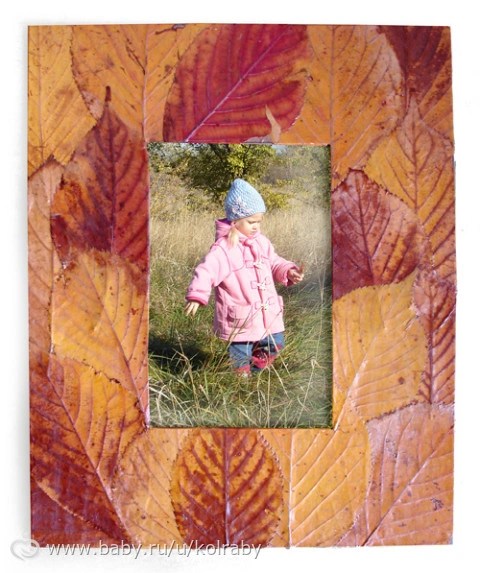
- Frame for a photo or painting. It is made similarly to a decorative wreath, but the base is thick cardboard, which is cut out in the shape of a rectangle or oval.
- The simplest craft is a bouquet of leaves. When compiling it, it is important to select leaves with long and strong cuttings. The color combination and sizes are determined by the “master” himself. Green leaves go well in such bouquets, especially narrow, long “swords”.
Crafts from pine cones for school

Fir and pine cones, as ornamental materials, deserve special attention. They are used to make original trinkets that are not embarrassing to bring to school and present at an exhibition. The list of such crafts is huge. We can highlight only a few of them:
- Squirrel. A composition such as “Squirrel on a Pine” can be considered a school exhibition exhibit. The animal is assembled from 3 cones of different sizes. The largest, open cone of a Christmas tree is a ready-made squirrel tail. You should choose it with a slight bend. The base of the “tail” is pierced and a slightly smaller cone is attached to it. This is the torso. The squirrel's head is made from a small pine or larch cone (you can use a large acorn instead of a cone for the head). The elements are fastened to each other using pointed branches. If you want to strengthen the figurine, the joints are glued. The paws can be formed from twigs, wire or thick felt. The squirrel's eyes should be expressive, and therefore small shiny plant fruits (for example, peony seeds or cherry pits) should be used. The basis for the composition can be a large pine branch with a branching branch. A pine branch with needles should be strengthened on it. A squirrel is attached to a knot. As additional decoration, you can use small cones and multi-colored leaves. Cotton wool can imitate snow.
- Turtle. It is made from a large pine cone, preferably in a fully open state. An acorn is used for the head. A slightly rounded base is formed from below by cutting off protruding elements. The legs can imitate maple lionfish.
- Fish. A dense rounded cone is selected for it. The eyes are made from beads, seed beads, and small acorn caps. Bird feathers are suitable for the fins and tail. They should first be painted in the desired color. The golden hue is very attractive.
Paper crafts for school

Paper and cardboard are the most common craft materials. You can use simple movements to form flat and three-dimensional shapes, and the elements from them are easily connected with glue or a stapler. You can use multi-colored materials or paint them in any color with paints or gouache.
Different technologies can be used in the production of paper crafts:
- The most common are applications and postcards. The task is very simple. The necessary figures are cut out of colored paper and glued to a cardboard base. Volumetric cards are made using corrugated paper or by adding filler (for example, cotton wool). Some elements of the design are applied with a brush directly to the base, and then the prepared elements are glued. Small details (eyes, mouth, etc.) are also applied with a brush.
- Volumetric figures and objects. A very popular example is caskets. They are glued together from cardboard and then decorated. Beads, beads, braid, and natural materials can be used for these purposes. The volume in the figures can be formed by various fillers - foam rubber, cotton wool, polystyrene foam, etc.
- Trimming technique. Volumetric things can be created from paper or thin cardboard using a special method. An example would be making a rose. In this case, take a sheet of thick colored paper, colored on both sides (different colors are possible). The most suitable colors for a flower are red, pink, yellow, and orange. A spiral is marked on a sheet of paper along which the cutting occurs. The result should be an uneven spiral-shaped tape. It twists starting from the end. After receiving the flower, the free end is secured with glue. Such roses are then attached to a cardboard base in the intended composition.
- . Using this technique, thematic photo albums are created. For this purpose, woven scraps, velvety paper, bows, ribbons, and foil are successfully used. A variation of this technology is embossing, when convex images are formed. Another technology is distress, based on artificial aging of the album.
Pumpkin craft for school

The pumpkin, with its size and shape, allows us to talk about itself as a raw material for crafts. It is easy to process with a knife, and the skin can be dyed. The main thing is to carefully remove the soft insides to prevent rotting. You can offer the following ideas for making pumpkin crafts:
- Mask. For elementary school students, the greatest interest is in making a scary or funny face out of a pumpkin. Making them is quite simple. After all the pulp has been removed with a spoon, the shell is cut with a knife to form the eyes, nose, and mouth. Such a face can be given a different character - from a very kind cutie to an evil monster. In the latter case, the effect is enhanced by internal illumination using a flashlight.
- Vase. For older students, you can offer a more elegant option - a flower vase. At the top of the pumpkin, the “cap” is cut off and a depression is made. It contains a glass or plastic container into which you can pour water. The pumpkin itself can simply be varnished or some kind of design can be applied.
- Ball with sparkles. Pumpkin can be used as a purely decorative element. For example, when decorating a classroom for the New Year, you can make a pumpkin ball with sparkles. To do this, use acrylic paints to paint the pumpkin completely white (you can give it another delicate shade). Glue is applied to the surface of the vegetable in certain areas where the glitter is attached. They can be in the shape of a rhombus, circle, star, etc.
- Various figures. You can also use small pumpkins for crafts. By connecting them together you can imitate various animals. For the New Year, white painted pumpkins can be a good material for making “snow women”.
Autumn crafts for school

It just so happens that the autumn season, rich in various craft materials, falls at the beginning of the school year, when the children meet together after the summer holidays. How I want to surprise my peers at this time. Autumn opens up great opportunities for creativity. At this time, the above-described leaf products are popular. Various fruits can be used.
The composition “Golden Autumn” can leave a good memory of this period. You can propose the idea of creating an applique with a tree in autumn decoration. It is made as follows. A tree trunk is drawn with dark paint on a sheet of cardboard. Next, small plant leaves or fragments from large leaves are glued onto it. They are attached at one edge to make it possible to lift the other edge of the leaf. This creates a voluminous effect
Crafts from vegetables for an exhibition at school

You can make original crafts from vegetables and fruits, which may well qualify for victory at school exhibitions. The following vegetables can be used:
- Eggplant. The dark color of the peel and the light tone when peeling it off make it possible to imitate various animals, combining these effects. Penguins and dolphins are especially popular. Combined with Chinese cabbage you can make a cute duck. A vase made from a large eggplant looks good.
- Zucchini. From this vegetable you can create such figures as penguins, sharks (from zucchini), and shoes.
- Cucumbers. The green color of the vegetable immediately creates the image of Gena the crocodile. Fairytale shoes look very beautiful.
- Cauliflower. A white furry hat, when combined with other vegetables, allows you to make different figures - Dolly the sheep, a swan, ice cream and much more.
- Radish. This small vegetable makes beautiful little mice, fly agaric mushrooms, and flowers.
- Carrot. Its bright color is great for creating flowers. It goes well in composition with other vegetables.
DIY crafts on the theme “School”
Of course, for students the topic “School” is close in spirit and includes many concepts. Particularly noteworthy are sections such as “My school”, “My class”, “What is needed at school”, “School of the future”, etc. Most often, such crafts are based on applications, albums, products made of clay or plasticine, paper and cardboard.
A photo album, especially one made using scrapbooking technology, leaves a memory for many years. What is the effect of this approach? The technique involves non-standard design of the cover and each sheet of the album. The cover is designed lushly and brightly. Three-dimensional images and embossing are welcome here. Each inner sheet usually contains only one photograph. But there can be original and succinct comments and cartoons for it. It is important that the decorative elements match the theme. It is this approach that ensures great interest in the craft many years later, when surging memories cover a person who has long since matured.
Can offer a wide variety paper crafts elementary school, because at this time the labor lesson takes on a special meaning for the development of the child’s personality. During labor lessons, the student learns to work with various materials, gets acquainted with plasticine for the first time and understands that it can be used to create various figures. Now, even from an ordinary sheet of paper, the teacher shows how you can create original and beautiful crafts, which can also have practical significance.
If it’s approaching, it will come in handy, because on the eve of this holiday you want not only to decorate the house, but also to create a special festive atmosphere in your classroom, where your parents have already put up a small holiday tree.
Paper crafts, primary school: master classes
If you choose paper crafts elementary school master classes, then they should be simple and understandable so that the child immediately has the desire to do such a homemade product with his own hands. Among the many ideas, there are also practical crafts that can be used in the interior of a children's room. As you know, there should be bright accents in the room, and if you use only pastel colors in the nursery, then you can make bright spots using multi-colored paper, and the child can handle this task.
Thanks to such bright paper garlands, your home will always have a festive mood and a cheerful atmosphere. Such garlands can be hung on a window or on cabinets, on ceilings, and if the New Year is approaching, then they can decorate a Christmas tree.
You can, for example, make a rainbow from ribbons, which can be hung not only horizontally, but also vertically, then you need to attach a small weight to one end, even plasticine will do.

The creative process begins with folding a sheet of colored paper in half and then cutting it into two halves with scissors. Cut colored strips of the same width, preferably about one centimeter.
For this simple garland you will need a sewing machine, but at the age of 8-9 years you can already teach a girl how to use a sewing machine, this will give the child the first skills in working with equipment that can be used in the future.
The stripes should be folded in the sequence of colors that you like, because in such a garland you will probably want to use more than 2-3 colors, as you can get a stylish rainbow with very rich colors. The threads must be strong so that they do not break and the decoration lasts for several years. The strips must be sewn together, leaving a small area empty, that is, there will only be a thread of intertwined threads. And to make it fluffy, you can twist the ribbon.

For such a craft, even thin cardboard is suitable, they talked about such creativity, and wrapping paper, the scraps of which are always in abundance after wrapping gifts. You can also avoid the need to stitch all the elements, instead they need to be glued to a thread, but this will take much more time.
How to make paper crafts: elementary school
A place where all children are taught how to make paper crafts - elementary school, and the teacher tries to select only the best and simplest ideas. Among them there are those that will greatly captivate schoolchildren, because the result of their work will be noticeable to everyone. For example, on New Year's Eve or March 8, you can invite the children to make original colorful garlands with their own hands, and then hang them around the classroom. Christmas rings are the most popular way to make garlands because such decorations exceed all expectations. It's very easy to do.
For the rings, you need to cut out strips from different colored papers; packaging with various bright patterns is also suitable here. On the sheet you need to measure segments of the same width, approximately 3.5 cm, and a length of 21 cm (this is the width of the sheet of paper). Then the measured strips must be cut with scissors. The strips may be narrower, but in this case the rings will be smaller.

When gluing the rings, you need to thread one into the other to form a chain. You can close it if you plan to decorate the Christmas tree with it and know its diameter, or you can leave a long chain that can later be attached to the wall or wrapped around the tree several times.
The chain can be created in another unusual way. In this case, you will also need bright paper, scissors and PVA. A piece of paper must be folded in half to form a small square. The chain element can be of two types: in one there is a “figure of eight” without a connected middle, and in the second version there is a small rectangle of connection between the two rings. Depending on the size of the links you want to get, a sheet of paper should be cut into two or four parts, one such part will go to one link. In order not to have to worry about creating a link of an unusual shape each time, you can make a template on thin cardboard, and then simply trace it with a pencil and cut it out, thus you can keep two children, your desk neighbors, busy at once, let one do the transfer of the outline onto paper, and the second one cuts them out carefully with scissors.

When all the elements are ready, you can begin to form the garland; to do this, one link must be threaded into another, thus creating a chain, and its length depends only on your desire. Of course, such a craft will become a real home decoration before the holidays if you use multi-colored bright paper and alternate colors.
Paper crafts: elementary school appliques
Of course, the main crafts that children make at school are appliqués. You can cut out various elements from colored paper and then form them into an interesting design. This technique can be used to make a themed garland. For the base, you can use thin multi-colored cardboard, from which you need to cut out small triangles with identical sides (two sides must be the same).

Such a garland can be made small; 10-15 elements will be enough. It can be hung in the room above the desk. As for the topic, it can be very different. On each such triangle you can glue a dried autumn leaf, and if you stick different leaves on each, then the house will have a special autumn atmosphere. You can create from leaves, and these can be not only applications, but also original flowers from leaves, but such creativity can already be offered to high school students. You can also create a marine atmosphere in triangles, cut out pieces from paper elements, and then form them into an anchor, a steering wheel, make sea waves, alternating white and blue zigzags, which can be laid out from small white and blue squares.

You can come up with a wide variety of paper crafts: elementary school - applications; middle school - quilling and simple decoupage, but high school students can already engage in more serious homemade cards using the scrapbooking technique, besides, there are now a lot of different materials for scrap in art stores, which means that your imagination can run wild to create the most original crafts with your own hands.
Paper Crafts: Elementary School
A garland in which each link is a multi-layered heart looks very beautiful; to create it you need to take bright colored paper, scissors, a stapler, scissors. You need to cut strips out of paper that will form one wall of your heart, so you need to choose the appropriate size. The garland may have one such heart as a link, or there may be two or three, each of which will be larger than the previous one.

Two strips must be folded at one end and secured with a stapler, the other ends must be folded to form a heart, and also connected with a stapler; at the same stage, you can insert the two lower ends into the folded two upper ends and fix four layers of paper. This will already be the beginning of assembling your chain.
Surely, elementary school students will really enjoy making stylish decorations for their room using candy wrappers; besides, there is definitely an abundance of this material before the holidays. This is practically the case when recyclable materials are used to create original homemade things; such garlands can be used to decorate a tree that grows in the school yard, and if every class takes up such creativity, then the garland will be long, and enough for a tall spruce.

The first thing you need to do is cut the candy wrapper into equal parts, you may end up with 3, 4, 6 pieces, it depends on the size of the candy wrapper itself. Each part can have a size of 2 by 4 or 3 by 5. For convenience, you can even make a template that will help in the future to create all the parts the same size.

Next, each rectangle needs to be rolled into a tube, but you don’t need to let go of it right away, because it will quickly unfold, so hold it with your fingers. You need to insert a thick needle into a needle with a large eye and begin to string the tubes one by one on this thread. You can make a loose knot at the end of the thread so that your tubes do not jump off. When they are all strung, you can turn them in different directions, so the garland will look even brighter.
Paper crafts elementary school: master classes
Of course, children at any age love to make paper airplanes, and in elementary school you can tell them about the art of origami, show pictures to demonstrate what interesting crafts can be made with its help. You can also make a garland using the origami technique, but here the student will need the help of an adult, this could be a teacher or a parent.

For one element we will need two strips of two different colors. The width of one is 3.5 cm, the length is 21 cm (equal to the width of an A4 sheet). Next, they need to be folded to form a long rainbow ribbon. One tape must be connected to the other with the edges at right angles. Consistently, you need to continue folding the strips so that the horizontal goes across, the vertical goes down.

By the way, the origami technique can help you make interesting ones, because both a yellow chicken and an Easter egg can be made using this technique, but this is already a task for parents who will be preparing for Easter. Primary school students can be asked to make a thematic application.
All mothers and fathers who have children - primary schoolchildren, make, together with them, simple and complex crafts for school. Naturally, this is an excellent excuse to spend pleasant and exciting time with your child, get away from routine and engage in an interesting creative process.
Techniques, themes and materials are very diverse. Similar to the rules, schools and kindergartens make appropriate crafts for various events.

What can you make a craft from at home?
For the purpose of making crafts for school with your own hands, it is not necessary to use any unique or imported materials. Ordinary resources found in any home will do just fine. You will also need tools for the job that correspond to the specific craft.


Autumn is the most suitable time of year for preparing natural materials in order to subsequently make interesting crafts with your own hands in elementary school on a variety of topics.

The task of parents will be not only the mental development of their child, but also persistent, gradual work on the importance of maintaining accuracy and learning to plan their actions. It is also very important to teach the child to bring the work started to its logical conclusion, then in the end the result will be, although not large, but at least its own unique masterpiece, which has no analogues.

To make it easier to make souvenirs with your own hands, photos of crafts for school that can be found on the World Wide Web will help with this. There is no need to copy, you just need to understand the technique and do something of your own.
![]()
Using the same principle that postcards are made, it is possible to make a bright panel. But in this case, to make the souvenir look complete, you also need to think about the frame.

A ready-made wooden frame would be an excellent option. Provided that there is no such thing, you can make it yourself from plain cardboard of a suitable color, decorating it as you wish.

Bright crafts will be an excellent gift for many different holidays, for moms and dads, grandparents, brothers and sisters, classmates, or simple acquaintances. An interesting idea is voluminous souvenirs made from thermoplastic or plasticine. They also make pretty cute refrigerator magnets.


Step-by-step making of crafts for school
Unique, colorful moths will become a designer decoration for any school office or your own apartment. To make them you need:
- multi-colored cardboard;
- toilet paper tubes;
- multi-colored ribbons;
- special eyes for crafts;
- multi-colored paper;
- glue.

Outline of the creation of a masterpiece:


First, you need to cut a rectangle of about 13-16 cm from the cardboard. Then coat it with glue along the ends on the inside and outside. In addition, glue is applied to the middle of a cardboard toilet paper tube.

The rectangle is wrapped tightly around the roll and pressed so that it sticks well. Based on this, the body of a moth is obtained.

Naturally, all moths have antennae. For them, cut 2 strips of 8 cm long from the ribbon. Knots are made at the ends. The antennae must be attached to the body of the moth from the inside of the roll.

The wings are cut out from cardboard, in absolutely any shiny color. After that, they are decorated with figures made from multi-colored paper, which are glued in a chaotic form.

At the end, special eyes are glued on and the souvenir is complete!


Master class on school crafts - “fish from dough”
You will need:
- waterproof varnish;
- multi-colored acrylic paints;
- a brush for glue and paints;
- toothpick;
- cardboard;
- dough.

Outline of creating a unique souvenir:

First you need to draw and, accordingly, cut off the fish pattern on cardboard. Then tear off a piece of dough, roll it into a pancake and place a cardboard fish on it.

Now it is advisable to carefully cut off the fish figurine according to the design. Small punctures are made with a toothpick to separate the fins from the tail.

A little dough is rolled into a tiny ball - this is the base for the eye. After this, the ball is rolled even smaller and placed on top of the eye - the base is the pupil.


Using a piece of dough, a fin is made and applied to the desired location. To ensure that all the parts stick, it is advisable to wet the joints a little with water.


The decor of the fish is molded on the basis of dough, for example, bright flowers or various figures.

Then the craft must be dried in the oven for about 2 hours at 45-70 degrees. Next, paint the fish figurine with gouache to your taste.

The finishing touch is to coat the dough fish with waterproof varnish.

DIY crafts in elementary school are considered one of the most important ways to improve the creative thinking and skillful potential of children. When setting the topic of work, the labor lesson teacher always takes into account what event is approaching or what season of the year is outside the school window.

It is worth noting that all works that are made by hand can be supplemented with your own imagination and creative ideas.

Photos of crafts for school


Sharing with your finds. All or almost all of us have to do crafts with children for kindergarten or school... You will also find fantasies here for home creativity with kids.
Let's start with the trees...


And now - pumpkins...


You don't have to do everything for a specific master class... And strictly adhere to the proposed topic. Can just take a craft idea and remake it in your own way.
Fantasies about candles...


Accessories of the “Queen of Autumn”…


Papier-mâché... And not only...


Well I didn’t put the owls first again. They are always the first and most important for us...


There are, in addition to owls, other living creatures…


And again - improvised material. Not only the one found in the forest... But also the “home” one... For example, pistachio shells...


AND door (wall) wreaths... good not only for New Year and Christmas... In autumn they especially cozy and bright it turns out...


And again pumpkins... Some people have a lot of them in their dachas! I’m not a dacha lover (no, no): my mother just hands me buckets of vegetables. But my godmother gave me a pumpkin last year. Ahhhh... Maybe I'm Cinderella?


If you don't understand how cover with leaves or dough bowl from below, to get such beauty, watch the master classes...


Many people make baskets now. A very popular craft. On this topic "Gifts of Autumn"... Well, the baskets really turn out very colorful and juicy...


And again leaves... And again owls... And a lot of art...


In our kindergarten, Alice’s group is very talented, kind and hardworking teachers- Olga Grigorievna and Anna Sergeevna. They love children. And they adore them make all sorts of things in the educational process... Or draw...


Us crafts for children in kindergarten teachers left on a large panel- attached to paper clips that hang on fishing lines... Now I’ll find a post in a magazine when we made such a panel (with owls, of course) for crafts...


Some parents ignore creative activities... They say that paints are a lot of dirt and stains - you can only get by with pencils or felt-tip pens... And all that comes out is a mess... But the child, they say, doesn’t understand the plasticine - he rejects it... Start small- just give the child the materials. A couple of lessons... Then again... And then start gradually advise and help... To encourage creativity, to create... I also don’t really like dolls and LEGOs covered with plasticine... But accuracy, diligence and imagination... will not come from anywhere from a child if you don’t work. Daily.


Of course, there is always not enough time. Of course, there is a lot of work and household chores. But the child is delighted that his autumn work is also on display in a kindergarten or school. This - a source of pride yourself and your family...


Maybe this year... Maybe next... Your work will be recognized as the best at the exhibition. Even a prize. It will be a wonderful day. In the meantime, let family evenings be warmed by autumn candles, and photo frames decorated with leaves or acorns adorn the shelves...
By the way, my friend and I once made of papier-mâché just made giant mushrooms... All the children made them as tall as a palm... And here we have... Giants. Mutants...)))


Who hasn't read mine yet? 100 ideas for autumn, be sure to read. And apply - partially...
We a lot of things have already been used and done with Alisa and Shura- I’ll tell you in other posts...
And I’ll show you not today or tomorrow... autumn video...And pictures. According to last fall. Ours is so beautiful There was a family shoot. It’s just so complicated for a video combination of video and photo...So I'm waiting for Shura will finish installation. For now he has a lot of work to do.
P.S. Yes, I show you very few personal and family photos. Otherwise you will get tired of me...


Autumn is the best time to prepare natural materials from which various crafts will be created in the future. Many schools celebrate autumn day today. And on this holiday it is customary to make various crafts from natural materials. Indeed, crafts for 1st grade in schools at the beginning of autumn are made mainly from natural materials. Therefore, in our selection of crafts for 1st grade you can also find such wonderful crafts made from materials that nature has generously rewarded us with. In addition, here you will see other options for crafts that you will definitely want to make.
Crafts for 1st grade from natural materials
Look at what a wonderful composition can be made from the materials that lie under our feet in the fall. And for this composition you will have to collect acorns. You will also need PVA glue and a sheet of cardboard, from which you must cut out the shape of a regular leaf.

Probably all 1st grade students are familiar with the popular cartoon - Smeshariki. So, you can make these heroes from natural materials during a creativity lesson at school. To create this craft, you only need to prepare vegetables and plasticine. You may also need felt-tip pens with which you will decorate the characters. Everything looks very funny. Is not it?

Crafts from handy materials
In this article you will find crafts for elementary school students. You can make all these crafts at school in class or at home, for example, for a school exhibition. We all have a lot of unnecessary things in our home. And if you have old glass jars lying around at home, we suggest making them a little brighter.
So, you should prepare:
- a clean glass jar,
- acrylic paints,
- flowers for decoration.
Making such a craft is very simple. To do this, you just need to paint the jar with acrylic paints. And as soon as the paint dries, you need to write on it using a marker. That's it, the wonderful vase is ready. All you have to do is insert flowers into it.

If you have matches at home, you can make such a picture out of them. Here you will need glue and a sheet of cardboard. Let your imagination run wild and see what you can come up with.


Crafts made from colored paper
You can make many crafts from colored paper. And therefore, such material is used quite often in classes with schoolchildren. You can make such bright and interesting things from paper. And the diagram will tell you how to make them.


Indian.
To make such an Indian you should prepare:
- colored paper: red, yellow and orange;
- toilet paper roll;
- scissors;
- glue;
- a couple of buttons;
- marker;
- a couple of large buttons.

Progress:
- First, you should glue a couple of buttons onto a toilet paper roll. As a result, you get eyes.
- From orange paper you need to cut out a triangle, which is instead of a beak. And from red paper you need to cut out a squiggle, which is glued under the beak.
- Now place your palm and circle it. After which you should cut it out. This palm should be used as a template. And it’s worth cutting out several of these palms. There should be approximately 6 of them.
- Now we glue the palms behind the sleeves. Moreover, you need to glue it in 2 layers in order to get feathers.
- Finally, we glue 2 large buttons to the bottom of the sleeve, which will be the legs of the craft.
Hand toy - a cheerful octopus.
This craft is very easy to make. To work you need to prepare:
- scissors and pencil;
- glue and colored paper.
Progress:
- First, you should place your palm on a piece of paper. Then you should outline it with a simple pencil. Moreover, the fingers are the legs of an octopus.
- Now, using colored paper, you should make the face of an octopus.
- Then you should cut out a skirt for the octopus girl from paper.

That's it, the fun craft is ready.
Finally
Now you have learned about what crafts you can make for school in 1st grade. It is worth saying that this is just part of the crafts. And you can supplement these ideas with your creative thinking and imagination.


