In order for the interior lighting to work according to the chosen scenario, special devices are used that regulate the brightness of the glow. Such wiring devices allow you to stepwise or smoothly change the load applied to the light sources. Dimmers for 220V LED lamps not only control the luminous flux, but also contribute to energy saving and a long service life.
Dimmers allow you to adjust the brightness of the lighting in the room
Dimmer is a multifunctional switch designed to control the luminous flux of incandescent lamps, fluorescent light sources and LED lamps. Initially, such devices were controlled mechanically, and their function was only to change the brightness of various light sources. Modern dimmers are endowed with microcircuits (microcontrollers) designed to perform a number of functions:
- changing the glow level;
- smooth shutdown and inclusion of the light source;
- the effect of being in the house (this function allows you to support the scenario of simulating the presence of the owners in the dwelling, periodically turning the light on and off);

- automatic disconnection from the network;
- support for a series of blinking and dimming modes;
- possibility of electronic, remote and acoustic control.
Dimmers can be installed individually or as a group, controlling the operation of one or more luminaires, respectively. If several light sources are combined to illuminate a zone, they can be connected to one dimmer. With its help, it will be possible to change the brightness of the glow using a special remote control panel.
The dimmer device is based on the rheostat principle. By changing the resistance of the circuit, you can change the value of the voltage or current. The higher the resistance value, the lower the electric current voltage. The dimmer device has a set of resistors, through which the intensity of the glow is regulated. Using a dimmer, you can set a comfortable level of lighting, taking into account the fact that at different times the lighting requirements of the premises may be different.

Dimmer connection principle for
Thus, the use of such devices makes it possible to implement not only a variety of design solutions, but also significantly reduce energy consumption costs.
Note! Operating in a soft dimmed mode, incandescent bulbs and LED luminaires can last 5-10 times longer.
Dimmers for LED lamps
Depending on which light sources the dimmers are used for, they are classified into:
- dimmer control for incandescent lamps;
- dimmers for;
- dimmers for LED lamps 220V;
- dimmers for energy-saving lamps (fluorescent).

It should be noted that, unlike LED strips and designs, semiconductor lamps can be connected to a 220V household network without using voltage converters. Their power is up to 40W. When replacing conventional incandescent lamps with LED light sources, you must familiarize yourself with the technical characteristics of the latter: voltage, power, color temperature, type of base, service life. All these data are available on the product packaging.
The LED lamps are equipped with a base that is adapted to the standard lamp holder. They are available with E, MR and G (male) base. The presence of threaded socles for dimmable LED lamps E14, E27 makes them convenient for connecting to a 220V household lighting system and allows you to use standard dimmers for them.
Not all control devices are compatible with LED lamps. So that the buyer can understand whether it is possible to adjust the brightness of the purchased products, manufacturers put an indication of such a possibility on the packaging and in the passport of the LED lamp. This can be either a corresponding inscription or a symbol.

By purchasing a dimmed LED lamp, you can save on purchasing a special dimmer. For lamps in which the dimming function is not incorporated, dimmers for LED lamps are used, operating on the principle of pole-width modulation (PWM), which are quite expensive.
Dimmers for LED lamps 220V: types, circuits and connection of devices
Connecting a standard dimmer for non-dimmable LED lamps requires a certain amount of power up to 45W. So, the power of one incandescent lamp can be produced by two or even three semiconductor lamps 220V. If the load is not enough, LED lamps will not work correctly and quickly fail without the possibility of warranty replacement.
Dimmer classification
You can choose a dimmer model that would maximize energy saving and increase the life of LED lamps when reviewing the classification and technical parameters of dimmers. They differ in design, current load, control principle, installation method and other characteristics.

By the way of control, dimmers are classified into:
- touch (contact) - control of such devices occurs through contact with the touch panel;
- rotary-push - the start occurs by pressing the handle (large round button), and brightness control - by turning. The main feature of such devices is that you can turn off the lighting in the selected mode without bringing the handle to its original position;
- keyboards - models with buttons or keys that regulate the level of illumination. Usually in such dimmers there is a disconnect key from the mains, like a conventional switch;
- remote - the luminous flux is adjusted using the remote control or wirelessly (Wi-Fi).
Note! Due to the absence of moving elements in the design, touch-sensitive dimmers are the most reliable and high-quality relative to other models.

Depending on the place of installation, dimmers are divided into the following types:
- wall-mounted - they are mounted at the location of the switch in the rooms where the luminous flux is planned to be controlled;
- remote - look like a small block installed next to the luminaire;
- modular - they are installed in the switchboard on a DIN rail, to which automatic protection switches and other devices are attached.
According to the method of electrical installation, dimmers are divided into devices for outdoor and hidden wiring.
Dimmer circuit for a 220V LED lamp
The first simple dimmers were used only to change the brightness. Their device included a rotary knob and a connection terminal. Such devices worked without saving electricity, since the released power simply disappeared in the form of unnecessary heat. With the advent of semiconductor electronic devices (dinistors and triacs), the functions of dimmers have expanded significantly.

The principle of operation of the dimmer circuit on the triac is to pass current through it. In such dimmers, the triac is the main controlled element. The power of the load connected to such a circuit depends on its parameter. Due to the appearance of a voltage between the electrodes of the triac A1 and G, the lamp lights up.
The charging rate depends on the value of the potentiometer R, which is charged at the beginning of the positive half-wave. When the resistance indicator on the triac reaches its minimum value, it opens and the lamp glows until the end of the half-wave. The same picture is observed in the case of a negative half-wave, since the current in the triac is transferred in both directions.
Thus, the voltage across an active load is a section of negative and positive half-waves, going one after another with a frequency of 100 Hz. At a very low brightness of the light bulb, its flickering can be observed. This is due to the fact that the lamp power is very short.

The circuitry of various triac dimmers for LED lamps is almost identical everywhere, and may differ in additional elements for stable operation at low voltage “outputs”. In some cases, details are added to the circuit for smoother control of the luminous flux and elements that reduce the level of interference in the network.
How to connect a dimmer
Recently, to control lighting, many have replaced conventional switches with dimming devices. The dimmer, like the switch, has two clamps and is mounted in place of the junction box using the same wires that were used for the household switch. Using a fairly simple dimmer wiring diagram, anyone can install a dimmer.
Note! The installation of the dimmer must be carried out, adhering to the safety rules for electrical work.

The procedure for connecting a dimmer for 220V LED lamps with your own hands:
- using an indicator screwdriver, it is necessary to determine the phase;
- de-energize the household power supply;
- guided by the dimmer circuit for LED lamps, the wire with the phase should be connected to the dimmer terminal marked "L", the second wire to the connector marked "N";
- to obtain a reliable connection, the wires must be clamped well;
- after assembling the entire circuit, using the adjusting bolts, the position of the device body should be corrected;
- install a decorative cover;
- connect the power. If the system is functioning, then the connection is correct.
The process of connecting a dimmer with a switch is performed sequentially. Some dimmers are equipped with a start / stop function. If you purchased just such a model, then when you install a dimmer, the switch is completely replaced by this device.

Dimming from several places: the principle of operation of the pass-through dimmer
Quite often, situations arise when it is necessary to organize a lighting system in a large house or large apartment. It may be necessary, for example, to turn on the light in a long and narrow hallway and, after walking along it, turn off the lighting. The need to dim the brightness of the light may arise if you have already gone to rest or watch TV, and you do not want to get out of bed at all.
Pass-through switches will help to solve the problem of switching on lighting from several points. But you can adjust the luminous flux from several places by installing a pass-through switch at one point, and a rotary dimmer at another. Such an arrangement of devices will allow in one place only to turn on the lighting, in another - only to adjust the brightness.
However, there are models of dimmers that provide pass-through dimming. These include sensor devices that, thanks to electronics, can be synchronized with each other. For pass-through dimming, satellite devices are connected to the dimmer. Depending on the type of dimmer, 5 to 10 satellites can be connected to it. Using a satellite device as an independent device is impossible.

Note! To install dimmers with satellites that provide pass-through dimming, you will need the help of qualified specialists.
Dimmer manufacturers: where to buy dimmers for 220V LED lamps
Guided by the opinions of experts, it is better to buy dimmers for LED lamps from reputable manufacturers of wiring devices. Leading manufacturers of dimmers for LED lamps: Legrand, Schneider, Makel. They offer a complete range of equipment, from household switches to lighting control systems.
Dimmers Legrand for LED lamps 220V
All products manufactured by Legrand are developed on the basis of advanced technologies and meet the requirements of European quality. The main advantage of wiring devices from this manufacturer is ease of installation, trouble-free operation and excellent design. All products are certified and meet the requirements of GOST.

You can purchase Legrand dimmers for LED lamps by ordering the device on the company's official website or in online stores specializing in the sale of such products. The cost of the Legrand Valen dimmer with a power of 400 W of the rotary type is 2080 rubles. The price of a push-button type 400 W dimmer is 4000 rubles. A rotary dimmer with a power of 1000 W will cost 6160 rubles. Dimmers Legrand are presented in the catalog in the following colors: aluminum, white, ivory.
Before buying a dimmer for an LED lamp, you should familiarize yourself with the device compatibility data in a special table. As a rule, lighting equipment sales points have this information. Ideally, having bought a dimmable LED lamp, it is better to immediately check its compatibility with the purchased dimmer.
Dimmers Schneider Electric
Another world-renowned manufacturer is Schneider Electric. Dimmers from this manufacturer are presented in several series. The devices have an elegant design and are available in seven colors. The durability of the devices is due to the use of proven and high-quality materials. The dimmers are protected against short circuit, overload and overheating.

Thanks to special guides and mounting lugs, the devices are easy and quick to install. All products are guaranteed by the manufacturer for 18 months. Developed flexible conditions for the exchange and return of devices. The company is constantly working to create new devices with more advanced functions.
The price of a rotary dimmer Schneider of the Unica series TOP color Graphite for halogen lamps and incandescent lamps is 4200 rubles, the cost of a rotary-push dimmer Schneider Electric of the Unica series with a power of 400 W of the color Aluminum for halogen lamps is 4050 rubles.
There are also more budgetary series of Schneider dimmers, the price of which does not exceed 1500 rubles. Thus, you can purchase a swing-type dimmer of the W59 series with a power of 300 W in the color Matt chrome for flush mounting for 1400 rubles.

Helpful advice! To protect yourself from counterfeiting, you should not buy devices at random points of sale.
Making a dimmer with your own hands
You can make a dimmer yourself for anyone who considers himself a radio amateurs and has at least little skills in this matter. Since the dimmer circuit for LED lamps is very simple, it will not be difficult to deal with the device, provided that you have a soldering iron and electronic components. Radio parts can be purchased separately or you can purchase a ready-made construction kit for assembly.
To make the device with your own hands, you will need the following parts and tools:
- copper wire;
- triac (triac);
- capacitors - 2 pcs;
- dinistor;

- fixed and variable resistors;
- soldering iron, solder.
Electronic components are placed on a printed circuit board and connected with a wire using soldering. When connecting radio components, they are guided by the dimmer circuit. The work of the assembled circuit will consist in the fact that an alternating current of the resistor will be supplied to the non-polar capacitor. And the capacitor, while charging, will transfer power to the lamp.
After the homemade device is assembled, it must be tested. For this, you can use a lamp holder with a lamp. You need to connect the device to the socket using wires and connect to the network. Since life-threatening voltages are present in the circuit, all connections must be carefully insulated. In addition, do not touch the bare areas of the printed circuit board where the conductors are located.

If everything is assembled correctly, and all radio components are in good order, the dimmer will work: when the control element of the device is turned in one direction, the lamp will light up brighter, and when turned in the opposite direction, the glow intensity will decrease, until it is turned off.
Dimmers are successfully used by designers for interior lighting design. After all, experimenting with lighting, you can give the room different shades: from muted and mysterious to bright and invigorating. With the help of dimmers, you can set convenient lighting scenarios and change the familiar environment, getting completely unexpected effects.
Very often there is a need to regulate the brightness of the lamp within a certain value, this is usually from 20% to 100%. It does not make sense to set the brightness less, since most lamps simply do not work in this mode or give a meager amount of light, which is only enough for the lamp to glow, but at the same time it will not illuminate anything. You can go to the store and buy a ready-made device, but now the prices for these devices are very high and do not correspond to the product you receive. Since we are jack of all trades, we will make these devices ourselves. Today we will consider several schemes, thanks to which it will become clear to you how to make a 12 V and 220 V dimmer with your own hands.
On a triac
To begin with, consider the circuit of a dimmer operating from a 220 Volt network. This type of device works on the principle of phase displacement of the opening of the power switch. The heart of the dimmer is the RC circuit. Control pulse shaping unit, which is a symmetrical dinistor. And in fact, the power switch itself that controls the load is a triac.
Let's consider how the circuit works. Resistors R1 and R2 form. Since R1 is variable, it changes the voltage in the R2C1 chain. The dynistor DB3 is connected to the point between them and when the voltage of the opening threshold on the capacitor C1 is reached, it is triggered and gives a pulse to the power switch - the triac VS1. It opens and passes a current through itself, thereby we get a voltage at the output. The position of the regulator determines how much of the wave will go to the lamp. The faster it charges, the faster the key opens, and most of the wave and power will go to the load. Thus, the circuit literally cuts off part of the sinusoid. Below is the schedule of the device.

The value (t *) is the time during which the capacitor is charged up to the opening threshold of the power cell. This dimmer circuit is simple and easy to repeat in practice. It works best on incandescent lamps, due to the fact that the spiral in the lamp has inertness, but problems with LED and other lamps can arise, so it is necessary to check the performance of the circuit specifically on your consumers before final installation. We recommend watching the video below, which clearly shows how to make a dimmer on a triac:
Triac power regulator 1000 W
On thyristors
You can not buy a triac, but make a simple thyristor-based dimmer, which can be easily obtained from old non-working equipment and boards, like TVs, tape recorders, etc. The circuit is slightly different from the previous one, in that each half-wave has its own thyristor, and thus its own dinistor for each key.

Let's briefly describe the regulation process. During the positive half-wave, the capacitance C1 is charged through the chain R5, R4, R3. When the opening threshold of the V3 dynistor is reached, the current through it enters the control electrode of the thyristor V1. The key opens by passing the positive half-wave through itself. With a negative phase, the thyristor is locked, and the process is repeated for another key V2 and capacitor C2, which is charged through the chain R1, R2, R5.
Phase regulators - dimers can be used not only to adjust the brightness of incandescent lamps, but also to adjust the fan speed of the hood, you can make an attachment for a soldering iron and thus adjust the temperature of its tip to improve the quality of soldering.
Video assembly instruction:
Assembling a thyristor dimmer
Important! This control method is not suitable for work with fluorescent, economical compact and LED lamps due to the nature of their operation.
Condenser dimmer
Along with smooth regulators, capacitor dimmers have become widespread in everyday life. The operation of this device is based on the dependence of the transmission of alternating current on the value of the capacity. The larger the capacitance of the capacitor, the more current it passes through itself. Thus, with the help of a capacitor, it is possible to reduce the power supplied to the lamp, but this method does not allow for smooth adjustment. This type of homemade dimmer can be quite compact, it all depends on the required brightness parameters, and therefore on the capacitance of the capacitor, which is related to its size.

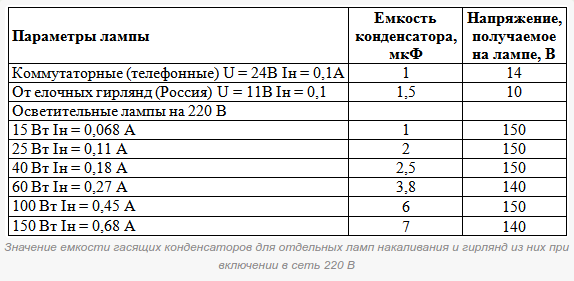
As you can see from the diagram, there are three positions: 100% power, through a quenching capacitor (power reduction) and off. The device uses a non-polar paper capacitor that can be obtained from old technology. We talked about that in the corresponding article!
Below is a table linking capacitance and voltage across a lamp.
Based on this scheme, you can assemble a simple night light yourself and use a toggle switch or switch to control the brightness of the lamp.
On a microcircuit
To regulate the power supplied to the load in 12 Volt DC circuits, integral stabilizers - KRENKs are often used. The use of a microcircuit simplifies the development and installation of devices due to the small number of radio components. This homemade dimmer is easy to set up and has some protection features.

With the help of a variable resistor R2, a reference voltage is created at the control electrode of the microcircuit. Depending on the set parameter, the output value is adjusted from a maximum of 12 V to a minimum of tenths of a Volt. The lack of these regulators in their low efficiency and the maximum possible power of the connected load, as a result of this, there is a need to install an additional radiator for good cooling KREN, since part of the energy is released on it in the form of heat. However, it is ideal for low power DC and low voltage circuits due to its simplicity and versatility.
This dimmer was repeated by me and did an excellent job with a 12 Volt LED strip, three meters long and made it possible to adjust the brightness of the LEDs from zero to maximum.
An excellent option is a dimmer on the 555 integral timer, which controls the KT819G power switch, with short PWM pulses. By setting a high frequency of the circuit, you can get rid of flickering, which often occurs due to cheap commercial dimmers and causes quick fatigue and irritation of the eyes in humans.
In this mode, the transistor is in two states: fully open or fully closed. The voltage drop across it is minimal, which allows you to connect a more powerful load and use a circuit with a small radiator, which, compared to the previous circuit with a KREN regulator, compares favorably in size and efficiency.
![]()
Making a dimmer for 12 volts
That's actually all the ideas for assembling a simple dimmer at home. Now you know how to make a dimmer with your own hands for 220 and 12V.
Ecology of consumption. Home: Dimmers not only bring convenience to the environment, but also help to save up to 30% of electricity
After the appearance of incandescent lamps, manufacturers almost immediately came up with a device that would regulate their brightness. The first dimmers were a device that absorbed electricity. Today everything is much simpler. On the market, you can find a wide range of this product that you will definitely like. LED dimmers are also considered common and are used for LED downlights.
In this article, you will find detailed information about their device. As of today, these products may include a number of features that will make your life easier. In this article, you will learn how to choose the right dimmer for your LED lamps?
Compatibility of LED bulbs with dimmers
You should never confuse an LED bulb with simple LEDs. The LED lamp is an independent device that you just need to connect to electricity. Here are its main similarities with other products:
- The LED lamp also has a standard E-type screw base.
- You can easily connect these products in your home. It can be used to work in a standard electrical network.
- The luminous flux of this device also has similarities to conventional lamps.
The LED lamp will primarily consist of a diode diffuser. These devices can also have different capacities. In order to find out which dimmer for LED lamps is best, you will need to know the lamp power. When purchasing this product, you should definitely see what the manufacturer indicates on this device. In order for you to easily adjust the brightness of the lighting in a standard lighting system, LED dimmers were invented. Also, the LED lamp must have this function. The manufacturer usually indicates this on their packaging. Here's what the packaging might say:
- There is a possibility to adjust the brightness.
- The device is "Dimmable".
- The luminaire supports the Dimmable function.
Also, those lamps that support this function have an inscription on the box, which can be seen in the photo below.

These lamps already have a dimming function. That is why you can easily control it even with a conventional dimmer. Dimmable bulbs are much more expensive than conventional products. But here you can save on the use of dimmers. A dimmer for LED lamps will cost significantly more, since it has a special PWM adjustment in its design.
Popular LED dimmers for 220 volts
LED dimmers today can have a huge assortment. Also, dimmers can be divided according to the type of installation:
Modular dimmers for LED lamps are installed in distribution boards. These devices can not only adjust brightness, but also perform a wide variety of other functions. You can easily control this device using the external regulator.
Usually these devices are produced only for driving LED lamps. In domestic conditions, they are rarely used, since they have a high price.
Monoblock dimmers for LED lamps are also considered a fairly common product. This type is considered the most common.
You can install it instead of a regular lamp. In order for you to be able to control the LED lamp with this device, you need the PWM function.
LED dimmers can also vary in the way they are controlled. Here are their main varieties:
- Swivel. The control process will take place with a handle.
- Rotary-push. The control process in this device will take place by pressing and turning the handle.
- Keyboards. By pressing the keys, you can increase or decrease the brightness of the lighting.
- Sensory. These products are considered to be more modern. With their help, you can also take advantage of other functions.

The dimmer circuit for LED lamps is the same as that of other products. In the photo below you can see this diagram.

LED dimmers and lamp compatibility
Not every dimmer can work with LED lamps. In order to carry out you will need either a conventional dimmer for special lamps or a dimmer that has a PWM function. But there are other problems as well. For example, some companies make LED bulbs that can only work with a specific dimmer. Usually sellers of these products should have special tables to help determine compatibility.
When choosing a dimmer, you also need to take into account its power. Here are some tips to help you make the right calculations.
But the best method for testing is the empirical method. To do this, come to the store with a lamp and check its operation.
Using dimmers
LED dimmers today have a fairly wide range of applications. Here are the main problems that can be solved with a dimmer:
- With their help, you can easily organize a flexible lighting system. Also, the dimmer will help to divide the room into certain zones with the help of light.
- With its help, you can easily organize a design solution.
- Modern devices have a fairly high efficiency. The PWM principle avoids overheating and noise emission.
- Their use significantly increases the level of comfort.
LED dimmers can also be integrated with the Smart Home system. This allows the implementation of various lighting systems. The only drawback that can be distinguished is the price of these devices.
conclusions
- The use of these devices is considered fully justified due to their cost-effectiveness.
- The most effective way to adjust the brightness is the PWM system.
- When choosing these products, it is better to give your preference to well-known brands.
- Before proceeding with the installation, it is better to additionally check their bunch.
Previously, room illumination was controlled by a rheostat. A significant drawback of these devices was their high power consumption, regardless of brightness. At the minimum lamp power, electricity was consumed in the same amount as at the maximum one, since most of it heated the rheostat.
Room lighting control
Advantages and disadvantages
You can now buy an electrical load regulator (dimmer) at an electrical store. It is mainly used to change the brightness of different types of lamps and has the following advantages:
- changing the intensity of the glow of the lamps;
- setting automatic brightness change Automatic dimmer of the glow using a timer;
- remote control;
- it is used as a switch and to set the lamp glow modes: smooth change, creation of light pictures, blinking;
- increase in lamp durability due to soft start;
- saving of consumed electricity.
Regulators have disadvantages:
- extraneous interference interferes with the operation of devices that do not have filters;
- generating interference for other devices that receive radio signals;
- not all devices save energy;
Dimmer types
The simplest adjustable device has a switch and a rotary knob. The brightness of the regulator depends on the position of the potentiometer. The dimmer is suitable for controlling incandescent and halogen lamps. In terms of power, it is selected at least 15% higher than the connected maximum load. It must have built-in short circuit protection. The easiest option is a fuse.
The dimmer is of the following types:
- Overhead. Most often contains an auxiliary rheostat and is used for LED strips.
- Checkpoint - for large areas of premises.
- Two- and multichannel - are selected according to the number of lamps and control modes.
Where do you not need to install dimmers?
- In common areas where frequent use will not allow their basic functions to be performed. Everywhere it is possible to install devices for smooth switching on of lamps built into the switches, allowing to increase their service life.
- In places where there is no certainty about the installation of luminaires.
Regulation methods
- Mechanical - turning the handle. First, the dimmer turns on until it clicks, and then the brightness is set. The turn-and-push device is more convenient, since it is possible to use a switch with a constant regulator setting.
- Electronic: push-button, keyboard. Can be used as a switch and regulator.
- Touch - the control panel provides many different functions.
- Remote - control by radio signal or using an IR remote control.
Dimmer lamp types
- Incandescent and halogen lamps for 220V. Any dimmers can be used to change the light intensity, since the load is only active (does not have inductance and capacitance). The disadvantage is the shift of the spectrum towards red when the voltage is reduced. The power limitation for dimmers exists in the range of 60-600 watts.
- Low voltage halogen lamps. For them, a step-down winding transformer is applicable, which requires a regulator capable of operating with an inductive load. It is marked RL. When using an electronic transformer, capacitive loads are installed.
For halogen lamps, a smooth voltage change is required, which increases their service life. The latest models determine the type of load and adapt to it, changing the control algorithm. It is possible to simultaneously regulate different groups of lamps: incandescent and halogen.
- Fluorescent lamps. If they are started via a switch, glow starter and electromagnetic choke, a conventional dimmer and rheostat will not work with them. Here you need electronic control gear (ECG).
- LED lamp. For them, voltage regulation leads to a spectrum change. Therefore, the LEDs are regulated by changing the duration of the supplied pulses. In this case, flickering is not noticed, since their repetition rate reaches 300 kHz.
Connecting regulators to the load
The connection to the load is made in series (Fig. A). The regulator works in the same way as a switch, but it is advisable to install the latter separately, since in case of failure from frequent switching, you will have to change an expensive dimmer to a new one.

Dimmer connection diagrams
The main requirement is polarity. The phase is always connected to the input terminal of the dimmer, marked with the letter L, and from the output, the wire goes to the lamp. The phase can be detected with a voltage indicator.
A switch is often installed in the phase wire break (Fig. B). It is located closer to the door, and the dimmer is near the bed, so that it is convenient to control.
You can install another regulator and connect them in parallel (Fig. C). To do this, lead 3 wires from each device to the junction box. Such switching, similar to pass-through switches, is done in long corridors.
The use of dimmers differs in the number of loads. The single method consists in connecting one device or combined into a common group. The next control method is based on accent lights to highlight individual areas.

Adjustable room lighting
Dimmer connection
The regulator is mounted in an installation box like a conventional switch. First, it is connected in the absence of voltage in the supply wires, and then installed in the box. Then put on the frame and the brightness control knob.
The basic scheme for regulating the light intensity of lamps is the same for most conventional devices. The only difference is in additional details for smoother handling and stability at lower limits.
To supply voltage to the lamp, open the triac (Fig. A). To do this, a voltage must be created between the electrodes.

Circuits with triac regulation for incandescent lamps: a - the simplest; b - improved
At the beginning of the positive half-wave, capacitor C is charged through the variable resistor R. When a certain value is reached, the triac opens. At the same time, the lamp comes on. Then the triac closes and a similar situation occurs on the negative half wave, since the semiconductors pass current in both directions.
Thus, “stumps” of half-waves with a frequency of 100 Hz come to the light bulb, which was not the case when the rheostat was used. As the brightness decreases, the flickering of light becomes more and more apparent. To avoid this, details are added to the diagram, as shown in Fig. b. Triacs are installed according to the actual load, and the permissible voltage is 400V.
By choosing the values of resistors and capacitors, you can change the initial and final moments of ignition and the stability of the lamp glow.
For LED lamps
Despite the efficiency of LED lamps, garlands and ribbons, energy saving issues also apply to them. There is often a need to reduce the brightness of the glow. LED lamps with conventional dimmers do not work and quickly fail during the regulation process. For this, special regulators of two types are used: changing the supply voltage, controlling by the method of pulse-width modulation - PWM (load switching intervals).
Devices with dimming by varying the voltage are expensive and bulky (rheostat or potentiometer). At the same time, they do not fit well with low-voltage lamps and turn on only at 9V and 18V.
A modern regulator is a complex device that provides a smooth start of lamps, brightness control and setting the light switching modes on a timer.
The LED lamp differs from conventional tapes and assemblies, which can only be connected using additional devices. Its main features are as follows:
- Availability of standard plinths types E, G, MR for connection.
- The ability to work with a network without additional devices. If the lamp is powered by a voltage of 12V, auxiliary devices are specified in its characteristics.
- The generated luminous flux should not differ significantly from the standard values.
To provide the required mode of operation, a driver is built inside the lamp that performs useful functions. If it provides for dimming, it is said in the passport and on the packaging. In this case, the brightness of such lamps can be adjusted using conventional controls.
If dimming is not provided, you should purchase special control devices with PWM control. They differ in the types of installation:
- modular (in distribution boards) controlled by external regulators, remote controls or by special buses;
- located in an installation box, as under a switch, with rotary or push-button control;
- remote blocks mounted in ceiling structures (for spotlights and LED strips).
PWM-based regulators operate on expensive microcontrollers that cannot be repaired. It's easier to make a homemade device based on a simple microcircuit. The dimmer made on the basis of the NE555 timer works stably at a voltage of 3-18 V with an output current of up to 0.2 A.

Dimmer circuit for LED lamps
The oscillation frequency is provided by a generator consisting of a resistor and a capacitor. By the value of the variable resistor, you can set the interval for turning on and off the load at the output 3 of the microcircuit. The field-effect transistor here serves as a power amplifier, since the microcircuit cannot cope with the load from the LED lamps. If the current through them exceeds 1A, a cooling radiator is required for the transistor.
For fluorescent lamps
The brightness of the lamps can be controlled using electronic ballasts, which perform the main function of starting them. A simple diagram is shown in Fig. below.

Controlling a fluorescent lamp using an electronic ballast
The voltage is supplied to the lamp from a frequency generator of 20-50 kHz. The circuit formed by the capacitor and the choke enters into resonance and ignites the lamp. To change the strength of the current and thus the intensity of the light, you need to change the frequency. Dimming is done only after the lamp reaches full power.
The adjustable electronic ballast is created on the basis of the IRS2530D controller with 8 outputs. The device is a 600V half-bridge driver with start, dimming and anti-failure functions. The integrated circuit allows you to implement all the necessary control methods through 8 pins and is used in many ways to change the brightness of lamps.

Block diagram of electronic control of fluorescent lamps
Choice. Video
It is better to find out in advance about the correct choice of dimmers from the video.
When buying a dimmer, you should carefully study its technical characteristics and determine what types of lamps it is intended for. The correct choice of the device makes it easy to connect it with your own hands without the help of specialists.
A modern dimmer for LED lamps has a complex electrical circuit, the work of which is to adjust the luminous flux. In addition, it serves as overvoltage protection, acts as a load distributor and saves electrical life, extending the life of the lamps.
Regulators for LED lamps with a voltage of 220 V are similar in functionality and structure to models for other light sources. In general, this is a switch with an adjusting wheel or buttons. There are circuit connections on the body for connecting wires. The functionality of the regulator is to cut off the voltage amplitude. By turning the wheel or pressing the buttons, the brightness of the lamp, and therefore of the entire illumination, changes. Dimmers for LED lamps have their own characteristics:
- the dimmer cannot adjust the brightness of each cycle of turning on the lighting. Better to do this periodically. If a lower brightness of the light is required each time it is turned on, lamps of lower power must be installed in the lighting fixtures;
- for the dimmer to work with LED lamps, a choke is required. This is due to the fact that such models are designed for less power;
- LED lamps have 10 times less power from conventional light sources, which requires the use of low-power dimmers for them;
- and, finally, their main difference lies in the adjustment. The brightness of LED lamps is not regulated by decreasing or increasing the current strength, but by changing its pulses in the power grid.
It is these features that indicate why it is impossible to install a dimmer of LED lamps with other types of lamps. The switch and lamps must be compatible.

Difference in management
There are different types of dimmers for LED lamps, which differ in their control:
- mechanical control is performed by a button or a wheel. The mechanism can be rotary, push or rotary push. By turning the wheel or pressing a button, the brightness of the lighting changes;
- electronic control has a switch, which has a touch or infrared sensor;
- acoustic adjustment occurs due to the presence of a sensor that reacts to loud sounds, for example, a human voice. The disadvantage of this control is an unplanned change in the brightness of the lighting from the sound of accidentally falling objects;
- remote adjustment is carried out via the control panel. With such a dimmer, it is convenient to adjust or turn on the lighting without getting up.
Of all the models considered, the rotary switch can be considered the most reliable. Its mechanism is simple and affordable. When performing installation, the easiest way is to find accessories. One of the main and popular manufacturers of dimmers is Legrand.
Difference by type of installation
Modern models of LED dimmers have a large assortment, which differ in the type of installation:
- modular models are mounted on a DIN rail and located in a switchboard. They are controlled through remote controls. In addition to changing the brightness of the glow of the lamps, the switch has additional functions;
- monoblock models are quite common. They can be installed instead of a conventional switch, but they must have a PWM function;
- according to the type of installation, regulators are for hidden and outdoor wiring.
What is PWM?
PWM stands for pole-width modulation. It is used to adjust the glow of LED lamps. The principle of operation of the PWM generator is to generate a high-frequency current of about 200 Hz, which is required for the operation of the LED lamp. The change in the brightness of the glow occurs from the change in voltage, width and time of the positive pulse. An electrical signal is generated at the output of the PWM generator, while the frequency and magnitude of the current do not change.
![]()
LED lamp compatibility
To find out which dimmer you need to purchase, you need to determine its compatibility with the light source. Since LED lamps are adjustable and unregulated, not every dimmer can be installed in a circuit. Some manufacturers produce LED lamps that work with a specific regulator. Their compatibility can be determined by the tables available from sellers of this type of product. Before installing the dimmer, you need to study the technical characteristics of the light sources:
- Non-dimmable lamps cannot be installed in conjunction with a dimmer. This will lead to their poor performance, and in case of failure, the seller or manufacturer will refuse warranty service.
- Dimmable lamps often function with standard dimmers that operate on the phase cut principle. But here you need to know that the quality of dimming is affected by the number of LEDs on the switch. Most ESCs require a minimum load of between 20 and 45 watts for optimal performance. If 1 incandescent lamp is enough to achieve such power, then 2 or 3 LEDs with a voltage of 220 V will have to be connected.
- If only 1 LED lamp is required for lighting, it is better to use a low voltage regulator. It is designed to regulate low-voltage LED lighting, which has a magnetic transformer.
When buying an LED lamp, you need to pay attention to the packaging. Manufacturers indicate on it whether the regulator can be used. It can be an inscription or a round icon.

Calculating the maximum number of lamps
When choosing a regulator for do-it-yourself installation on home lighting, you must take into account its power. It is impossible to calculate the maximum number of 220 V LED lamps according to the principle of calculating conventional light sources. The easiest way is to consult a specialist for advice or, if 1 220 V lamp is used to illuminate the room, take it with you to the store and test it for performance by connecting to the regulator.
But if a self-calculation decision is made, let's look at the differences between conventional and 220 V LED light sources:
- the number of conventional light sources can be calculated by dividing the maximum power of the regulator by the power of one lamp;
- to calculate the maximum number of 220 V LED light sources, divide the maximum power of the regulator by 10. Divide the result by the power of the LED lamp.
Self-installation of the regulator
The process of connecting a regulator with your own hands is quite simple:
- Disconnect the electricity supply to the electricity meter.
- At the installation site, it is necessary to cut the wiring and strip the ends of the wires.
- Apply electricity to the network and find the phase wire with a tester or probe. After that, the electricity must be turned off again.
- On the regulator, connect the phase wire to the connector with the letter L, and insert the other wire into the connector with the letter N. After that, clamp the wires with clamps and check the tightness of the connection.
- After the entire circuit is assembled, align the dimmer evenly by adjusting it with the adjusting bolts.
- Fasten the decorative casing on top and, applying voltage, test the system's performance.
At this stage, if all lighting devices are working properly, the installation of the regulator with your own hands can be considered complete.
Homemade regulator
The homemade dimmer circuit is pretty simple. If the house has a soldering iron and radio parts can be soldered with your own hands, of course, it is advisable to have at least minimal radio skills.

To make a regulator with your own hands, you need a copper wire, a triac, two capacitors, a dinistor, variable and constant resistors, as well as a soldering iron with solder. Install the radio components on a textolite board, and solder them together with a wire as shown in the diagram.
The principle of operation of a homemade circuit is to supply current from a variable resistor to a non-polar capacitor. In turn, it charges and gives off energy to the lamp. If the circuit is assembled correctly and all parts are functional, the regulator should work.
Having installed a dimmer on their own for LED lighting 220 V, the owner will take a step towards creating high-tech housing.
In contact with


 White bedroom furniture with burgundy wallpaper")


