Give an old, tattered book a beautiful, unique look back. After trying different methods, I think I have found the right way to bind a book block. My method for making an embossed cover.
Preparing a book block.
The book block is all the pages of the book that we will bind into a leather cover. I will tell you more about preparing a book block in another master class, but briefly the gist is this:
Removing the old cover:

Remove any remaining paper from the spine:

We prepare paper endpapers and fold them in half along the grain.

I glue the endpapers to the book block with PVA glue. I apply glue to a strip 6mm wide.


I add captal to both sides of the book block and reinforce the spine with binding fabric.


You now have a book block with endpapers in your hands, ready to be bound.

Preparing the skin.

First, you need to get a couple of pieces of vegetable tanned leather. The pieces should be rectangular in shape and slightly larger than a book block.

Then find an embossing design on the Internet or draw it yourself. I search for drawings on Google, most often among tattoo designs. I download them to the computer and adjust them to the size of the future binding. Please note that part of the top cover on the spine side is free from the design by about 2cm. We will subsequently cover this strip with a leather binding strip. Accordingly, there is no need to apply embossing there.

What size should the leather be? Very good question. I have included all dimensions in the picture below.

Embossing.

You need to start with .

Use a stylus or pencil to transfer the design onto damp skin.

Using a rotary knife, I cut out the outlines of the design.


I use the beveler to hit the perimeter.


You can add volume and shadows to the design by using “pear”, matte and other stamps.

Final cover editing.

To make the cover look prettier, I process the ends. First I remove the chamfer with an edge cutter.

Then polish the ends. You need to wet the ends with gum traganth or water and rub it with a wooden slicker. Many people recommend using gum traganth, but I haven’t noticed that it works better than water.

If you wish, you can cover some areas of the design with acrylic varnish to give the cover a more “multi-colored” look. Acrylic varnish will not allow the antique to penetrate deep into the skin and the latter will be lighter. I covered the leaves of the tree with one coat of varnish, and the apple, the snake's eye and its tongue with three.

I apply antique gel. It's a simple process - just rub it into all the nicks and scratches to remove any excess gel. The longer the antique gel remains on the skin, the darker it will be.


I apply several thin layers of acrylic varnish.

Then I polish everything with a cloth or paper towel. Pay attention to the tongue, eye and apple:

We fasten the cover with a leather spine.

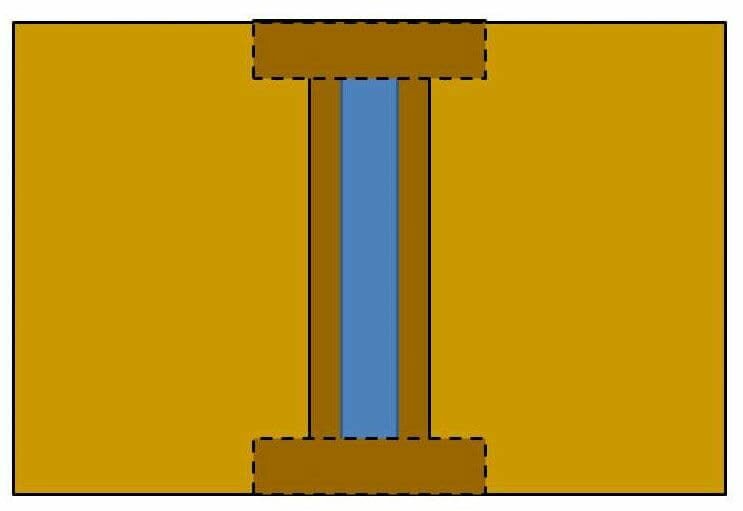
I have found that soft leather on the spine lasts longer. The book opens easier and the cover does not push the book block out of itself. Take a good piece of 1-2mm chrome tanned leather and cut a strip to the desired size. The cover should be made in such a way that this leather strip covers the area of the cover without embossing.

Three things can be learned from the picture below:
- soft leather on the binding covers the spine and is glued to the covers
- soft skin should be about 2cm higher than the cover.
- Additionally, you can cut a strip of hard, thin cardboard to strengthen the spine. The cardboard strip should be as wide as the spine and as tall as the cover.

My cover is 24cm high, so the soft leather is 29cm long.
The spine is about 5cm (book block and cover), which means you need to add a couple of centimeters on each side - and you get the width of soft leather.

Then I sand the edges of the soft leather along the length. This way it will fit flush to the cover and will not cling.


When the glue dries, we will get a ready-made “box” for the book block.

Glue the cover.

Place a sheet of paper under the endpaper to protect the book block from glue. I apply glue to the endpaper with the exception of a narrow strip near the spine and close the cover. I repeat the same operation on the back side of the cover.

Then I put the book on the table and place knitting needles in the places indicated in the photo.

I put a weight on top and leave it for a couple of days.

Carefully open the dry book. If done correctly, you will have a spine that is strong and easy to open.

We admire it.

You now have a beautifully bound book. And it doesn’t matter what book is inside - now you can admire and admire your work, as well as use the book for its intended purpose.

Translation LeatherThoughts
If your favorite book has a seriously tattered cover, and you want to make a leather binding for it, then there are two ways to solve this problem: take the book to a book workshop, where they will make you a beautiful, but, let’s say right away, not a cheap leather cover, or make leather binding yourself.
When choosing the second option, you will not only save a lot of money, but you will also be proud that you yourself have extended the life of your favorite book for a long time.
For restoration you will need:
- thick cardboard
- scissors
- wood glue
- book spine fabric
- decorative elements (if cover decoration is needed).
Two book covers are cut out of thick cardboard. These covers are slightly larger than the width and height of the pages. In height and width, the cardboard should be 3 mm higher and wider than the page (on each side).
Then you will need to glue the top and bottom cardboard covers to the fabric spine with wood glue.
We calculate the dimensions of the spine as follows: take the height and width of all the pages of the book and add a margin of 1.5 cm to these parameters on each side.
From the bottom, top and sides this allowance will be used to glue both cardboard covers to the spine. For strength, we glue it all with wood glue, not stationery glue.
When this blank of covers and spine is completely dry, we proceed to attach the females of the book to it. This can be done using the same wood glue, covering the fabric spine and the back of the pages well, where they are fastened together.
Then glue a piece of leather, or leatherette, the same size as the spine, on top of the spine. Subsequently, it is to it and to the cardboard covers that the leather cover will be glued.
The leather can be cut out for each lid separately, if there is no large piece of leather to wrap it around the entire book at once, or you can make a single pattern that takes into account the overlap inside the cardboard lids.
How to make a leather binding for a book step by step can be seen below in the step-by-step schematic drawing (see photo):
If you have a great desire to make the cover not only expensive and practical, but also to decorate it in a special way, then you can make various decorations for the top cover of the book, using decorative elements made of the same leather (the texture and colors can be use whatever you like).
In addition to decorations, you can make overhead corners from decorative metal elements so that the corners do not rub.

You can also make the book close with a beautiful miniature lock. Leather straps with clasps can be used for closure.
Our workshop offers you a unique chance to buy gift books with original leather binding without extra charges and a lengthy search for a suitable edition. Here you will find a large number of gift editions. Our catalog is constantly updated with new books and gift boxes.
If you did not find the publication you wanted to buy on the website, we will make its leather binding for you individually. All you need to do is call us and leave your order.


The following information from you will be enough for us:
1. The name of the book for which you want to make a gift binding (any book ever published).
2. Skin color (white, black, brown, burgundy, cream, green, blue, gold)
3. Requests for design (name plates, engravings, metal elements, corners, coats of arms, etc. as desired)
4. Requests for the appearance of the book. With the same author's style of our bindings, each book is unique in its appearance. When ordering, you can point us to the book you like (from those presented on the site) and the master will adhere to the style of the specified layout when designing.
5. Requests for creating a gift box (we know that in most cases a person who receives a book in our box puts it in a visible or significant place for him in his work or home space)
6. Request for jewelry decoration of a book and box-box with precious metals and stones.
In terms of timing, the production of a book takes no more than 2-3 days (more urgent release is possible)
Books bound in leather attract attention, and a person who sees such a publication strives to pick it up as soon as possible and receive genuine aesthetic pleasure from using it. The development of printing technologies has led to the fact that inexpensive books with simple, uncomplicated hard or soft binding are sold in bookstores and markets. Such publications are perceived as everyday items and do not cause delight. Therefore, the art of bookbinding is still highly valued, since such books have a soul, they are capable of delivering real aesthetic pleasure
Book restoration and binding
The appearance of the cover is the first thing a person pays attention to when picking up a book for the first time. The unusual design and the use of materials that are pleasant to the touch make people delighted and want to open and read the selected publication.
Binding books in leather is a great way to give a valuable copy a second life and protect the publication from the influence of negative environmental factors and rapid wear and tear.
However, the cover, in addition to its aesthetic function, is also intended to protect the book itself from damage, exposure to moisture, direct sunlight and excessive wear of the sheets. It is not surprising that many antique publications have covers that need to be restored or completely replaced.
Making binding is a labor-intensive process that can only be done by professionals. The Leather Mosaic bookbinding workshop produces covers for vintage and antique rare books embossed with genuine leather. In addition, we are engaged in the production of leather book bindings. Such specimens subsequently become suitable for use and provide their owner with indescribable aesthetic impressions.
You can order the creation of a leather binding for any publication. We guarantee high quality, as our workshop uses high-quality shagreen leather. Here you can make a handmade leather binding: the wrapped book will look stylish and fascinating, and is also reliably protected from damage and wear.
A custom-made genuine leather binding is the best thing that can bring an old book back to life, and we guarantee the highest quality of such a product!
Nowadays, book lovers do not necessarily have to visit the library, sit there for hours, and take notes on the necessary material. All you have to do is make one click and the book you need is already in front of your eyes. Fast and cheap. However, there are many reasons for transferring an electronic version of a book to paper. For some, the text is too small, for those who don’t perceive it on the screen at all. And then it begins: sheets change places, get lost, become wrinkled... What pleasure is there in reading if it’s just inconvenience. Don't rush to throw away your printouts - get your binding done in ten minutes. And your favorite piece can also be decorated with a chic leather cover.
Materials for work:
text printout – A4 format, 2 pages on the back;
photo paper – 1 sheet;
PVA glue – 1 pencil;
old meat grinder - can be replaced with a special device;
nylon threads – 20 cm;
jigsaw blade – 1 pc.;
leather or its substitute – 35 x 40 cm;
sewing machine, wide stationery tape, a piece of medical bandage, gold paint, scissors, brush.
Stages of work:
First stage: binding.
We take the necessary tools and materials.
We make a “book” printout on A4 paper in a text editor. Each sheet has 2 sheets of the future book on both sides. Fold the sheets in half and straighten them. Place short boards on both sides where the sheets are folded and compress the future binding with a meat grinder.

Using a jigsaw blade, we make transverse shallow cuts at a distance of several centimeters from each other.

We cut the thread according to the number of cuts. The length of each thread should be twice the height of the binding.

Carefully coat the cuts with PVA glue, filling the voids with it.

We insert threads into the cuts, leaving their ends free on both sides of the binding. We “drown” the threads in the cuts. Let the glue dry, remove the meat grinder.

Second stage: fix the binding.
We cut a piece of medical bandage so that its length is enough to cover the length of the binding and the bends on both sides. We cut out a strip of paper that completely matches the length and width of the book’s binding.

We apply a thick layer of glue to the entire binding, and on top of it - a bandage (with the edges previously bent inward).

Apply glue to a strip of paper and smooth it onto the binding over the bandage. Carefully smooth the entire surface of the strip.

Apply glue to the top of the book.

Smooth the ends of the threads and the edges of the bandage, while simultaneously stretching it in both directions from the binding. We dry the book in a standing position (with the binding upside down).

Third stage: blank for the cover.
We print on photo paper (or paste prepared clippings onto it) pictures for the title and back sides of the book. The size of the blanks should be 0.5 cm narrower than the width of the book. We cut out a strip of photo paper that exactly matches the size of the binding (both in length and width).

In order to make cutouts in the leather according to the size of the pictures, we make stencils from plain paper. If you need perfect accuracy in matching the lines, you can use tracing paper or make a translation by attaching the picture and the top sheet to the window glass.

Fourth stage: we work with a leather substitute.
For the cover you can use genuine leather or its substitute. In this case, a substitute purchased at a fabric store is used.

We place the cover and binding blanks on the reverse side of the leather. Don’t forget to make a distance between them slightly larger than the reduced width of the cover (about 0.7 cm each). We trace the contours with a pencil.

We place inverted stencil blanks on the drawn areas. The main thing in this stage of work is not to confuse left and right. We outline the places for future cutouts.


Cut out the outlined outlines.

Fifth stage: preparing the cover.
We cover pictures on photo paper with stationery tape so that they do not get dirty in the future. We glue the tape only to the front side of the sheet, without wrapping it on the back.

Apply glue to the areas of the photo paper free from the picture.

Combine the skin cutout and the picture.

Gently, without stretching, press the skin to the glue.

We machine stitch along the edges of the cuts, securing the leather.


Cut off the corners of the cover.


