Admin 2015-06-03 at 3:52 am
This new article is devoted to the design features of collars of various types and cuts, methods of their processing and connection with the neck. And with this post I’m opening a new section on my blog: 100 collars. I will fill it until I describe exactly 100 collars.
I don’t know if I’ll get that much in my memory - well, there’s the Internet - I’ll look there. And you, dear reader, will help, if anything. So send in your designs - I love understanding clothing designs.
Today I will describe the first collar - like this:
And I’ll tell you how I used perforated glasses for the first time today to improve my vision.
So, how many designs of collars are there, their shapes, sizes, processing methods and the number of included parts?

Studying the varieties of collars from fashion magazines, catalogs and simply samples of finished products, I always pay attention to what the shape of the collar depends on:
First, I look at the shape of the collar.
Second, I decide how it connects to the neckline (set-in or one-piece).
Third - how the collar fits to the neck - tightly, at some distance or even flat on the bodice.
And fourth - how the collar is connected to the clasp - whether there is one at all, whether the clasp is up to the top or to the bend of the lapel.
Structurally, the collar most often consists of an upper and lower collar part, as well as a gasket part.
In total, there are several varieties of collar cut: flat with different stand-up heights, set-in stand-ups (vertical and inclined), solid stand-ups with front and back details, shirt collars, collar-clips, turn-down collars with a stand-up in the middle, and collars for products with an open fastener: jacket type collars, shawl collars, apache type collars.
A lot, right? We will slowly consider all these designs in the following articles of this new column of mine.
Now let’s start with the simplest collars to design, these are:
Turn-down flat collars:
This is a collar that completely follows the shape of the neck and shoulder area of the product - turn-down, flat-lying.
A distinctive feature of this collar is the absence of a stand. That is, the collar lies flat on the figure.
The pattern of such a collar is based on the basic basis of the front and back of the product.
The shape of such a collar varies depending on the shape of the neck.
The line of sewing the collar into the neck completely follows the contour of the neck of the product. The detachable part of the collar can have a different shape - rounded or pointed edges, different collar widths.

The clasp in products with such collars can be either on the shelf or on the back. There may also be no clasp at all.

Let's consider the most common model of such a collar - round or, as it is now called “Peter Pan”.

The pattern of such a collar is simpler than all others - directly based on the neck of the product.
In the drawing of the shelves, set aside 6 cm along the contour of the neck in order to outline the contours of the collar. The contour of the collar's departure is rounded to the center of the neck in front of a smooth line. The width of the collar is usually the same along the entire contour and varies depending on the model. In a child's dress 4 - 5 cm, in a woman's dress or blouse 5 - 6 cm, in a coat 7 - 10 cm or more.
On the back, along the contour of the neck, you also need to set aside the width of the collar, in this case 6 cm. If there is no fastener on the back, then the collar can have a seam located in the center of the back. If there is a fastener, then the collar along the back is not sewn, but is decorated with rounded lines. And thus, two parts of the collar are formed - left and right.
The design of the collar lines on the back should be done with a closed shoulder dart. This dart can be temporarily closed and transferred to the armhole, or it can be conditionally considered closed by extending the shoulder seam in a straight line from the neckline point towards the shoulder.
There should, of course, be no seam along the shoulder line on the collar.
The contour lines of the collar are copied onto a separate sheet of paper, combined along the shoulder seam line and a collar pattern is obtained.
For the collection, I offer slightly different neckline shapes, suitable for a flat turn-down collar, without a stand-up collar:
The algorithm for constructing a pattern for such collars is simple - we change the neckline according to the model, then draw the lines of the collar.
Using the open neckline as an example, I’ll note once again that the key changes in the neckline are its width and depth. And also the shape of the neckline on the chest - round or U-shaped:
The neckline of the next dress is formed similarly to the previous model, but there is also a Y-shaped neckline on the back. The shape of the ends of the collar is also different - they are not round, but sharp. The width of the collar is figured and gradually narrows closer to the shoulder.
Detachable collar - decorated with beads and rhinestones.


The neckline is designed in a boat shape, the right collar piece is overlapped with the left one, and then sewn into the neckline as one piece.

Let's continue the topic of collars in the next article -.
My reader and training group participant Tatyana sent me an interesting letter. Quote:
“Ellen, I see you are wearing plus glasses. My mother, who is over 70, restored her near vision in three months. Her eyesight has been good throughout her life. So, she is a “non-believing Thomas,” and until she checks it herself, she won’t believe it.
I bought her glasses with perforations, like “holes.” During this time, she read for an hour a day, looked at something on the Internet, and suddenly, once again, she puts on strong glasses, and they blur everything. She went and wiped them, but there was no result.
I put on other glasses, weak ones, which I hadn’t worn for a hundred years - and then I immediately began to see! Well, we moved on. This is already the second little man who, in my presence, began to see well up close - “far-sighted.” And the first grandmother, she is 80 years old, and she has restored her vision and reads small letters calmly. The witness herself is where it all started. But I’m myopic and I can easily watch movies in them. So if you are interested, as they say, this is the result first-hand.”
My vision really began to deteriorate - I can’t see well at close range. Without glasses I can’t even see the phone button.
Thanks to Tatyana - I bought these glasses today - they have perforations - these are small holes on... I wanted to say, on the glasses. But these are plastic “Glass”. In general, here is a photo of what these glasses look like:
And now I’m reporting on my impressions: (I bought it, by the way, at an optician. They cost 890 rubles.) I ask the seller - “How do they work?” She - “You can read the instructions.” And asks to put on these perforation glasses and read. I say: “I won’t see such small letters.” She - “put on glasses then.”
Well, I put it on - I look and see! Small letters. I see! You can read directly through the perforation and letters and objects become sharper. But it’s unusual, really - the image seems to split into two and you have to somehow align it.
Right now I’m writing these lines with new glasses. And what’s interesting is that when I was reading these instructions for the glasses, I tried to bring the text very close to my eyes - almost end-to-end - 5 cm distance - and it was still visible.
Today I spent about an hour in them in total. Then I took it off - and when reading my mail, I could see the text - although it was blurry, but I could read it without glasses at all. Marvelous! Are your eyes rested in these glasses? In general, I am a Thomas believer, so I will continue to study them.
I’ll write about the results if you’re interested. So, no don't miss it. And that’s all I have for today.
Electronic pattern for a white boat dress.
Sizes: 42-52 and 52-62 (the buyer receives a choice of one of the gradations of sizes).
Electronic dress pattern file format:
PDF in full size and without seam allowances.
- PDF file A4, adapted for printing patterns on sheets of A4 paper in any program on any device, including mobile phones.
- Multi-format PDF file for printing on sheets of any format from A0 to A4 on a printer or plotter using Adobe Reader.
All rights to the pattern belong to Vera Olkhovskaya.
Sewing difficulty level: simple - dress pattern for beginner tailors who have mastered skirt sewing.
This model, like other dresses with a sun skirt and a sheath dress bodice, suits most body shapes and can effectively hide imperfections. The silhouette is adjacent. It is also recommended for girls and women with different bust and hip sizes.
The set of patterns includes bodice patterns and recess patterns for the “sun” skirt (Fig. 1).
Almost any fabric in the dress range is suitable for sewing, except for highly stretchable stretch, chiffon and cambric. It is not advisable to use a staple - it wrinkles a lot and the skirt will be deformed during wear and after washing. Chintz, thin denim, thin dress linen and poplin are ideal. If you are sewing a dress for special occasions, then jacquard and velvet on a stable basis will be appropriate.
Consumption depends on the length of the skirt. This dress can use from 2 to 5 meters of fabric. Consumption calculations for different cutting options are described below.
 How to buy an electronic pattern
We finish processing the bodice (until the zipper is attached), including sewing the edges and ironing.
And we connect the bodice with the skirt. When joining, it is important to remember that the side seams of the bodice and skirt must match, despite the fact that the halves of the skirt are the same, and the front of the bodice is wider than the back. That is, the back half of the skirt should be slightly seated.
By connecting the bodice to the skirt, you can sew on a zipper.
(See the video master class on sewing for beginners “The hidden zipper in a dress”)
Processing the bottom of the skirt can be very simple - hem with an open cut.
Or with trim and regilin - see video tutorial on sewing
That's all! Stay tuned!
We have many more dress patterns for beginners and other women's patterns that can be downloaded almost free of charge.
Several video tutorials on sewing and cutting are already being filmed using the new models. Do not miss!
And don’t skimp on fabric, because sewing is free for you.
Download this PDF pattern:
White boat dress pattern
Price:
$1.50
(108 rub., 43.5 UAH.)
The name “boat” stuck to this cutout for its visual resemblance to a small vessel. The boat neck is elongated horizontally both at the front and at the back. The upper shoulder area can be open up to the collarbones.
The boat neckline suits ladies with a pear-shaped figure, the main characteristics of which are narrow shoulders and a wide bottom. Clear horizontal lines of the neckline will highlight feminine sloping shoulders and help balance the figure. Relative to the horizontal, the long neck will visually become a thin swan.
Boat neck - photo
The design of the “boat” is rich in variety - it can be more or less cut out, decorated with a collar, a scarf, or combined with a “swing” drapery. As decoration you can use trims, colored piping, small bows and other decorations.


Processing the boat neck with undercut facings
The boat neckline is good for a fitted evening dress - it will make the look elegant. It can be used for summer dresses made of flowing materials - silk or chiffon.
We prepare facings
- Take a small piece of fabric, fold it in the longitudinal direction, and place the front piece on top, aligning the fold of the material with the fold of the product. Trace the neckline and shoulder sections with chalk. Set aside 4 cm from the marked line and draw a front facing, which you cut with scissors.
- Similarly, prepare the hem for the back neckline.
- Take the adhesive fabric and cut out the interfacing for the facings. Please note that when cutting out parts, you should step back inward from the chalk line by 0.5 cm. This is done so that the seam does not thicken. Using an iron, glue the interfacing to the wrong side of the facings.

1. Cut out the front facing

2. Open the back facing

3. Finished hems
Finishing the neckline before hemming
- On the facing and on the front part, make a cut in the center.
- Fold the facing and front of the product face to face, align the marks on the neckline and baste the smaller piece to the larger one. Work from the front. After basting, transfer the shoulder seam lines to the other side.
- Place a seam stitch on the facing side. When you reach the shoulder line, open the seam. Remove the basting threads. Make a cut in the area where the stitch turns. Cut the stitching seam where it curves, cutting out excess fabric in the corners.

1. We make cuts in the center of the parts.

2. Baste the facing to the front part.

3. Stitch the hem. We cut the seam.
Finishing the back neckline with facing
We begin to process the back after sewing in the zipper.
- Baste the facing, and then stitch it, releasing the ends approximately 1.5 cm. Remove the basting threads, cut the seams.
- Baste the shoulder sections by folding back the facings.
- Sew the shoulder seams. Sew from the front, starting from the armhole, and bring the stitch exactly to the end of the finished neckline. Sew the other shoulder in the reverse order, from neckline to armhole. Then fold the shoulder seam towards the back.

1. Stitching the facing. Cutting the seam.

2. Sweeping the shoulder sections.

3. Stitching the shoulder sections.
Finishing the boat neck
- Fold down the front and back hems, stitch the seams 1 mm from the edge.
- Turn the facing inside out, sweep the seam to form a 1 mm edge. In the zipper area, fold the previously released fabric. Iron the finished neckline.
- Hide the edges of the front neck facing under the back facing. Hem the folded edge with a blind stitch.

A boat neck is a wide neckline that runs horizontally across the collarbone from one shoulder seam to the other.
Traditionally used in marine casual clothing and uniforms. In modern fashion, the boat collar is popular in knitwear and elegant cocktail dresses.
In international fashion terminology, the names of the cutout “bateau”, “boat” and “Sabrina” are synonymous.
Marine uniform
The laconic horizontal neckline was historically used exclusively in sailor clothing. In conditions of unfavorable sea weather, a long-sleeved straight-fit T-shirt made of cotton knit fabric turned out to be very comfortable. The wide neck of the boat is comfortable to wear and allows you to quickly remove the product. A thin cotton jumper with blue and white uniform stripes, known as the “marinière” or “Breton striped shirt”, was adopted as the official uniform of the French Breton navy in 1858. The French name for the cutout “bateau”, like many textile terms, has passed into international terminology.
Coco Chanel and world stars
Fortunately, the distinctive striped pattern did not remain just a uniform. Designer Coco Chanel was first inspired by the sea jumper of fishermen and sailors. Chanel embodied her own version of the knitted jersey jumper model, which she saw on the beaches of Brittany, in her 1917 collection. She effortlessly paired striped modified uniforms with wide-leg trousers and espadrille sandals in the women's collection.
Since then, variations of the striped wide-neck jumper have become an iconic wardrobe item. Brigitte Bardot, Picasso, Audrey Hepburn, Andy Warhol happily wore a striped T-shirt with such a neck, cementing the popularity of this model in Europe and the USA.
Meanwhile, North American designers Ralph Lauren and LL Bean continued their expansion of the nautical jumper and the horizontal slit neckline. In the second half of the 20th century, this clothing became the epitome of elegant style wherever it was worn, be it yachting or evening wear.
In addition, the horizontal cutout goes harmoniously with a strip of fabric or knitted fabric. In products with a characteristic pattern, he does not cut it, allowing the designer’s idea to be fully realized.
One of the modifications of the neckline, which is actively used in evening, cocktail and wedding dresses, is named after the heroine Sabrina from the film of the same name. The 1954 film made Audrey Hepburn the highest paid actress in the world at the time. The horizontal neckline of the dress, created by the couturier Givenchy, was so in harmony with the image and physique of the actress that it went down in the history of costume under the name of the heroine. The heroine of the film wore two dresses with a horizontal neckline. Both models have become iconic in the history of costume.
After the release of the film, the boat neckline became popular in decorating evening dresses, and not just everyday dresses. The closed bodice creates a laconic look that does not distract from the silhouette, fabric or drapery.
Designers especially love bateau necklines in wedding dresses that require rigor and clean lines. A closed neckline does not focus attention on the chest area, allowing the quality of the fabric and the cut of the formal dress to come to the fore. The closed bodice shifts the accents of the decor and demonstrates the elegance and appropriateness of the image.
Despite the fact that the horizontal line visually shortens the neck, such a neckline is beautiful for presenting jewelry, which is especially important in evening dresses.
Participant
From: Tomsk
Thank you said: 8 times
I really want this jacket. The jacket is fine, but the collar is difficult. I ask for help accordingly.
And yet, I don’t think the buttons are soutache.
*************************************
From Donchanka: added later. Techniques for modeling such a collar can be found in the article Modeling a voluminous shawl collar., link in the attached topic post.
clothing demagogue
From: France
Thank you said: 4178 times
G@la writes: “The promised material on modeling a blouse collar.
We made a similar collar some time ago in one of the theater costumes.
I drew it quickly, BY EYE. Of course, I tried to maintain the proportions, but... If something is unclear, I will explain.
An insert made of organza or mesh is desirable inside.
There are many ways to process and fasten (you don’t have to fasten) the inner cut of the collar and the cord holding it together - as you like.
The main thing is that the part is of sufficient width and does not turn outward.
The height of the collar and the size of the gather are based on personal preferences and the drape of the fabric.”
————
Girls, drawings from _g@la can be downloaded here (pgf-format, watch in “Acrobat”). She even anticipates your questions
vor_1.zip (533.33 kb) Number of downloads: 86
“A small clarification to the previous document (collar modeling
blouses)."
vor_2.zip (196.75 kb) Number of downloads: 57
Who thinks what? How to depict this? what kind of collar is this?
Thumbnails of attached images
Participant
From: Vilnius
Thank you said: 487 times
this is deferred. a collar that lags behind the neck, with asymmetrical ends (as far as I could see). The collar itself can be constructed in 2 ways: according to Müller (when the front and back are connected along the shoulders, with a slight overhang of the ends, and directly on these parts the collar is drawn, adding stands, etc. And according to TsOTSHL - the collar is built separately.
first you need to increase the bead setback = 8cm
widen the neck of the shelf and back by 2cm
deepen the throat. back by 1 cm, throat. shelves 2-3cm
draw neck lines for the right and left. parts of the shelf (red outline - right side of the shelf).
We build the collar like this:
right angle -> OB = 6 cm
BA = half the length of the neck - 0.5 cm (measure the length of the neck of the red outline and gray)
BB1 = 3cm
BB2
13cm (optional)
AA1
14 cm (optional)
AA2
18 cm (optional)
deflection at the bottom of the collar and at the top = 1.5-2cm
The red outline of the collar is the right side, the blue outline is the left.
judging by the last picture, it looks like a shawl with asymmetrical ends
![]()
Sew a sheath dress
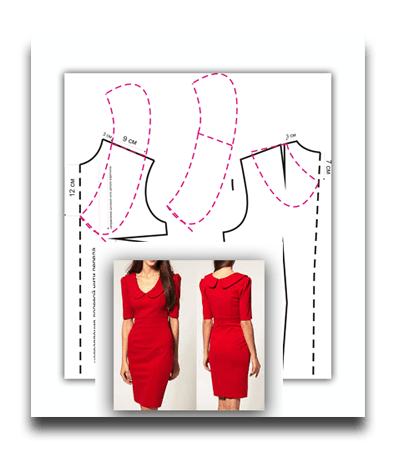
Bright red sheath dress
A bright and luxurious sheath dress as if created for stylish women. The color of this sheath dress is not its main advantage. The boat neckline, fitted silhouette and elegant length make this sheath dress a true masterpiece.
The pattern of a sheath dress is modeled according to the Pattern-basis of a women's dress.
Sheath dress pattern
Rice. 1. Sheath dress pattern - modeling
Rice. 2. Pattern of a sheath dress, cut details
Modeling sheath dress patterns with reliefs
1. Set aside 6 cm along the back and front of the dress from the depth line of the armhole of the dress upwards. This value may vary depending on your body shape and your personal wishes. To get exactly the dress relief pattern you want, it is best to attach the dress pattern, transferred to tracing paper, to the figure and in front of the mirror, mark the point on the armhole of the dress from which you will build the relief.
2. Move the darts of the front of the dress and the back of the dress as shown in the drawing. Remove the side dart on the front half of the dress.
3. Using the pattern, draw the reliefs of the front of the sheath dress and the back of the sheath dress as shown in the patterns.
4. Cut the details of the sheath dress along the resulting relief lines.
5. Cut the top dart on the front half of the dress and close it.
6. Close the small dart that appeared on the front half of the dress during the modeling process on the pattern, lightly iron the pattern, and straighten it.
The neckline of the sheath dress must be modeled independently as shown in Sheath Dress Pattern 2.
How to cut a sheath dress with reliefs
From the main fabric the following is cut out:
- 1 part of the front of a sheath dress with a fold in the middle of the front;
- 2 details of the barrel front of the sheath dress;
- 2 details of the barrel back of the dress;
- 2 parts of the central part of the back of the dress.
All details of the dress are cut along the grain thread. Seam allowance - 1.5 cm, hem allowance - 4 cm.
Additionally, cut out all the details of the dress from lining fabric (if you decide to sew a sheath dress with a lining) or 2 bias tapes 3 cm wide for processing the armholes of the sheath dress and 1 bias tape 3 cm wide for processing the neckline of the sheath dress.
How to sew a sheath dress using a pattern
Baste and stitch raised seams. Overcast seam allowances. Baste and stitch the side seams of the sheath dress, overcast the seam allowances.
Sew a hidden zipper along the back of the dress.
Finish the neckline and armholes of the dress with bias tape. Tuck the bottom of the dress and hem it by hand with hidden stitches.
How to sew a lined sheath dress
Sew the dress from the main fabric as described above, just leave the shoulder seams open. Sew all the lining details of the dress in the same way (shoulder seams are open). Then finish the armholes and neckline with lining: see How to finish the neckline and armholes of a dress with facings.
Pattern of a knitted dress with sleeves
Constructing a dress pattern
White dress
- Comments 14 Pingbacks 0 —>
I made a pattern for a sheath dress. I wanted to ask, is it possible to make it with short or 3/4 sleeves?
Thank you very much for your selflessness! I wish you abundance in all areas!
Of course you can! The sleeve pattern is constructed and modeled separately: https://korfiati.ru/2010/02/kak-sshit-rukav-dlya-bluzki/
Many thanks to a talented and selfless person!
Anastasia, thank you very much for the opportunity to learn how to make patterns. I had been sewing all my life, but I didn’t know how to make patterns, and my figure was not standard. But thanks to your school, everything is very accessible and understandable. I use your site as a sewing cheat sheet. God bless you with health and happiness.
We are very pleased to be of service to you.
Thank you very much, Anastasia! I cut it out from textbooks several times, but couldn’t understand it, but with you everything is so simply and clearly explained and shown. May God grant you health and prosperity for your selfless work!
Valentina, thank you very much!
Anastasia. I also want to say a HUGE THANK YOU for all your knowledge that you share with us. I really liked your site. your style of presenting material.
I found out about you by chance, bought your book on sewing dresses (I’ve long dreamed of buying a similar one, yours is the best of all the ones I bought), I saw the address of your page on the Internet in it, for the second day I’ve been sitting, reading, reading, reading, a sea of useful information, satisfying my “ I'm thirsty." I also bought your “The Largest Book of Cutting and Sewing.”
May God grant you health, joy and creative achievements!
Irina, thank you very much for your kind words addressed to me. I'm glad I was able to captivate you!
Good evening! I have nothing to do with sewing, but I really like it and for a teenage girl it is very difficult to find something suitable for school. So I decided to make her a sheath dress. Guided by your master class, I made a pattern for the base of the dress. But then the question arose: if my fabric is black with white stripes, then should I move the bust dart under the bust? Maybe I’m using the wrong terms, but in short, is it necessary to move the dart from the shoulder to under the bust?? How will this affect the stripes? And the sheath dress must consist of 8 parts or not. or you can sew directly from the base pattern, i.e. without cutting it. And I have not yet been able to find out whether it is possible to sew a zipper under the armhole of the sleeve (in short, where there are cutouts for the sleeves), because it is much easier for my daughter to take off the dress if it is unbuttoned from the side, and not from the back on the back. Thank you very much.
Larisa, you can move the dart horizontally to the side line or under the bust, it all depends on the style you want to get. Of course, if the fabric is striped, then complex styles are not always justified, since the geometry of the pattern is disrupted. You can draw the style of the dress, then model it using the base pattern. A zipper in the side seam is often used in dresses; step back 2-3 cm from the armhole and sew in a zipper.
Anastasia, please tell me how to model such a dress with a boat neckline and dropped sleeves.

Summer dress with boat neck
The summer dress pattern with a boat neck and side slit is a simple model. Sewing is very simple, the dress is without a zipper, which we hope will especially appeal to novice dressmakers.
Cutting details of a dress with a boat neck
The dress has six parts: two backs, one front, three inner yokes of the corresponding parts. The yokes are marked on the pattern with lines on the main parts; they should be cut out yourself. Add 1 cm to all cuts for seam processing.
Dress sewing technique
Overcast the side, shoulder and middle sections of the back and press with an iron.
Place the back pieces right sides together and stitch. Iron the seam.
Fold the back and front right sides together and sew the shoulder and side seams, leaving an open area for cutting in the left side seam.
Repeat all operations for the inner yoke.
Overcast the bottom edges of the dress and the yoke.
Place the inner yoke into the dress with the right sides facing in, stitch along the boat neckline, press the seam, turn the dress inside out, iron the bodice allowances and stitch the seam allowances onto the inner yokes.
Baste and iron the armhole and bottom allowances of the one-piece sleeve to the wrong side, secure along the fold with a fixing finishing stitch. Remove the basting line.
Iron the side seam allowances for the slit and the bottom of the dress inside out and stitch with a finishing stitch the width of the sewing machine foot.
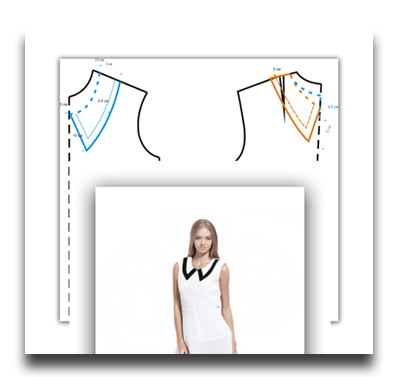
1. Modeling a boat neck
To design the boat neckline on the pattern of the front and back of the product (blouse, dress), step back 3-5 cm along the shoulder to the right and connect this point with the height point of the sprout (point 8 on the front in the figure). Cut out the resulting neck. The upper cut is processed with a facing, it is cut out according to the shape of the neck, 3 cm wide, indicated in Figure 1 by a dotted line.
1 Neck modeling
Rice. 1
2. V-neck
To create a V-shaped neckline, we retreat 2-3 cm along the shoulder to the right, and in the middle of the front, we retreat 13-16 cm downwards. We connect these points first with a straight line and then with a concave line (see Fig. 2). Thus, a new neck was created. The back pattern can be modeled similarly or remain unchanged. The neckline and armhole are processed by facing, it is cut out according to the shape of the neckline and armhole 3 cm wide, indicated in the figure by a dotted line.
2 Neck modeling
Rice. 2
3. Modeling an oval neck
When constructing a pattern along the shoulder, we retreat 5 cm from the neckline to the right, and 2 cm from the armhole to the left. In the middle of the front we measure down 13-16 cm, and along the side seam we go up by 2 cm. We connect points 13-16 with point 5 with a concave line, and through points 2 and 2 we form a new armhole, as shown in Fig. 3.
3 Neck modeling
Rice. 3
4. Square neckline
Such a cutout is constructed according to the drawing (Fig. 4). For example, we retreat 3 cm to the right along the shoulder, and lower the depth of the neck down by 10-12 cm. At the intersection of straight lines we get a square cutout.
4 Neck modeling
Rice. 4
5. Modeling a trapezoidal neck
Along the shoulder to the right we retreat 2 cm, and down in the middle of the front we retreat 10-12 cm and from this point we draw a horizontal line, along it we also measure 10-12 cm, we get point A. Then we connect A and 2 according to Figure 5. From the armhole to the left we set aside 2 cm, then we form a new armhole: connect points 2 - 4.
5 Neck modeling
Rice. 5
6. Sundress with straps
Let's consider constructing a sundress with wide straps without a seam along the shoulder. Modeling the front: find the middle of the shoulder, measure 5cm to the right and 7cm to the left, get the width of the straps (according to the planned model). From the depth of the neck we put 10-16 cm down and connect it to point 4. From point 10-16 to the right we put 1 cm and connect it to the waist line. Along the shoulder from points 5 and 7 we draw a perpendicular down to a horizontal line, we get the length of the straps. Next, we retreat 1 cm from G2 to the right, connect this point to the waist line and measure up 2 cm from it (Fig. 6). Connect the dots 2cm-4-5-7cm-1cm. We get a new pattern for a sundress with straps. The modeling of the back is similar (see Fig. 6).
6 Neck modeling
Rice. 6
7. Top with open shoulders and a deep neckline
A top with an open shoulder line and a deep neckline in the front is constructed as follows: find the middle of the shoulder, and step back from it to the right and left by 0.5 cm. From the depth of the neck we set aside 16 cm. Next we find point 9: from B1 upward we measure 9cm. From the side cut along the armhole we put 1 cm to the left, from the resulting point we draw a line equal to 2 cm up and down to the waist, as shown in the figure. Then we connect points 16-9-2 with concave lines.
Along the back, the top is constructed in the same way as along the front, with the only difference being that the lines connecting the straps with the side cut and the middle of the product will be straight or any, depending on the wishes of the client (Fig. 7).
7 Neck modeling
Rice. 7
8. Top with a clasp at the neck
Be built on the basis of the adjacent silhouette (see Fig. 8). The shoulder dart is not added; 1cm is not added to the back width. We reduce the depth of the armhole by 1-2 cm, the width decreases by 1 cm. The straps on the back will have a clasp, so we are building an approach to the clasp. On the back we make a fastener with a button or lacing, or we make drapery with an elastic thread. When cutting, add 0.5-0.7 cm to allowances. The top can be finished with lining, facing, bias binding or edge stitching.

cutting and sewing courses by hereditary tailor Alexander Timofeev
patterns, sewing courses,
How to cut out and sew the perfect neckline on a dress, blouse, top, tunic, etc.
To get a perfectly straight neckline when sewing a dress, blouse, top, tunic, etc. I advise you to pre-approve the width and depth of the neckline
This is necessary in order to avoid stretching the fabric cuts, which in most cases will be on the bias. Therefore, I determine the neckline before cutting out the product as follows
First, we determine the shape, depth and width of the neck with the client
Then I draw on paper a drawing of the future neckline, front and back.
I take a newspaper, tracing paper or other paper suitable for this process and cut out
part of the bodice with seam allowances if I baste, or without them if I want to
glue the cut pieces together, seam to seam. Tape can also be used to glue in the first case
Then the client and I try on the paper blank and adjust the shape of the neck
Only after this do I start cutting out the main product, facings for processing
neck and immediately to its processing without subsequent changes during fitting
I don't make any changes during fitting. Like – deepen, expand, change shape
in the video I tell in detail and show the whole process, called
“How to make a perfectly straight neckline easily and simply”
I wish to benefit from watching my video advice:
Video tutorial from hereditary tailor Alexander Timofeev
(14 min.)

Dress with a boat neckline - sew it yourself
Surely, in the wardrobe of many modern women there are dresses or blouses with a beautiful, always relevant, boat neckline. It is also used in summer clothing models made from flowing chiffon or silk, for dresses and blouses that can be worn regardless of the season.
To sew a light, beautiful, flowy dress for the spring season or to appear at the office in a formal dress with an original neckline, use dress pattern with an intelligent neckline boat. Sewing it does not require any special skill, so even a novice seamstress can handle it.
To wear a dress all year round, as well as to wear it “on special occasions”, it is better if the dress has long sleeves, but use some light fabric for it, for example, chiffon with lining, which comes in a wide variety of colors, so each a woman will choose the most suitable one for herself. To add novelty and lightness to the look, the skirt should be flared, and the sleeves should be wide, but gathered at the cuff. For a business-style dress, knitwear, satin and even cotton fabric are suitable.
You can learn how to build a pattern from a step-by-step video on the Internet. As a rule, video tutorials are constructed competently and accessible, so they do not cause any difficulties and help you sew beautiful and unique things, as well as significantly save your family budget. The main thing is to follow all stages of work and take measurements correctly. The result largely depends on them, even in cases where you trust professionals and sew clothes in an atelier or from a seamstress you know.
As a rule, to create a pattern for a dress with a boat neck, use a drawing of the base of a straight, semi-adjacent silhouette, however, you can use other bases that you have on hand. The pattern for the base of the dress is basic, so it is worth having if you are seriously planning to sew clothes yourself for yourself or to order. It will definitely come in handy in the future when you have to model clothes of different types and styles.
Dress pattern with a neckline a boat will be needed for those who can boast of a beautiful curve of the neck and straight posture, but even if you do not think that you have an impeccable figure, you should not deny yourself the pleasure of sewing a new thing and going on an experiment, the results of which you will definitely be satisfied with.

Boat neckline on crochet tunics – 4 models and MK video
in White, Crochet, Blue 05/30/2018 0 2,210 Views
The boat neckline is considered one of the easiest to make for beginner knitters. And in general, not the neck, but the song:
- Easy to knit
- Looks amazing
- Worn with or without accessories.
Tunics with such a neckline are a must-have in your wardrobe. Judge for yourself, they can be worn at any time of the year, with any bottom. We dilute it with new decoration and voila - you look fresh and stylish. By the way, a little secret, a long thread of pearls or pearl beads in several layers, tied with a knot, is the most universal decoration for all knitted items with such a neckline.
Snow-white tunic with a boat neckline and a Pineapple pattern in the center
Dimensions: XS (SM) L (XL) XXL
Dimensions of the finished product: chest girth - 84(92)100(108)118 cm, length - 66(69)71(73)75 cm, inner sleeve length - 10(10)11(11)11 cm.
You will need:
- Novita Puuvilla-bambu yarn (52% cotton, 48% bamboo-viscose, 108 m/50 g) – 400(450)500(550)600 g white (011),
- hook No. 3-3 1/2.
Knitting density: 1st-5th rows of the central motif = 12 cm (diameter).
Back: First, tie the central motif. To do this, dial a chain of 6 air. etc., close it into a ring connection. column. Next, knit according to the pattern, perform rows 1-24 once, then repeat rows 25-26 until the width of the motif is 42(46)50(54)59 cm. Cut the thread. Then tie the bottom part of the piece. To do this, attach the thread to one corner of the central motif, performing 1 tbsp. b/n. Next, knit as shown at the top of the diagram (highlighted in gray) as follows: 1st row-3 air. lifting item (= 1 tbsp. s/n), 1 tbsp. s/n, *1 air. p., 2 tbsp. s/n in the arch made of air. p.* repeat *-* 2nd row – 4 air. rise p. (= 1 tbsp. s/n +1 air p.), * 2 tbsp. s/n under air. n. of the previous row, 1 air. p.* repeat *-* at the end of the row, knit 1 tbsp. s/n. 3rd row-3 air. p. lifting (= 1 tbsp s/n), 1 tbsp. s/n under air. n. of the previous row, * 1 air. p., 2 st. s/n under air. p. of the previous row* repeat *-*, at the end of the row knit 1 tbsp. s/n under air. p. of the previous row and 1 tbsp. s/n in the last st. Next, repeat the 2nd-3rd rows to a height of 10(9)8(7)5 cm from the central motif.
Then tie the bottom edge of the part as follows: dial 1 air. p., knit 1 tbsp. b/n under air. p., ‘knit 7 tbsp. s/n under the next air. p., 1 tbsp. b/n under the next air. p.* repeat *-* knit 1 tbsp. b/n at the end of the row. Cut and secure the thread. Complete the upper part of the part as follows: first knit rows 1 and 2 in the same way as the lower part. Next, knit in s/n stitches until the height of the piece is 13(13)12(11)10 cm from the central motif. In this case, start each row with 3 air. p. rise (= 1 tbsp. s/n) and finish 1 tbsp. s/n. Cut and secure the thread.
Before: knit similarly to the back, but with a neckline. To do this, at the height of the upper part 6(6)5(4)3 cm from the central motif, mark the middle of the part. In the next row, knit st. s/n, until there are 11 stitches left to the mark, knit 2 stitches. s/n, 2 tbsp. s/n, 15 connections tbsp., 2 tbsp. b/n, 2 half-st. s/n, knit st. s/n to the end of the row. 8 next row knit st. s/n, until there are 16 stitches left to the mark, knit 2 half stitches. s/n, 2 tbsp. b/n, 25 conn. tbsp., 2 tbsp. b/n, 2 half-st. s/n, knit st. s/n to the end of the row. In the next row, knit st. s/n, until there are 19 stitches left to the mark, knit 2 half stitches. s/n, 2 tbsp. s/n, 31 connection tbsp., 2 tbsp. b/n, 2 half-st. s/n, knit st. s/n to the end of the row. Next, knit each shoulder separately with s/n stitches, knitting 2 tbsp in each row from the neckline. s/n together. Knit in this way until the shoulder width is 24 (25) 25 (25) 25 cm. Next, knit without decreasing until the same number of rows of s/n stitches are completed as on the back. Cut and secure the thread. Tie the second shoulder symmetrically.
Assembly: sew shoulder seams end to end. Sew the side seams, leaving a 14 cm high slit at the bottom and a 29 (30) 31 (31) 32 cm high sleeve opening at the top.
Sleeves: attach the thread to the edge of the armhole in the armpit area. 1st row – dial 4 air. rise p. (= 1 tbsp. s/n + 1 air p.), *knit 2 tbsp. s/n under air. n., 1 air. p.* repeat *-* along the entire edge of the armholes, at the end of the row knit 1 tbsp. s/n under air. p. and close the row of connections. Art. to the 3rd air. lifting point. 2nd row – 3 air. lifting item (= 1 st s/n), 1 st s/n under air. n. of the previous row, * 1 air. p., 2 st. s/n under air. p. of the previous row* repeat *-* at the end of the row knit 1 air. p. and close the row of connections. column. 3rd row – dial 3 air. lifting item (= 1 tbsp. s/n), 1 tbsp. s/n under air. n. of the previous row, 1 air. p., *1 tbsp. s/n under air. n. of the previous row, 1 air. p., 2 tbsp. s/n under air. n. of the previous row, 1 air. p.* repeat *-* close the row of connections. column.
Repeat the 3rd row until the sleeve height is 6(6)7(7)7 cm. In the next row, knit 3 air. lifting item (= 1 st. s/n), 1 air. p., *1 tbsp. s/n under air. n. of the previous row, 1 air. p.* repeat *-* close the row of connections. column. Repeat this row 2 more times. Then tie the bottom edge of the sleeve as follows: dial 1 air. p., knit 1 tbsp. b/n under air p., ‘knit 7 tbsp. s/n under the next air. p., 1 tbsp. b/n under the next air. p.* repeat *-* knit 1 tbsp. b/n at the end of the row. Cut and secure the thread. Lightly steam all seams.
Tunic "Lacy hyacinth" with boat neckline
The original “Lacy Hyacinth” tunic is made with an interesting pattern consisting of lush columns and double crochets.
Tunic size: 46-48
Materials:
- 450 g yarn (100% acrylic) bright blue
- 2 buttons for covering.
- Hook No. 3.
Fantasy pattern: according to scheme 1.
Button: according to scheme 2.
Knitting density: 10 cm = 23 p.
Description of the process of knitting a tunic
Back: cast on a chain of 113 chain stitches and knit according to pattern 1. At a height of 51 cm, mark the armholes and elm on both sides with a thread of a contrasting color. directly. At a total height of 72 cm, taking into account that the last row of sts should be knitted. b/n, having received 20 stitches for each shoulder and 73 stitches for the neckline, finish knitting.
Before: Knitted similarly to the back.
Assembly: pin the details onto the pattern, moisten and let them dry. Sew shoulder and side seams.
For the belt cast on a chain of woven fabric about 130 cm long and tie it with 2 rows of st. s/n.
Knit 2 buttons: according to pattern 2, knit from the 1st to the 4th row, then insert a button and complete the remaining 3 rows. Thread the belt through the loops of the pattern along the waist line and sew 1 button on each end of the belt.
Openwork tunic with a straight boat neck
A wonderful tunic, made with an openwork crochet pattern, and it is knitted very simply. The product can be worn in the summer with a swimsuit, in the spring with jeans or leggings.


