I am glad to welcome lovers of creativity and lovers of contemplating beauty!
Finally, I did a master class on modeling from polymer clay and now I’m ready to show you how I do THIS and how my jewelry is created!)))
I will say right away that I indicated the time VERY approximately, because... I usually work on one project for several days due to lack of time. Being a mom is already a job, but a mom of three kids is a 24/7 job))))))) So I work (and I can’t help but create) mostly at night and the product is born in several stages, so I can’t say definitely how long It took me a while to make these beads)))
So, we will need:
polymer clay in several colors
acrylic paints
varnish for polymer clay
toothpicks
blade (for cutting clay)
coarse sandpaper
waxed cord
wood beads
accessories
Let's start by deciding what style the work will be in and roughly what we want to get. I rarely draw sketches, I often experiment and work on a whim, unless the work is commissioned. We decide on a color scheme, ornament and... let's go!))
I start with the ornament itself. Making sausage)))) I will not describe this process in detail, because... There are a lot of lessons on this topic, so I’ll only show step-by-step photos, and those who want to will find a detailed description on the Internet)))


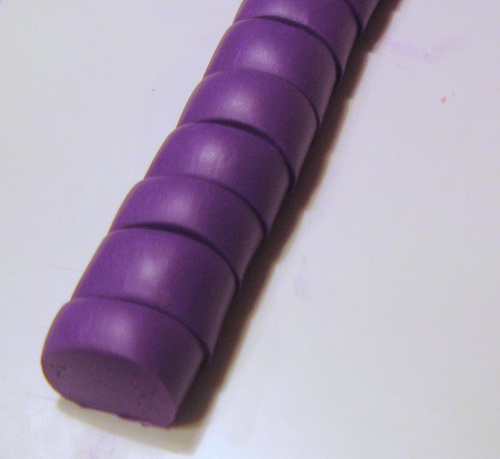
We squeeze our sausage, starting from the middle

This is what happened))

Set the sausage aside and prepare the base beads. We make balls from clay scraps. I have them all of the same size (this is how the beads were originally conceived), but this is not at all necessary, it all depends on the imagination of the creator!)))

Now we “stick” each ball with the main color of the bead (I have chocolate). This is all done solely in order to save clay; you could simply roll balls of clay of the main color and that’s it, or you can use wooden beads as the base beads, then the design will be much lighter (for NOT lovers of heavy jewelry). This time I did it like that)))


Now our base beads are ready, let’s start decorating them! I make semblances of hats from black clay


Now it’s the sausage’s turn... I cut the sausage into circles and glue the ornament to the beads


I intentionally do not compare the pattern with a bead, I do not make it smooth and round, but if you want, you just need to roll the bead between your palms and roll out the pattern))
At this stage I place beads on toothpicks

You can leave it like that, it’s already beautiful)), but I’m a fan of tinting, so let’s move on!)))
Using tubes of different diameters (anything that comes to hand, from ballpoint pens to straws, only the required diameter is important) and a blade, we create a texture - stripes, dashes, etc.


And we send it to bake, as written in the instructions for the clay you are using.
Again, you can stop here and go straight to tinting, but again this is not about me)))
I arm myself with coarse sandpaper and...

I start scratching the beads mercilessly))

This is what I did with them!!!)))

Well, now tinting! We take white acrylic paint and completely paint over our beads

iii... oh god, what have I done! covered up all the beauty!!!))) This is what happens

Until the paint is completely dry (it should dry, but not dry, otherwise it will be very difficult to remove), wash it with a damp cloth

I really like to experiment with tinting and I didn’t miss this opportunity))) These beads seemed a little boring to me and I decided to add a little ocher and black... just a little, in places

Again, it’s up to the master’s taste! Who likes what))) We erase the paint again and admire it! If the result is not satisfactory, then we tint again))) As a last resort, you can cover everything with white paint again and erase it, or you can use sandpaper to help get rid of the excess tint)))

My beads are ready for varnishing!

I would like to remind you that we use varnish ONLY for polymer clay, because... Other varnishes may take a while to start sticking, and some varnishes will never dry at all! and all the work will be ruined!!!
By the way, you don’t have to varnish it, it’s just that then the beads will be less bright, which in some cases is even good (for example, I don’t varnish aged beads or “stones”)
Hooray! The beads are dry, you can start assembling!
I assembled my beads on a waxed cord using wooden beads (who knows what, a complete flight of fancy)))

All that remains is to attach the clasp and trim the ends, which is what I did! I love that handmade work was as handmade as possible, and that’s why I don’t like to use factory fittings, so I decided to make a hook clasp from copper wire - I twisted it, beat it, covered it with a patina and secured it! I will not describe this process in detail, because... this is a completely different topic, but you can find how to fasten the clasp on the Internet))

I had a couple of beads left and made earrings to go with it! Here is the result! We love it!!!)))


Thank you for your attention! I hope that my experience will be interesting and useful)))
I wish you creative success and a great mood!!!
Polymer clay is a relatively new material in the fashion jewelry industry. A stunning rich palette, unique plasticity, and environmental safety make clay one of the most popular materials in creating bright and original hand made accessories. In its structure, clay resembles plasticine; working with it, pleasant childhood memories appear, the master receives real anti-stress and relaxation. From the first day, and without a specialized art course, you can learn how to make jewelry from polymer clay with your own hands at home. All you need for work is several layers of colored clay, and toothpicks, a stationery knife, and a rolling pin will act as professional assistant tools.
Basics of Craftsmanship
Before you begin the creative process, you should choose the right material. The main selection criterion is quality. Undoubtedly, there are proven foreign manufacturers, but their prices are unaffordable for many. There are several analogue brands on the market at an affordable price and decent quality. You don’t need to buy the entire color palette presented; it’s enough to buy a few basic shades of clay and then mix them to create original combinations.
Polymer clay setImportant!
Jewelry made from polymer clay must be baked; this can be done in a standard household oven.
For clay jewelry, you need to stock up on a whole arsenal of accessories: earrings, fastening and decorative elements, and much more.
 Set of accessories for jewelry
High-quality polymer clay is a pliable and pleasant material to work with. For exclusive collections of beautiful and fashionable jewelry at home, it is enough to learn how to make simple basic elements. We offer several simple lessons for beginning craftsmen.
Necessary materials for modeling
Learning to make kane
Kanes, or sausages, are one of the main types of blanks for making plates, beads and other jewelry elements. By experimenting with clay colors, creating various patterns, bright, rich, original masterpieces are born in the skillful hands of needlewomen.
 Kane in the form of an orange
 Ready-made fruit bracelet made from oranges
 Multicolored Kane Beads
We suggest making a simple cane for elegant jewelry in a black and white palette. To work, you will need blocks of material in pure black and white, a stationery knife or a sharp plate for cutting, a rolling pin or glass bottle for rolling out the “dough,” and a press for squeezing. Experienced needlewomen recommend working with medical gloves. This will allow you to work carefully without leaving fingerprints on the delicate texture of the clay.
Let's start the sculpting process:
- Roll out two identical blocks into two square-shaped sheets 0.5 centimeters thick.
- We fold the layers one on top, then cut them in half and fold them again one on one.
- We stretch our “striped sandwich” into a “sausage”, and then scroll it so that the stripes look like a spiral.
- We place the workpiece in the press, squeeze out the sausage, which in cross-section has a beautiful striped pattern.
- We cut the kane into plates and start sculpting the decorations.
 Black and white kane
Kane millefiori made of polymer clay
In this simple way, you can make a variety of blanks, with unique patterns and color combinations in the section, for designer collections of original costume jewelry.
Lemon sausage made from polymer clay
Master class: Gzhel kane made of polymer clay
Making beads
The simplest and most indispensable blank for necklaces, earrings, beads and bracelets are smooth, patterned, bright beads. Knowing the algorithm and secrets, it is easy to make such elements for stylish jewelry from polymer clay.
 Stylish jewelry made from polymer clay beads
 Colored bracelets with large beads
We invite beginning craftswomen to create beads with a beautiful pattern:
- Let's prepare several blocks of clay for the beads: white, green, golden and sunny yellow.
Advice:
To create a beautiful and clear pattern on the surface of the bead, you need to use clay of several shades in your work. At first glance, it may seem that the pattern is drawn with a brush and paints; in fact, the whole secret is in sculpting and mixing shades.
- We will sculpt a delicate spring pattern in the form of a daisy. From white clay we make a sausage with a diameter of 4 centimeters. To get a beautiful halftone of the design, separately roll out gray clay into a thin layer and wrap the workpiece. Wrap a thin layer of green over the gray shade. Be sure to remove everything unnecessary so that the drawing turns out clear.
- We make cuts on the white part of the sausage with a knife or a metal ruler. In total you need to make three cuts, retreating at equal intervals.
- We insert thin gray plates into the cuts and gently squeeze the sausage so that the air layer between the parts disappears.
- We cut the long sausage into several parts, their number depends on how many petals your chamomile will have.
- Separately make the middle of the flower. Roll the yellow block into a sausage, wrap it in a golden layer, press it and roll it again.
- We attach all the petal blanks around the middle sausage to make a beautiful daisy. We fill the voids between the elements with green clay. We roll again so that all parts of the workpiece are tightly compressed together, but the beautiful pattern is not broken.
- Cut the chamomile sausage into thin slices. Roll a round bead out of polymer clay, cover it with chopped “daisies” and roll into a ball. The result is a beautiful bead with a delicate spring pattern.
By showing your creative imagination or using ready-made patterns from craftswomen, you can create any patterned jewelry with your own hands in a similar way.
Tube beads
Making handmade jewelry from polymer clay can become not only an exciting hobby. Stylish, original, bright DIY polymer clay jewelry is in incredible demand among fashionistas, so it’s easy to turn your favorite hobby into an idea for a profitable home business.
Polymer clay - PANDORA style beads
Imitation stone beads made of polymer clay
Nowadays, bud beads made of polymer clay are very common online. There are also master classes on them.
The most common version of modeling is on foil, when before baking the flower is formed on a ball of foil, inside of which there is a folded napkin. After baking, the foil is unrolled and the napkin is removed.
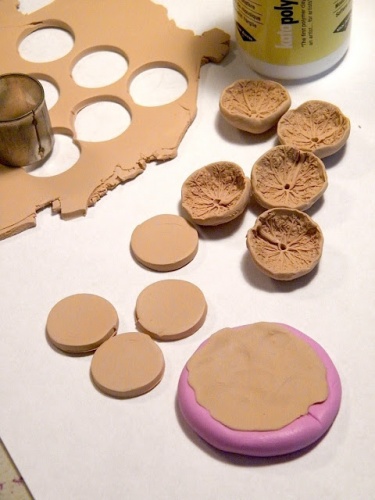
Today I want to show what I thought was a simpler method. In any case, it is faster, since you do not need to roll balls of foil and napkins.
For sculpting you need medium soft clay, I use it, a toothpick, a regular bag, a piece of corrugated paper, a sushi stick, a round or shaped mold.

Roll out the clay to approximately medium thickness in a pasta machine (I have number 3), cut out the blanks with a mold. If you don’t have a flower-shaped mold, use round molds or any other shape, they all turn out beautiful:

We wrap the bead in a bag and level the workpiece on the ball.

I wrap the bead in corrugated paper and roll it a little in my hands, trying not to press it on top, but pressing down more on the edges to make them thinner.

I take off the paper and take out the bead.


Then I carefully take out the bag.

I trim the edges and round them a little with my finger. Use a toothpick to make a hole for the cord. I bake at the temperature indicated on the package. (Chinese clay has a temperature of 125-130 degrees).


I try on the approximate size of the thread for the necklace and unwind it according to this size. I have a chair that fits this length, I stretch the cord between the legs. I connect the ends of the cord and fasten it at the junction; you can simply wrap it around the cords several times:

I stretch the pin into a large cap, fold it into a ring, and attach the clasp to the ring. The assemblies were made separately from above:

Remember that the toggle ring can be attached directly to the beads, and to attach the wand you definitely need a piece of chain or a pin with small beads so that the wand can freely turn around its axis, otherwise it will not fit into the toggle ring:

We tie the beads themselves onto cords; for the photo I took a contrasting thread. We make a knot on a piece of cord, string a bead, tie a knot on the cords, string a second bead, and secure it with a knot. Thus, it will no longer be possible to untie these beads; we cut the ends of the cord. For beauty, I also selected different sizes:


Content
Many different types of needlework occupy all creative and talented craftsmen today. Polymer clay is a relatively new material, but it has already proven itself and is loved by many needlewomen. You can make many different products from clay, the variations and varieties of which can be tired of listing. However, beads made from polymer clay are the most popular, because by making them with their own hands, every girl can not only show her creative abilities, but also add zest to her appearance.
Making beads from polymer clay with your own hands is not at all difficult; even children can participate in the process. This is a soft, flexible and easy-to-work material that allows you to make a wide variety of bead options. The only drawback of polymer clay is the impossibility of making identical designs, because different colors can appear differently. But on the other hand, this can be considered a plus, because the result is a bright and unique product that no one else will have.
Tools for making jewelry
Polymer clay is a material that requires different variations of working with it, which means the presence of certain tools. Of course, in order to make it easier to work, and if you plan to make more than one product, but do handicrafts constantly, you need to purchase special devices and tools.
Among the main necessary assistants in the work are:
- plastic spatula;
- sharp knife;
- roller or rolling pin;
- modeling board;
- clay varnish;
- extruder for producing geometric shapes.
You should only purchase tools when you are sure that the process is exciting and enjoyable. For your first experiment, you can try to make a product from improvised materials without spending extra money on professional tools. At the same time, in the process, you will understand why it is inconvenient to work and what you need to purchase for the future.
Master class for beginners
For your first trial lesson on making beads from polymer clay, you can take a simple, but at the same time original and bright product.

These beads are made from polymer clay in two colors. It is advisable to take plastic with glitter, and rhinestones and inserts of purchased glass beads will make them even more original and expressive.
The first step is to roll out the two colors of sausages, trim small pieces and form into balls.

The sizes of the cut pieces should not be very large, depending on what kind of beads you want to get in the end. It is important that they are all the same size, so you can use a ruler or centimeter.

A sausage made from polymer clay of a different color is cut in the same way.
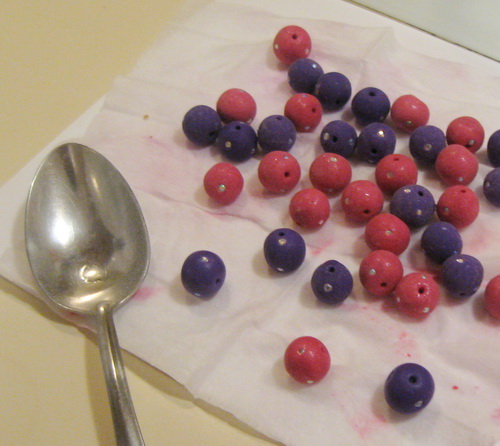
Before the plastic hardens, you need to insert rhinestones inside. Two or three pebbles for each future bead will be enough.

When inserting rhinestones into the balls, you must immediately make holes through which the beads will then be strung on a thread. The end result should be a lot of shiny beads.

Next, the beads must be boiled in ordinary water so that the material hardens and the shine does not wear off over time. To do this, use a regular saucepan, place the beads in cold water, bring to a boil and keep on low heat for 5-10 minutes.
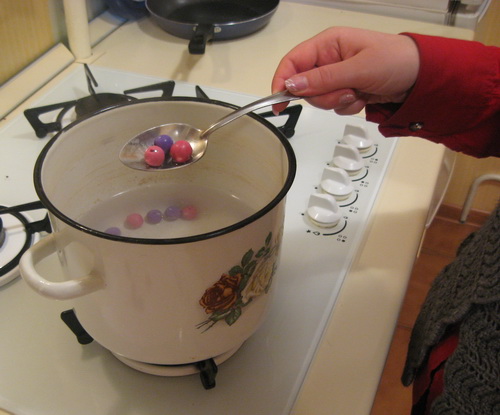
After this, the beads must be removed from the boiling water and placed on a napkin to dry and cool.
Finished beads can be strung on a thick thread or fishing line, diluted with beads or pebbles as desired. The number of additional elements and options for combining colored beads depends on the wishes of the needlewoman and may vary depending on the availability of materials.

Simple, but bright and beautiful beads are ready.
Master class on making beads for an experienced craftswoman
If the process of making products from polymer clay is fascinating and brings pleasure, you can further improve your skills and technique. For example, make beads from such unusual and original beads that resemble the inside of a nut shell.

Despite the fact that such beads look very unusual and may seem difficult to make, they are made quite quickly. The uneven texture is achieved through the use of a relief blank, which will leave imprints on the clay circles.
To make beads, you need to take plastic, roll out a separate piece into a sheet 5-6mm thick, no thinner. Using a metal cylinder, cut out circles of the same size.
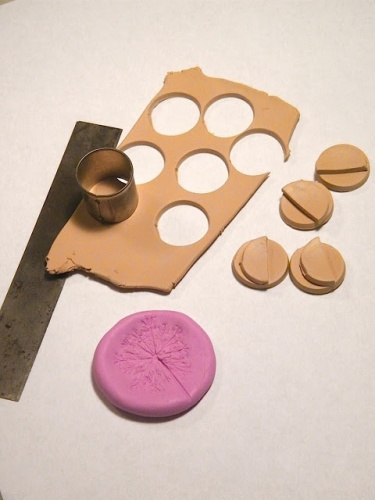
When making a print using a relief blank, you need to immediately make a hole for the thread.
To make an ornament, any sausage made of polymer clay is suitable. Today we will make a new cane with a simple flower. If you have any other drawings, you can use them.
For this work I used 4 colors of polymer clay:
premo blue-green with mother-of-pearl effect, scalpi soft pink, premo purple, premo pink mother-of-pearl, rolling pin, knife. Before working, knead the clay thoroughly.
We wrap a piece of pink with a thin layer of purple, we get a simple sausage that needs to be compressed to a length of about 60 cm. When wrapping, cut off the layer of clay so that they fit together without gaps or layers
After squeezing, cut off a piece of sausage approximately 3-4 cm long. Wrap it in blue. According to the plan, I need to make a thick layer of blue. I do it in two steps, in two layers, so that it turns out neat, since it is more difficult to wrap a thick layer of clay than a thin one.
After this, we cut the remaining cane into as many pieces as possible and place it around the blue sausage, inserting thin light pink tubes into the gaps. In this photo, the size of the sausage is much larger than the natural size, so that the pattern is clearly visible.
Wrap it in a pink layer.
We squeeze the resulting sausage, cut off a part with a cut diameter of about 1 cm, and squeeze part of the sausage into thin pieces about 5 mm in diameter. We put them side by side, put thin tubes between the sausages, with even pink layers on top and bottom.
Press the resulting structure lightly with your fingers to allow excess air to escape. We make 2 cuts from a round sausage and one cut from a flat sausage. We wrap the beads prepared in advance from light pink with slices. If the cut of a flat sausage is too long, you can compress it, stretch it in length and slightly compress it in width.
We roll the beads in our hands; gloves are required, since the pink one gets dirty very quickly. Before baking, I make holes with a toothpick, first on one side and then on the other side. This is how the beads turned out:
And I made these beads in the process of recycling sausages. Here, on the black background of the sausage from the lesson, there is a black and white flower, on the burgundy background there is a center of poppies, on the brown background there are the remains of the sausages from the last lesson with flowers. The side pattern is almost invisible when the beads are tightly assembled, but they are not assembled yet; you can play with the intermediate beads in the decoration.
If you find the lesson too difficult, don’t be alarmed; the main thing is to start. It doesn’t take too much time, it’s a meditative, calming activity) Sometimes I see that beginners want to simplify the task and make simple geometric sausages, and then get upset that they didn’t work out. Making an even geometric sausage is more difficult than making a sausage with a small floral pattern. For those who are trying to sculpt for the first time, I suggest you familiarize yourself with


