DIY cold porcelain crafts
Cold porcelain- this is a very malleable material, so even very small products can be sculpted from it. Of course, other materials may be suitable for modeling, for example, salt dough or polymer clay, however, they need to be baked in the future, and porcelain hardens in the fresh air after 2 days. It is convenient to work with him, so needlewomen are very fond of this material. You can look at the cold porcelain recipe on our website, and in this article we will tell you how to make a spring bouquet of flowers.
Materials for making flowers:
- plastic spoons;
- cold porcelain of several colors;
- a form for cookies;
- cutting board;
- wire;
- knife;
- rolling pin;
- green tape
- plastic grass;
- a basket for a bouquet.
DIY cold porcelain crafts
1. To create a beautiful flower bouquet, you will need cold porcelain of different colors or you can use a solid mass.
2. Roll out porcelain in the same way as dough. Cut out the petals with an iron mold. You can make your own from a beer can or use a cookie cutter.

3. If you are working on a glass cutting board, press each petal firmly against it and get a nice texture. You can also press it against another corrugated surface.
4. To make the petals arched, place them on disposable plastic spoons.
5. Wrap the wire with green tape - these are our stems.

6. Take yellow or orange porcelain. Also roll out and cut into small triangles.
7. Finely cut the base of the triangle, roll the triangles into tubes and you will get beautiful pistils.

8. From yellow porcelain, stamens must also be fashioned. Additionally, coat them with PVA and dip them in fine corn grits to create the effect of pollen.
10. In two rows, 6 petals are glued to the stem.

11. Cover the stem with green porcelain and hang the flowers so that they dry and do not change shape.
12. Ready-made flowers are placed in a basket, or simply collected in a bouquet and tied with a ribbon.

From cold porcelain you can make not only crocuses, but also tulips, roses, lilies of the valley and other flowers. It is not necessary to paint porcelain during the preparation of the mass, you can then cover the finished products with oil paints. Caring for porcelain flowers is simple, just blow on them with a hair dryer to fly away the dust.
Watch a video on the topic: do-it-yourself cold porcelain flowers crafts
Porcelain crafts do not lose their shape and do not crack over time, so they can become a beautiful interior decoration or durable.
In the age of technological progress, when the industry overflows the shelves with goods and there are no problems with the purchase of finished products, a person wanted to create with his own hands. And the Internet unites all creative people into communities. So, there were many needlewomen who were carried away by cold porcelain. Those products that they produce and demonstrate on their pages on the Internet are very beautiful. A flower made of cold porcelain or polymer clay is sometimes impossible to distinguish from a living one!
No one argues that for such creativity one must have the ability to draw, sculpt. But who said it can't be learned? It is enough to make the first products according to the proposed master classes. When the mastery of technique comes, the ability to mix colors and an understanding of the behavior of the material, then ideas for further creativity will come. The easiest way is to buy ready-made and try it in action. But still, flowers are more beautiful from
Today, on the Internet, many needlewomen demonstrate their talent and products created by them. Seeing this, I want to try to do something similar. For a hobby, you will need some tools and materials. This:
Devices with different tips;
Roller for dough;
Forms for cutting;
Wire of two types;
floral tape;
Scissors.

To make a white rose that will not differ from a living one, you will need a special form. Petals roll out on it: they become as similar as possible to pink ones.
DIY Material Recipe
You can buy ready-made, or you can make your own porcelain. Flowers, the manufacturing master class of which is described below, are molded from a home-made mixture. In order to cook porcelain at home, the following materials are required:
Starch, maybe corn;
PVA glue;
Oil for children "Johnsons baby";
Vinegar or lemon juice;
Oily hand cream.
Starch and glue are taken in 240 grams, the rest of the ingredients - 2 tablespoons or 50 grams each.

Cooking sequence
All ingredients are mixed in a bowl and placed in the microwave for 30 seconds. Then the mixture should be taken out and mixed well. The action is repeated three times. The last time the mixture will become so thick that it can hardly be stirred.

In this state, it is transferred to a cutting board, greased with a fat cream, and thoroughly kneaded until elastic. This is how cold porcelain is prepared and other products made from it do not need to be heated or dried under special conditions: they dry out, being open, in the air.

Therefore, it is necessary to ensure that the prepared mass does not lie open before sculpting. The finished product is tightly wrapped in foil and stored in the refrigerator. To sculpt a flower from cold porcelain, it is enough to take a small portion of the material. Close the rest and place back in the refrigerator. There are several other recipes for preparing the mixture, but this one is optimal and easy to manufacture.

MK: cold porcelain, flowers
The finished material is white. But for sculpting products, it is required to give it a certain color. You can use oil paints for this. Some needlewomen add color to porcelain by adding cosmetics to it: blush, shadows. A little dye is added to a small amount of the mixture and mixed well so that the color becomes even and the desired shade. In its consistency, it resembles plasticine, but which hardens.

When cold porcelain is ready, flower molding is very fast. For this, a blank is made of wire, napkins and PVA in advance: a bud for a future rose. Rose petals will be superimposed around it. Before starting work, hands are generously lubricated with cream.

Sculpting rose petals
A small piece of the mass is plucked off and rolled in the palms. Then it is kneaded, given the desired shape, the excess is cut off. Using a tool with a round tip, the edge of the petal is smoothed. It is made thin: much thinner at the edge than in the middle. Sculpting flowers from cold porcelain is a painstaking task that requires patience.

You can make the tool yourself: a bead is put on the tip of a wooden skewer, which will play the role of a stack. The resulting small petal is smeared with glue and applied to the workpiece. Excess glue is wiped off. It is necessary to make several small petals that completely cover the bud.

Next is a line of large, blossoming petals. They will be of medium size and should be glued so that they go one on top of the other. The upper ones are the largest petals; a larger cake is rolled out for them. They are also brought to the condition of the bead.

If there is a relief form, then on it. Or you just need to apply notches. The cold porcelain flower is assembled and should be sent to dry. It is recommended to place the rose head down, hanging on a wire stalk.

Stem and green leaves
To decorate the so-called greens, you need a mass of green. It can be purchased, you can add a little paint to your white porcelain and knead until the color is evenly distributed. There are special molds for leaves, they can be used.

It is rolled out on a board smeared with cream, a layer 1 - 1.5 mm thick. Leaves are squeezed out using a mold. Notches should be made on them and give the appearance of real, living leaves. When making flowers from cold porcelain, you need to stock up on thin wire, on which the greenery will be glued. The wire is wrapped around cooked. The tip is smeared with glue and pressed into the porcelain leaf. Excess glue is wiped off with a napkin. The leaf is then attached to the stem of the rose.

Some needlewomen use elements from artificial flowers in their work: they press the sheet against porcelain so that the relief is printed and the leaf looks realistic. They are shaped by the stack. When all the parts are attached to the stem, it should be completely wrapped with floral tape and all fasteners should be hidden.
Cold porcelain flower
The finished product should be left to dry. When the rose is dry, it can be varnished. But I want to note that fresh flowers do not have shine. Therefore, varnish can give out their artificial origin. The finished product can be left as is, with a matte surface. It all depends on what these flowers are for. If you put it in a vase, then not everyone will understand that this product is molded from artificial material. Lacquered for decoration.

Having prepared several roses of different sizes, you can make a beautiful decorative bouquet from them. For this, satin ribbon bows are added and a bouquet is assembled, which is beautifully tied.
different types of flowers
There are several recipes for making cold porcelain at home. Flowers, the master class for creating which is described above, is just the beginning of an interesting hobby. Having mastered the technique and all the nuances, the craftswoman can no longer stop: after all, there are a huge number of flowers in nature and everyone wants to be captured in fine porcelain!
In addition, passion will always help solve the problem of a gift: after all, no one remains indifferent to porcelain products. And what is done with your own hands is exclusive works. It is difficult to repeat the made flower: each one is special.

Additional Porcelain Recipe
Many use the first version of the recipe. But some get a mass that is not elastic enough or cracks when it dries. Therefore, you can use another method of making porcelain, in which two ingredients remain unchanged. This is cornstarch and PVA glue. They are taken in equal quantities: for a full serving - 250 grams each. 50 grams of glycerin and 50 grams of vinegar or citric acid are added to the mixture. Everything is mixed and heated in a water bath with constant stirring.
When the mixture has cooled down a bit, it can be kneaded until elastic. The board and hands should be generously greased with a greasy cream. As in the first case, the finished mass is hermetically wrapped in a film and stored in a cold place.
Beautiful flowers that are obtained from this material can decorate a home, making it stylish and original in its own way. Gradually, needlewomen begin to make amazing bouquets of different types of flowers: made up of a bunch of lilacs or autumn asters. It can be whole compositions, which are folded according to the rules of floristic art. Passion for porcelain is a beautiful and original hobby.
Cold porcelain is the most accessible, inexpensive and very convenient material for modeling.
It is completely safe to work with it, and to create crafts you do not need special skills in sculpting, even a preschooler can sculpt from porcelain.
You can make cold porcelain with your own hands at home.
Do-it-yourself cold porcelain: a recipe for making
There are a great many recipes for making cold porcelain, and each master has his own secrets and components. They have one thing in common: this is PVA glue (white, construction), 1 part, 1 part of starch (it is recommended to take corn starch), 2 tablespoons of glycerin (sold in a pharmacy), 1 table. a spoonful of baby cream (or any other).
Glue is poured into a pan or saucepan, cream is added, the whole mass must be continuously mixed with quick movements, the saucepan is put on fire to heat, starch is gradually poured out, and stirring continues.
The mass thickens almost immediately, and will resemble unmixed dough, gradually a “snowball” is obtained in a saucepan, it must be put on a surface greased with cream and allowed to cool slightly. Then, the mass is kneaded until smooth. In this form, the mass can be stored for up to 2 days, but it is better to use it immediately.
Cold porcelain as a material: do-it-yourself crafts for beginners: a master class
Lilac flower making:
To begin with, a white flower is molded, and shades of color are applied later.
The mass dries pretty quickly, so you need to cover it with a piece of plastic wrap after each pinching.
1. Pinch off a piece of mass the size of peas.

2. With the help of fingers, the pea is shaped like a drop.

3. With small scissors, the drop is cut in width, several times so that petals are obtained. Then, gently straighten the resulting petals.

4. The flower comes out in about three approaches, the finished product is shaped with tweezers.
5. For the manufacture of the stem, a wire is taken, cut to the desired length, folded in half and twisted. The fold must be dipped in PVA glue, with a tip - pierce the flower in the middle, and pull the wire all the way. The product is installed in a vase until the glue dries. When the glue dries, the petals need to be closed.

6. We carry out a flower with petals of a different shape. A droplet is also molded, but now not its wide part is cut, but a narrow one. We continue to act step by step, as with the first flower.

7. Another version of the flower is a lilac bud. To do this, the pea must immediately be strung on a wire with glue. Directly on the wire with your fingers, the bead is shaped like a drop. Scissors slightly cut the very top. Everything, the bud is ready!
8. We do this several times until a sufficient number of buds and flowers are created.

9. To get a colored flower, you need to tint the mass during the kneading process. To do this, a piece of the mass is plucked off, a little lilac acrylic paint is dripped inside. It is important not to overfill, otherwise the mass will not mix well. Now you need to knead until smooth.
10. After making a sufficient number of flowers, you need to send them to dry in a place where there are no drafts. Approximately, this will take a day. After drying, the flowers decrease in volume by twenty percent.
11. Now you can collect inflorescences, for this the wire is twisted. Inside the flower, the center is stained with a drop of paint.
12. Leaflets are cut with scissors from a pre-rolled green mass. The veins are made in a stack (sticks for modeling).
13. A bouquet is being assembled. All is ready! You can admire!

Making sakura flowers
1. Sakura is no less interesting to sculpt. For this, two “sausages” are rolled from the mass: unpainted and tinted with pink. White sausage should be twice as big as pink sausage. Now they need to be folded together and shaped into a block. Then, it is cut into cubes.

2. A petal is molded from the cube.
3. Petals are collected in a flower, they need to be fastened with a small amount of PVA. The collected petals are pierced with wire under the stem.

4. Buds are made similarly to lilac buds. Do not forget about a drop of glue on the wire.
5. Sakura sepals consist of five petals, they can be tinted with cosmetic shadows. We repeat the operations - wire, glue, a bud and a sepal are going.
6. A branch of sakura is collected in the same way as a lilac branch. It is necessary to take into account its natural appearance (you can first look at the photos of sakura on the Internet). A brown mass is applied to the twig in a small layer, imitating the bark of the twig. Fingers need to give characteristic cracks and protrusions.

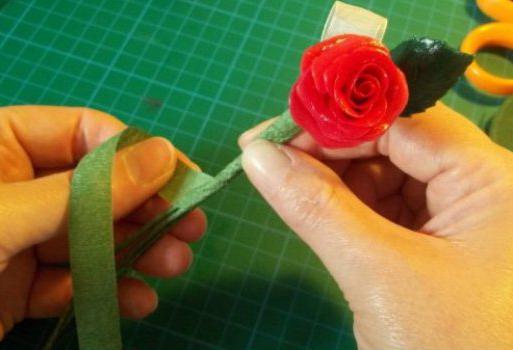
DIY cold porcelain rose
To make a rose, you will need everything in the photo:
1. A small ball is rolled out.
2. A drop is formed from it.
3. The tip of the toothpick is dipped in PVA and the resulting drop is strung on it with a wide base down. This is the base of the flower. For fixation and stability, you need to stick the end of the toothpick into the foam or sponge.
4. It is better to prepare the pistil of the flower in advance so that they have time to dry.
5. We form the ball again. With a finger, the ball is shaped like a drop.
6. On the palm of our hand, we spit our droplet, forming a rose petal. Make sure that the edges are not thick.
7. A drop of PVA is applied to the base of the rose for adhesion and the first petal is applied, it should slightly “hug” the middle.

8. Repeat steps 5-7, forming the desired number of petals. Starting from the second petal, each subsequent petal must overlap the previous one.
9. We look at a photo of a rose flower and adapt to a real flower (we perform tucks and bends in the right places)

From these flowers, you can later make a decorative topiary - a beautiful tree on a long stem. Branches of lilac and sakura can decorate the house, or give to someone.
From cold porcelain, you can make not only flowers, but also various figurines, key rings, panels, decorate flower pots with stucco molding, make interesting bas-reliefs and many more different crafts.
Cold porcelain is an affordable, cheap and most malleable material for modeling today. Working with cold porcelain is absolutely safe and does not require any special skills and knowledge; even a small child can engage in such creativity. You can prepare the material at home, that is, you do not need to run around the shops and look for something special to make your dream come true, the joy of touching art in order to create a unique decoration or piece of furniture with your own hands.
In its appearance, cold porcelain resembles clay or plasticine, but after drying it becomes very hard. When sculpting from it, you can use any type of jewelry, any accessories, from small beads and beads, shells, buttons, twigs or dried flowers, to textiles of any structure - threads or rags left over from knitting, embroidery or tailoring. The surface of the product using the technique of cold porcelain can be painted, sprinkled with small materials (sand, beads), varnished.
The history of the creation of cold porcelain
The history of this material for modeling dates back to the first years of the 19th century, it was at that time that records about it and the first products date back. According to the data, cold porcelain was invented by the Argentines, but there is no exact information about its origin and the history of its invention. There is much more information about the Russian master Ivanov Peter, who worked at the imperial porcelain factory and already at the beginning of the 19th century created unique products from a special type of porcelain. If you believe the archival documents of this St. Petersburg plant, it was Peter Ulyanovich who created the first flowers from cold porcelain. They were intended to decorate perfume bottles and eau de parfum, which was supplied to the emperor and his family.
But there are earlier confirmations of the existence of this material. In Chinese treatises on art and sculpture, there are many descriptions of cold porcelain molding, but it is called differently, but its recipe is absolutely similar to that used by Ivanov Peter.
Features of cold porcelain products
Products made from this material are unusually beautiful, but no less “demanding”. Store or install them away from moisture and direct sunlight. You need to understand that cold porcelain is polymer clay, which is able to absorb moisture and become sour, lose color from exposure to sunlight. Vases with stucco, flowers and other decorations made of cold porcelain should not be placed on a window or near a water source.
In the premises where objects made of this material are located, the optimum temperature regime for them must be observed. If the air is colder than 10º C, then the structure will collapse, as moisture particles in the composition crystallize. High temperatures also destroy cold porcelain - it simply dries out and crumbles.
You can extend the "life" of cold porcelain products with the help of varnish coatings. They not only protect against moisture, but also help maintain the shape, color and gloss of the surface.
What can be created from cold porcelain
Everything can be sculpted from this material - from women's jewelry to small interior items. Hairpins decorated with flowers from this material look very original. For children, together with children, you can make fairy-tale characters, heroes of their favorite cartoons that will decorate their room.
Many creative housewives decorate the pots of indoor plants with cold porcelain stucco, frames, lamps and flowerpots.
Garlands of flowers, greenery, figurines of animals or houses, thematic compositions of cold porcelain will become a unique decoration of the interior. In addition, you can make an original and inexpensive gift for friends or relatives.
How to make cold porcelain at home
Preparing polymer clay for modeling is not difficult. The simplest recipe for cold porcelain is rice or corn starch, PVA glue, glycerin and regular baby cream in a ratio of 1: 1 (a glass of glue and starch) and 2: 1 (tablespoons of glycerin and cream).
Mix the ingredients thoroughly and leave for 10-20 minutes. They will mutually dissolve, and the mass will take on the consistency that is ideal for modeling. In no case should the prepared material be placed in the refrigerator or stored at room temperature for more than 2 hours. You need to sculpt immediately and it is advisable to spend the entire volume of the prepared material.
Some masters add citric acid to the mass. Products made from such porcelain are stored much longer, since the acid creates a conservation effect.
You can find examples of recipes with water content, but such compositions are fragile and not durable. Water, under the influence of external factors, reacts with other ingredients of the polymer clay composition, as a result of which an unpleasant odor may appear, the shape of the product may change, and its strength is significantly reduced.
To change the color, food colorings, chalk are most often used. But the surface of cold porcelain souvenirs can also be painted after it has completely dried, not earlier than a day after the end of modeling.


 Coffee bean frame")


