If you want to distinguish yourself and congratulate your family and friends, then you just need to make such a postcard
A postcard is a universal component of almost any congratulation or sign of attention. It is she who gives a gift as one of the ways of communication, not only with the help of words, but also with pleasant images. Everyone wants to give something not only beautiful and useful, but also unique.
And a handmade postcard will cope with this task in the best possible way. To decorate postcards, they use the scrapbooking technique, the essence of which is to create compositions from special paper, decorations and scrap materials. Scrapbooking can be done by anyone, regardless of age or artistic talent.
The term “scrapbooking” comes from two English words: scrap (scrap) and book (book). Indeed, the first scrap products of the late 16th century, albums, consisted of interesting newspaper clippings with quotes, poems, notes, and sometimes drawings. Later, with the advent of photography, photo albums began to be made using the scrapbooking technique. Today this art is popular among both professional designers and amateurs. This technique is used to make albums, books, boxes, business cards, and, of course, greeting cards.
What materials will be needed for work?
The base for the postcard is made from special cardboard - cardstock, or medium-density paper. If it is too tight, creases will be visible when folded. Pastel sheets are suitable. The sheet size depends on the postcard format, on average it is 15x15 or 13x18 cm, but you can choose any other. To create the base you will need:
- Scrappaper. This is decorative paper that is sold in special sets or one sheet at a time. It can be of different densities, textures (for example, embossed), matte or glossy, with different patterns. In addition, sheets can be single-sided or double-sided.
- Paper for insert. On such a piece of paper you can place small pictures and text of congratulations.
- Decorative elements. You can decorate the card to suit your taste.
Most often used:
- satin ribbons;
- lace;
- stickers;
- rhinestones, buttons, beads;
- flowers made of paper and fabric;
- decorative carnations.
Decor for cards


Advice from the master on what materials are needed for beginners
Tools for beginner scrapbookers
There are a large number of special tools for working in the scrapbooking technique: from figured hole punches and cutters to sewing machines. Beginners are advised to purchase only the essentials and gradually add to their kit.
 What will you need first to get started?
First of all you will need:
- Scissors. They come in regular and curly different types. You can do without the latter at first, or buy 1-2 pairs of the most original ones.
- Double-sided tape: it can be used to secure photos and decorations, except for small parts and background paper.
- Glue: PVA and “moment” will be the most useful.
- Hole punches: curb (they are used most often) or other shaped ones. For beginners, one or two are enough, over time it will become clear what exactly you need.
- Stationery knife. In the future, it is better to purchase special cutters.
- Cutting mat. It is convenient with its centimeter markings, but at the initial stage you can replace it with any thick cardboard or an old magazine.
- Sewing machine. It is necessary for professionals, but you can sew a small amount of stitching by hand using a regular needle and awl.
- Rubber or silicone stamps with ink pads. Beginners are also not recommended to buy them in large quantities; it is better to limit themselves to two or three and add to the collection as needed.
- Rulers. The most suitable for such work are metal ones. With their help you can cut through paper with a knife.
Useful tools part 1
Useful tools part 2
Useful tools part 3
Tips for composing compositions on postcards
The scrapbooking technique for beginning needlewomen is an opportunity to show their imagination and create a unique craft.
 Composition - example for postcard design
However, beginners often make mistakes that prevent them from developing creatively. Therefore, at the beginning of your journey, it will be useful to learn a few simple rules:
- In each composition it is necessary to highlight the main accents, which are also called semantic elements. There should be no more than three of them: for example, in a postcard it could be text, a frame and decoration.
- Don't overload your work with too much decor. This is one of the most common problems for beginning scrapbookers. The best solution would be to limit yourself to just a few elements and place them correctly.
- To create successful combinations from different materials, you need to choose those that have something in common with each other in color, texture or type of pattern. Similar prints on paper and fabric, the same decor with beads and beads will make the work a single whole.
- The parts of the composition on the left and right, above and below must be balanced. If the volumetric decor is only on one side of the card, the composition will look unstable. However, there may be exceptions here when the designer intentionally creates an asymmetrical and slightly pretentious composition.
- Many beginners find it helpful to create simple pencil sketches. One of the simple and winning solutions is to draw straight lines horizontally, vertically and diagonally and place decorative elements on them.
Basic elements of scrap work
Basic elements of scrap cards
Recommendations for scrapbooking cards for beginners usually include five basic elements for future work. These include the main photograph or picture, a background for it, small decorations, an inscription (magazine) and a title. For journaling, special cards, films are often pasted on, or the field is marked with a stamp.
Live cards


Beginners can purchase special sketches. These are cards that schematically depict the most successful options for arranging scrap elements on a postcard. It is not at all necessary to follow the proposed layout exactly, but it will give a general idea of how to make the composition harmonious.
Stages of making a postcard with your own hands
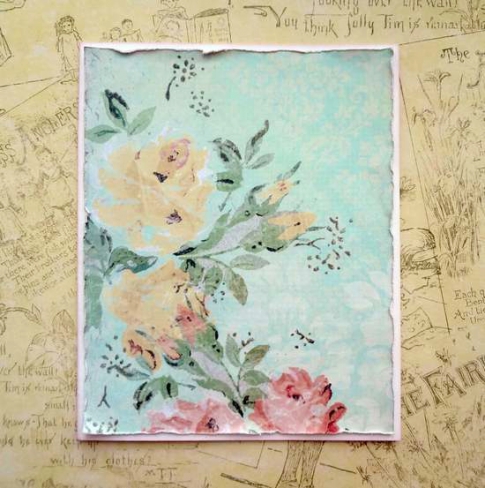
Let's look at scrapbooking step by step using a specific example. This card is interesting because its base consists of 2 types of scrap paper in contrasting shades. The size of the finished postcard is 20x20 cm.
- We cut out two blanks for the base measuring 10x20 and 11x20 cm.
- Draw a line along the long side of the larger rectangle, retreating 1 cm. Glue the second rectangle.
- Along the glue line we sew the base with two different threads in the color of the paper so that they go crosswise. Use an awl to make holes. We glue the ends of the threads from the inside out.
- We will use a white rectangle 9x12 cm as a background for the photo. Then we cut out three more rectangles from different scrap paper: 8x10, 8x16, 7x13 cm.
- We mark the location of the rectangles and the backing on the postcard, retreating two centimeters from the left and bottom edges, and one centimeter from the right and top edges. Before gluing, be sure to try on all the elements. To make the work more voluminous, we glue the rectangles onto pieces of cardboard or glue pads.
- We decorate the card (except for the white backing) with any decor at our discretion. These can be paper flowers and butterflies, beads, rhinestones and beads.
- Glue a small signature card to the bottom.
- In addition, we decorate small squares (2x2 cm) with small flowers, buttons, hearts and glue them at the bottom of the craft.
- For the title, cut out several ovals of different diameters, glue them together and glue them in the upper left corner. The inscription can be made by hand or in cardboard letters.
- Add a photo and signature.
 We make a card to your liking
Postcard - DIY photo frame
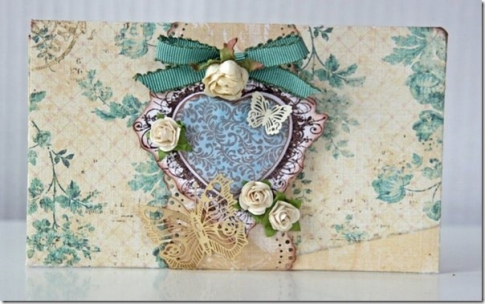
Making wedding scrap cards
This master class will allow you to make a gift for the newlyweds with your own hands.
 A voluminous postcard always looks very meaningful and beautiful.
You will need watercolor paper, sheets of scrap paper in pastel shades, satin ribbons and lace (white), and suitable decorations to suit your taste. In addition, you need PVA glue and a glue gun, a knife, a ruler with a pencil, ink and a sponge for applying them.
- We cut out a 25x15 cm base from watercolor paper, make 2 folds, measuring 3 cm from the bottom and 8 cm from the top.
- We cut the scrap paper into small rectangles of different sizes. You can also print the inscriptions or make the inscription yourself.
- We tint the edges of the rectangles with distress ink. Using double-sided tape, glue the rectangles to the paper, retreating 2-3 cm, and cut them out.
- We glue a ribbon approximately 50 cm long onto the back side of the workpiece.
- Inside and outside (on top of the tape), we glue scrap paper. We paste a piece of paper with lines for congratulations inside (a notebook piece of paper will do).
- We design the front side of the postcard. We glue lace under the ribbon in the center. We glue the remaining paper rectangles on top of the tape.
- We decorate the card with flowers, leaves or rhinestones. The flower can be pinned with pins decorated with beads. Lightly burn the ends of the ribbon and tie them into a bow.
Master class on making a wedding card
DIY postcard for a man
A postcard that a man will really like should be designed taking into account the interests and preferences of a particular person.
 This card will be the most exclusive gift
For example, choose the topic of his hobby or profession. The next master class will tell you how to make a man's card in a neutral style. The decor can be adjusted to your taste.
- Cut out a square of thick scrap paper in a calm dark color (15x15 cm).
- The rectangle of white paper for the background should be slightly smaller than the size of the postcard.
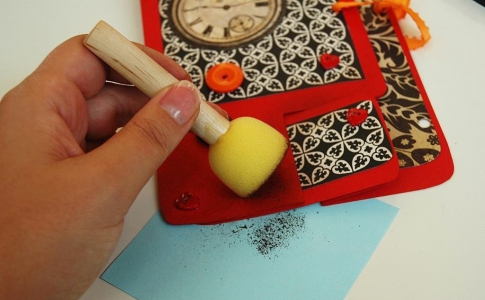
- We perform wet embossing; it will require a stamp, ink, special powder and a hair dryer. Using a stamp we apply a pattern in the form of a research map. Apply powder on top and heat it with a hairdryer. We tint the drawing.
- Cut a strip about 3 cm wide. We make a torn edge for this strip and the rectangle with the “map”.
- We print a small slogan or poem on paper. Cut it in the shape of a tag and tint the edges. We do the same with a small title.
- We put all the elements together, try them on and glue them together.
- We decorate the work with any paper and metal decor (stars, rivets, coats of arms, etc.).
- We decorate the inside with strips of scrap paper with a figured edge and stamps. We make a “window” for the text of the congratulations (ordinary paper with a square or line will do).
An example of a postcard for a man
Scrapbooking is a universal technique that allows you to create cards for all occasions, not only serious, but also humorous. Once you have mastered the basic principles of operation, you can experiment with different styles and materials. This hobby will help you develop your creativity, artistic taste and delight your loved ones with unique gifts.
Agree - without a postcard, a gift seems incomplete and incomplete. She keeps touching congratulatory words that will warm the soul of the recipient long after the holiday. Check out the master classes that will tell you how to make a postcard using the scrapbooking technique for all occasions.
Postcards for all occasions
Many handicrafts keep secrets on how to make a card that will become universal: one can be given both for birthdays, anniversaries, name days, and on March 8, Teacher's Day and other significant dates.
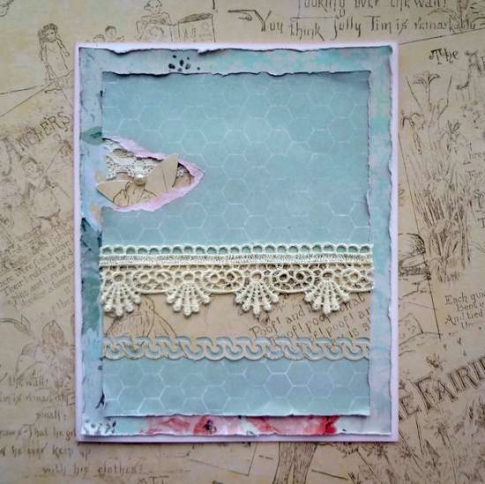
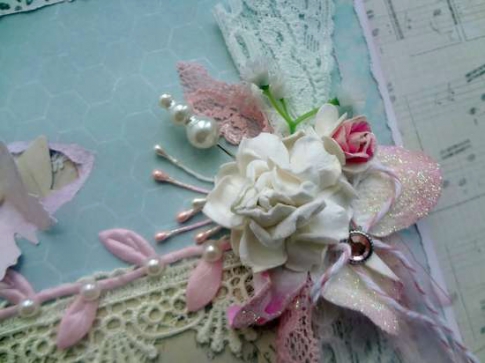
Take note of this way to make a card in the shabby chic style - one of the types of scrapbooking techniques. You will need white thick paper, 2 sheets of multi-colored paper with patterns that match each other, ribbons, lace, curly “border” and “butterfly” hole punches, sandpaper, half beads, stamens, decorative pin, flowers, cord, brads, glue, mock-up mat, pencil, pastel stamp pad.
Prepare the paper: cut out a white base measuring 16x13 centimeters, a backing of colored paper with dimensions of 15.5x12.5 centimeters and 13.5x10.5 centimeters. Take a rectangle of colored paper with sides 10.5 x 4 centimeters and use a curly “border” hole punch along its length.
- Use a pastel stamp to tint the edges of the white base.

- Use sandpaper to give the backing ribs a distressed, distressed look.

- Also tint the edges of the substrates with a stamp.

- Glue the first, larger backing to the white blank.
- Take the second colored backing and make a small pocket in the middle of the left side by casually tearing off a piece of paper.

- Using a second shaped hole punch, make a butterfly. If you do not have such a device, you can cut out the insect yourself. In addition, prepare a lace ribbon. Do not glue the top backing yet.
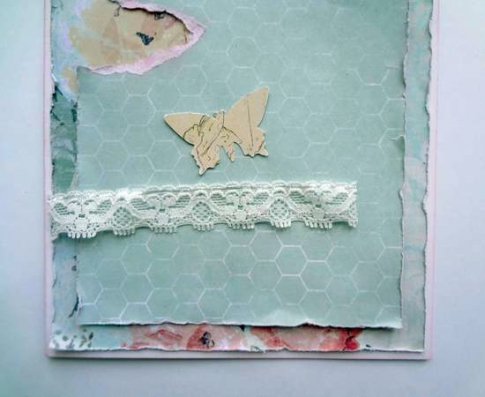
- Attach a butterfly and lace on the left side in the middle. Glue a colored blank on top of them so that the wings of the insect look out. Glue a border in the middle of the top backing, and thick lace on top of it.
- Take several lace ribbons of different colors and widths to make a bun by tying them together.

- Place the ribbons on the right side of the card.
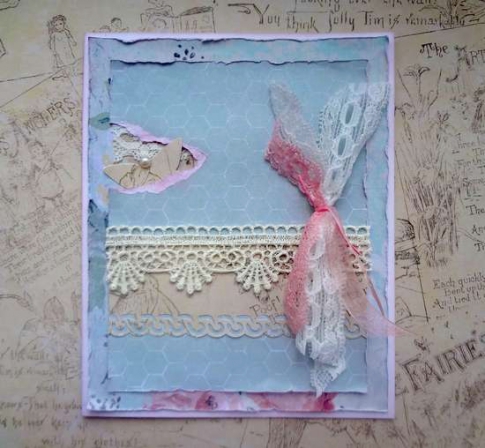
- Glue flower buds of different varieties on top of the lace. Coat the petals with clear glue and sprinkle with glitter.

- Glue the braid with leaves on top of the middle lace. Decorate it with half beads or beads.

- Glue another one on top of the lower butterfly so that its wings stick out in different directions, creating volume.

- Tie a simple cord into a bow and secure it to the flowers using a brad - a brooch with a stone.

- Prepare a decorative pin and stamens.

- Glue decorative elements to the free space.
Your card is ready! Write a text of congratulations on its back and you can give your creation as a gift.

The next video tutorial will tell you how to make 1 more card in the shabby chic style.
Despite the fact that these models are universal, they look very gentle, so it is better to give them to women and girls. Use these tips to make a card for your grandmother, sister or teacher for March 8th, birthday or Mother's Day.
Postcards to loved ones
Romantic gifts are most often accompanied by cards and valentines with pleasant, intimate wishes. Sometimes a beautifully designed letter can completely replace a gift - the confessions in it are so touching and pleasant.
To surprise your other half, learn how to make a romantic card. You can give it for a birthday, Valentine's Day, or for no reason, just to remind you of your love.
Prepare a sheet of thick multi-colored paper, all kinds of ribbons, brooches, beads and rhinestones, a sheet of thin cardboard, scissors, a pencil and a ruler.
- Fold thin cardboard in half. Draw half a heart and cut out the shape along the outline.

- Attach the stencil to multi-colored paper and trace along the outline. Cut out the finished heart.

- Make the same markings on the workpiece as shown in the image. If your heart turns out smaller than in the picture, don’t be upset - the master class shows the approximate universal size.
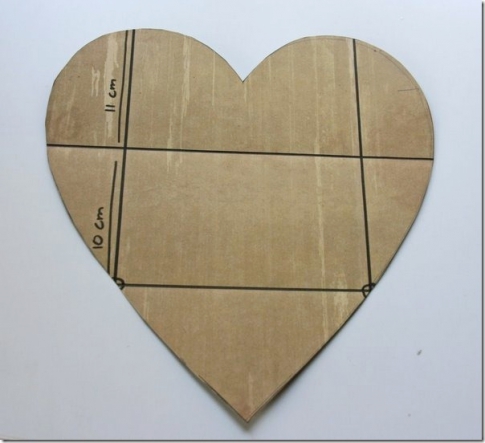
- Start folding the edges of the heart, following the previously outlined markings.

- You should now have an envelope.

Using the skills acquired in the previous master class, make decorations for the resulting envelope - they can be made both outside and inside.
Inside the envelope, write a warm message to your chosen one. Try writing your own poem describing a memorable moment or your feelings to caption the card.
Halloween Ideas
If Halloween's October 31st date is just around the corner, it's time to get ready for the holiday. Start preparing by designing colorful invitations in the form of scrapbooking cards.
Prepare thick double-sided colored A4 paper, a sheet of thin cardboard of the same size, photo clippings, pictures and beautiful images, beads, buttons in colors that match the overall composition, ribbons of the same shades, scissors, a ruler and a pencil.
- Using the diagram, draw a drawing of the postcard on thin cardboard. For a better understanding, the places of folds inward are marked in orange and outward in blue.

- Transfer the main lines onto colored paper, cutting in the right places and rounding the edges of the card with scissors.
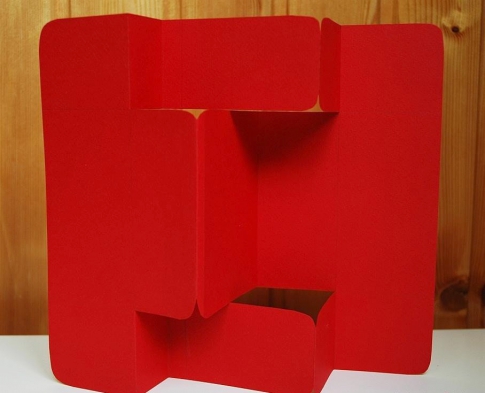
- Prepare decorating elements. In the master class, this is decorative paper with a geometric pattern, cut-out images of alarm clocks and watches, red, orange and black beads and ribbons.

- You can use the card from the master class as an example of design or decorate it as you wish.
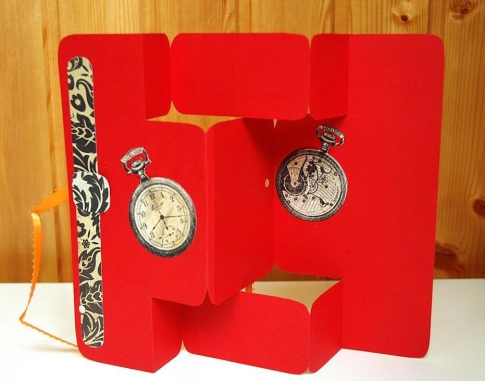
- Tint the body and edges of the finished postcard using a dark stamp.
You have created an interesting invitation in the style of the Hatter from the work “Alice in Wonderland”.

After the “make a card” step is completed, you can begin the main preparations for Halloween: making a costume, decorating the room and preparing a festive treat.
Evgenia Smirnova
To send light into the depths of the human heart - this is the purpose of the artist
Content
Scrapbooking is the art of making and designing photo albums, photo and picture frames, booklets, postcards, and gift wrapping. Scrapbooking for beginners will give everyone a chance to learn how to create original things with their own hands. The art of scrapbooking has several different directions and techniques - distressing (aging album pages), stamping (creating original effects using ink, stamps and applicators), embossing (creating raised paintings) and other styles used to design albums and paintings.
Scrapbooking – what is it and where to start
Scrapbooking for beginners is a type of manual creativity, which is based on the design and production of photo albums, the original storage of family photographs, personal stories in the form of photographs, drawings, newspaper clippings, and notes. An original wedding and New Year's album, personal diary, invitation card, gift box, picture, book, binding, envelope for money will be very beautiful. Scrapbooking is also suitable for beginners; it is worth choosing simple options, after mastering which it will be possible to move on to complex patterns.

At its core, scrapbooking acts as a unique way of storing stories, using tactile and visual techniques that replace the story. The photo album must be decorated in a special way and consist of separate leaves, each of which will express a complete thought (collage). Such original albums should cover one topic - the birth of a child, a wedding. For beginning craftsmen, there are ready-made diagrams (sketches).

In Russia, demobilization albums are widely popular, containing not only photographs, but also drawings, collages, interesting caricatures, wishes, and addresses of colleagues. The production of such original albums is carried out by soldiers who are novice craftsmen, and everything necessary can be collected during the service.
It simply doesn’t make sense to arrange all the photographs in the house in scrapbooking style, so a specific theme must be chosen, after which photos will be selected to match it. Beginning scrapbookers may find it tiring to spend a long time creating a masterpiece, but after completing a few elements, they will have a desire to continue practicing this art.

What you need for scrapbooking
Scrapbooking for beginners requires patience and preparation of materials. You will immediately want to buy a lot of things for work, but you should not buy too expensive tools. For beginning scrapbooking masters, you need to select a starter set of tools that are not very expensive, and any beginner can purchase them. It is not necessary to buy professional tools that experienced scrapbookers use.

Materials
If you have decided to engage in this type of art, beginning scrapbooking craftsmen will need the following materials:
- scissors (several types);
- Double-sided tape;
- glue;
- paper and pencil;
- sewing machine;
- figured hole punch;
- buttons, ribbons, rhinestones;
- cardboard or cutting mat;
- rubber stamps;
- ruler and scissors.
Tools
Beginning scrapbookers should have the following tools:
- You need to take several types of scissors (small and large).
- Double-sided bulk tape, special adhesive tape for photos.
- Simple PVA is ideal for gluing paper.
- You will need special shaped hole punches, but there is no need for beginner scrapbookers to buy more than 2 pieces.

- For a beautiful and original decoration of a notebook or photo frame, ribbons of various thicknesses, rhinestones, buttons or other decorative materials that are at hand can be used.
- For cutting parts, simple cardboard or thick old magazines are suitable.
- Scrapbooking for beginners does not require too many tools, so it is not necessary to purchase a sewing machine; it is not always needed. Instead, take a simple thick needle or thin awl.
- You will only need a few rubber stamps, which come with stamp pads. Wet wipes can be used to clean dies, but only those that do not contain alcohol; beginner scrapbookers can wash them with warm water and soap.
- Experienced scrapbookers use eyelet installers, and beginners can buy kits for their installation in specialized sewing stores.
- The ruler with scissors will be replaced by a special cutter (a simple metal ruler, a stationery knife).
Sketches
Scrapbooking sketches for beginners will help make cards, postcards, and notebooks much easier. For beginning craftsmen, sketches will be a real lifesaver, because they can give new ideas and inspiration when creating an original photo album, frame, or notepad. If you can’t make a scrapbook page yourself, you should pay attention to ready-made templates (blanks) for scrapbooking.


Master class on scrapbooking a photo album for a child
A step-by-step scrapbooking master class for beginners will help you easily make a beautiful, original album for a child. Possessing creative and unconventional thinking, you can easily create a real work of art, but if you lack imagination, there is a way out - check out the master classes and choose a more suitable option for beginning craftsmen.

In this case, you will need the following materials:
- 3-5 sheets of paper with any design;
- 4 sheets of cardboard (white), size 12.5x12.5 cm;
- 2 sheets of thick cardboard measuring 13x13 cm (special paper for scrapbooking).

Step-by-step instructions for scrapbooking a photo album for beginners.
- First, the original album cover is created. 2 squares are cut out of paper, the dimensions of which are 15x15 cm. 6 square sheets (12.5x12.5 cm) will be used as the inner sheets of the album.
- Paper is glued to the cardboard squares, all protruding corners are cut off. The left and right corners are cut straight, and the bottom and top at an angle.

- Carefully glue it over.
- Next, take a thin tape (about 50 cm long) and glue it to the inside of the square. The end of the tape “A” (as indicated in the photo) should be slightly longer.
- 2 pieces of tape are glued to the square (tape length 5 cm, in the lower and upper parts of the square).

- Following the example shown in the photo below, all parts of the future album are connected.
- White sheets of paper are glued on top, directly onto the tape, and for the cover you will need to take colored paper (various colors - black, red, blue, pink).

- All pages of the album are covered with squares of paper; any other decorations can be used according to your own taste.

How to make scrapbooking frames with your own hands
To make an original photo frame with your own hands, novice scrapbookers will need the following materials:
- scrap paper (1 sheet);
- pencil;
- ruler;
- scissors;
- non-writing pen or stick;
- photo;
- stationery knife;
- glue;
- scotch.

A step-by-step plan will help you avoid mistakes and do all the work correctly, and a stencil will help you make a beautiful inscription, which will be simply irreplaceable in the initial stages. To create an original and unusual photo frame, you should use a variety of stencils that help you make various drawings, which will be important for people who do not know how to draw beautifully. Scrapbooking video tutorials for beginners will become an indispensable assistant in creating a real masterpiece.
- At the initial stage, the sheet of cardboard is divided according to the pattern shown in the photo.
- Using a stationery knife, carefully cut out the middle. A cardboard frame is glued to the back of the scrap paper.
- Inside the frame, carefully cut the paper crosswise and use a non-writing pen to make the sides of the bends.

- The corners are cut off, approximately 5 cm is removed from the edge of the cardboard. The upper and lower parts of the future frame are determined. Not very large cuts are made at the top, which should be slightly larger than the photograph. Scotch tape is glued around the perimeter of the frame, with the exception of the top part.
- A piece of cardboard is glued to the back to prevent the photo from falling out. The corners of the frame are bent on all sides; it is necessary to cut out all excess.
- A footrest is made from the remaining cardboard and attached to the frame.

- Almost any decoration can be used to decorate a photo frame - flowers, letters, beads, rhinestones, any available material. A digital camera will help you take beautiful photos for an entire showroom of original photo frames.
Notepad scrapbooking technique
To make a beautiful notebook with your own hands, a novice crafter will need the following materials:
- Super glue;
- thin felt;
- scissors;
- double-sided tape (sticky film);
- notebook and paint;
- decorative elements for decoration.

- Thin felt is laid out on the table, after which a notepad is laid out in the center, about 10 cm is left for hemming the material around the perimeter, all excess is cut off (it is necessary to cut out the shape of the notebook).
- Double-sided tape is glued to the inside of the cover, the notebook is folded together with the felt, and all the lines are carefully smoothed by hand (the binding should be evenly covered with the material). Corners need to be cut.
- All edges of the felt cover are glued, each bend is pressed well so that the glue has time to set. The notepad is closed and pressed down on top with any hard object.
- At the very end, the notebook cover is decorated - a pre-prepared blank or template and colored paint are used (colors can be very diverse - black, scarlet, gold, green, yellow, blue). The most important thing is that the paint is completely dry.
Video tutorials for scrapbooking postcards
Things that were made with your own hands, and this is scrapbooking for beginners, are in a real trend and are becoming more and more popular every day. It is possible to buy ready-made exclusive items or be patient to create a work of art. Having done just one
A postcard is always a valuable and expensive gift for every person. Whether it's a birthday, anniversary, wedding or wedding anniversary, christening or New Year, the most important thing is the warm and sympathetic congratulations and words that we read from the pages of cards. Today we will show you how to make a scrapbooking greeting card that is suitable for beginners. The beauty is that such a postcard preserves the warmth and eternal memory of the person who gave it and created it himself. Such crafts are popular and successful among craftswomen.
Let's look at the main ideas for holiday cards in scrapbooking style
The ideas for such postcards are varied and can have a different character.
You can make these men's cards in the scrapbooking style using scrap materials that appeal to a man. You can insert a picture of a vintage car and decorate it with a star, as indicated in the photo, and the gift will delight the recipient!
This truly masculine postcard is perfect for a mature man who is a connoisseur of antiquity.
For business men, professors, businessmen, teachers, you can add metal pendants for watches, various mechanisms, keys, add beautiful inscriptions, make cardboard shirts with ties, as in the example below:

And for lovers of women and bachelors, you can add images of flirty Pin-Up girls. You can see their photos below:


Greeting cards for teachers and professors
Beautiful, bright greeting cards in this style are well suited for congratulating teachers and university professors. They are also good because they can be completely different from standard postcards, they have a certain meaning, they can be both humorous and absolutely strict. For those with a sweet tooth, a chocolate card is perfect. You can leave not only your heartfelt poems and congratulations in it, but also put a sweet gift in it in the form of a chocolate bar.

Complete the postcard with a sincere wish: on the link you will see fonts, examples, photo ideas.
Unusual shapes of templates for newborns
You can also make cards of unusual shapes. Namely, you can add a silhouette of a stroller or baby slippers to a card for newborns, as in the example:


Or even make these same postcards in the shape of strollers or slippers, as in the photo below.


"Happy Birthday" cards They can also be either absolutely serious or cheerful, using different appropriate decor. In a word, what is your imagination rich in! Ideas for birthdays and anniversaries can be seen in these photographs:


You can combine scrapbooking directly with a gift by decorating it using the materials from our master class.
Master class for beginners on creating creative congratulations
- Base for postcard, designer decorated cardboard;
- Scrapbooking paper;
- Pictures for scrap, lace, satin ribbons; half beads, flower.
- Stamp and ink;
- Glue, double-sided tape, pencil, ruler.
Everything we need for work is shown in the photo:

So let's get started! We discussed the ideas above, now is the time to put your knowledge into practice!
Cut out a square from one sheet of scrap paper of the desired size, and a rectangle as in the photo.

Then we cut out two identical strips of lace that correspond to the length of the rectangle, glue them onto our square blank, and glue a rectangle of scrap paper on top, we see more details in the photo.

Dip the stamp in the ink of the desired color and place the stamps as shown below.

Let's move on to the most interesting part - decorating the card itself. We tie bows from satin ribbons, glue them, attach a beautiful half-bead inside, and stick on a picture.

The final step is to stick our decorated blank onto the cardboard base with double-sided tape. We get such a wonderful handmade postcard using the scrapbooking technique, as in the photo.

You will find amazing ideas in the article about making a passbook for a wedding gift - an original, fun gift that deserves attention!
Training video MK for beginners
It is in more and more demand, and products made using this technique are now the most common and widespread. You can make a bunch of different souvenirs and gifts for absolutely any occasion: a birthday is a card, box or envelope for money, the birth of a baby is a box, postcard or casket of mother’s treasures, a wedding is an album, postcard, envelope, wish book, and so on can be listed endlessly. Moreover, if you judge logically, you can do not just, but very necessary things and objects for yourself and your family. Scrapbooking is a whole handicraft dynasty that has its own characteristics and styles. For example, the oldest style of scrapbooking called “shabby” is still popular today. And products made in the shabby chic style have such a feature as an old fashioned one, which exudes coziness and a homely atmosphere. There are a lot of styles, but we’ll still focus on shabby chic and look at a very gentle and interesting master class that will teach us how to make birthday cards. This is always a necessary thing, so it will be interesting for everyone to read it.
So, to make shabby cards we take:
Three sheets of cardboard of different colors, take red, soft pink and blue;
Scrappaper from sets called “Shabby” and “Ukraine” from the famous designer Evgenia Kurdibanovskaya;
Colored pictures with flowers and sweets;
Cotton lace in mint, pink and dark pink colors;
Artificial flowers: latex roses white, pink and green, poppies red and salad green, paper hydrangea flowers white-orange, white and green;
Bouquets of complex stamens are mother-of-pearl and with glitter in white, red, orange and mint;
Die-cut paper napkins mint, pink and red;
Cut out butterflies, three large and 6-7 small;
Stamped inscription in different colors “Happy Birthday”;
Artificial branches with buds of different colors;
Metal plain brads;
Double-sided tape and scissors;
Whatman paper A4 format;
Ruler and simple pencil;
Glue stick;
Small half beads of different pearl colors;
Ink pads for tinting green and burgundy;

Let's start with the basics of postcards, for this we take cardboard of three colors and cut out three rectangles 18.5 * 20 cm.
Now we fold each one in half and get three such bases.


Now we will cut out the lower bases. To do this, we measure and cut out two 9.5*18 cm rectangles for each postcard, so there are six in total.


For the front decoration, we cut out each postcard and need three more rectangles.


We have prepared everything, now we need to scratch all the rectangles along the edges, so to speak, make them old.


We immediately glue the rectangle onto the back sides of the postcard.


Also, for internal wishes, we need to glue white sheets of whatman paper, we also cut out three rectangles 9.5 * 18 cm. We tint the edges of each and glue them inside each card. We glue one small rectangle onto the front rectangles.


We immediately estimate the design, glue a napkin on top, then two pictures at a time, shifting them a little. We do this on all three and sew each part separately, starting with a small rectangle.


Now we insert two branches onto each workpiece using brads. Now we glue these blanks onto our base. Separately sew the front and back sides of each postcard.


