The idea of book design for postcards and photos appealed to many handmade lovers. Modern materials and tools allow you to create real masterpieces. You yourself can get to know this technique better, learn how to make scrapbooking with your own hands or learn special paper for this type of creativity.
In such a place it will be pleasant to keep memories of the most precious moments of life.
The fashionable trend in handicrafts allows you to design and create family and personal photo albums in various styles.
- European - a minimum of decor, the main focus is on the photo and its shape.
- American - the composition consists of many elements and decorations, representing a single whole.
- Clean and simple - original solutions for free space, simplicity and neatness.
- Shabby chic - lace, bows and ribbons are combined with elements of draperies and fraying.
- Vintage - the atmosphere of antiquity and the spirit of Victorian England.

Using this technique you can make various crafts for your home.
His common techniques are:
- cropping - photographs are cropped so that only the most important details remain;
- stamping - various applicators and stamps with patterns are used;
- decoupage - special pictures are transferred to paper and other surfaces;
- journaling - small inscriptions and tags with its description are placed under the photo;
- distressing - the method of aging paper using ink is used.
You can use almost any materials in them - from colored paper to thick fabrics and dried flowers. It all depends on your imagination and the given topic.
Necessary materials

List of tools and materials that will be needed for work
Beginners often wonder how to do scrapbooking with their own hands and where to start? For them, there are special sets of already assembled scrap paper. For this you will need special tools:
- different types of scissors for cutting;
- hole punches and stamps;
- sharp stationery knife;
- glue, ruler and tape;
- cutting mat;
- decorative fittings.
How to make scrapbooking paper with your own hands
You don’t have to buy a whole set, but make all the blanks yourself. To do this, follow the instructions on how to make scrapbooking paper with your own hands.
You will need - colored or white cardboard, napkins with designs for decoupage, sharp scissors, a spray bottle with water, an iron and ironing board, thermal film.
- Separate the bottom layers of the napkin and iron the top one so that there are no bends or folds left.
- Place the cardboard and spread the thermal film evenly on it.
- Place the prepared part of the napkin on top, aligning it with the edges of the cardboard so that a few millimeters of film protrudes beyond the edge.
- Cover the workpiece with a clean sheet of paper or the lower layers of a napkin and iron it with a hot iron.
- Turn the hot paper over so as not to dislodge the film and trim off any excess film around the perimeter.
- Iron again - if wrinkles form, moisten them with water and repeat the procedure until they disappear.
This way you can make scrap paper of any size, color and thickness, with any design you like, saving significantly on a store-bought kit.
DIY scrapbooking album - step by step
Creating albums is a more responsible and complex task, and at the same time incredibly exciting and interesting. If you don’t have your own ideas, you can get them from master classes on making a scrapbooking album with your own hands on the Internet.
Start with simple and small compositions that do not require a lot of decor, so you can practice gluing and decorating sheets so that further complex work will be more accurate.
The choice of color and decor is a matter of taste
How to make a scrapbooking photo album with your own hands step by step:
- Take a sheet of thick white paper and divide it into 12 equal squares using a pencil and a ruler in three rows of four squares.
- Cut the sheet, separating the sectors from each other. Do not cut one square on each side to the end.
- Glue certain sections together to make a whole tape, fold it like an accordion.
- Assemble the album using washi tape or medium-thick paper, gluing the pages together to prevent them from falling apart.
- Make a book spine - glue a strip of tape of the required size to its first and last pages.
- Start finishing your album. Think in advance about its theme and the photos that you will place in it, create several preliminary sketches.
- You can use any available tools - stamps and curly scissors, small sewing accessories, pieces of thread and fabric, buttons and rhinestones. But remember that the smaller the album, the fewer voluminous details, otherwise its appearance will be far from ideal.
- Tie the finished item with a beautiful ribbon or sew it with an unusual thread. If desired, write your name or its title on the cover with ink or paint.
DIY postcards using scrapbooking technique
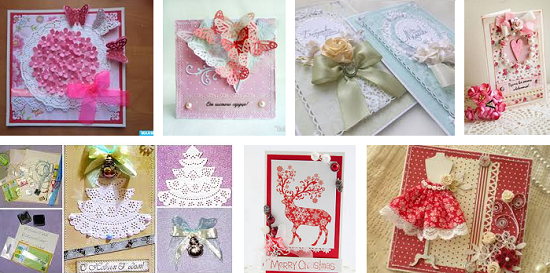
Postcards for any occasion in life look especially touching in this style.
All you need to create an individual card is whatman paper, colored paper, scissors, glue and a little imagination. Depending on who it is intended for, its content and form may differ.
How to make a postcard from scrapbooking with your own hands?
- Prepare the necessary items - colored paper, cardboard, scissors, glue, lace, ribbons, beads, artificial flowers.
- Make the base of the card from thick paper, preferably soft double-sided cardstock. It can be colored, smooth or embossed.
- If you have a dark base, cut off some light paper and place it in the wish area. Use ready-made templates to cut out even shapes.
- Don't be afraid to experiment with materials with different textures. They will give your product originality.
- For beginners, there is an easier way to create their masterpiece. Stationery departments sell ready-made thematic kits for creating postcards. They include all the necessary elements for creativity.
DIY scrapbooking notebook - step-by-step instructions
Small scrapbooks look neat and are easy to use; they can be a good gift for a loved one.
You can make a scrapbooking notebook with your own hands using this master class.
- Make a blank from A4 sheets to make an A5 notebook. Fold each sheet in half and stack them into a stack of three sheets.
- Sew the structure with a thick thread, fill the seam line with glue from the fold side so that the threads are fixed in place and you get a neat spine.
- Secure the workpiece with stationery clips and let it dry. Re-coat the joint with glue and press the satin ribbon onto it so that its edges protrude on both sides - one short, the other long.
- Burn the edges of the ribbon with a lighter to prevent them from fraying. Fold the short end inward and glue it again.
- Make the binding. Cut out three cardboard shapes. corresponding to the size of the spine, front and back of the workpiece with a margin of 0.5 cm.
- Move on to cover design. Place the binding parts on the material with which your notebook will be covered - scrap paper, textiles or leather. Cut off the top corners of the cardboard.
- Cover the binding by folding the outer edges of the material inward. Secure them with glue. Mask the attachment points with endpapers - fold two sheets of thin office paper in half and glue them to the cover on both sides, first to the block and then to the top.
- Connect the pages to the prepared block - glue the stitched folds to the spine, and then start decorating.
- Design the notebook at your discretion - cut out various shapes from leather or colored paper, tint the pages, use lace, beads and buttons.
How to make a DIY scrapbooking wedding album
All young couples want pictures from the most memorable day of their lives to last a long time. An original way to store them is offered by a master class on a DIY wedding scrapbooking album.
- Make an album, selecting the size of the sheets in accordance with the format of the existing photographs.
- Place one photo on each sheet and start designing it.
- Connect sheets of watercolor paper in pairs with glue, decorate them with gold patterns or use a stencil.
- For greater effect, brush along the edges of the pages with a dry brush with gilding.
- Make separate substrates for your photos - use the same stencils to apply fragments of the pattern on them, make slits in their corners to secure the photos.
- Take care of the backings for the photo cards - stick lace, glitter or satin ribbon around their perimeter. Make sure that the pictures do not get lost against the background of your chosen design.
- Cut the cover from thick cardboard so that it is slightly larger than the size of the pages themselves. Cover it with velvet, similar to the technique shown in making a notebook. Decorate the top of the cover with an applique of pearls or beads or small lace. For greater density, place padding polyester underneath.
- To make it easier to view your wedding album, insert rings into it. Make identical holes in the sheets and cover with a hole punch and fix the ring fastenings in them.
DIY flowers for scrapbooking

The most delicate decor - various flowers
The variety of decorations and small decorative elements allows you to create real handmade miracles. But many needlewomen try to make various flowers and figures on their own. For those who are not afraid of difficulties - a master class on how to make flowers for scrapbooking with your own hands.
- You need - two hole punches for 6 petals of different sizes, watercolor paper and whatman paper, food coloring, plastic stamens, cotton swabs, water and glue.
- Using hole punchers, make flower blanks - two large parts and one small one per flower. Cut the pieces and place them in a container of water.
- Dilute the dye in the proportion required to obtain the desired shade. The brighter the color, the more paint and less water, and vice versa.
- Make sure that the paper elements are well saturated with moisture. Take them out of the water, put them in piles of 6 large and 3 small shapes, apply the diluted paint with a cotton swab.
- Drop a couple of drops into the middle of the flower, and then spread it around the edges. Press the stack of blanks on top so that the dye penetrates all the elements and set them aside to dry. To speed up the process, use a hair dryer.
- Collect the dried petals with accordions - place the outer petals in the middle, and the next ones under the middle.
- Glue the parts together, slightly shifting them relative to each other, place the smallest parts on top.
- Make holes for the stamens in the center of the resulting blanks. Thread them with a thin wire and secure them at the base with glue.
Valentines cards in scrapbooking style
Valentine's Day is a good reason to please your loved one with a homemade card. Make your own valentines in scrapbooking style. To do this, follow the above technique.

One of the most favorite holidays is Valentine's Day.
A couple of tips for those who don’t know how to make a scrapbooking card for February 14 with their own hands:
- make a Valentine's card in rich red and pink colors;
- use the heart holiday symbol as a form for a blank or decoration;
- write a frank or romantic, memorable wish;
- think over the design and prepare the necessary materials;
- do not use expensive accessories if you are making a card for the first time;
- try to do the work neatly and harmoniously;
- Don’t copy other people’s ideas, bring something of your own.
Family tree scrapbooking book
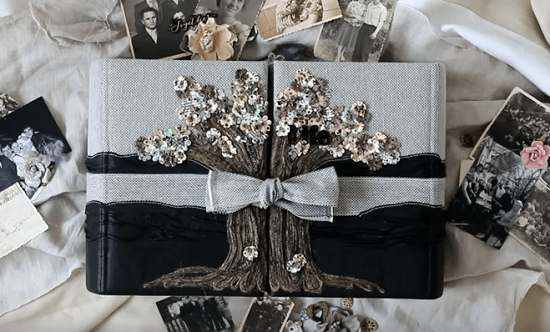
Option for designing a family album in the form of a tree
The principle of operation is similar to a notepad or wedding album. A do-it-yourself scrapbooking genealogy book differs from them only in a few nuances.
- It must contain a family tree. It can be drawn by hand or made in the form of an applique.
- Under photographs of family members, you should indicate the names and dates of the events captured, and include a brief description.
- It is best to design a book in shabby chic or vintage styles, and apply journaling and distressing techniques to it.
- It is worth taking care of the size of the album in advance - there should be enough space for photos of new relatives.
A family photo album is a tangible memory of the past; creating such a thing requires creative ideas and a creative approach.
This interesting process can unite the whole family: children and adults, turning photo design into a good tradition. And no matter how much time it takes to work, the result will be worth it and will delight family members, loved ones and guests from time to time.
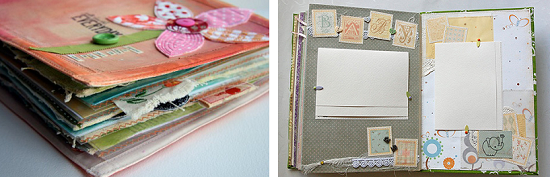
Photos of interesting and beautiful photo albums lovingly created by craftsmen with their own hands
By creating a family photo album and decorating it according to your taste, you become the owner of an exclusive item, one of a kind. We invite you to familiarize yourself with the interesting works that are presented in our photo gallery.


Remember, the photo album will carefully preserve the history of your family’s life, the most memorable and valuable moments.
Today, there are special design techniques that can be easily mastered if desired, and decoration elements are widely available. The most important requirement is the desire to create a family heirloom and put a piece of your soul into it.
A self-made photo album is a unique family attribute
A photo album is a symbol of family unity, a detail that connects older and younger generations. Flipping through old heavy albums that predate digital technology, you feel a sense of warmth and charm.

They will never be replaced by computer files. Therefore, photographs need to be printed, and albums should be designed with your own hands - in the future, your children, and, possibly, grandchildren and great-grandchildren will look at them with interest.
A family photo album can be dedicated to an important event in life, for a child, or uniting several generations (in the form of a family tree).
A photo album with the history of our acquaintance and old wedding photographs is the best gift for parents on their wedding anniversary. You can make this attribute the initial step in the design of a series of albums about the family.
Cover design for a photo keeper
Select the cover design style based on the theme and style of the photographs:

- romantic - for the cover, a prepared canvas with embroidery with threads, beads, decoration with lace, ribbons, braid, written poems, flowers from scraps of fabric are suitable;
- retro - artificially aged paper, newspaper clippings, yellowed photographs, brooches, braid, lace, flowers made from natural materials, straws;
- modern - fabric with interesting prints, braid, beads, rhinestones, artificial flowers;
- for children - you can paste a child’s drawing, flat crafts, buttons, or images of cartoon characters onto the cover.
The cover can be covered with paper, fabric, leather, or a combination of different materials. It is better to choose dense fabric: denim, felt. Place a piece of padding polyester between the base of the cover and the decorative fabric - this will make the album soft. Decorate the seams with suitable decorative elements.

When designing the cover, you need to be guided by the rules of composition; make sure that there are not too many decorations.
Materials and decorative elements
To decorate a family album, you can use special scrapbooking kits or look for materials yourself. Suitable parts can be purchased at a sewing accessories store, but you can certainly find interesting products right at home.
To do this, it is worth reviewing things that you do not wear, children's toys, jewelry, postcards, beautiful covers, unnecessary handbags, buttons, etc. Do not neglect parts made of wood, metal and plastic.

Albums decorated with various types of stitches made from multi-colored threads look very beautiful. They can be made by hand or using a sewing machine.
How to decorate a photo album
A win-win option that is suitable for most family albums is flower decorations. Flowers are made by hand from fabric, mesh and beads.
An interesting effect is provided by ribbons and narrow ribbons, which are placed at the edge of the album. A tourniquet is suitable for these purposes, especially if the background design is made of natural fabrics.

You can get an unconventional result on the cover or pages if you attach rounded clockwork parts. Family members in large format photographs can be decorated with a crown, hat and other interesting details cut out from magazines.
Favorite cartoon characters are most suitable for children's pages or albums. You can draw them yourself or stick cut ones.
Supplement the proposed design ideas with details that are close to your heart, this will make it even more memorable and valuable.
Scrapbooking and other modern decoration achievements
Scrapbooking is a handicraft technique that is actively gaining momentum today. This art form aims to preserve photographs in an interesting form through the use of special tactile and visual techniques.
Scrapbooking allows you to create albums with your own hands not only in the traditional form of a code; among the works of masters there are: a box-photo album, a house-photo album, a basket-photo album.

The decoupage technique involves decorating various surfaces with printed pictures and then varnishing them. After the varnish dries, the image looks like it was painted.
Interesting, creative ideas are the key to a beautiful and unique photo album

In conclusion, we bring to your attention a short video master class on creating a beautiful photo album with your own hands, in particular, we will look at creating a cover. Enjoy watching friends!
Useful tips

What is scrapbooking
Term "scrapbooking", or as it is also called “scrapbooking” comes from the English scrap - cutting and book - book, i.e. this can be literally translated as "scrapbook".
Scrapbooking is a type of handicraft art in which anyone makes and designs a photo album, which tells family history in the form of pictures, photographs, records, newspaper clippings and other things that have memorable value.
It is worth noting that scrapbooking can not only be tied to the creation of a classic photo album, but also album in the form of an accordion, a house, a box, as well as postcards.
Scrapbooking for Beginners
Usually, when a person decides to start scrapbooking, he wants to buy a lot of things to work with.
In reality, you don't need much, or you can find a suitable replacement.
Here's what you want to have if you decide to take up this type of needlework:
1. Several types of scissors

You'll be cutting out a lot of different pieces with scissors, both large and small, which means you'll need the appropriate size scissors.
In addition, curly scissors will not hurt. You should not buy a large number of different curly scissors - 2-3 pieces will be enough to start with.
2. Double-sided tape

You will use it to fasten photographs, ribbons, letters and other details.
This tape is NOT suitable for gluing:
Small parts
Background paper
In these cases, special photo tape will help you.
In addition, in stores you can find bulky double-sided tape that will give certain parts a small volume.
3. Glue

You can choose regular or PVA glue for gluing paper.
4. Shaped hole punch

You should not buy more than 2 types of figured hole punches at once. It is worth noting that some hole punches become dull quickly. In addition, by choosing 1-2 hole punches, you will be better able to determine what suits you best.
5. Sewing machine
This tool is optional, but it's worth noting that sewing stitches will look nice on cards.
If you don't have a sewing machine, a thin awl or a thick needle will help you.
6. Ribbons, buttons, rhinestones and other details.

These little things will help to beautifully decorate your album or card.
7. Cutting mat or cardboard.

For beginners, it is better to use cardboard or scrap magazines to cut on.
8. Rubber stamps.

Also, you shouldn’t buy a lot of stamps, 2-3 pieces are enough. Buy ink pads for them. You can use plexiglass as a base for a small stamp.
To clean the stamp, use a damp cloth (without alcohol) or you can wash the stamp with warm water and soap.
9. More advanced craftsmen use a grommet installer, while beginners can purchase a grommet installation kit, which you will find in sewing stores.

If you decide to work with this tool, cover your work area with a sheet of cardboard.
10. Scissors and ruler.

These tools will replace your special cutter. You can also use a utility knife and a metal ruler.
Scrapbooking (master class). DIY photo panel.

To create such an original panel, you will need a shoebox and your favorite photographs, as well as:
Scrapbooking paper (can be replaced with old wallpaper)
Roll of paper (color: brown)
Lace

1. First, cover the shoebox with brown paper. You need to lay (glue) scrapbooking paper on the bottom of this box.

2. Use cardboard to make internal dividers.

3. Now insert the lace into the sides of the box.

4. If you wish, you can decorate the box (in this example we used paper flowers and butterflies).
You can find out how to make paper flowers and butterflies in our articles:

5. It's time to glue the photos.
6. Prepare scrapbooking paper and cut out a rosette in a spiral. Next, wrap the rose around the pencil and secure with glue.


Album (scrapbooking) from a photo on your Instagram
This mini album will remind you of the most unusual and beautiful moments in your life, because all your favorite photos from your Instagram account will be in it.

It can also be used for photos taken with good old Polaroid.
You will need:
Colored cardboard (possibly with a picture), old road maps or Whatman paper
Square photos
Ruler and pencil
Double tape
Simple tape
PVA glue or superglue
Marker or pen
Washi tape
Various decorations (stickers, glitter, etc.)
1. Cut out squares measuring 13x13 cm from colored cardboard.
2. Print photos from Instagram (PostalPix will help you).

3. Glue or double tape the photos to the cut out squares.
4. Fold all the blanks, place them between the pages of a thick book so that the ends of the paper where you want to fasten the book stick out.

5. Apply glue to the ends of the paper (you may need several layers) and leave to dry.
*As an alternative, you can glue all the pages with tape, first two at a time, and then all together.

6. You can place washi tape, a strip of construction paper, colored tape, or a flat sticker over the area where you glued the pages together to hide some of the rough edges and/or glue marks.
Mini photo album (scrapbooking)
The dimensions of this notebook are approximately 18*24 cm, but you can choose the size that suits you.

1. Prepare a sheet of thick paper and divide it into 12 squares. Use a ruler and pencil to do this.

2. Now you need to make two cuts on opposite sides, leaving 1 square to the end of the paper. Look carefully at the image to see how this is done.

3. Fold all three resulting strips into one, gluing the places indicated by the arrows.
4. Now fold the workpiece like an accordion. The arrows indicate the places where you need to apply glue to connect these parts into one page.

*You can also cut these pieces to make more pages.
5. Fold the accordion and connect all the pages with washi tape or a regular paper strip, which you need to glue to the ends of the pages.


6. Once you have a mini photo album, you can decorate it to your liking. Use paper of various shapes and colors, markers, stickers, small memorable souvenirs that can be pasted, etc.


How to make a unique album from a notebook

You will need:
Notepad (preferably with a bright cover)
Photos (choose them logically)
Markers and pens
Pencil
Ruler
Glue or double-sided tape
Washi tape
Decorations

1. Prepare everything you need to create an album so you don't have to look for it later.
2. Organize your favorite photos in a specific order, based on 2-3 photos per page (the fewer photos per page, the more room for decoration and experimentation).

3. To create an original album, also use:
Colored tape
washi tape
Stamps of different sizes and shapes
Wrapping paper for background
Stickers - you can decorate almost anything with them if used wisely.


Gold card (scrapbooking)

To make gold paper you will need:
Printing paper (any white A4 paper)
Scissors
Acrylic gold paint
Jewelry (ribbons, beads)
Brush.
1. Cover the table with newspaper and place a plastic bag on top of the newspaper. Place a sheet of white paper on the bag.

2. Prepare 5 white A4 sheets and crumple them into a ball and wet them with hot water.
3. Place the wet, crumpled paper in a bowl, into which you first pour PVA and water and stir until the consistency of kefir.

4. Take out the crumpled paper and carefully place it on the sheet of paper you prepared in step 1.

5. Prepare the threads and place them on damp paper in a chaotic manner. You can put various small objects on top of the paper to create some texture, for example, you can wrinkle thin napkins, which you then place on the paper, or use dry grass.
Surely everyone has such an album of memories
Stores offer a variety of cards and albums for all occasions, but it is often very difficult to make a choice when you want to congratulate and surprise a loved one. You can choose an original postcard in handmade goods stores. Scrapbooking masters create amazing things from cardboard, paper, various stickers and details.
But prices for “handmade” products are often very high. What if you do your own scrapbooking? This type of creativity is one of the most popular. It requires virtually no initial skills (except for the ability to use scissors, glue and tape) and a significant investment. You can also make stencils, paper decorations and stamps for scrapbooking with your own hands.
Beginning of work
As mentioned above, scrapbooking requires a minimum of tools, but as you become more passionate about this type of creativity, you may need additional materials.
 All the necessary materials and tools that will be useful for a beginning needlewoman
Let's list them all:
- Paper is the main element in scrapbooking. In this type of needlework, special durable cardboard is used as a base, and decorative paper with illustrations or ornaments. For those who are taking on this business for the first time, it will be convenient to use ready-made sets of several types of sheets that match each other in style and color.
- The second thing you can’t do without is scissors. Scissors can be any kind, the main thing is that they are sharp - the paper must be cut evenly, the edges must remain smooth.
- Double-sided tape is a very convenient thing for scrapbooking. When you need to glue voluminous or simply large parts, it is indispensable. The strength of the connection is superior to glue and does not leave dirty marks; it is a pleasure to work with.
- In some cases, you cannot do without glue. For example, when you need to add small details.
- Hole punches are a functional thing, and in some cases, a decoration tool. Sometimes you just need to connect several pages, this requires holes. And sometimes decorate the sheet with carved patterns.
- Stamps. With them, making beautiful inscriptions is as easy as shelling pears.
- Cutter or utility knife. Cutting a cardboard sheet in half or trimming a photograph with scissors is unlikely to work out neatly; here you will need a stationery knife, or even better, a cutter.
- And finally, a variety of volumetric decorative elements. Without them, a handmade postcard or album will be no different from ordinary store-bought items. Scrapbooking supply stores are simply eye-opening. Buy a few individual decorative parts to get started. And if you decide to engage in this craft seriously, it is much more profitable to purchase goods in bulk.
 Volumetric decorative elements visually resemble a 3D picture
When you have decided on all the tools and elements, it’s time to choose a place to work. Good lighting of the workplace and sufficient free space are important for scrapbooking.
Necessary materials for work
It is better to remove everything unnecessary from the table so that nothing gets in the way of your hands and small details are not lost.
Which style to choose for decoration
Among the many design options in scrapbooking, there are several main styles:
- Heritage and vintage. Postcards and albums “from the past” are created in these styles. Muted colors, scuffs, old photographs, newspaper clippings. It would be appropriate to use lace, stamps and beads. A gift in an antique style looks expensive and elegant.
 Worn elements give the album an antique look
- If you like polka dot or striped designs, then the shabby chic style will not leave you indifferent. The combination of a simple background and layering of lace, beads, and pictures is romantic and daring.
 Delicate tones and ruffles speak of shabby chic style
- The classic of modern scrapbooking is the American style. Album pages and postcards are designed in the form of a collage. As a rule, there are several photographs, decorated according to the theme with ribbons, paper figures, and inscriptions. Each sheet of the album is unique, in its own style and fully reflects the mood of the day when the photographs were taken. An interesting addition would be air or train tickets, tickets to an amusement park or zoo.
 Very bright and rich style in scrapbooking
- European style is more minimalistic compared to American. Mini-albums are created in scrapbooking in this style. Not many decorative elements are used, but pencils and pens are used, complementing the composition with artistic sketches. The edges of the pages can be decorated using shaped hole punches and scissors.
 This album is suitable for drawing lovers
- The increasingly popular steampunk style is considered a “masculine style.” Indeed, without flowers, lace and beads, with a truly brutal design, a “steampunk” postcard will appeal to the stronger sex. This artistic movement is interesting for its set of decorative elements: gears, old miniature mechanisms, drawings and maps. The design is done in gray-brown tones.
 In this design you can show all your artistic abilities
Several master classes of different styles:
American design style, with grunge style, vintage, shabby chic and steampunk.
Scrapbooking techniques
When creating products, various techniques are used in scrapbooking: rare ones, which are mastered by experienced craftsmen, and simple ones, accessible to everyone.
Scrapbooking techniques


For example, several well-known techniques that are used most often:
- Artificial aging of paper. You can achieve the effect of old paper using improvised means: remove the top layer of the sheet with tape, use a scraper to create an uneven edge, use tea and coffee to color the paper in brown shades to give it a vintage look.
- Embossing allows you to make paper parts convex and voluminous. The technique can be “wet” or “dry”, in which a special hair dryer is used.
- Stamping. Stamps fit well into almost any scrapbooking style and add originality to scrap pages, emphasizing the “hand-made” design. You can make stamps yourself; for this you will need: a foam block, thick cardboard and metal parts, the shape of which will be the stamp. The fittings are placed on the foam block, the surface is heated with an embossing hairdryer, and cardboard is placed on top. The parts are pressed into a soft surface, leaving imprints (stamps) on the cardboard. The finished elements need to be cut out and can be used for matching cards and album pages.
Interesting decor using embossing, stamps and a cutting machine
Albums using scrapbooking techniques
Using the scrapbooking technique, you can create not only postcards, but also a variety of albums for all occasions, displaying your most significant and memorable events.
They can be large, almost grandiose, or small, neat, that fit in your hand.
Review of a travel album using scrapbooking technique
Mini album
A good start for beginners in scrapbooking is to create your own mini-album. It’s bold to take on large-scale work right away, but it’s better to start small.
Master class: mini - bound album part 1
Master class: mini - bound album part 2
First steps to make an album:
- Take some strong scrap paper and divide it into 12 equal square or rectangular pieces. Cut the sheet evenly in rows, but be sure to leave one square (rectangle) with an unseparated side. It is these two uncut lines that will need to be glued together.
- Fold the sheets like an accordion and collect all the future pages of the album together, and then glue them on the inside. Use ribbon as the spine of the book. The album layout is ready.
When you have a completed but empty book in your hands, it’s time to begin the creative stage of creating an album. Guided by the experience of the craftsmen, make a sketch of the product in a thin blank notebook or on blank sheets of paper, which you then staple together. Sketch the location of the photographs, the principle of their division, inscriptions and design. Decide what decorative elements and in what quantity you will need. Let there be a little less detail, without going overboard - this overloads the work and spoils the overall picture of the album in assembled form.
Mini-album with accordion binding
Album with binding
The album on the rings looks great, but it looks solid, of course, with a binding.
Cut narrow strips of strong paper to glue the album sheets together. On each of them, mark a section 2-4 mm wide in the middle. A gap of this width will allow you to use volumetric elements when decorating.
 The most important part of the album is the binding.
Cut the extreme parts of the strips diagonally. Leaving a marked gap strip in the center, fold the sides over and glue them to the pages. Thus, you get two sheets connected to each other. Next, you will glue the sheets to them using the remaining strips. Do this work carefully, otherwise the album will end up uneven.
The internal content of the album is ready, it’s time to move directly to the binding. You will need gauze that is as long as the height of the album and as wide as its thickness plus a couple of centimeters. Attach ribbon along the horizontal edges of the binding.
The spine is made of a thick sheet of paper with a margin of 1-2 cm in width. Place it evenly on the base of the resulting book, and glue the cover to the album to its protruding stripes. Now the base of the album with binding is ready, then it’s just a matter of imagination.
Album from scratch part 1 - binding
Album from scratch part 2 - cover
Binding with hidden rings
A popular theme in scrapbooking is weddings. Any girl, after answering “Yes” to a marriage proposal, begins to think through all the details of the future event. A wedding requires a lot of attention, even in small things. If the bride has time, she can create a photo album for pictures of this important event entirely at her own discretion.
 Volumetric elements only add freshness to the album
Wedding album review
The cover is the first thing a person sees when picking up an album. The cover can reflect the idea of the wedding - theme, color scheme or remind of the venue. You can use all sorts of ready-made solutions for wedding scrapbooking. Stencils, stamps, badges depicting the bride and groom, miniatures of wedding arches and retro cars - it is impossible to list everything that specialized stores of this craft have.
Master class on creating a wedding album
The design of the album pages is also an individual choice. An interesting solution would be to split the album into several parts. In one - professional photographs of the photographer, in the other - selfies with friends, in the third - reportage photographs of wedding guests. Then a section of pictures of gifts or photos of spouses as children.
 We fill the album with only fun and bright moments
Creating a wedding album will be a fun activity that will help you pass the “endless” wait for the celebration.
Scrapbooking is the art of creating and designing original photo albums. The main goal of this type of needlework is to turn a boring photo album into a unique story from our lives. In this article you will learn the history of the development of scrapbooking, as well as how to make an album cover, binding and secrets.

Notepads were popular in the 16th century to record important dates, quotes, recipes, and more. At the end of the 17th century, a book appeared in which there were additional blank pages so that the owner could independently paste in the illustrations he liked. After the advent of color printing, collectors actively began collecting cut-out images in their albums. This was the beginning of the development of scrapbooking.

In the 19th century, when photography began to actively develop in scarpbooking, a real revolution took place: special pockets for photos began and people began coloring the pages themselves. Girls' albums with drawings, photographs, stickers and secrets have become popular. Today, many styles of scrapbooking have emerged and it has regained popularity around the world.
Scrapbooking album, do it yourself
Cover for a photo album using scrapbooking technique
Materials:
- canvas;
- cardboard or paper with millimeter markings;
- padding polyester;
- PVA;
- cardboard;
- scissors;
— eyelets;
- rings.
- Decide on the dimensions of the album. In our master class, the album turned out to be 30x30.
- Using graph paper or sheet, measure 30cm long and 30cm wide on regular cardboard.

- Cut a piece of padding polyester of the same size.
- Glue the padding polyester onto the cardboard with PVA glue.
- Cut a square of canvas, making a margin of 1 cm on each side so that it is convenient to glue. Glue the canvas onto the padding polyester.
- To cover the pieces of material, a sheet of cardboard is glued to the inside. The back cover for the album is ready.


- Glue padding polyester to the front of the cover, and canvas on top, but without a window.
- Now carefully cut out the window and glue the edges to the cardboard.

- Make holes for the eyelets at a distance of 2 cm from the edge.

If you want the album not to have rings, but like a bound book, then do not make holes for the eyelets. You can decorate the cover to your liking, not necessarily the same as in the first master class.

To fill the album you will need sheets. It is best to use cardboard. Also cut additional strips, 2-2.5 cm wide, for gluing the main sheets together. Ready-made colored pages, such as paper or thin cardboard with color prints, are also useful.

On each strip in the center, measure a strip 2-4 mm wide; for this you can use a pen that does not write or a sharp object. This is done so that voluminous decorations, for example, convex paper flowers, can be stored in the album. The edges of the strips must be cut at an angle of 45 degrees on both sides. Fold the strips so that the marked strip remains in the center and begin gluing to the pages. All pages must be glued evenly so that the album also comes out even and not skewed.

You can determine the number of pages yourself. After the middle of the album is ready, we begin binding. To do this, take gauze or a bandage, cut a strip to the height of the album and at the same time 1.5-2 cm larger than the width. Now you need to take a piece of braid or tape and stick it on the upper and lower edges of the binding. Thanks to the braid, the edges will look aesthetically attractive, and the binding will also be more durable.

Make a spine out of thick paper that will completely cover the binding and protrude 1-1.5 cm. Attach it to the album, and glue the cover on top to the folds of the spine.

Do not glue the spine itself to the binding, otherwise the album pages will not open freely. Open the cover and glue the protruding layer of bandage or gauze and the ends of the tape to it. The most convenient way to do this is not with PVA glue, but with transparent “Moment”.


Everyone who wants to make a photo album plans for it to be interesting, beautiful and original. Sometimes the volume of an album does not allow you to place a large number of photos in it, so we offer unique ideas for its design.

Secrets are a way of arranging inscriptions, drawings or photos, which is known to every schoolgirl who had a “girl album”. There are several options for their design for a photo album.
- Secrets based on the postcard principle. Make the card to match the background color of the album page. Glue the main photo on the front side, and a secret inside. The flip page can be secured with tape, a lock, or cord.
- Secrets in pockets. Think in advance where such a pocket will be located and make it in the color of the page. Paste the main photos on top and decorate the page. Don't forget to put your photo secret in your pocket. In the photo it is better to make a loop or make a hole for the grommet to make it easier to pull out. You can decorate the pocket so that additional pictures are pasted on it and visually hidden.

Thanks to the secrets, it is easy to paste vertical and horizontal photographs on one page of the photo album. Also, the photo itself can become a pocket for another one. You can stick a photo on a postcard and stick a few more photos inside. “Sandwiches” made from photos and paper look original, thanks to which you can hide several surprises on the page.

Do you want to paste a large photo into your album, but don’t have space? Glue the photo onto a piece of paper in the same color as the background so that the fold can be conveniently glued to the base of the album. Now the large photo can open, and stick other photos under it. Secure the large photo with thread or a lock. In the same way, it’s easy to glue many more photos, if instead of a large photo you use several small ones, and save the technology for secrets.

To make your album look creative, cut off vertical or horizontal sections of individual pages and decorate them as if they were an extension of the next page. Don’t forget that it is permissible not only to paste a photo, but also to sew it on. This will add zest to the finished product. Sew some photos with an accordion and secure them to a cord.

If it seems that some photos do not fit into the plot, hide them behind a decorative door. For children's albums, use drawings of flowers or animals, behind which secrets will also be hidden.

Also watch the video: Scrapbooking: “Do-it-yourself Wedding Photo Album”
It all depends on the preferences of the owners of the future family heirloom and the style of execution. See more crafts in this.


 united with Archbishop Martin (Lapkovsky), former hierarch of the Russian Orthodox Church (V-F), “on the basis of imyaslaviya”")


