Hello, dear readers, guests, friends! On Sunday, the whole country will celebrate a wonderful holiday - Cosmonautics Day. Dasha and I have already visited every planet, got acquainted with cosmic bodies and learned the secrets of our Universe. You, too, can make an exciting journey into space by taking part in our space project "".
And now I’ll tell you what we flew on. Dasha and I built a huge rocket, which helped us on our journey.
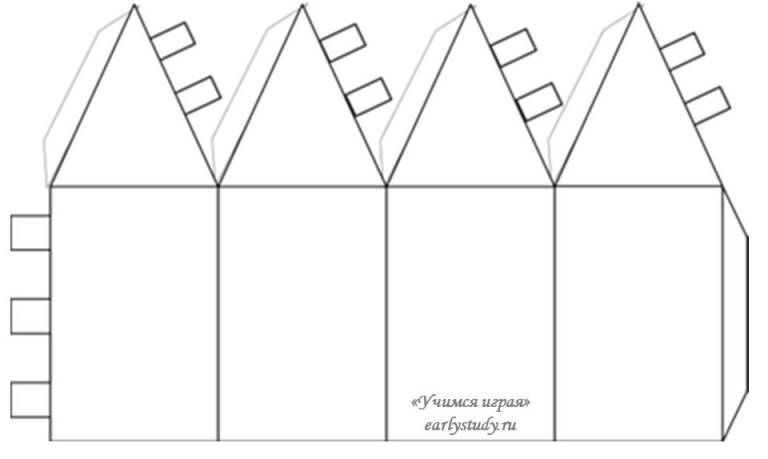 To create a rocket we will need a lot of cardboard. I used a piece of 2.1 * 1.2 m (this was enough for 3 sides) and another piece of 1.2 * 1 m). Our rocket turned out to be 1.2 m high and 1 m cm on each side. This is what the rocket diagram looks like, which I transferred to large cardboard.
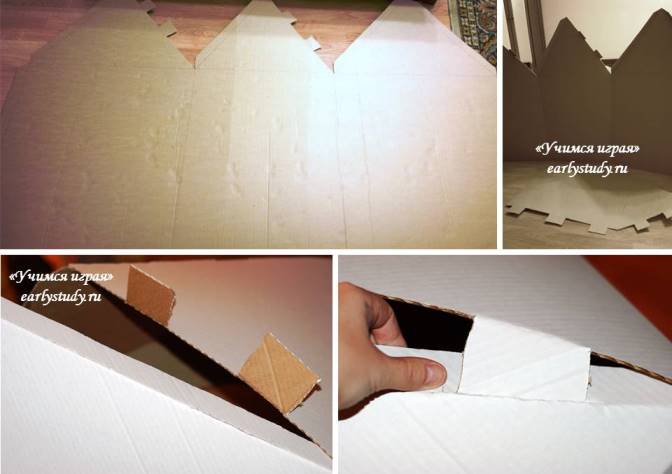
In fact, the rocket is assembled very quickly and easily, the main thing is to have cardboard on hand. I drew a template using a long ruler (30 cm), and cut everything out with a breadboard knife. Since the cardboard is very thick, you can’t just bend it. It will break and there will be no view. Using the blade of (not very sharp) scissors, I drew lines with strong pressure along the folds (1 layer of corrugated cardboard was cut through) and folded. The folds turned out smooth and beautiful. Now the structure needs to be folded. We lean the parts against each other and see in what places the “ears” touch the other side. It is in this place that we make a slot with a breadboard knife to insert the “ears”. The entire structure can be assembled in 5 minutes without glue or extras. connecting materials. Everything rests on the “ears”. Now that the rocket base is assembled, all you have to do is cut out the windows and the door. And decorate the rocket. Don't forget to come up with a name for it.
As a decorative element, Dasha came up with the idea of making the solar system on the sides. I had 4 circles left from the portholes and Dasha painted them as planets, then at her request I cut out the missing circles of different sizes, and she painted the sun and the remaining planets. Using a glue gun, she placed all this on the sides of the rocket in the correct order.

We also cut out “wings” from cardboard and glued them to the rocket with a glue gun. Then Dasha wrote the name of the ship and decorated it with stars. Using the same principle, you can make a cardboard rocket, but not full-length, but for a doll, for example.
Origami rocket - craft or bookmark for children and beginners with a diagram. How to make a paper rocket using the origami technique - master class (step-by-step (step-by-step) instructions with photos).
Origami rocket
On Cosmonautics Day, many parents, as well as teachers in kindergartens and schools, conduct various activities with their children dedicated to this holiday. Crafts help reinforce theoretical material.
In this article I will tell you how to make a simple model of a rocket using the origami technique, which preschoolers in the senior group of kindergarten and junior schoolchildren can handle.
This could be an ordinary craft, or it could be a useful and functional thing - a bookmark for a book, or even better - for.


How to make an origami rocket with your own hands. Master Class
In order to make a paper rocket using the origami technique, you will need the following materials and tools.
Materials and tools
- a square sheet of paper (this can be special paper for origami or regular office paper, preferably colored. Colored office paper is also good because it is double-sided)
- scissors
- for the first design option: felt-tip pens or colored pencils and a small piece of white paper
- for the second design option: colored paper
Stages of work
If you cut out a square of the maximum possible size from a sheet of A4 office paper, you will get a large craft - a rocket. If you divide the sheet in half and cut two squares out of it, you will get two rockets about 15 cm long, as in my master class. They are convenient to use as bookmarks.
The basis of the craft is a rocket
- Make marks on a square piece of paper - folds. To do this, bend the sheet in half vertically and straighten it, and then bend the sides towards the middle and straighten it.

- Bend the top corners towards the middle.

- Bend the resulting shape so that the side coincides with the fold on the other side.

- Bend the fold in the other direction.

- Bend the figure on the other side in the same way.

- Cut a triangle from the bottom on each side as in the photo.

- Turn over to the other side. The base of the craft is ready.

Decor

The rocket is ready to fly!


© Yulia Valerievna Sherstyuk, https://site
All the best! If the article was useful to you, please help the development of the site by sharing a link to it on social networks.
Posting site materials (images and text) on other resources without the written permission of the author is prohibited and punishable by law.
April 12 is a special holiday in our country. It was from the territory of our Motherland that the first manned flight into space was made. It is from our cosmodromes that almost all artificial Earth satellites are launched, without which many of the benefits of civilization would be unavailable. Satellites provide us with communications, monitor atmospheric phenomena, warning us in time about dangerous weather changes; powerful satellite optics are able to find the right person even anywhere in the world. Astronauts from all over the world work on our research space stations and make a lot of very useful discoveries for humans. The time is not far off when any person will be able to fly to the stars and take a tour of Mars or the Moon.
Dreams of space travel, as a rule, are born in childhood, and perhaps that is why with such pleasure and interest they make crafts with children on Aviation and Cosmonautics Day - the day when the stars became closer! We invite you to join us and make your own rocket, more precisely, the launch vehicle with the Vostok spacecraft, on which on April 12, 1961 cosmonaut Yuri Gagarin made the world's first flight beyond the Earth. And along the way we’ll learn a little about its design.
Materials and tools
We will need:
1. Tube from a roll of paper towels - 1 pc.
2. Tube of toilet paper rolls - 2 pcs.
3. Thick paper or cardboard.
4. Plastic ball - 1 pc.
5. Cell from paper egg packaging - 2 pcs.
6. Paper adhesive tape or masking tape.
7. Hot glue or “Moment” type.
8. Paints, preferably gouache or acrylic.
9. Foil.

Step-by-step job description
1. Let's manufacture the first stage of the launch vehicle. It consists of four parts. These side blocks contained jet engines that propelled the rocket into space. They will be the first to be disconnected from the rocket. So, take 4 cardboard squares and roll them into little bags. Secure with adhesive tape and trim the cuts. Cover the bottom with cardboard circles.

We glue the corners of adhesive tape to the blocks so that the rocket flies more smoothly along the given trajectory. We glue 4 nozzles onto each block, because the engines were four-chamber, which means there should be 4 outlets for the burnt fuel. We attach a cardboard “eye” to each block, with their help we will connect the first stage of the launch vehicle with the second stage.

2. The second stage is the central block. We will have it from a long tube. If the edges peel a little, secure them with adhesive tape. We also cover the bottom with a cardboard circle and glue 4 nozzles.

After all, the central block also has the same engine. Now we apply our side blocks and mark the places where the “ears” will enter the body. Let's cut through. This is how we connected the first and second stages of the launch vehicle.


3. We will make the third stage, in which the spaceship was located, from a short tube and one cell from an egg carton. We connect them using adhesive tape. The second and third stages of the rocket are connected by a huge, strong lattice (transition truss). We will make it by drawing it on half of the second short tube. In order for our parts to fit into each other freely, we will reduce the diameter of the cut tube with a lattice, simply cut it, fold it a little and connect the edges again.


4. All stages of the launch vehicle are ready. We make the spaceship itself. Of course, it’s not like in Star Wars, it’s the very first, real one. It consists of a very strong round “cabin” with a porthole, which is also a descent module, in which the astronaut will then fall to the ground at great speed. Of course, there is also an instrument compartment and other special units attached there. We will make the ship from a balloon, egg cells and foil.


5. Let's start the final painting. We used gouache, but if you have acrylic paints, it's better to use them. That's it, ours is ready!
Our launch vehicle with the first spacecraft was tested by a kindergarten! Now we will prepare a presentation for Cosmonautics Day, and the rocket will become a collapsible visual aid. It turned out that many people didn’t even suspect how everything worked with the missiles. Make crafts with your children and expand their horizons!
What other rockets are on our website:


And many other photos are on the competition page.
Did you like the product and want to order the same from the author? Write to us.
More interesting:
See also:
Pencil "Rocket"
Paper pencil "Rocket" - a new master class from Lilia Lyandres. Don't know what to do with...
Children are the flowers of life. But these “flowers” can sometimes be so unbearable, especially in outdoor games. Sometimes there is a desire to sit in a quiet environment, without shouting, noise or running. And there is a great activity that will help your children concentrate on creating something new - the Rocket craft. There are several ways to create this kind of instance. This article will discuss two options for creating a rocket.
Tube rocket.
To work you will need:
cling film tube,
scissors,
paper of different shades and colors,
PVA glue (the set is minimal, this craft is suitable for any family budget).
Having chosen the color of paper you like, cut out one fourth of the circle. Having determined the diameter of the tube, we glue a cone from the resulting cut-out part. You need to make small cuts at the ends, after which we glue this part to the tube from under the cling film (you must first cut the tube to the length required). We cover the cylinder (tube) with colored paper. The next step is to cut out the trapezoids, they will serve as the wings of our rocket. Glue the trapezoid in half, leaving an allowance to glue it to the rocket. We decorate the rocket with different “twists”.


All is ready!
Colored paper rocket
This type of work is perfect for children over three years old. First you need to prepare at least four different colors of corrugated paper. The work is not that difficult, but warn your baby to be patient.
We take corrugated paper and carefully cut strips 1.5 and 2 centimeters wide.
To create the rocket body we will need ten strips of the same color. We twist the strips into one roll, gluing one strip to the other alternately. You should try to twist it as tightly as possible. After all ten strips are wound, push the middle of the “roll” upward. The result should be a neat cone. We repeat again, the result should be two such cones (it is advisable to make them the same color, it will look more beautiful).


We cut out two strips 4 centimeters wide, and twist them into a circle with a diameter identical to the cones. We get the “cabin” of the rocket. From 1.5 centimeter strips we wind six “rolls” consisting of five strips. We make cones from the three resulting rolls, and glue the remaining three as a base to each resulting cone. All that remains is to assemble the rocket. We put all the parts in place using superglue.
The rocket is ready to launch!
Your baby will love these toys because he will create them himself and it will be very interesting to play with them.
Making rockets with your own hands from scrap materials is a popular hobby among residents of Western countries. In Russia, home “rocket science” is not in such high demand, but even here we meet enthusiasts. And in most cases, these are not students of technical specialties, but parents of little fidgets and young dreamers. Only loving mothers, fathers and creative teachers-educators know how to make a rocket with their own hands from paper, cardboard, bottles, so that it not only involves children in space travel, but also takes off spectacularly. Using diagrams and models, brave experimenters will make a rocket that flies out of matches and foil. Don't believe me? Experience our master classes with photos and videos for yourself!
How to make a space rocket with your own hands from scrap materials - a step-by-step master class for children and parents

To give your child a new exciting toy, you don’t have to visit stores and auctions of expensive children’s goods. You can make a bright, interesting and, most importantly, safe thing with your own hands. For example, an intergalactic rocket for entertaining role-playing games and virtual travel. And our step-by-step master class “How to make a space rocket with your own hands from scrap materials” will simplify and speed up the collective creative process of parents and children.
Necessary materials for a rocket from scrap materials
- plastic bottle
- colored terry sock
- glue gun
- sheet of red felt
- thick foil
- cardboard
- scissors
- red and yellow yarn
- paper towel tube
- thin cord
Step-by-step master class for children on creating a space rocket from scrap materials
- Wash the empty plastic bottle with warm water and dry. Place a colored sock over a clean, dry container. Tie it with a thin cord under the bottom of the bottle and cut off the tail.

- Cut out two circles with a diameter of 5 cm from red felt. Glue the figures onto the finished base of the rocket, imitating portholes. On the red circles, use a glue gun to secure the same round parts made of thick foil, but with a smaller diameter. Approximately - 3.5 cm.

- Draw three “fins” on a piece of white cardboard. Cut out the shapes and glue them point down to the rocket on three sides.

- Cut a ring 5-6 cm wide from a cardboard tube (from toilet paper or paper towels). Wrap the piece in thick foil. Wind the red woolen threads around your palm, then glue the resulting skein on one side to the previously prepared part.

- Do the same with yellow yarn. This way you can make the lower part of the rocket with decorative flames. Secure the part with a glue gun to the bottom of the bottle. This completes the step-by-step master class for children and parents “How to make a space rocket with your own hands from scrap materials”!

How to make a bright rocket out of cardboard and paper with your own hands - diagrams and models

If preschoolers are delighted and delighted by a small toy rocket, the size of a bottle, then older children will love the “full-length” spacecraft. Having your own intergalactic ship will allow younger schoolchildren to feel like real captains and show courage, bravery and bravery, as the main traits of a man’s character.
How to properly make a large model of a rocket out of paper and cardboard with your own hands for a child, see the next master class with diagrams, photos and videos.
Necessary materials for a DIY paper and cardboard rocket model
- carton boxes
- colored paper
- yoghurt cups
- disposable plates
- plastic covers and buttons
- letters and numbers on adhesive backing
- bobbins of thread
- flower pot
- foam circle and pieces of fabric
- letter stencils
- markers
- scissors
- pencil
- satin ribbons
- thick foil
- glue gun
A simple diagram of how to make a rocket model from cardboard and paper with your own hands
- Start creating a bright rocket with the help of the kids. Let children help you with their favorite toy tools. Use a large household appliance box as the base of the rocket. Ideally, from the refrigerator.

- Make the top of the rocket from a painted flower pot, disposable dishes and plastic spools of sewing thread. Decorate the details with pieces of satin ribbons and voluminous stars made of colored paper.

- Cut a round window in the front wall of the rocket. Wrap the foam circle with multi-colored satin ribbons and glue it to the panel in place of the porthole. Glue a few spools of thread a little higher and mark them with adhesive numbers. This will make it easier for the little pilot to count down the time before launch. Below the window, place another instrument panel to make the rocket more interesting.

- On the right side of the space rocket, equip the fuel tank lid with bright plastic buttons. Plastic bottle caps, thread spools, and old buttons from various devices will be useful for this.

- Don't forget about the front door. Draw a large oblong rectangle on the back wall of the rocket and cut three sides (bottom, top and right). The remaining left side will serve as a curtain. Decorate the captain's door with decorative elements.

- Draw two “legs” on thick cardboard, cut out the parts and cover them with foil. Fix the elements on the bottom of the right and left walls of the rocket. At this point the spacecraft is ready. For a clear picture of how to make a bright rocket out of cardboard and paper with your own hands, see the model diagram.

How to make a rocket with your own hands so that it flies - step-by-step instructions with photos and videos

Even using the most primitive waste materials (candy boxes, cardboard napkin tubes, etc.), you can make an unusual rocket with your own hands that will fly. Of course, she will not be able to surf the expanses of the universe, but she will boldly go on a journey through the children's room. Use our step-by-step instructions with photos and videos to make a nice gift for your kids for the significant Cosmonautics Day.
Necessary materials for a DIY flying paper rocket
- paper towel tube
- thick cardboard
- scissors
- pencil
- brushes and gouache paints
- permanent marker
- yarn
- drinking straw
Step-by-step instructions with photos and videos for creating a flying rocket with your own hands

How to make a simple bottle rocket with a launcher to make it take off

If the kids have grown up a long time ago and are no longer interested in toy models made of cardboard, invite them to make a simple rocket with a trigger mechanism that can fly high and impressively. Rest assured, the trick of launching a spacecraft will cause wild delight even in an adult. What can we say about impressionable teenagers?
Materials needed for a simple bottle rocket with launcher
- thick cardboard
- thin cardboard
- scotch
- plastic bottle
- plasticine
- wine stopper
- pencil
- scissors
- Bicycle Pump
Step-by-step instructions for creating a simple rocket with a trigger mechanism
- Roll a sheet of thin cardboard into a cone. Trim the edge to make the shape even.

- Cover the finished cone with colored tape, this will increase its resistance to water.

- Wash and dry the empty bottle. Paint the container in any color, if desired, draw an emblem or leave an inscription.

- Glue the main part of the rocket - the cone - with liquid silicone to the bottom of the bottle. Try to make the structure as smooth as possible.

- Cut out 3-4 right triangles from thicker cardboard. Glue the parts to the bottle. This will give the rocket tail fins. Ideally, the “legs” should end at the level of the extreme point of the container neck.

- Weight the bottom of the rocket. To do this, wrap a piece of plasticine around the neck of the bottle and disguise the load with adhesive tape.

- Pour 1 liter of water into the bottle.

- Use a needle to make a thin hole in the wine cork. The hole size should not exceed the diameter of the bicycle pump needle.

- Carefully insert the cork into the neck of the bottle. Insert the bicycle pump needle firmly so that it does not pop out.

- Take the rocket with the neck up and connect it to the pump. Turn the spacecraft over and position it so that it does not fly towards you.

- Holding it with your hand, inflate the rocket with air. Then release the craft and continue pumping air. A simple bottle rocket with a launcher will take off as soon as the cork can no longer hold the pressure.

How to make a rocket from matches, foil and other improvised materials with your own hands according to video

And for those who want to remember a fun and carefree childhood, being already old enough, we have prepared another master class with a video on making a flying rocket from matches, paper clips and foil. This time you won’t have to make crafts from cardboard, paper, bottles and other scrap materials. It is enough just to remember that very simple model that flies, and carefully reproduce it, observing safety precautions. And if you can’t remember the step-by-step instructions in your memory, watch the video “How to make a rocket from matches, foil and other materials with your own hands.”


 united with Archbishop Martin (Lapkovsky), former hierarch of the Russian Orthodox Church (V-F), “on the basis of imyaslaviya”")


