Girls, hello! Remember labor lessons at school? For me, these were completely useless classes for 11-13-year-old schoolgirls, because all sewing or cooking tasks were carried out rather thoughtlessly, in haste. Is it possible to instill thriftiness in teenagers with such lessons, a controversial question. I remember sewing lessons, and especially the first self-sewn skirt-sun, which in the finished version did not fit on me at all due to incorrectly taken measurements. In fact, sewing a skirt of this style is not at all difficult, the main thing is to approach this process with interest. Today I will tell you how quickly and easily a sun skirt is sewn (pattern, fabric calculation is also in the article), how to take measurements correctly so that the thing really “sits down”. Happy viewing!
Step-by-step instructions for sewing a sun skirt, building a pattern, calculating fabric
Skirt - the sun: the pattern and calculation of the required amount of fabric is the most difficult stage of the whole process, so let's take a closer look. Let's start from the very beginning, namely with a sketch. Here I advise you not to invent any complicated designs if you are sewing for the first time, besides the classic shape of the A-line flared skirt. To make the thing come out original, you can play with the color and texture of the fabric. Also, you can always decorate the skirt at your discretion with decorative elements, whether it be flowers, stones, lace. So, having drawn a sketch, you need to take measurements from yourself in order to acquire the required amount of fabric and build the correct pattern. You need only 2 measurements: waist circumference and the length of the future skirt-sun (flared). After taking measurements, we build a pattern, because our skirt is essentially round, we need to cut out a “place for the waist”. We calculate it using the formula waist girth / 2π, where π = 3.14. The resulting value will be the radius of the circle for the waist. To understand what I mean, look at the picture below. 
Before going to the store, you will also need to calculate the required amount of fabric. Consumption is calculated using the following formula: waist circumference / 2π + skirt length + hem allowance. In order not to make a mistake and buy a sufficient amount of material, remember the rule that the expense calculated by the formula should not exceed the width of the material. If this happens, then you will have to lay out the pattern on the fabric in 1 layer and cut out 2 semicircles.
If you doubt that you have made the correct calculation, then seek help from a consultant in a fabric store. By the way, among fabrics it is better to give preference to cotton, because. it will be much easier to sew a sun skirt (flared) from it. 
Skirt-sun: with a zipper and elastic
After acquiring the material, you need to decide which version of the skirt to sew: with a zipper or with an elastic band.
In order to sew a skirt with a zipper, you need a circle of fabric, folded four times, cut along the fold along the share. Insert a zipper into the resulting incision, and process the upper cut with a belt or braid. Be careful: the zipper should not unfasten the finished product.
With an elasticated skirt, everything is even simpler, only use the hip circumference when taking measurements and building a pattern. A drawstring is sewn to the upper cut from a strip of fabric folded in half, the length of which is the girth of the hips plus 2 cm, then insert the elastic into the drawstring. 
After you have sewn on the zipper or elastic, finish the bottom edge of the product: the skirt is ready to wear! By the way, if you don’t have a sewing machine, then it’s better to sew a sun skirt with an elastic band, and fix the bottom edge with adhesive tape (in this case, add another 1.5 cm to the length of the product). 
The sun skirt, about the pattern and calculation of fabric for self-sewing, we talked today, is one of the simplest clothing options that any girl can reproduce. The key to this is patience! Wear a sun skirt (flared) and flutter like a butterfly! Good luck with your fashion endeavors!
You can sew a skirt of any length. In our master class, we opted for a long sun skirt.
How to build a sun skirt
A sun skirt is one of the options for a flared skirt. It is based on a circle. You can make a sun skirt pattern yourself with the help of our master class. A step-by-step illustrated master class will tell you how to take measurements correctly, make calculations for construction and complete the design of a long skirt-sun, half-sun skirt and flared skirt based on 1/6 of the circumference.Step 1

We cut 2 halves of the "sun" and the belt, taking into account the allowances for the side seams and the hem of the bottom - 1.5 cm, and for the upper cut of the skirt and the belt - 1 cm.
Step 2

We overlock the side sections of the front and rear panels on the overlock on the front side.
Step 3

We grind the right side seam 1.3 cm from the edge.
Step 4
Iron out the side seam.Step 5
Cut out a strip of adhesive fabric or interlining 4 cm wide and equal to the length of the belt.Step 6

Duplicate the belt detail with glue cloth.
Step 7

We fold the part of the belt in half (along the long side) with an adhesive cloth inside and iron it.
Step 8

We overcast one long section of the belt detail on the overlock (on the front side).
Step 9

We lay two lines with large stitches along the front and back panels along the waist line 0.7 and 1 cm from the edge (for fitting).
Step 10
Slightly collect the front and back panels of the skirt on two lines along the waistline to the length of the belt.Step 11

We sew the belt (with a raw cut) to the fitted panels of the skirt 1 cm from the edge.
Step 12

We iron the allowances towards the belt.
Step 13
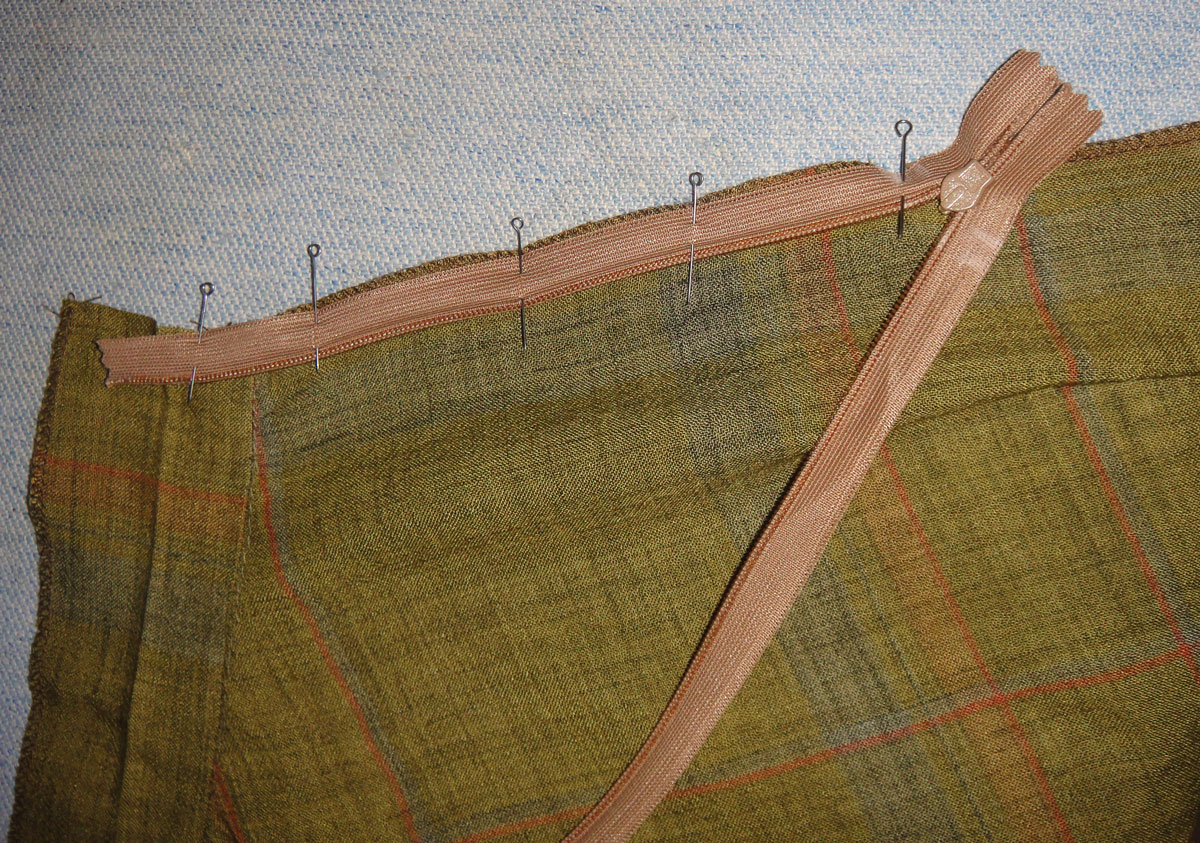
We prick with pins a hidden zipper on the front panel of the skirt “face to face”, the edge of the fastener coincides with the middle (upper) fold of the belt.
Step 14

We sew a zipper to the front panel of a long sun skirt. We use a special foot for a hidden zipper.
Step 15

We prick with pins a hidden zipper on the back panel of the skirt “face to face”, the edge of the fastener coincides with the middle (upper) fold of the belt. We check whether the seam of attaching the belt matches when we fasten the zipper.
Step 16

Attach the zipper to the front of the skirt.
Step 17

We grind the side seam of the sun skirt from the bottom to the zipper, we make a bartack at the base of the zipper.
Step 18

Iron out the side seam.
Step 19

We fold the end of the belt along the upper fold line face to face (turn inside out).

We grind the outer and inner halves of the belt, laying the line in the line of attaching the zipper, or retreating from it by 1 mm towards the cut.

We twist the end of the belt, iron it. Repeat the same with the other end of the belt.
Step 20

We pin with pins or we outline the inside of the belt to the skirt. We adjust, laying a line along the front side of the skirt in the seam of attaching the belt.
Step 21
We iron the belt.Step 22
We level the bottom from the floor. It is best to do this on the figure on which we sew the skirt, but you can also use it on a mannequin.Step 23

We bend and iron the bottom of the skirt.
Step 24

We hem the bottom of the sun skirt with a hem seam with a closed cut.
Step 25
Iron the bottom of the skirt.
The long sun skirt is ready!
You can also sew.A skirt is always beautiful and feminine, and a sun skirt is femininity a thousandfold. Sewing the latter is very simple, and wearing the fruits of your creativity is many times more pleasant than a purchased item. Today's article is a detailed, step-by-step master class with photos. After reading it, you will be able to sew a wonderful skirt, spending only a couple of hours of free time on it.
Sun skirt fabric
The choice of fabric is one of the fundamental success factors in tailoring a product. Even if you correctly determined the style of the outfit that suits your type of figure, color scheme, but at the same time bought a fabric of the wrong structure, texture and quality, the result will disappoint you. In other matters, most materials are suitable for a sun skirt, you just need to know what kind of product you want to get. The best option is a fabric of medium hardness and the same degree of drape. Gabardine fits this description perfectly. This is a very high quality fabric that does not shrink when washed and wear-resistant. Things sewn from gabardine retain their original appearance for a very long time, they are easy to iron and wrinkle slightly.
Skirt sun pattern
In ours, it is sewn in size 42 (waist circumference 64 cm). Fabric consumption is taken taking into account the length just above the knee (45 cm from the waist). If you are planning a skirt longer or, conversely, shorter, then you will need more or less fabric, respectively.
So, for work you will need the following materials:
- gabardine - 1.3 m;
- dublerin (or interlining) - 30 cm (with a width of 150 cm);
- oblique inlay - 4 m;
- secret lock 20 cm;
- spool of thread to match the fabric;
- button;
- soft mesh - 0.5 m.
Before starting work, be sure to iron the fabric. Firstly, the material will shrink a little, and secondly, it will be much more pleasant to work with the fabric.

The sun skirt pattern is so simple that you can do it immediately on the fabric, without transferring from paper.
Fold the ironed fabric in half. To prevent the material from “driving” during the construction of the pattern and cutting out the details, carefully chip off the fold with needles.

Then measure and mark the middle of the fabric fold with a contrasting chalk.

The next step is to calculate the radius. In order not to build complex schemes, simply divide the waist circumference (+ 0.5 cm) by 6.28. For example, if the waist circumference is 65 cm, then the radius will be: 65.5 / 6.28 = 10.4 cm. Attention, if you plan to sew a sun skirt with an elastic band, then consider the radius according to the circumference of the hips, otherwise you simply cannot wear it.
From the intended center, measure the resulting radius to the right, left and down at a right angle. Then connect three dots to get this semicircle. To make the figure even, use a centimeter as a compass.
 Now you should postpone the length of the skirt. From the edges of the drawn semicircle, measure the desired length of the skirt with a ruler. And draw another semicircle.
 Draw a straight line in the center of the skirt - this is the future seam where the lock will fit.
 That's all, the skirt pattern is ready, you can start cutting it out. You get this element.
 Cut the skirt along the "seam" that you outlined earlier. If the skirt was sewn on an elastic band and the radius was calculated according to the circumference of the hips, then there will be no seam.
We sew a skirt the sun
Now be sure to try it on. Wrap the skirt around your waist and check that everything fits well. If the waist circumference of the skirt turned out to be much larger, excess fabric should be removed. To do this, determine exactly how much you have to cut off, then divide by 2 and measure the difference from the two edges of the skirt - cut off. Attention, never cut off all the difference on one side, then the edges of the skirt will not converge and you will simply ruin the material.Remember that you must have left seam allowances. It is 1 cm along the waist line, 2 cm along the side seam, and 0.5 cm along the hem (for the sun skirt).
Process the edges of the skirt on an overlock or typewriter: the bottom and side seams. Leave the waist line intact.

Then "walk" along the edge of the skirt with an oblique trim.

Despite the fact that the edges of the skirt will be almost invisible, still carefully consider the edging process. If you do not have a special foot, then it is better to baste the tape before sewing it on.

The next couple of paragraphs will focus on the decorative element of the skirt, which is optional. If you want to leave only a slanting inlay on the bottom, then just scroll the article a little lower.
Cut strips from a soft mesh, about 2-3 cm wide. This is a future decorative assembly. The number of stripes depends on the width of the bottom of the skirt. For reference: the width of the skirt in the photo is a little more than 3.6 m, it took 11 such strips to decorate it.

Sew the strips together, turning them into one long ribbon. Then set the stitch on the machine to at least 3 mm, loosen the thread tension and stitch along the tape, a centimeter from the edge. Then fold the strip with your hands, forming ruffles. For these purposes, you can purchase a special foot (pictured), which will immediately make a decorative element from any fabric.

You will get such cute ruffles.

Pin the frill to the wrong side of the skirt so that a wavy mesh peeks out from the front, but the seam is not visible.

Stitch them on the machine. It is advisable to sew the frill along the same line as the bias tape, or so that the new line runs parallel to the previous one. Don't worry if you can't make the frill even, as soon as you sew them to the skirt, just trim them with scissors and that's it.

Now fold over and iron the back seam allowances.

Baste the zipper and sew it on using the special zipper foot.

Close the back seam.

The secret lock on the front side should not be visible.

Iron the back seam from the wrong side.

Now let's start sewing the belt. To do this, cut a rectangle out of the fabric. Its length should be 5 cm more than your waist circumference (of which 3 cm for entry and 2 cm for processing). The width is equal to twice the width of the desired belt + 2 cm for processing. Those. if you want to make a 5 cm belt, then the width of the workpiece will be 12 cm (5 x 2 + 2 cm). Cut a similar rectangle from dublerin (you can use interlining, it is cheaper). Attach the doubler with a glue base to the wrong side of the belt and glue it with an iron. Then overlock one side of the belt.

Mark the allowances left earlier. The button will be located on the right side, so we leave 4 cm there, and 1 cm on the left side, there will be a loop. Mark the lines, taking into account the fact that the belt will be sewn to the skirt with the raw side.

Baste the belt to the skirt with needles, leaving the marked ends free.

 Sew the belt with the raw side to the skirt, at a distance of 1 cm from the edge.
 Before you continue sewing, be sure to check that the back seams of the belt are joined. All irregularities will be noticeable when worn, which looks ugly.
 Turn the left side of the belt as shown in the photo and fix the corner with a needle.
 Sew on the machine at a distance of 1 cm from the edge. This centimeter was just left for processing.
 Then carefully, at a distance of a couple of millimeters, cut off the allowance.
 Turn the corner of the belt right side out. Correct the corners by prying the allowances from the wrong side. You should get such a flat corner.
Do the same on the other side. Start sewing from the top, reduce the stitch length in the middle and sew the corner of the waistband, then increase the stitch and sew to the end. Turn right side out and straighten all corners as well.
 Fold the belt over to take its final shape. Iron it and the seam that connects the belt to the skirt from the front side.
 Pin the belt so that it lies motionless on the skirt. From the “face” of the product, lay the line exactly into the seam, which is shown in the photo. When working on a typewriter, slightly part the skirt with your hands so that you can clearly see where the needle should hit.

The threads that remain after sewing must be hidden so that there are no knots. To do this, make 2-3 knots, tighten them well, then thread both threads into one needle and insert the last one into the belt, and after 2-3 cm, cut the tail that came out. 

We make a loop on the left side. It is located 0.5 cm from the edge, exactly in the center. Mark the beginning, attach the button and circle it (beginning and end of the button). This will be the loop size. Make the latter with a special foot.
 Open the loop with a seam ripper. You need to do this from the edges to the center. Cut very carefully so as not to damage the threads.
 Now you need to determine where to sew the button. To do this, connect the belt and pierce the very edge of the loop with a needle. Then remove the loop and sew on the button, stepping back from the puncture site of millimeter 3.
 After sewing on the button, check whether it fits well and how easily it passes into the loop.
 The final step is to iron the product, paying special attention to the seams.
That's all, the sun skirt is ready! Now the best part - fitting.


A skirt-sun will give a pleasant roundness to a thin figure, make it more seductive and feminine. Modern stores offer a variety of things for every taste, and you can always find what you want. But if you want to have an exclusive model, then it is better to sew a skirt yourself. For a woman who has minimal sewing machine skills, this is not difficult. Consider tips on how to sew a do-it-yourself sun skirt for beginners.
Here is such a skirt-sun can turn out even in the absence of sewing experience
For beginner craftswomen, a step-by-step instruction has been developed, which includes:
- taking measurements;
- drawing up a pattern;
- transferring markings to fabric;
- cutting;
- sewing.
The instruction for beginners on how to sew a sun skirt is not complicated, and if you follow all the points, then success is guaranteed. And in the wardrobe there will be a fashionable exclusive thing.
We prepare everything you need
Sewing begins with the preparation of the workplace. For work you will need:
- pencil;
- pattern paper;
- thin chalk;
- scissors;
- needles and sewing pins;
- ruler;
- tailor's centimeter;
- the cloth;
- hidden zipper;
- hook or button for a belt;
- threads;
- sewing needle.
When buying material, it is important to consider the width of the fabric, because the length of the sun skirt depends on this size.
Taking measurements for cutting
Despite the fact that you don’t need to make complex drawings to build a sun skirt pattern, you still need to take a few measurements and make small calculations. You will need to freeze:
- waist circumference;
- the length of the product (chosen at will, because only the woman decides how long the sun skirt should be).
It is important to measure the waist circumference accurately, because the convenience of the thing depends on how well the drawing is built. If you make the size larger, then the sun skirt will slide down to the hips, and if it is smaller, the belt will put pressure on the stomach. The waist measurement is measured along the thin part of the body above the hips.
We draw a pattern
The most difficult thing is to draw a circle without a compass, but this task can be handled. First you need to draw a small circle (place for the waist). To do this, we recall school mathematics lessons and carry out simple calculations: we divide the waist circumference by 3.14 (pi) and by 2 - we get the radius. Next, you need to follow the instructions step by step:
- from a right angle on paper, set aside the radius and mark with a pencil;
- to get a perfect circle, make a few more marks (the more, the better);
- connect the marks with each other with a rounded line;
- cut out the marked corner section.

The pattern is drawn on paper in accordance with the calculated dimensions, and then transferred to the fabric
Material cutting
Perhaps this is the most terrible moment for beginner craftswomen, because inept actions can irreversibly spoil the material. But there is no reason for fear. The pattern is so simple that even beginners successfully cut out a beautiful skirt. Before you start cutting, you need to decide on the number of seams:
- One. The most ideal option would be to cut a skirt with one seam. To do this, you need to fold the fabric four times and put a pattern on the material (for convenience, it is recommended to pin the paper with sewing pins). It is important to leave 2 cm at the cut points for a seam allowance. Such a product is sewn easily and quickly. But, unfortunately, it is not always possible to acquire the material of the required width.
- Two. This option is sewn most often. The fabric is folded in half, and a paper blank is applied to it. After marking with chalk and cutting off the excess, taking into account the seam allowances, half will be cut out. The operation must be repeated again on the second piece of material.
- Four. The sun skirt with four wedges is almost never done. The four-wedge option is chosen only if you need to emphasize the features of the fabric.
Additionally, a belt is cut out - a strip of fabric 10 cm wide, and its length will be the waist circumference plus 3 cm (dimensions are given without seam allowances). So that the cut in the seam allowances does not crumble in the process of working on the product, it can be processed using an overlock.
Responsible moment - assembly
The work consists of several stages:
- Connecting the side seams (it is important to leave room for sewing in the zipper). It's easy, just sew the pieces together with a sewing machine.
- Bottom processing. Care will be required to make the semicircular edge even. It is best, after basting, to iron the thing well and evaluate the result. If exactly, then you can hem.
- Lock stitching. "Lightning" is sewn into the place left for it.

Before sewing on a zipper, it must be basted
Now you need to sew on the belt. To do this, a strip of fabric must be folded along the length and ironed. Next, we sew the outer side of the belt to the upper edge and iron it well, after which we attach it to the inside. On the protruding section of the belt, using an overlock, we make a buttonhole. The finished thing needs to be ironed and check how smooth the seams are.

When sewing a sun skirt with a belt, a wide strip is also first swept
Model options
Some craftswomen ask how to sew a sun skirt for a girl of 5 years old or any other age. Are there any features of building a skirt for children? There are no special features, the pattern of the sun skirt for girls is done according to the step-by-step instructions described above. Consider the options for children's models:
- Skirt double sun. To build the inner circle, half the radius is measured. 2 circles are cut out, which are interconnected. Further sewing operations are carried out according to the standard scheme. The fluffy skirt will appeal to little princesses.
- Skirt-sun with a high waist. Ideal for petite girls and women. Allows you to visually increase growth, and at the same time hide extra pounds. In order to give an image of style, when sewing a model with a high waist, it is recommended to make the belt wider. When constructing a pattern, take measurements not from the narrowest part of the body, but higher. When sewing a skirt for a child, so that the thing does not slip during active movements to the waist line, the craftsmen advise sewing original straps to the belt.
- Skirt-sun with a wide belt. The width of the cut out strip of fabric for the girdle must be greater than indicated in the step-by-step instructions. In a wide belt, in order to give additional rigidity, it is necessary to insert the adhesive base, and then iron it well.
- Sun skirt with pockets. It is not recommended to heavily weight the thing with complex mortise pockets, they will look out of place. It is better to refuse them. When making pockets on children's things for storing house keys or a handkerchief, it is better to get by with the simplest model - invoices.
- Basque skirt. The upper skirt (basque) must be sewn according to the proposed instructions, only the length should be made small. This option is not suitable for full ones - the peplum adds volume.
- Skirt-sun on an elastic band. All details are sewn step by step, but there is no place for a fastener. The upper circle (waist) is made larger. After sewing on the belt, one or more elastic bands are inserted into it (depending on the width). A simple skirt with an elastic band can be worn for gymnastics or kindergarten.
- School uniform option. A skirt-sun in a cage or made of soft plain fabric is convenient for going to school. For this, a simple children's skirt with an elastic band can be sewn. If there is a machine for shirring fabric, then you can make a school pleated skirt.
Choice of length
There are 3 length options:
- Mini. Short skirt to mid-thigh. Great summer option. It is well sewn from a fabric that lays down in soft folds, creating a feeling of airiness.
- Midi. Model to the knee, appropriate at any time of the year.
- Maxi. A sun skirt (flared to the floor), depending on the color of the fabric, looks strict or romantic, but is inconvenient for constant wear.
The choice of length depends on the habits and taste of the woman. It is only important to remember that when wearing a mini, the emphasis is on the legs. This option is not suitable for the fair sex with short legs.
A little about the material for sewing
You can take any fabric for a sun skirt, but it is worth remembering that not only the color, but also the nature of the material affects the appearance of the thing:
- Neoprene sun skirt. The fabric is considered an ideal option, because the neoprene structure (the material is made on the basis of foamed rubber) passes air well and does not wrinkle. The thing will always look neat.
- Skater skirt in gabardine. A warm gabardine skirt is perfect for winter and off-season. But it is worth remembering that a product made of dense fabric with natural wool needs care: it is necessary to regularly remove the “pellets”.
- Leather model. If you need a leather thing, then it is recommended to give preference to thin suede. Other types of leather will bulge in uneven folds.
When choosing a material, thin or moderately dense fabrics should be preferred. Then the model will give the impression of lightness.

There is also a model of a sun skirt without a seam. The possibility of its tailoring depends on the width of the fabric used.
Following the proposed step-by-step instructions, even a novice craftswoman can easily sew a fashionable sun skirt for herself or her child, and the suggested recommendations will help make the thing original and exclusive.
The cut of the half-sun skirt is universal. Made from soft, well-draped fabrics, it will hide the flaws of a plump figure. Made from a dense and shape-holding material, on the contrary, it will make the hips of thin girls more rounded. Below are several ways to cut out a half-sun skirt, as well as instructions for them.
How to sew a semi-sun skirt
Before you correctly draw a half-sun skirt pattern, otherwise flared, you need to take the necessary measurements:
- semi-waist - CT;
- semicircle of the hips - SB;
- product length - Di.
For example, let's take these 3 values \u200b\u200bare equal to 38, 52 and 70 cm. The construction includes the following steps:
- Construction of a right angle, the vertex of which is indicated by the point O.
- Deposition from the vertex of a right angle, i.e. point O, the radius required to build the waist line. Its value is calculated by the formula - K * (ST + CO): K - the coefficient of curvature of the upper cut of the skirt, which is equal to 0.64 for this model, CO - the value of the free fit, equal to 1 centimeter, OT \u003d OT1 \u003d 0.64 * (38 + 1) = 24.96 cm.
- Drawing a semicircle through the points T, T1 and T2. The first 2 are obtained by setting aside the radius calculated in the previous paragraph. Point T2 is at the intersection of the semicircle and the bisector of the right angle.
- Postponing the length of the skirt from the points T, T1 and T2, i.e. values Diz = 70 cm.
- Length adjustment. If the shared thread goes along an oblique or across, then it is necessary to raise the H2 point up by 2 + 1.5-2 cm, i.e. the distance H2-H3 must be taken within 3.5-4 cm.
- Making a new bottom line through the points H, H1, H3.
- Fold correction, i.e. crease in the middle of the front. To do this, you need to straighten the waist line, raising the T2 point by 2 cm, i.e. T2-T3 \u003d 2 cm. Then arrange it for new points - T, T1 and T3.
- Creating an artificial welt for a skirt model with 1 or 2 seams. To reduce the size of the coattail on the side seams and make it easier to draw the fabric, the seams along the bottom of the product must be moved by 2-8 centimeters.
- Pattern of the second same part, if the skirt involves 2 parts. For a single-seam product, you must first fold the material in half.
How to cut a semi-sun skirt on fabric

After the drawing of the pattern is ready, you can begin to transfer it to the fabric. First you need to transfer all the lines to thick paper and cut out patterns from it. You can cut a skirt in 2 ways:
- With one detail, then you will have to sew a semicircle with only one seam, which is located on the back.
- From 2 parts, i.e. quarters. In this case, the seams are obtained along the longitudinal and transverse threads.
With one seam
For a beginner seamstress, a half-sun skirt pattern with one seam will be easier. Such a simple model can be cut immediately on the canvas. The instruction includes several steps:
- Make the necessary measurements, build a half part according to the above instructions.
- Take a canvas with a length equal to two lengths of the product. In our example, this value will be equal to 70 * 2 = 140 cm. The width of the canvas is calculated by adding the length of the skirt, the radius of the recess for the waist and an additional 6 cm, i. 70 + 25 + 6 = 101 cm.
- Fold the canvas inside out.
- Combine the share line of the half-sun skirt pattern with the fold of the fabric, pin the pattern.
- Add allowances of 1.5-2 cm at the waist and bottom, 1-2 cm on the sides.
- Cut off a double cut and cut out the part.

On an elastic band
A model such as a half-sun skirt with an elastic band does not involve the use of a zipper. The finished product should be easy to put on without a fastener. Therefore, to the waist volume from our example, you need to add another 15-20 cm. We get 38 * 2 + 18 = 94 cm. The half-sun skirt pattern will be made for a waist with a circumference of 94 cm. The cutting instructions are as follows:
- Calculate the radius of the circumference of the waist line - R \u003d From / 3.14 \u003d 94 / 3.14 \u003d 30 cm.
- Draw on paper or immediately on a fabric folded in half, a circle with a radius of 30 cm. Set it aside from the corner of the folded material.
- Draw another circle with a radius calculated by the formula - R1 \u003d R + Diz + 2 \u003d 30 + 70 + 2 \u003d 100 cm.
- Add seam allowances, cut out.
With pleats

To build a skirt pattern in the shape of a semicircle with folds, you need to determine their number and depth. For example, take 4 folds on the front and back of the product. Let them be 3 centimeters deep. Then we get the radius of the circle for the waist line:
- R \u003d (38 * 2 + 8 * 3 * 2) / 3 - 2 \u003d 39 cm.
Given this radius, we calculate the second one to determine the bottom of the product:
- R1 \u003d R + Di + 2 \u003d 39 + 70 + 2 \u003d 111 cm.
On a coquette
Building a pattern for a half-sun skirt with a yoke includes the following steps:
- Having decided on the height of the coquette (for example, take 20 cm), build it according to the principle as for a direct product.
- Subtract the height of the yoke from the length of the skirt to determine the size of the lower part - Di - 20 \u003d 70 - 20 \u003d 50 cm.
- Construct the lower part from the condition that the first radius will be equal to R \u003d 2 * Vkok - 2 cm. The second is determined from the condition - R1 \u003d R + 50.
- Add seam allowances, attach the pattern and cut out the product.
With two seams
A half-sun skirt pattern with 2 seams is very easy to make. You just need to take measurements and cut out 2 parts according to the above instructions, i.e. quarters of a full circle. For this:
- Calculate the dimensions of the canvas. In our example, this is 140x101 cm.
- Make patterns according to the calculated values \u200b\u200band taking into account seam allowances.
- Lay the fabric wrong side up on the table.
- Pin the pattern from one corner of the canvas, circle it.
- Then mirror pin the pattern on the other side of the canvas so that the bottom of the future parts is in contact.
- Circle the pattern a second time.
- Cut out both pieces.

Fabric consumption for a half-sun skirt
- 2*(R + Di) + 10.
The R value in this formula is determined by the difference between 1/3 of the waist and 2 cm for seam allowances. For the example taken with OT 38 * 2 = 76 cm, this number turns out to be 23 cm. Then, using the above formula, you can determine the amount of material - 2 * (23 + 70) + 10 = 196 cm. It turns out that fabric consumption can cover a canvas with a width 2 m and a length of 90 cm. For a product with an elastic band, the value R \u003d 90/3 - 2 \u003d 28 cm will change. The value 90 is taken from the condition that a pattern was made for such a waist volume. Then the fabric consumption will be different - 2 * (28 + 70) + 10 = 206 cm.
For a model with pleats, the value R = 39 * 2/3 - 2 = 24 cm, and the consumption value is 2 * (24 + 70) + 10 = 198 cm. From the formulas it can be seen that the required amount of material depends on the length of the skirt and its type . In addition, a different calculation is needed for material with a pattern, such as cells or lines. For single-seam models, you need to move the pattern until its corners coincide with the longitudinal and transverse stripes. If the cut takes place on a bent fabric, then you need to combine the drawings of its layers. The consumption for such materials will be greater by the value of the pattern repeat.
Video: how to cut a half-sun skirt
Having learned how to cut a skirt in the shape of a semicircle, you can even sew a dress for yourself, one-piece or detachable. In addition, this form is easy not only to create patterns, but also to stitch parts, especially for a single-seam product. If according to the written instructions it is difficult to make a pattern of a half-sun skirt on your own, then watch useful videos that clearly show the whole process.
Half sun pattern
Do-it-yourself semi-sun skirt
Long semi-sun skirt
How to sew a half-sun skirt with an elastic band


")


")
