With the arrival of autumn, it was not only the time for rains, but also the time for creating beautiful autumn crafts. It's good that autumn is no less generous than summer and we have something to make autumn crafts for kindergarten.
Additionally, to work with natural materials, you will need paints, brushes, a glue gun, small colored pompons, feathers, remnants of felt or fabric, beads, and other options for various decor.
Now, knowing what to make autumn crafts from, let's get down to creating them as soon as possible. For example, pine cones make such cute chickens. For them, you will need cones, yellow gouache, a brush, a foam ball or large bead, a glue gun, plastic eyes, a piece of orange felt and scissors. Paint both the bump and the ball in yellow, glue them together, glue a felt beak and eyes to the head, and a pair of legs to the bottom of the bump. If you have a pair of real feathers, you can glue them on the sides of the chicken.

A hedgehog from a cone can be made in two versions. In the first case, you will need a bump, a piece of light brown or beige felt, eyes, a small black pompom, and a glue gun. Cut out the piece for the hedgehog's face from felt, arrange it appropriately and glue it to the bump.

The second option assumes the presence of a large number of spruce cones, a small plastic bottle with a black cap, a glue gun, jute rope, a large ready-made eyelet, or the remains of black and white felt. Wrap the neck of the bottle with jute rope and glue the cones all over the bottle. Cut out the eyes out of felt and shape the muzzle.

A wonderful owl can turn out if after a trip to the forest you have acorn hats, a piece of bark and a pumpkin seed. Just glue all the details and secure the owl to the tree branch.

To make a snail, you will need chestnuts, plasticine and a pair of matches for horns. If there are no matches, then you can replace them with toothpicks, however, it is worth protecting the child from injury and sticking a bead on the ends of the horns.

You can also turn a chestnut into an incomprehensible but funny animal by gluing huge paper eyes, a pair of paper legs and a braid hat to the chestnut.

A bright beloved beetle, ladybug, you will definitely succeed if you find a chestnut, a couple of eyes, paints and two pushpins. You can read more in our master class.

Young fans of the cartoon "My Neighbor Totoro" can create their favorite character from acorn and paper. Paint the acorn with gouache, and make the ears from tiny pieces of paper or paper and glue to the acorn.

A nutshell will turn into a boat in a matter of minutes, if you glue a tree branch inside each shell and attach a leaf sail.

The variety of autumn leaves stimulates children's imagination and, as a result, we can see completely extraordinary things.
For example, here are such funny leaves made of leaves. Just glue the maple leaves to the paper, add the handles, legs and glue the eyes with a spout.

Hedgehogs from leaves will turn out for every kid if the mother draws the face of a hedgehog on paper and entrusts the child to glue leaves - needles to it.


Another forest dweller, red-haired and cunning, can be your fall craft. To create it, you will need a maple leaf, eyes and paper ears, a small spout pompom and PVA glue.

Another version of forest animals made of leaves and paper. To give the craft the features of the desired animal, simply draw a face on paper and glue the appropriate-sized leaf ears.

With the help of leaves, you can make not only animals, but also people. Cut the head out of felt, paper, or foamiran, glue the eyes with a spout, and make a fluffy hairstyle out of maple leaves.

Foresters, the indigenous inhabitants of the forest, are made from cardboard sleeves, leaves, buttons, small stones and pieces of chenille. It is best to fasten all the parts with a glue gun.

Also, cardboard sleeves can be turned into autumn trees by painting them brown, gluing one edge to cardboard, and attaching autumn foliage to the other edge.

If it rains endlessly outside and you do not have the opportunity to collect the autumn herbarium, then you can make it out of paper.
For example, here is such a colorful autumn sheet turned out from ordinary office paper and, glued to it, pieces of paper in a silence of yellow and orange.

No paper? So you can make leaves from cardboard and knitting threads. Cut the leaves out of thick cardboard and wrap them with thick, bright threads. Glue the tip of the thread and hide it between the thread layers.

Do not forget about buttons, another versatile material for crafts.

If you repaint old and unnecessary puzzles, then you can get a beautiful autumn tree. Make a trunk for a tree from the remnants of fabric folded in a pigtail and glued to a dense base.
But, if, nevertheless, you managed to collect large reserves of autumn herbarium, then you can make such beautiful candlesticks. Only small leaves, PVA glue, a brush and a glass jar will be needed.


And with acorns, you can decorate a photo frame, where you place a photo taken during your last trip to the forest.

As you can see, there are a lot of options for autumn crafts for kindergarten and school. All you need is just to stock up on natural materials for crafts on time and open our website.
Autumn crafts for kindergarten
5 (100%) 1 vote [s]Crafts on the theme of autumn are a wonderful accessory. Kids in kindergarten, pupils at school and adults at their leisure meet with their manufacture. Autumn is one of the most enchanting periods when you can enjoy the red and yellow colors of the landscape.
Due to the variety of gifts of this time, an apartment or cottage is decorated with outlandish crafts made of cones, autumn flowers and leaves. When a kid wants to help his parents create some interesting trinkets and crafts, it's just wonderful. Some of them become truly real works of art. We will try to reveal the most entertaining and original options for making autumn crafts with our own hands, which will be especially useful for parents whose children attend kindergarten or school. And you can take a closer look at some ideas and make crafts to decorate your home.
Cones are a natural material from which you can make many outlandish gizmos. You just need to give free rein to your imagination, show a little perseverance and ... voila, a wonderful accessory will be ready, pleasing the eye and bringing a great mood.

When making autumn crafts from cones, you need to connect them with threads, wire or elastic band. The safest option is to use super glue. Various natural and artificial materials are attached to the cones, for example, acorns, twigs, grains, threads, etc.
Advice! If you can't hold the hard bumps together, you can soak them in water for a couple of hours. When they are soft, dry them thoroughly. Such manipulations will allow you to cut cones and pierce them with a nail or an awl.
Anything can be created from the fruits of conifers - animals, men, insects, wreaths. So, open cones are used to make the torso of a turkey or camel, and when constructing the legs, closed cones are used. The simplest craft in autumn is a bird, which even a small child can make.

Hedgehogs are often made from the cones of almost any coniferous plant. To create a craft, a special test or plasticine is used to mold the paws and head of the animal. The cone is used as the body of a future hedgehog. Eyes are made from black peas, beads or rowan berries. Using different types of cones, and adding a drop of imagination, they get very cute and funny animals.

It is more difficult to make figurines of such representatives of the animal world as a camel, swans or deer. To make the cervical spine of animals, you can use acorn caps, which must be strung on a curved base made from a piece of wire. The head of the animal is made from an acorn. On the network you can find a variety of schemes and photos of ready-made crafts that will help create an autumn animal.

Another interesting option is the forester. It can be done using ripe and unripe buds, which are held together with a thin wire. To connect the trunk and head of the woodsman, you need to apply glue. To make a mustache, you can use small needles, and for an eye - scales from a cone.
On a note! In addition to handicrafts, cones are used as a finishing material for many items. For example, you can get a beautiful basket from a pine or spruce cone, they fill candlesticks and decorate autumn wreaths on the door. Even a simple indoor flower pot, beautifully decorated with pine cones, will look completely different.
Compositions of autumn leaves
Gold leaf is the main attribute of a beautiful autumn. In addition, a large number of unique and interesting crafts can be made from it.

To decorate your home and fill it with an enchanting autumn spirit, you can make the following compositions yourself:
- Pendants and garlands of leaf blades. For manufacturing, you will need two or three leaves, colorless varnish, paraffin, thread or ribbon. Autumn leaves are varnished and then dipped in melted paraffin. They are tied with threads or beautiful ribbons, loops are made and hung in the right place. Also, beads can be strung on a thread or ribbon, which will give a zest to this accessory. A garland is a more complex decor option. To make it, you need to process the leaves in varnish and paraffin, and then fix the leaves one by one on a thread or ribbon, leaving small gaps.

- Candles and candlesticks with leaves. First, the leaves are dried using a press or iron. The outer part of the jar can be pasted over with leaves and covered with clear varnish and a beautiful candle can be placed inside. Large candles are decorated in the same way, using leaves of different types and sizes for this.
- Bouquets of autumn leaves. With the help of maple leaves, cute roses are made, which are collected not only in a bouquet, but used as a decoration for wicker products. The leaves are wound on a blank and fold back the edges, getting a beautiful rose. Detailed information on how to make such flowers correctly can be found on the net. For a beautiful composition, you will have to prepare 5-7 pieces of flowers.

- Framework from autumn leaves. Wall clocks and photographs, framed with yellow and red leaves, are pleasing to the eye. To make such a composition, you need to stick the leaves on the frame, and then cover with colorless varnish. If some elements look too far beyond the edges of the frame, they can be trimmed neatly.

In addition, you can make an autumn owl. First, a strong cardboard is taken on which a silhouette of a bird is depicted and cut out. Prepare eyes, legs and beak separately. Starting from the bottom edge, dry leaves are glued to the owl's outline, alternating their color. When the lower part is ready, you can glue the legs. Having completely glued the leaves, you need to attach the yellow eyes, drawing black circles on them, and the ears of an owl. It remains only to glue the beak in the middle of the composition. Such a craft will perfectly fit into the interior of the house or will please the kid in kindergarten.
Making crafts from fruits and vegetables
Autumn gifts will be a great decoration in your home. Paradise apples are not only a delicious fruit, but also a good material for crafts. They can simply be placed in a basket on the table or hung on the wall. Other fruits are also suitable that look harmonious with autumn colors. For example, a composition containing ripe pomegranates and pears.

Various berries are used as ornamental material for work. It can be viburnum, mountain ash, rose hips or wild grapes. They will look charming in a candlestick or an autumn wreath. On the table or by the fireplace, you can put a bunch of viburnum or mountain ash along with yellow leaves, which will remind you of the extraordinary beauty of this pore.
Cereals and corn are often used to decorate the home. Even our grandfathers and great-grandfathers believed that wheat is a symbol of fertility and prosperity. Therefore, a wonderful composition made of wheat spikelets and other cereals will become an integral part of the autumn table. The front door can be decorated with a wreath of autumn leaves and cereals.

Corn is an excellent material for making crafts. Below are the popular gizmos that you can make from it:
- Candlestick made of corn. To make it, you need to take a large thick candle, an elastic band, several heads of cabbage and a decorative ribbon or twine. Stretch an elastic band around the candle, and then insert the heads of corn between them. When the candle is completely girdled with corn, tie a ribbon tightly in place of the elastic. You can also use hot glue to glue the heads of cabbage to the candle, but it will ruin the material so it cannot be used in other crafts.
- Decoration for an extension in the country. You will need several cobs of corn to make. It is necessary to take a pitchfork and put the ears on the tines. Then the forks are suspended with the handle down.

The pumpkin is used not only for the celebration of Halloween. When planning a kids' party at home, the pumpkin is a great decoration. For example, small pumpkins with names can be placed on guests' plates. It is best to take fruits of the same shape or buy decorative pumpkins from the store. First, they need to be painted silver, gold, or whatever color you like. The guest's name is written by hand or printed on special adhesive paper, attached to the spine of the vegetable.
Applications for children to school and kindergarten
Application is something that almost everyone has encountered in kindergarten or school. For its manufacture, you can use various materials - leaves, colored paper, scraps of fabric, straw, glitter, and more.
On the net you can find many instructions and diagrams that will help you make wonderful applications. They are made by both adults and children. Here are some interesting options:
- Butterflies from bright autumn leaves. To make an applique, leaves are useful (preferably two yellow and two red), two acorns, black peas and decorations to your taste (rowan berries, etc.), glue and cardboard. We glue 2 acorns to the cardboard, which will be the body of a butterfly. Next, glue the winged leaves: red at the top and yellow at the bottom. You also need to glue two black peas, which will be the eyes. It remains only at your discretion to decorate the butterfly. Thus, you can create appliqués for other animals, having previously made a blank.
- Felt leaves. Find on the Internet or make yourself several blanks and cut out leaves of the same shape in different colors from felt. Then it is necessary to designate the place where the veins will pass. Using scissors, you need to cut out the veins in one leaf. Then one whole and one cut leaves are connected and stitched along each branch.
- Window decoration. To create an interesting applique, you need to take a lot of autumn leaves of different shapes and colors, as well as glue and a large sheet of paper. Various shapes are cut out of paper - hearts, droplets, flowers. Then different autumn leaves are glued to these figures. After the applique dries, the glass is decorated with it.

- "Spider". To make the composition, you will need to take 8 even thin twigs, white thread, autumn leaves, chestnut, cardboard and glue. 8 branches must be glued to the cardboard, connecting in the center, this will be the basis of our web. Next, with the help of a thread, make the spider web itself and glue the leaves to it in arbitrary places. You need to place a leaf in the center, and attach half a chestnut to it. This will be the spider, to which you need to glue small legs, that is, thin and short twigs. This craft is very simple, but it looks pretty original.

The process of creating an interesting applique does not take very long and is not difficult. But it will become a highlight in the interior of any home or summer cottage.
Making crafts from physalis
Physalis is a perennial plant from the Solanaceae family. It has an outlandish shape, and got its name from the Greek word "physo", which means "bloated". It is in the swollen cups that juicy fiery orange berries ripen.

Since physalis can go without water for a long time, it is used as a home decoration. Below are some interesting options for crafts from the fruits of this plant:
- Physalis garland. To create an accessory, you need to carefully remove the fruit with sharp scissors, and also cut out the stem. In this case, the hole is made small so that the flowers do not fall during the operation of the garland. Then the flowers are put on the "spot" bulbs of the purchased garland.
- Autumn elf. To make such a small miracle, you need dried physalis flowers, wool or felt (two different colors), ribbons, wooden beads, brushes, acrylic paints, a glue gun and scissors. A circle must be cut out of the first piece of wool (felt) - this will be a collar. From the second piece you will get a hat, for which a triangle with two sides of 7 cm is cut out. Then the triangle is connected with a cone and glued together. At the top of the cone, you need to fix and glue the ribbon. To the inside of the cap, you need to glue the pre-shaped hair made of threads or wool. Next, you need to check if the diameter of the wooden bead fits the hole of the hat. All other parts are assembled with a glue gun. The Autumn Man is a design that consists of a hat-cap on a ribbon, a bead, hair, collar and physalis. A brush and acrylic are used to decorate the eyes, mouth and nose.
4 238 884
Evening is an amazing time when the whole family gets together and unsuspecting parents find out that it is for tomorrow that they need to bring autumn crafts to the kindergarten. To prevent this situation from catching you by surprise, we recommend that you prepare in advance and familiarize yourself with the ideas of children's homemade products.
We have prepared for you many step-by-step and colorful master classes of various difficulty levels. We are sure that you will definitely find something worthwhile for yourself.
Hedgehogs are all different
Did you know that the Soviet cartoon "Hedgehog in the Fog" 15 years ago was recognized as the best animated film of all times and peoples? You see what a difficult animal this hedgehog is. It is definitely worthy of repeated implementation using various natural materials.Bulky hedgehog from seeds and plasticine
A cheerful and thrifty hedgehog, cheerfully carrying mushrooms on its back, can come to visit your apartment in the fall. To do this, you will need to stock up on simple natural materials, an hour of free time and attract young assistants to work. For joint creativity you will need:
- foil;
- leg-split;
- black and brown
- unpeeled seeds;
- PVA glue;
- acorns and leaves for decoration.

Stick the hedgehog's body with black plasticine, and the muzzle with brown. This crucial stage can be safely entrusted to the child, nothing will be spoiled, and all the flaws will then disappear.

Lubricate the muzzle with a thin layer of PVA. Also moisten the twine a little with glue and tightly, row by row, wrap the face with it, starting from the nose. For now, you have to stop and let the glue dry. Remember this must happen naturally. On a battery or when drying with a hair dryer, the plasticine will melt.
The next stage is decoration. From the seeds you need to make a needle hedgehog. Start work from the head, arrange the rows of seeds in a checkerboard pattern. Stick the "needles" into the plasticine as tightly as possible to each other.

Decorate the face with plasticine eyes and a nose.
Mushrooms are easy to make from acorns by simply covering their caps with brown plasticine. If you wish, you can attach real leaves to them. Using plasticine, attach the fungi to the back of the hedgehog.
Such a handsome man will surely delight your child, and will also allow you to enjoy joint creativity.
Dry leaf hedgehog applique
Did you pick up a beautiful bouquet of yellow leaves while walking in the autumn park? Great, add some more glue and cardboard to them - we will make a cute hedgehog.All you need is to draw an outline. Your baby will be happy to glue the leaves. Just show him how it's done.

You can download the hedgehog template, we offer you 4 options:


Hedgehog applique from seeds
Did you like the idea of using seeds for the hedgehog's needles, but the bulky craft seems too complicated to implement? We have prepared another simple MK, which features a funny hedgehog, seeds and plasticine.A little perseverance and you can make a surprisingly cute and uncomplicated craft for kindergarten.

Paper hedgehog
We bring to your attention one more idea that even children from the younger group can cope with. An original and cute applique using autumn leaves will not take much of your time. It also comes with a paper cut template to make parenting even easier.
Template:

Mushrooms
You have already loaded your head, how else to surprise the seasoned kindergarten teachers who are waiting for crafts from your child again and again? We offer to amaze their imagination with surprisingly realistic mushrooms from the simplest materials at hand.
For work you will need:
- cotton wool;
- water; starch;
- long nails or thick wire;
- cardboard;
- paints and brushes;
- PVA glue;
- dry tea leaves or poppy seeds.

Pierce each circle in the middle with a nail. It will serve as the base for the leg. Thick steel wire can be used instead. But it is better not to bother and buy a dozen or two potential "mushroom legs" in the nearest hardware store.

Now it's time to cook the paste. Boil a liter of water. Stir 5 tablespoons in a glass of cold water. with a slide of potato starch. While stirring boiling water, pour the starch into it in a trickle. While stirring, bring the paste to a boil. It is ready to use, you just have to wait for it to cool down to room temperature.

Coat the mushroom blank with paste. Roll a ball for a hat out of cotton wool, dip it in paste and glue it to the hat. Wrap the stem of the mushroom with moistened cotton wool. Repeat this process several times until you get the desired size and shape of the fungus.

Do not forget to squeeze excess glue from the cotton wool! The resulting blanks must be completely dried on a battery or in a warm oven. Already at this stage, the mushrooms are very cute.

The moment of creative work has come - painting. It is she who will turn faded blanks into real autumn mushrooms. You can paint crafts with any paint: acrylic, gouache or watercolor.
Color the caps according to the selected types of mushrooms.

Wait for the paint to dry completely. Cover the end of the leg with a thin layer of PVA and dip it in dry poppy seeds or tea leaves - this will simulate the remains of the earth.

For extra shine and chic, you can cover the mushroom caps with any colorless varnish.
You can arrange a beautiful basket with mushrooms - your craft will not go unnoticed. And the secret of making realistic mushrooms will excite the imagination of everyone who is lucky enough to see them for a long time.
These hand-made handsome men are obtained as a result of the applied efforts.

Don't have a matching basket? No problem! The most beautiful composition using moss, coniferous or dry twigs and real dry leaves can be arranged in an ordinary cardboard box or on a small stump, or on your own.

Imagine and think outside the box - in kindergarten, and in any other, creativity, this is only welcome.
Autumn trees
Has your child already wondered why trees change their green outfit for bright yellow-orange decorations in autumn? So the time has come to satisfy his curiosity, and at the same time the craving for creativity.Plasticine tree
We offer you a beautiful and uncomplicated plasticine application that even the youngest naturalists can handle.
For work, prepare colored plasticine and cardboard.
Draw a tree trunk on thick cardboard. Now let your child roll a lot of thin and long plasticine sausages 2-3 shades of brown.

Glue them along the tree trunk, alternating shades for realism. Fill in the entire outline of the trunk and don't forget about the twigs.

Add some more branches for a lush crown.

Roll out many thin red, orange and yellow sausages. Roll each sausage with a spiral snail. You will see, the child will really like this exciting activity.

Glue the spirals to the crown of the tree in random order. Form the tree to the desired size.

Make blades of grass out of green plasticine. "Plant" the grass near the tree.

Complete the applique with falling leaves.

Here we have such a man-made beauty. And the bright frame will make the picture even more expressive.
Application "Confetti tree"
The original idea for an autumn tree is to decorate it with paper confetti. Check out the step-by-step master class by watching our proposed video. Confetti can be cut easily and simply with a conventional hole punch. With this technique, you can quickly grow a whole fantasy forest.Pumpkin seed trees
Have you noticed how a pumpkin seed looks like a leaf? And creative people not only noticed this, but also used the similarities to create an original applique from this natural material.See our step-by-step photo of MK and be inspired by your own masterpieces.


Unusual cereal trees
We continue to heat up the degree of creativity. Now, to create crafts, dyed cereals will be used. Do you have rice, semolina or millet in stock? Then try to master this method of creating an applique.Or this option:
"Macaroni" tree
The unusual shape and safe composition of various pasta makes it possible to use them in preschool creativity. Find pasta in the form of bows or leaves and "grow" your own unique tree.
Unusual "button" trees
And if a lot of unnecessary multi-colored buttons were accidentally lying around in your house, then we know how to use them for a good cause. Try to create a bright panel that will decorate a summer cottage or nursery. And armed with wire and pliers, you can learn the art of button bonsai.


Pumpkin
Autumn is harvest time. And even if you did not plan to harvest a real crop, surprise everyone with a realistic nylon pumpkin. You can make it both for the competition of children's autumn crafts, and just for the soul, and at the same time you will get acquainted with the interesting technique of making nylon vegetables and fruits.
For work you will need:
- painted nylon;
- filler (foam rubber or synthetic winterizer, even ordinary cotton wool will do);
- needle and thread;
- thin wire;
- a small piece of wire;
- green tape tape;
- scissors;
- brush and paints.

Use a needle to thread the bridges. Do them at the same distance until you go around the entire workpiece in a circle.

From small pieces of thin wire, make round blanks for the leaves.

Cover them with green nylon, fix its ends with a thread and cut off the excess. Warp the edges of the leaves a little, giving them a realistic look. Wrap the ends of the wire with tape.

Wrap the piece of wire with tape. Wind it around the handle and carefully remove the resulting spiral. We got a tendril twig, which we attach to the pumpkin.

Assemble the branch of the pumpkin, gradually connecting the leaves and tendrils with tape in random order.

At the top of the pumpkin, fix a piece of wire and wrap it with tape. Attach a twig with leaves to the tail.

To achieve realism, tint the dimples with orange. Blot off excess moisture with a tissue.

As a result of the efforts made, a wonderful gift of autumn, made with your own hands, turned out.
Ideas for inspiration
We have prepared for you a selection of unusual autumn crafts to motivate you to take action. See and be inspired to collaborate.Spectacular composition of natural materials
Dry twigs and grass, a bunch of viburnum, a few smooth pebbles, a pine cone and sand, thanks to imagination, turn into a cozy country courtyard with a wooden house under a thatched roof. Such a craft looks very unusual, and you can get it absolutely free. You just need to go for a walk to the nearest park.
Yellow leaf bird:
Bird for printing:


Bouquet of maple leaves
In the fall, fallen golden leaves are begging for hands. Walking in the park, it is so easy to pick up a whole maple bouquet, but its natural beauty instantly disappears in the apartment. It can be fixed. We will teach you how to make beautiful roses from maple leaves. Such a bouquet will create an atmosphere of autumn comfort in the room and will delight you with its warmth for a long time.
Autumn crafts from twigs and threads
A little imagination - and dry twigs collected during a walk can be turned not only into crafts for the garden, but also into spectacular souvenirs or bright interior decorations.
Simple paper crafts
You can create unusual autumn leaves with your own hands, and turn an empty paper bag into a picturesque tree with a spreading crown.A few more templates for printing:


Just let your imagination run wild and follow the step by step photo instructions.
Children's crafts on the theme of Autumn are inexhaustible soil for creativity. To create them, you can use natural materials that have already become traditional, and other interesting objects and things.
Such simple ideas help children discover all facets of creativity and learn to see parts of the natural world around them, even in the usual household things.
In the fall, children and adults alike return to the topic of studying vegetables. Why not make a visual aid - a carrot? We glue the orange paper in the form of a roll.

We glue it on both sides at different angles. Cut corners on one side. Glue the greens cut into strips. The paper carrot is ready!

Apple tree from a paper plate
A truly autumnal craft can be made from a disposable plate. All you need is to paint the outside of the bottom of the plate green or yellow with a foam sponge

and apply red dots on the painted surface using cotton swabs.

We glue a rectangular piece of brown cardboard from below - and the autumn apple tree is already ready. Such an apple tree will become even more attractive if you use some small round objects as apples, gluing them with polymer glue.

A cute autumn applique can be made on a disposable plate.

Apple tree from a cardboard roll
In the same way, you can arrange the crown of a tree, the trunk of which is made from half a roll of toilet paper. We glue the half to an A4 sheet and decorate the upper part with pieces of soft colored paper.

Small red buttons imitating autumn apples will complement the look.

If you use a one-piece roll of paper, you get a voluminous tree. We put red dots on green paper - these are future apples. Letting the paint dry


To keep the crown better, before fixing it on the trunk, we cut the roll from the upper side and bend the strips outward.

We insert the crumpled paper into the roll, forming the crown of the apple tree.

Wood from cardboard rolls
An autumn tree can be made from cardboard rolls and real autumn leaves. Cut cardboard rolls and paint brown. We prepare leaves and other natural autumn materials: acorns, chestnuts, mountain ash, branches, maple seeds.

We glue leaves and other gifts of autumn to cardboard rolls. You can decorate the resulting piece of autumn forest with two adorable plasticine and chestnut hedgehogs.

Palm tree
You can make an even more original decorative tree: circle the child's handle up to the elbow on brown cardboard,

cut and paste over it with multi-colored paper autumn leaves. This craft can be used as a window decoration. In this case, we put the cut out pen and leaves on transparent adhesive paper and cover it with adhesive paper on the back side.

Autumn tree - decoration on the window
The leaf application can be placed on a cardboard stand - we will get a worthy exhibit of the autumn exhibition.

Craft on the theme of autumn "tree from leaves"
Crumpled paper tree
An interesting application turns out to be a tree made of crumpled paper.

We form a trunk and branches from it.

Then we glue bright yellow-red lumps of napkins or paper for packaging on them instead of leaves and fruits.

Autumn tree from the package
The bag is cut into small strips, which are then rolled into tree branches. To make the craft more durable, it is worth first applying glue to the paper strips. Leaves are glued to the tree branches. The curved shape of the twisted stripes makes it look like a fabulous tree.

Autumn tree made of threads
For crafts, glue a sheet of cardboard with a cone. Then we take thick yarn and wrap it on the cone layer by layer, fixing it on the glue (it is better to apply the glue gradually to the cone itself). The top can be decorated with a pom-pom and felt leaves can be glued on top. The result is a very unusual and spectacular autumn tree.

Autumn pendant from gifts of autumn
As a craft on the theme of autumn with your own hands for school, you can make a beautiful pendant from natural materials - tree twigs, pine and spruce cones, dried physalis nuts and other components.

Such a product will organically fit into a school office or hall.

Hedgehog from a plastic bottle and cones
You can use cones to create fun characters like hedgehogs. We take a small plastic bottle as the basis of the craft and wrap it with a thick cloth. We begin to glue the cones one by one onto the fabric. We glue the entire bottle in this way.

We glue the eyes and ears to the hedgehog. We decorate the craft with autumn gifts - apples, mountain ash, twigs. A hedgehog made of cones and a bottle is ready!

Look at the video on how to make a forest hedgehog from cones:
Squirrels from cones
Pine cones and felt can be used to make adorable squirrels with acorns.

A squirrel can be made from plasticine and pine cones.

Birds from cones
You can make a cone bird a little differently. We fasten the chestnut, cone and leaves with glue - we get a little body, head and wings.

Weave a nest from thin branches. We weave leaves into the nest, trying to close the gaps between the branches.

We glue the eyes and beak to the birds, then place them in the nest. Such a craft can easily decorate any autumn exhibition.


Another entertaining and very simple craft on the theme of autumn is a pine cone tree. From thin paper we make balls of "autumn" colors - green, orange, yellow, red. We put glue on the "scales" of the cones and insert paper balls into them.

Crafts on the theme of autumn from natural materials
And this is a funny little man made of natural materials! We make holes in chestnuts or acorns and insert matches into them. We fix all the details with glue.

From the gifts of autumn fruits, you can make a delicious and edible craft - a hedgehog.

The autumn handicraft "Pumpkin carriage" will become a real masterpiece of the autumn exhibition.

Young princesses will love making a pumpkin and zucchini snail! And how nice it is to decorate it with beads and rhinestones.


Autumn crafts from salt dough
Salted dough makes very beautiful autumn hedgehogs.

Another interesting fall idea for kids of all ages is making a salt dough pendant. We paint the pieces of dough in the colors of the autumn scale. We roll them into layers about one centimeter thick and cut out leaves of different shapes and sizes using molds.

We dry the leaves in the open air and hang them by strings to a branch of a tree.


A very beautiful composition on the theme of autumn can be made from a molding mass that solidifies in the air. We roll out the mass in a thin layer and press a real autumn leaf against it. Cut out the imprint of the sheet in a stack.

We make a hole at the top. We are waiting for the mass to dry up and paint it in bright autumn colors. We hang the resulting leaves to a stick. The composition "autumn leaves" is ready!

Composition "autumn leaves"
Autumn crafts from plasticine
You can make a very beautiful autumn landscape from plasticine. The basis of the craft is a sheet of cardboard, on which the details of the picture are glued.
We start a craft on the theme of autumn from plasticine by fixing the trunk and branches of a birch.

We glue yellow leaves and yellow grass. We decorate the sky with clouds and a flock of birds flying away. We plant mushrooms, a Christmas tree, a Christmas tree and a hare on the ground.

Plasticine vegetables have become a classic of autumn crafts.

Leaf applications
Another great idea for autumn creativity is leaf appliqués. One of my favorite applique themes is fish and the seabed.

You can decorate a cardboard tree trunk with real dry autumn leaves. Even the smallest toddlers will love this simple applique.

Application from leaves "tree"
You can make a beautiful autumn card with a mushroom from a leaf from a newspaper.

With the help of a laminator and real autumn leaves, you can make an interesting manual for children. We collect leaves from different types of trees. It is advisable to collect several pieces from each type of tree: three oak leaves, four maple leaves, three rowan leaves, five willow leaves, two chestnut leaves, three alder leaves. Laminate them.

Cut out the laminated leaves.

Educational purpose of the manual: to acquaint children with tree species and be able to distinguish between them. We invite the children to arrange the leaves by type and name them.

Leaves benefit
Real autumn leaves can be used to make a beautiful panel for decorating walls and windows. We need bright beautiful autumn leaves. We will leave some of them intact, and cut out hearts from others.

Place the leaves and hearts between two layers of sticky paper. The autumn composition is ready.

From autumn leaves and petals, you can make a portrait of the Queen of the Autumn.

From autumn leaves, you can make a lovely autumn composition with roses.

Autumn crafts from felt
You can make a very bright autumn garland out of colored pieces of felt.

Autumn garland made of felt will be a wonderful interior decoration.

Garland of felt "Colored leaves"
Autumn bouquet from foamiran
Many will surely like a bouquet on the theme of autumn made of foamed rubber or foamiran. Cut out leaves of different shapes. We paint with paint to emphasize the edges and veins on the leaves.

We make an autumn vase from a plastic can and branches. We fasten the branches with double-sided tape.

We put the leaves in a vase and complement the composition with twigs and cones. A bouquet on the theme of autumn from foamiran is ready!

Crafts on the theme of autumn reviews:
Beautiful crafts, thanks!))
A find for those who make crafts on the theme of autumn with a child in kindergarten! (alevita)
Children like to do something creative, they just need to be shown what can be made from certain materials.
Here you will find many interesting crafts from colored paper or natural materials that you can do with your children.
All crafts are not at all complicated and it will be a pleasure to make them.
Crafts for kindergarten: coloring stones
If you have collected stones at sea, do not throw them away. Arm yourself with acrylic paints or gouache and start painting them.
Such stones can be found in many places, then bring home or to the garden and paint them in all the colors of the rainbow. You can also draw different characters - the possibilities are endless.


Crafts for kindergarten with their own hands from plastic covers
If you have plastic bottles lying around, do not throw them away. A huge number of crafts can be made from them.

Moreover, crafts can be made not only from bottles, but from their caps. These are such interesting crafts you can do with your children. Arm yourself with colored paper, colored cardboard, glue and various decorations.


Autumn crafts from cones to kindergarten
Cones are a natural material from which many interesting crafts can be made.

You can connect several cones, for example. This can be done in several ways: using thread, wire or elastic; using glue or simply putting the bumps on a stick.
Many other natural materials can be attached to the buds, such as twigs, acorns, and grains.
If the bump is hard, you can soak it in water and after a couple of days they will become soft, making it easier for you to cut and pierce them (with an awl or nail).

Opened cones can be used to make the torso of a camel or turkey, and closed cones can be used for limbs (legs, arms).
* For a start, you can make a bird - this is probably the simplest craft from cones.

* Crafts "camel", "deer" or "swan" will be a little more difficult. You will need to make a neck - use acorn caps, which should be strung on a bent wire. The head is made of an acorn.

* Also try to make a forestry with the children. It is made with green and ripe buds. Use wire to attach the arms and legs.

Attach the forester's head to the body with glue.
Use the needles to make the mustache and use the bump scales to create the eyes.
What kind of craft to make in kindergarten: "Apple"
You can make an incredible amount of bright crafts out of colored paper with your children. One of them is a voluminous craft "apple".

Children will do this simple work with great interest.
For it you will need: colored paper, glue, cardboard (colored cardboard).
Prepare a template and cut a certain number of parts from it.


Start gluing all the pieces together.
Glue the blank on some kind of rod (ice cream stick).


Make a ponytail by cutting out an additional piece of paper.


Crafts of children in kindergarten: "Cloud and bright rain"
This craft also uses colored paper and glue.

You will need:
Colored paper
Scissors
1. First, cut out the outline of the cloud from white or blue paper.
2. Follow the pictures to figure out how to make a raindrop.

3. Putting everything together, the baby will get a very beautiful picture.


Crafts from paper in kindergarten: "Autumn leaves"
Colored paper can be used to make very beautiful leaves that take on rich colors of autumn.

Take a look at the images to see how you can make these leaves. The craft is actually pretty simple and kids will love working on it.


Autumn crafts for kindergarten: "Mushrooms - fly agaric"
Such beautiful mushrooms can be made from old egg packaging. Although fly agarics and poisonous mushrooms, they can boast of a very beautiful color, which you will convey in your crafts.


Crafts for the kindergarten site: "Goby"
But what a beautiful goby can be made from an old plastic bottle or container.

You will need:
2 cardboard toilet paper cylinders
Plastic bottle (not rounded)
Follow the photo instructions to craft a beautiful animal.


Crafts for kindergarten (photo): "Sheep"
If you do not mind cotton swabs, then you can make such a beautiful and fluffy lamb with your children.

You will need:
White cardboard
Cotton buds
Scissors
Clothespins
Black marker
Pink marker
1. Prepare a piece of cardboard and cut out two elliptical shapes from it - one part will serve as the body and the other as the head. Set aside the torso part temporarily.
2. Prepare cotton swabs and cut off the tops of the heads about 1.5 cm long.
3. Start gluing these tops to the torso.


4. Take two cotton tops and glue them on both sides of the lamb's head. For bangs, you can glue 3 tops of cotton swabs on top.
5. Draw the eyes with a marker. You can also add some color part.


6. Prepare a ribbon and make a bow out of it. This bow needs to be fixed to the sheep's head.
7. Now glue the sheep's head to the body.
8. Take the lamb's body and attach clothespins to it - they will act as legs. You can apply glue to these clothespins if necessary.

Crafts on the theme "Autumn": "Spider"
You can make such a beautiful craft from natural materials. Using autumn leaves, chestnuts, and thread, try making a spider on a web with your children.

You can see how to do this from the image. The craft is quite simple, but very interesting and original.


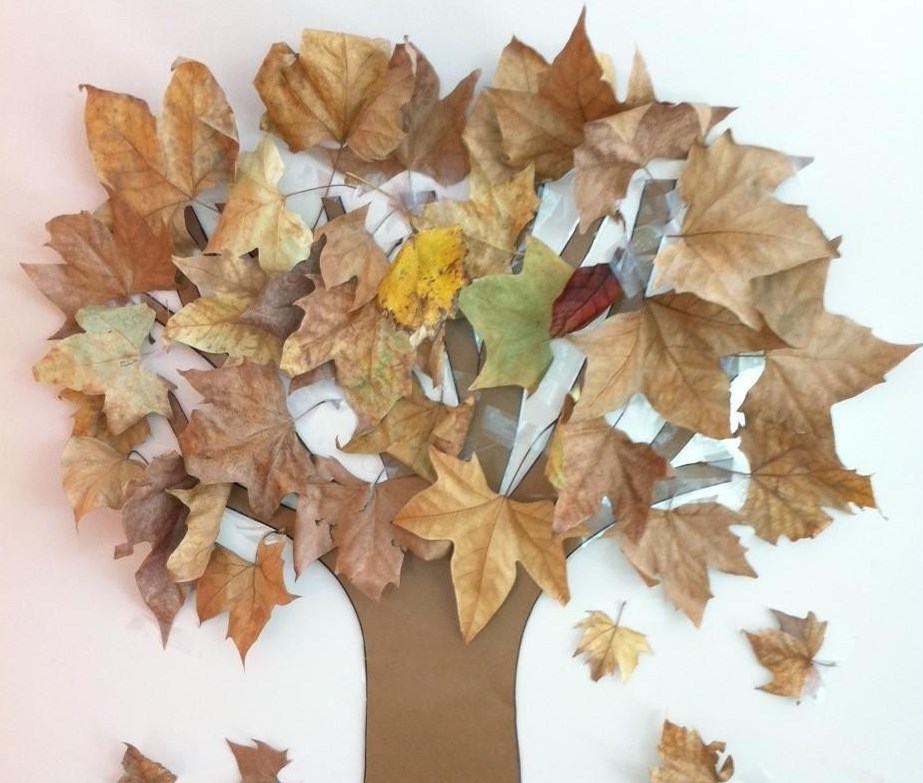
DIY autumn crafts: "A tree of leaves"

You will need:
Leaves (red, yellow, green)
* you can choose leaves of different shapes
* do not choose too dry leaves
Several thin branches and one thicker branch
* a large branch can be of an unusual shape, with knots
Rowan (if desired)
Glue gun or superglue


")


