Almost anyone can knit booties for a child. The article provides a detailed description and patterns for knitting and crocheting booties.
Seeing self-knitted booties on little chubby legs is a sight that will lift your spirits even in chilly weather. The realization that the product you knitted warms and protects this little treasure gives birth to peace and satisfaction in the soul. And knitting booties is not the most difficult thing, the main thing is a competent approach.
Types of baby booties
Booties are a very gentle and touching accessory that perform an important function - they warm a child's foot. Booties can be divided into groups:
- by material: cotton yarn, knitwear, leather or felted
- by gender: for boys and girls
- by season: warm and cold
- by purpose: everyday, formal
- in shape: in the form of bags, cakes, shoes, sandals, boots, sneakers, shoes, with a sharp nose a la “little muk”
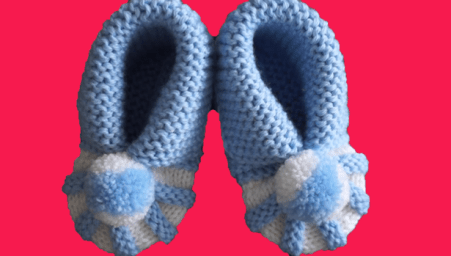
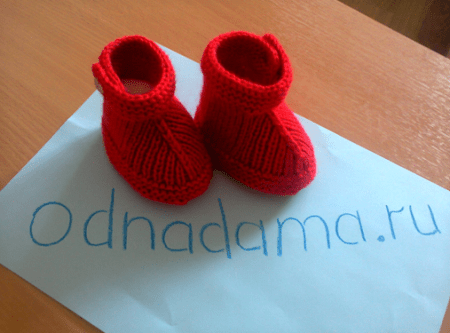
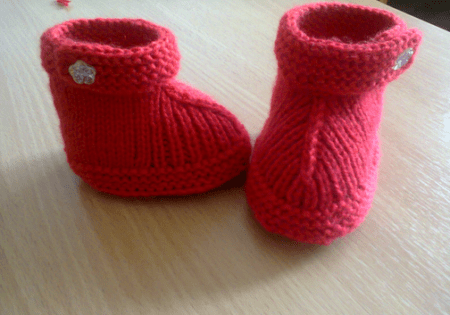
How to knit baby booties for beginners. Photo
Threads for booties need to be hypoallergenic. These can be cotton threads, acrylic, microfiber, wool. Booties are knitted from cotton for special occasions or for warm weather. You can knit absolutely any booties from microfiber, be it light holiday ones or warm everyday ones. You can knit very warm booties from acrylic bootie threads.
It must be remembered that booties are either a seamless product or have seams on the outside. Otherwise, the booties may rub the baby’s delicate skin.
Now let's determine the size of the insole:
- 8-9 cm for children from birth to 3 months
- 9-10 cm - up to 6 months
- 11 cm - up to 8 months
- 12 cm - up to 10 months
- 13 cm - up to 12 months
- 15 cm - up to 18 months
But this is an approximate ratio; the length of the baby’s foot may vary.
To determine the number of loops required, we knit a small piece of stitching with the main stitch to determine how many loops there are in 1 cm of fabric. On average, this is 2 loops.
In our example, five needles No. 3 are used, acrylic threads 100% 150m/50g. Booties are intended for a child 10-12 months old. If your child is smaller or has plump legs, then the number of loops must be adjusted. The booties were knitted in 2 threads.

 Knitting pattern for baby booties:

If you simply don’t have five knitting needles, or if it’s inconvenient to knit with them, then you can knit booties with two knitting needles. They will be just as beautiful, neat and functional.
Video: Master class on knitting baby booties with knitting needles from Olga Bokan
Crochet pattern for baby booties
Basic principles and stages of crocheting booties:

Video. Master class on crocheting baby booties by Svetlana Erbyagina
Baby booties for newborns, description
Booties for newborns should be knitted from very soft yarn, the thread should not prick. Especially if this concerns winter booties made of wool or if you will wear them on a bare leg. To do this, take the yarn you like and knit a small sample from it to determine how pleasant the booties will be to the touch.
You can decorate booties:
- satin braid
- lace
- embroidery
- appliqués
- beads
You should not decorate with Lurex, since the metallized thread can irritate the child’s skin.
Threads must be of high quality, hypoallergenic and not contain harmful dyes. You can look for special threads for children, they definitely meet all the requirements.
Booties for newborns should be very soft, elastic, not compress the fingers, without internal seams
Such shoes will not only warm the foot, but also prepare it for wearing shoes with stiffer soles.
 Baby booties for girls
- Little girls are already fashionistas. Therefore, even their booties should be “girly”: bright with bows, ruffles, beads, openwork elements
- For girls, it is customary to take pink, raspberry, red, and orange yarn. Girls look especially cute in this color scheme. Booties for girls are made in the form of slippers, shoes, sandals, boots with openwork decorations
- Stylization of booties for girls can be flowers, ladybugs, cakes, cats, foxes
Baby booties for boys
- Boys, although small, are already men. That’s why the booties for them are knitted less brightly and decorated more subtly. Among the colors they prefer are blue, light blue, lilac, gray, black, purple
- You can use yellow, green colors, which are considered suitable for all babies
- Booties for boys are knitted not only in the form of classic slippers and bags, but also in the form of boots, sneakers, sandals, boots
- Booties for a boy can be stylized as dogs, bears, cars, tanks, with a tie, a la “little mug”, chickens, bunnies
Simple baby booties
Simple baby booties mean that they should be simple in design, without any special decorations, but perform the functions of heating and protection assigned to them. Such booties are usually made in the form of shoes or boots.
Here is one option for simple booties.
 We knit with two needles No. 3. Yarn can be taken in any two colors, in our case it is pink and purple.
Cast on 22 loops with pink thread (the width of the knitted product is 9 cm). Knit 62 rows of garter stitch, but if you wish, you can use stocking stitch. The length of this sample was 14 cm.
Now we close off the first 8 loops and knit the row with purple thread. We knit this way:
Row 63 - knit stitches
64th - purl
65th - facial
66th - purl


Now we introduce the pink thread again:
Row 67 - knit stitches
68th - knits again
69th - purl
70th - facial


Alternating the threads in this way, knit 8 stripes in purple and 7 stripes in pink.  Now sew the first and last rows. You can use knitting needles while simultaneously closing the loops, using a needle or crocheting.
 It turns out this “ring”:
 We form the sole. We collect the lower striped part of the bootie with a thread and tighten it. Then, towards the heel, we sew the two parts together. The length of the seam is about 2 cm. We collect the remaining pink part on a thread in the same way as the striped part. Thus we form the heel.
We form the toe (sock). We also collect the striped part on top and tighten it with thread. The booties are ready. 
 You can decorate them with a pompom or any decor. You can crochet it, and also insert braid so that it stays on the leg better.
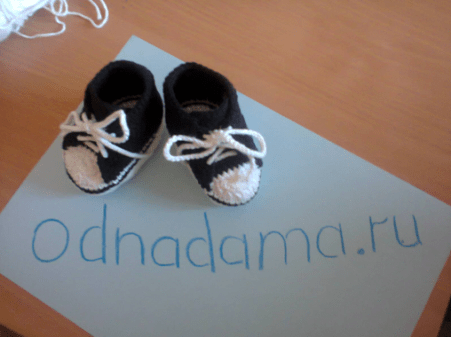
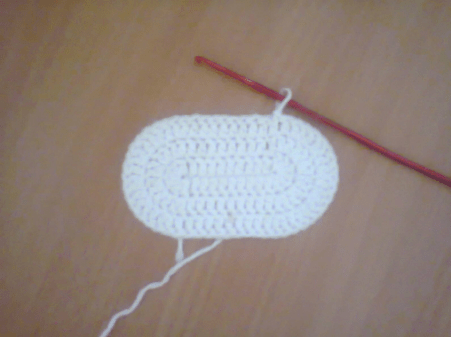
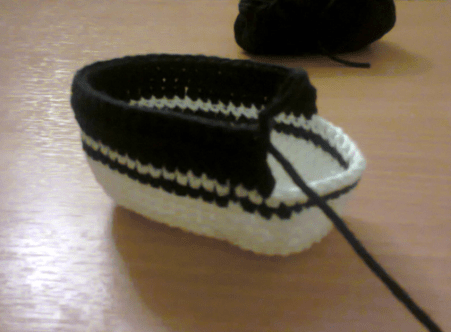
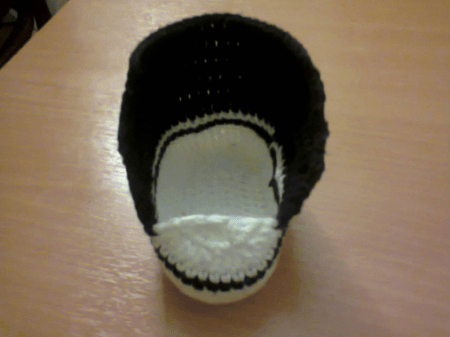
Children's booties-sneakers. Photo. Description
Booties-sneakers are easy to crochet. The result will be like this:


The sole can be knitted according to the pattern above, or you can use this one: 
 The booties were crocheted from iris using hook No. 2, although any thread can be used. The foot will be approximately 9.5 cm long for children up to 6 months. If the child is older, you can lengthen the foot by adding air loops at the very beginning. Or knit another row.

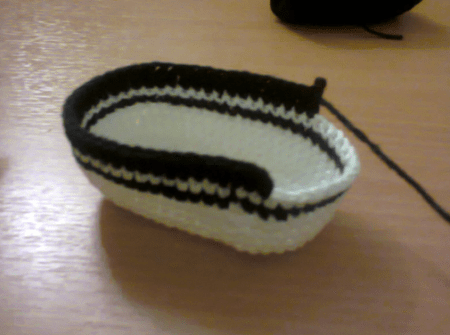
The next step is to knit the side. We knit one row with a double crochet, placing the hook behind the back wall of the loops. Like this: 
 Now we knit 3 rows with regular double crochets, we get a “boat”:
  Take a thread of a different color and knit the fourth row of double crochets. We knit the next 2 rows in exactly the same way, only with white thread. Then we cut off the white thread.
  Knitting the sides of booties. Fold the product lengthwise to define the middle loop of the toe. From this middle loop, count 8 loops in both directions and mark them. The tongue will be sewn here.
In our case, we attach an orange thread to the 8th loop. We knit in a regular stitch until the 8th loop on the other side.

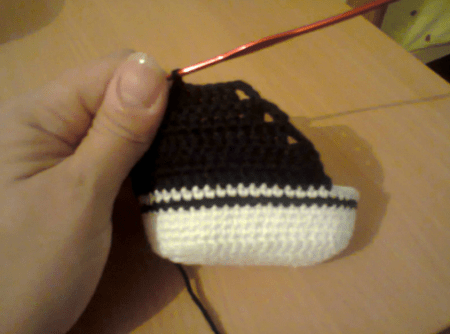
To get such an oblique edge, each row must be finished and started with a half-column. There are only 5 rows, but you can make them higher.
We knit the tongue. We make 17 air loops (according to the number of loops that we left on the toe). Using a single crochet we knit a rectangle of 10 rows. We add 3 rows of orange thread, where we knit the outer loops with a half-column. 
 And we sew the “tongue” to the toe.

Having made laces from air loops, we insert them into the sides of the sneakers. The booties are ready!
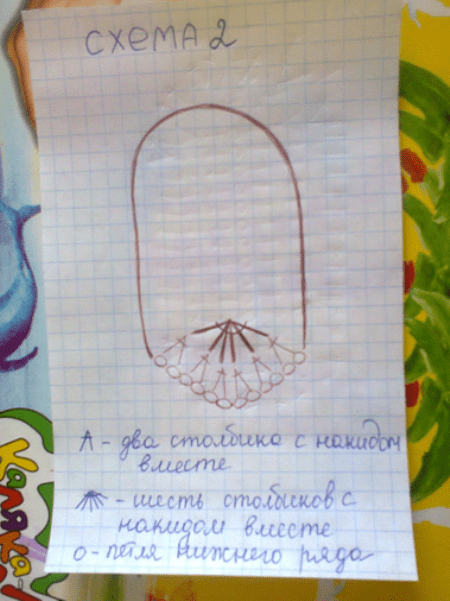
Baby hedgehog booties, diagram
Hedgehog booties are knitted. To make the “hedgehogs” as similar as possible, you need to knit with grass thread.  Here we use “grass” thread of two colors: gray (100g) and white (50g). Knitting needles No. 3.5. For the muzzle you need to take 10g white yarn and a hook number 2.5.
- Cuff. Using white weed thread, cast on 38 stitches and knit 22 rows in garter stitch. Then make holes for the braid using double crochets. Break the thread
- Toe. Draw a gray thread. Divide 38 stitches by 13/14/13. Set aside knitting needles with 13 stitches temporarily, and knit 14 stitches in garter stitch for 19 rows
- Side. Cast on 8 stitches on both sides of the toe. A total of 56 loops are obtained, which all together knit 12 rows
- Foot. We divide the loops on the knitting needles into 22/12/22 loops. 12 loops are a foot. We knit the foot in garter stitch, knitting the last loop of each row together with the loop on the side knitting needles
- Heel. When there are 6 loops left on the auxiliary knitting needles, decrease 2 loops on the sole itself 2 times. Fold the remaining 8 loops of the sole and 4 loops on the auxiliary needles together 8x8. Close them with a hook or a needle.
- Sew the cuffs
- Muzzle. Connect three air loops into a ring. Knit in the round with a stitch. From every 2nd loop, draw two loops, so you get a cone. Knit 7 rows. The muzzle is ready
- Sew the muzzle to the booties. To the muzzle - eyes and nose. Thread the tape. Ready
Baby booties-slippers, diagram
Baby booties and slippers can be quickly crocheted using this pattern. It will be very comfortable for the baby to walk in them.

 Unusual baby booties. Photo
Booties are warm, comfortable shoes for little ones, but also a stylish accessory in which you can show your individuality and imagination. At the same time, booties can be used as a tool for development and knowledge of the surrounding world.
Delicate cake
 Little mice

 Winter motives

 World of insects
 Automotive equipment
 Dogs and bunnies

 Patterns for booties with threads, diagram
Knitting patterns for booties:

Although for booties you can use any other pattern you like.
Winter baby booties
Very high demands are placed on winter baby booties. Winter booties should be light, soft, not restrict movement, not pinch boys, and be very warm.
To keep your baby's feet warm, ugg boots and fur boots are suitable for walks. At home, you can wear booties knitted from acrylic and wool threads or sewn from fur.
Baby booties made of fur
If the floors at home are cold, these booties are a real lifesaver. They don’t wash out like knitted ones, but they protect better from the cold. In addition, these booties are very light.
The material can be taken from rabbit or lamb fur, or even from your old sheepskin coat. You can sew fur booties using the pattern:

 The main thing is to take into account the direction of the fur when cutting. Booties can be made with or without lining.
First, decide on the size and make blanks. Sew the sides. Sew the back to the heel, just try to sew it so that no folds form. Now you need to sew the center of the tongue to the center of the toe of the sole. Sew them from the corner to the point where you will place the ties.
Pierce the leather in several places for the lace. Insert the lace. Now you need to sew to the cape, while gathering the edges. These booties can be worn with the fur facing out or in, as you wish. If you decide to wear it with fur inside, you can also sew on a decorative edge for beauty.

How to sew openwork baby booties, photo


Openwork booties can be knitted from acrylic and cotton threads. These booties are crocheted. We knit the foot according to any of the two previously presented patterns. 
 Now you need to knit a row with a “relief columns” pattern:
 Let's move on to the patterns. We knit patterns according to the pattern


We get this “boat”:

 We knit the toe. We find the middle of the side and draw 3 air loops from it:
 From the next three stitches, make 3 double crochets, which you knit together.
 So we knit to the middle of the opposite side. At the end of the row, turn the work over and knit a bootie from the inside. We also start with 3 chain stitches, but now we knit together not three double crochets, but two.
Now knit the row into which the ribbon will be inserted. We knit a double crochet, make an air loop, and skip the loop in the bottom row. Now again knit a double crochet, chain stitch, etc. And a single crochet.

 So the whole row.
 Tie the lower part in the same way, only instead of an arc, skip two loops.
All that remains is to sew on the beads and insert the ribbon.
Tips and reviews for knitting and crocheting booties
- If you sew a suede sole to the booties, for example, then you can take your first steps in them even on the street
- All beads, bows, and buttons must be sewn on very tightly so that the child cannot tear anything off. Be sure to check the strength of the threads on decorative parts after washing
- Crocheting booties is easier, although not much easier. But there are many more options for crochet decoration
- It is better to knit the insole with a tighter knit than the rest. After all, the child will learn to walk in booties, and a hard insole in this case is better
Marina:
I knitted booties for the first time for 2(!) months. When the little one was born, it turned out that they were small. They’re so “damn lumpy,” but I keep them as a memory. But now I can even knit a suit with openwork elements.
Pauline:
I knit well, so when I was on maternity leave and had money problems, I knitted booties and sold them. Although not big, there was a profit.
Video. Booties are the first shoes in a child's life
Description of patterns for crocheting booties.
Today, the choice of children's things is so large that it is simply dizzying. Let's talk about the first children's shoes - booties. And this time, after reading the article, you will be able to knit delicate delicate booties for your child.
Booties size by month
Young mothers want only the best for their children - the best toys and clothes. If you are afraid that the booties will not fit your baby in size, then it is quite simple to determine it:
- For newborns, size 16-17 is suitable. In centimeters this is approximately 9.5. This is approximately their size until they are three months old.
- From 3 to 6 months, the length of the foot is approximately 10.5, and this is already size 17-18
- From six months to a year, babies have a foot length of 11.5-12 centimeters - size 19
And you can measure a child’s foot very easily. A ruler or centimeter will help you.
Crochet booties for girls: diagram with description
Young mothers really like booties. There are many variations of them. They can be closed, open, with a button, Velcro or lacing. Before proceeding with the scheme itself, I would like to give a few recommendations:
- As for threads, they should only be natural. After all, synthetic threads can cause allergies
- The size of the booties will be larger if you use a thick hook and thick thread. And, conversely, the thinner the thread with the hook and the smaller the hook, the smaller they will be in size.
Well, now, one of the schemes of these beautiful shoe booties:
- Tie the sole with single crochets (hereinafter referred to as single crochets), leaving 2 chain stitches at the ends.
- After the sole, start creating the upper. Start making the first two rows with 2 air loops. Next, you need to knit half-columns s/n (hereinafter half-st. s/n). Finish rows with connecting loops
- Third row: make an air loop, and then all the columns go next. Finish with the same connecting column
- Fourth: as in the previous 6 rows, knit an air loop. After this there are 9 columns b/n. Next, you will need to connect 2 loops together and thus knit with regular b/n stitches. At the end there is a connecting loop
- Fifth row: knit 1 chain stitch (hereinafter referred to as ch). The next 9 columns need to be knitted with a b/n, and then 8 s/n, but after one
- The remaining columns will be b/n
- The sixth row is the last. All columns of this row must be done without a crochet. And at the end knit 5 connecting loops

There is no need to cut the thread at the end; you must secure it correctly. To do this, cast on 15 to 18 chain stitches and 2 additional ones. Make 1 or 2 rows with half double crochets, and simply fix the end in the other edge of the shoe.
This is how the thread will be secured. For a brighter or more interesting look, the booties can be tied in a contrasting color.
Video: Crochet booties-shoes
Crochet booties and sneakers for boys: pattern
An excellent alternative to booties and sneakers, knitted sneakers. They are no less popular.
In order to make them, you need to separately knit the sole, tongue, emblem and laces. We will need threads of three colors. The following is the process:
- For the sole, cast on 14 ch, start from the 4th loop and knit in s/n stitches. (hereinafter referred to as st.s/n), in the last 6 columns of the same type. Next again, treble s/n., Only in the last loop 5 treble s/n.
- Second row - 3 vp, treble s/n. until rounded. The next 6 loops - 2 treble crochets in each, continue knitting each
- On the rounding also treble s/n, 2 in each loop. After this, cut the thread. 1 v.p., st.b/n. behind the back wall and so on all the loops. And change the thread again
- 1 v.p., st.b/n. and thus knit 3 rows.
After this, fold the sole in half. Count 12 stitches and place a marker - Knit st.b/n. to the marker. 2 tbsp. b/n. together, 2 in different loops, 2 together, 2 regular, 2 together (total 3 decreases). Next 4 st.b/n. and repeat the decreases, after which knit all the loops in dc. When 2 loops remain, change the color
- V.p. and st.b/n. to the marker. 2 tbsp. b/n. together, 2 regular ones. And so 5 times. Further st.b/n. to the marker
- We knit the next row in st.b.n.
- Next v.p., st.b/n. to the marker, 2 st.b/n. together, 1 dc, and so on 4 times, then knit 2 together and until the end of the row with stitches in each loop
- From the 3rd decrease, count 8 loops, also on the other side
- v.p. and st.b/n. to the marker, turn over
- v.p., st.b/n. in each loop to the end. Change the thread
- dc, go down and knit dc. in the bottom loop
- V.p., skip 1, dc, v.p., dc, v.p., 2 stitches together (2 times), v.p., skip dc. ., v.p. again, skip 1
- Next, knit dc, rise, knit dc. in every loop
- On the sole from the additions to the 3rd column, attach a new thread
- Knit 7 double stitches, 8 half stitches. and 7 st.b/n.
- Turn the bootie over and make a v.p. and 1 tbsp. b/n. in each loop. Sew the blank to the sole
- Knit the nose, counting 2 loops from the middle (5 in total). Knit vp, st.b/n. (5 times), v.p. and again 5 tbsp.
- Turn over and skip the 1st stitch, knit the 2nd stitch, and do the next 2 stitches together
- After this, sew the booties to the bottom
- The tongue is knitted separately. To do this, cast on 11 vp, from the 4th loop we knit a double stitch.
- After that, change the thread
- Turn over and use a thread of a different color to make 3 vp, 1 dc. in each loop. And change the thread again
- Turn over and use a new thread to make 3 vp, dc. in each loop. And so 3 rows
- Tie the tongue in a square with st.b/n. and only along the edges there will be 2 tbsp on the loops.
- The tongue can be sewn on.
- Left to do laces and emblem. Laces can be made from air loops. Knit the emblem this way:
- Cast on 13 vp, 3 connecting loops, 3 treble crochets, 3 half treble crochets, 3 treble crochet stitches. in one loop

After you have completed all the elements, the booties are ready.
Video: Crochet booties-sneakers
How to crochet booties and sneakers for a boy?
Booties are one of the most popular options for knitted slippers for both boys and girls. For them, you can select a variety of color combinations that will look very extraordinary and unusual.

The process of knitting them consists of several stages:
- At first you must link sole. Its scheme is the most common. It is knitted in the round, adding stitches on both edges
- Sides and front also needs to be done separately. You will have three different stages. You learned about it from the previous section
- After you have knitted the bootie frame, consisting of all the above parts, you need to knit the tongue of the sneaker. As you can already see above, it is knitted very simply and sewn to the base with threads
- At the end, make the laces and all that remains is to lace up the finished product
Video: How to knit booties for a boy?
Crocodile booties for boys and girls
Crocodile booties are not only beautiful, but also very original. They can be made not only in green, but also in other bright colors, and believe me, the finished product will look no worse.
Of course, if mom has to knit them for the first time, then the pattern is not so simple. After all, the sole is knitted separately. After this, the front part is knitted.

But the difficulty may be the side part that needs to be done "scale" pattern. It is thanks to him that they are called crocodiles.
The beauty of these booties is that you choose the number of scales you want to knit. There may be two, three or even four rows. In addition, they are suitable for both boys and girls.
Video: Crocodile booties
Crochet sole for booties
The sole is one of the main parts of children's knitted booties. It is knitted separately from other parts. The knitting pattern is quite simple. Even a beginner can handle it.
The sole is knitted in the round, mostly using single crochets. What can be a little difficult is making the curves correctly. But you can easily deal with them if you find a diagram that is understandable to you.

If everything is done correctly, the sole will be flawless, but it does not depend on how the work will proceed. After all, it is the basis from which they begin to knit further both the side parts and the front of the booties.
Video: Crochet bootie soles
Crochet booties for boys and girls
Your little child will be warmed up on cool autumn and cold winter evenings by warm crochet booties knitted by your own hands, which are knitted according to the patterns described above.
The product is knitted from the bottom up, first the heel is knitted, and then the desired height of the boots. It is better to choose a dense pattern; it will help keep its shape and retain heat.
The peculiarity of such boots is the density of the knitting, the thickness of the thread and the height of the finished product, which can be adjusted by pumping out the freebie.

With the help of a magic hook and imagination, you can create a unique image for your baby, and most importantly, the child will be very warm and cozy. You can use various decoration materials: beads, seed beads, buttons, satin and lace ribbons, bright pom-poms that will delight your baby.

You can also knit booties and boots in the shape of different animals, select colors, sew on eyes, embroider mouth and ears, and your child will become a little mouse, lion cub or bunny, it all depends on your desire.
Video: Crocheting boots for a baby
Crochet berry booties
If you want to give warmth and a bright summer atmosphere, knit your little fairy with delicate booties in the form of strawberries or wild strawberries. To do this, you need to choose the right color and thickness of yarn: red, green, yellow, white or beige and brown and a hook 12 - 13.5.
Knit in the same way as other types of booties, starting from the heel, casting on 12 - 15 chain stitches. Knit the green leaves separately or knit in the round.
To add tenderness and sophistication to the look, use white or beige pearls or beads that will resemble seeds.

Sew a white openwork flower with a delicate yellow center onto the finished booties. Your baby will be irresistible in them.
Berry booties in the shape of blackberries are perfect for any outfit. White or beige can be used as the main color, and brown is ideal for finishing and knitting openwork frills.
For beauty, also use beads, satin or lace ribbons or purple or soft pink buttons.
Video: Master class on crocheting berry booties
Booties sandals for girls and boys
To help your baby's feet breathe on hot days, you can knit very comfortable and light booties and sandals using delicate light-colored cotton threads. For decoration, use various small pompoms, rhinestones, beads, lace ribbons or interestingly shaped buttons, which you tie with the main color or decorate with sparkles.
After you have finished knitting the heel according to the above pattern, you need to make 3 rows of single stitches, and then knit 2 connecting stitches, 3 chain stitches. for a bootie strap that will help keep its shape.

You must knit three straps, carefully connecting them together with non-woven stitches. In order for the backdrop to fit against the leg, you need to decrease the loops in the middle of the 3rd and 5th rows by knitting 2 tbsp together. s.n..
Now knit a row with 1 double crochet and 1 chain stitch to make at least 20 stitches. Decorate this row with a lace ribbon and sew on beads.
For a delicate openwork frill, you need to knit 3 rows of 5 chain stitches, in the end you should get no more than 20 houses. For boys, you can sew interestingly shaped buttons on the sides and make straps with Velcro or an invisible hook fastener, and for a girl, knit a delicate openwork flower and decorate the middle with pebbles.
Video: Crochet booties-sandals
Openwork crochet booties for newborns for summer
Booties are a good opportunity to unleash your creative potential and create a delicate and exquisite gift that your baby will be irresistible to. It is important to choose bright colors and soft baby yarn.
There are a huge number of knitting methods and materials for decorating the finished openwork product. The main thing is to connect with love and put your whole soul into it.
Openwork knitting is considered one of the most complex, but also beautiful. Today, a huge number of patterns have appeared for knitting openwork booties.

As for the knitting process, the sole is made separately, as well as the side parts. And the front part can be knitted not just as a certain stage of knitting, but can be a separate product, in the form of a flower or butterfly, which is then sewn on with threads and a needle.
Airy patterns and decorative elements will add tenderness and beauty. Most often these are beads and ribbons. Openwork booties are rightfully considered one of the most adorable options.
Video: Master class knitting booties
Crochet marshmallow booties
If you have leftover baby yarn in different colors, you can use it to knit beautiful marshmallow booties in a delicate white-coral color. They are knitted in one piece, without additions or decreases, which is possible even for beginner needlewomen.
Cast on 20 chain stitches with coral thread, and knit 34 rows of non-woven stitches, then you need to stretch 8 connecting loops, and taking a white color, knit 1 chain stitch.

Then carefully fold the knitted fabric face to face and sew without tearing the thread, pull the booties together, making small stitches to form a kind of wave.
Decorate the bootie with pearls arranged in the shape of a flower or baby's name. Shiny studs or hooks are also ideal.
Video: Crocheting marshmallow booties
How to crochet bunny booties?
Little children like interesting things, with different designs, in the form of bunnies, bees, dogs, cats. One of the most popular models are bunny booties. They have ears and a muzzle, so children will not only wear them with interest, but also walk with them.
Knitting bunny booties is quite simple. The sole is made separately, as in many other models, and from there, knit the upper front part and the sides.
The main stitches that are used when knitting this pattern are: single crochet and single crochet. The difficulty can only be in the process of knitting the front part. But to do this, you can watch a detailed video, after which you will definitely succeed.

The beauty of bunnies is that the top is quite delicate and delicate. In addition, the ears and muzzle give them an original, cheerful look. The ears are knitted separately. And then you just need to sew them onto the finished booties.
To prevent the bunny booties from falling off a small child’s foot, you can decorate them with a satin ribbon on top. It will be both beautiful and useful.
Video: Knitting bunny booties
Crochet booties - doggy boots for a princess, ballet shoes, lambs, bears, caramels: photo
Caramel booties
For all beginners and mothers with little experience, we still recommend watching the master classes, because in the video you can see all the knitting patterns more clearly. It will be quite difficult to read and understand the course of action at the beginning.
Video: Polar bear booties
Not everyone can crochet booties. This requires patience and some basic knitting knowledge. Therefore, if you decide to please your “little miracle” with a new thing made by yourself, we will teach you how to crochet booties beautifully and correctly. Booties for beginners - this will be the first part of a large lesson, then we will move on to more complex models.
Crochet lessons for beginners (patterns with step-by-step descriptions)
This part of the article can be called “training for dummies or how to quickly and easily crochet booties.” For beginners, this is a real find, as a large number of photos, videos and step-by-step instructions will help you understand this difficult matter. So, a master class on “how to learn how to knit the simplest booties.”
The simplest booties for baby (a lesson for beginner needlewomen)
If you learn how to knit the simplest patterns, you can get creative and turn them into funny little animals (monkeys, bunnies, lambs, bears), interesting fruits (strawberries, apples). You can also just beautifully tie the edge or decorate the socks, which will go beautifully, for example, with a headband and, voila, a chic set is ready.
Lightweight models for the summer or for home can be made with felt soles.

Popular articles:
For this model (sole size 10 cm) you need soft yarn (100% acrylic, 50 g / 200 m) in 2 colors.
We dial 12 v.p. + 3 v.p. (total 15 ch), insert the hook into the 4th loop of the chain from the hook and knit 3 rows according to this pattern.

Having knitted three rows, we move on to another color.

4th row - in each column (back) we knit a single crochet loop. The result should be 56 loops.

We knit the 5th one in the same way. The result will be two rows knitted with white thread.

Again we switch to blue. We start by knitting a “bump” (2 chain stitches, after 2 unfinished stitches, then one chain stitch).

We skip one loop and make a “bump” again.


So knit a whole row and close. We knit the 7th in the same way as the 6th.

We close the row and break the thread. Having marked the middle, we begin to knit the toe with a white thread.

Insert the hook into the back wall of the loop and knit a white “bump” from two unfinished loops.


Turn it over and also knit “bumps”.

There should be 7 pieces, after which you need to connect them.


Finish the row in the same way.

2 more rows and switch to blue again.

We decorate the edge by knitting three air loops for each column.

Master class with a detailed full description (step-by-step photos)
Step by step you learn the basics, which help you move on to more interesting models. When you start from scratch, all the little useful secrets help you move forward quickly, so I suggest moving on to more complex booties with a hook for beginners with a step-by-step description.
Knitted sneakers for children
Handmade Adidas sneakers will be appreciated by true gentlemen.
For this “masterpiece” you will need thin white cotton yarn (100% cotton, 50g/150m), hook number 2 and 3 hours of free time.
We start with the sole. The sole is knitted according to this pattern.


The sock is knitted from the front 30 stitches. 1 row - single crochets, 2 - double crochets (3 loops and one top). There should be 10 loops left.

We connect all 10 columns, move the thread to the beginning of the row and knit 2 rows of single crochets.

7 rows - double crochets.

The tongue ends with three rows of white thread. Then you can tie the product around the perimeter.

We embroider the logo and thread the lace. Ready!

DIY summer sandals for a child
If you love children's knitted sandals for the summer, by learning how to knit soles, you can come up with a lot of ideas and create a large number of interesting models.


Fold the sole in half and find the middle at the toe. The middle should be 5 columns. Tie a thread with a regular knot and tie 13 air loops, then attach it to the opposite side of the spout using a half single crochet (dc). Next, knit according to pattern 2 (only what is indicated in blue and dark red). The nose should look like in Fig. 3. Do not break the thread. In the last row you attached 2 half-columns bn to the sole.
Further:
1st row: 3 vp, attach them to pst.b.n. to the strap (skip 3 dc). Work 34 treble stitches. n. and also attach pst. b. n. to the strap.
2nd row: 1 vp and the entire row of st. b.n. = 35 st.b.n.
3rd row: Again 3 v.p. and 34 tbsp. With. n., 4 v.p., 3 tbsp. S.N. in the middle of the strap, ch 4
Next is a row of arches for the ribbon. 5 v.p., st.s.n. through 1 st.s.n. previous row. Senior s.n., 1 v.p., st.s. n. repeat the entire row in a circle.
Start the next row with pst. b.n. in an arch, 4 vp, dc, 1 v. p., senior senior sciences again in the arch. And so the whole series.

Children's shoes for girls (crochet)
Christening dresses or an openwork hat will look chic when paired with crocheted shoes with beads. Make them into ballet shoes or moccasins. The most important thing is that the yarn is soft and pleasant for a child’s feet.
Crochet booties for beginners with step-by-step description (crochet).

You can take any cotton threads you like and a hook No. 2.5. We start with the sole (look at the diagram below).

If you have a hard time navigating the diagram, I suggest you go into more detail at this stage.
We cast on 17 air loops (we start knitting from the 3rd).
1st row: 7 single crochets, 7 single crochets, 7 single crochets in the last stitch (and continue to knit on the other side of our chain), 7 single crochets, 7 single crochets, 4 single crochets in the last stitch, connecting stitch .

2nd row: 3 chain stitches, double crochet in the same base. 14 double crochets, (2 double crochets from one loop) - 5 times, 16 double crochets, 3 double crochets from one loop, 4 double crochets from one loop, 3 double crochets from one loop, connecting stitch.

3rd row: 3 chain loops, 15 double crochets, (2 double crochets from one loop, double crochet) - 2 times, (3 double crochets from one loop) - 2 times, (double crochet, 2 double crochets double crochet from one loop) - 2 times, 16 double crochets, (2 double crochets from one loop, double crochet) - 2 times, (3 double crochets from one loop) - 2 times, (double crochet, 2 double crochet from one loop) - 2 times, connecting stitch.
Row 4: chain stitch, tie the entire row with single crochets, ending with a connecting stitch.

Row 5: 3 chain stitches, knit the entire row with single crochets behind the back half-loop of our sole, ending the row with a connecting stitch.
Row 6: 3 chain stitches, knit the entire row with double crochets, ending with a connecting stitch.

Let's move on to the white thread.
7th row: 3 chain stitches, 15 double crochets, (we knit 2 double crochets together with a common top) - 10 times, finish the row with double crochets, ending with a connecting stitch.


8th row: 3 chain loops, 14 double crochets, (we knit 2 double crochets together with a common top) - 6 times, finish the row with double crochets, ending with a connecting stitch.

We make 5 connecting loops. We unfold our bootie and knit from the inside.
Row 9: 3 chain stitches, 27 double crochets.

For the strap we cast on 20 air loops. Row 10: we knit a double crochet into the fourth loop from the hook, 2 chain loops, skip 2 stitches of the previous row and knit 2 double crochets, knit 2 chain loops again - skip 2 stitches of the previous row and knit with double crochets to the end of the row.

It’s almost ready, so I suggest tying the product with single crochets.

Sew on a bow, buttons and beads.
Video tutorials - knitting booties for newborns
So, the most interesting ideas for a fashionable baby.
Beautiful “Crocodiles” booties in one evening
Such patterns are knitted very quickly and easily despite the scales.
Warm boots (ugg boots)
We will create high boots or boots made of wool yarn (grass can be used) for colder times. They will look very cute on a baby who is only a couple of months old.
Princess ballet shoes
MK - Sneakers for boys
Unusual white openwork “Raphael” for mom’s doll
Cozy “Minions” slippers for kids
Stylish “Marshmallows”
New Year's ideas "Santa Claus"
Now you can buy whatever your heart desires for a newborn. But not a single purchased item will convey your warmth and love to your baby like something you made with your own hands. Clothes such as booties will be suitable for any baby, especially since knitting them does not take much time and will not be difficult even for beginner knitters. As a result, you will receive an elegant, exclusive item.
Popular patterns for crocheting and knitting booties for newborns
If you look online, you will find many different models of booties. And not every pair can be mastered beginner knitter. I chose the simplest descriptions, but at the same time interesting and beautiful , in my opinion, knitted and crocheted booties that even a beginner can handle.
- The simplest “marshmallow” knitting for beginners
You will need 50g medium weight yarn in two colors . Cast on 28 stitches using the first color on straight needles. Knit garter stitches 52 rows (by the way, you can adjust the shoe size by the number of rows knitted). Then close on the right side 8 pieces at a time . The number of remaining loops became 20. Next, we will continue knitting in a different color: first perform 4 rows in knitting, then 4 in purl. Repeat this 7 times and finish with knit stitches. . Close everything at once.
After this, connect, more precisely, sew the part with the edges facing each other to create a vicious circle. Then sew the main part of the workpiece, and along the rest of the part (knitted with strips) lay a basting stitch and pull it towards the center.
Decorate the top of your baby's shoes knitted applique , beads or any other decorations according to your taste and imagination. Turn away the protruding edges.
- Another simplest version of one-color booties with knitting needles. Thread thickness is medium or higher

The size of the product can be increased or decreased due to the length of the knitted toe.
Cast on 37 stitches and spread them across 4 knitting needles - 9 pieces each . Join the knitting into a circle by knitting the last two stitches together. Then knit 12 rows in a circle with a 1 by 1 elastic pattern. Don’t forget to make a row of holes where you will insert the braid or lacing. It works like this : Knit 2 with one, 1 yarn over, 1 knit (alternate until the end of the row). Then knit two rows with facial loops, after which they need to be distributed as follows: 11 loops on the first knitting needle (try to ensure that the place where the knitting is connected into a circle is in the middle), 7 loops on the other, 11 loops on the third and seven on the fourth .
Now let's move on to knitting a toe . We knit it on 11 loops of the third knitting needle in a garter pattern, in reverse rows. We do not touch the remaining loops for now. We knit 18 rows of toe . Next we knit the sides. To do this, we cast on one loop from each edge loop on the sides and add all the postponed loops to the work. The sides are also knitted with garter stitches - 10 rows.
Well, then we will continue the sole from the top of the toe with facial loops, evenly grabbing and knitting together sole loops with side loops. Continue knitting until the side knitting needles run out of stitches. When all the eyelets are locked, the seam created on the heel is sewn together.
- Crochet "shoes"

We cast on 13 loops, knit a single crochet into the second loop from the hook and knit according to the pattern.

After knitting seven rows, we will get the finished sole of the shoe. We knit further from 8 to 11 row just single crochet - no additions or decreases.
Having knitted everything to the end according to the pattern, we get an almost finished slipper. Then we knit along the top edge three rows in single crochets and, fasten and break the thread.
To make the fastener, cast on a chain of 21 loops and knit a single crochet into the second loop from the hook, then knit according to the pattern.
Sew on the buckle and secure it with a pretty button.
Master class on knitting booties with your own hands
I suggest you try your hand at knitting a charming pair of shoes, your choice by knitting or crocheting, and an accessible description and detailed photographs will help you with this.
- Crochet booties
For these booties, I took the remains of the Turkish yarn “Lanoso” Egyptian cotton for children with a thickness of 50g/105m.

Materials
Let's start knitting from the sole - cast on 11 chain stitches. Add two for lifting.

Step 1. Cast on 11 chain stitches
And we knit according to the pattern.

Schematic drawing
In the outer loops of the chain in the first row we knit 6 double crochets (dc), in the second in each of these six there are two dcs - it turns out 12.
In the third row we alternate 2 dc – 1 dc.
Step 2. In the third row, alternate 2 dc – 1 dc
The sole is ready.
We tie it with single crochets (SC). We knit three rows in total. The resulting part is folded and a kind of “boat” is obtained.

Step 3. We roll up the base and get a “boat”
We take black yarn and knit one row with single crochets. After the black row, we knit another row of sc with white threads.

Step 4. One row of black yarn without crochet and another row of SC with white threads
Fasten the thread and cut it. We knit a second similar piece.

Step 5. Knit the second sneaker
In the resulting workpieces, remove all protruding ends of the threads so that they do not interfere with your work in the future.
We begin to knit the side parts of the “sneakers”. On the toe we count 12 loops - we leave them for the tongue, and with black thread we knit a row of dc above all the other stitches.
Step 6. Using black thread we knit a row of dcs
Then we unfold the workpiece and knit another row in the opposite direction.
Step 7. We knit another row in the opposite direction.
From the third row we begin to knit eyelets for the laces. To do this, at the beginning of the row we knit 3 chain stitches, count two stitches from the edge and knit a DC in the third. We continue to make dc until there are two columns left to the end. We collect three air loops and attach them to the edge of the row.
Unfold the knitting. Along a chain of three loops we knit three half double crochets. Let's move on to the fourth row. We also knit three chain stitches, skip two stitches and again knit a double crochet into the third.
We continue knitting similarly to the third row. There should be three rows with holes in total.
Step 8. Make 3 air loops, count two stitches from the edge and knit a dc in the third
We simply knit the sixth row with a dc, cut the thread and fasten it.
The main part of the “sneakers” is ready.

Step 9. We knit the sixth row simply with dc
We begin to make the tongue according to the diagram.
Scheme of the tongue for the sneaker
Along the edge of the twelve remaining loops we knit six double dcs with one vertex. We unfold the knitting and knit the resulting six double crochets together. We cut the thread and fasten it.
Step 10. We knit six double crochets and in the other direction six double crochets.
From the edge of the tongue we start knitting with white thread - 10 sc, unroll the knitting and knit another row. Change the thread to black and perform 6 rows of dc. We fasten the thread and cut it.

Step 11. Start knitting from the edge of the tongue with a white thread, and then change to black
We do the second one in the same way.
For the laces, we knit two chains of air loops with a length of 40 cm with white yarn.

Step 12. We knit the tongue on the second sneaker and knit chain laces
We tuck the laces into the finished “sneakers”. To prevent them from losing their shape, I advise you to put padding polyester or cotton wool inside.

Step 13. Cord and it’s time to try it on
Your crocheted sneakers are ready. This description is intended for babies from 0 to 6 months. The size of the sole is 8-9 cm. It is easy to knit a shoe of a larger size if you cast on a larger number of stitches at the beginning, instead of eleven.
- Knitted booties
For this model, I took Baby Wool Alize yarn 50g/175m in two threads. According to my description, the size of the sole turned out to be 8-9 cm, that is, also for a baby aged 0-6 months.

Materials
We start knitting from the sole. We put 8 loops on the knitting needles.


Step 2. Garter stitch
In total we get 14 loops. We continue knitting 34 rows in garter stitch.

Step 3. Knit 34 rows in garter stitch
In the 35th row we decrease one loop from each edge.
We repeat decreases in the 37th and 39th rows. There are 8 stitches left on the needles.

Step 4. From rows 35, 37 and 39, decrease one stitch from each edge
Close all the loops until only one remains. And along the edge of the sole we begin a set of stitches on four knitting needles.

Step 5. Close all the loops until one remains and cast on the loops on four knitting needles
We should have 60 loops.
We knit 6 rows with a scarf pattern.

Step 6. We knit 6 rows with a scarf pattern
We divide the work into two parts - heel and toe. We perform the toe with a 1 by 1 elastic band, and the heel with the stockinette stitch. In the first row on the sock exactly in the middle (between 15 and 16 loops) add one loop. We knit four more rows according to the pattern.

Step 7. We perform the toe with a 1 by 1 elastic band, and the heel with the stockinette stitch
Then on half of the sock in each row in the middle we knit three loops together.
We continue this way until there are seven loops left on the sock, while knitting the heel with a knit pattern.

Step 8. Continue this way until there are seven loops left on the sock
We close these seven loops, and add 16 more loops to the number of loops on the remaining knitting needles.

Step 9. Cast off seven loops and cast on 16 more loops for the remaining ones.
We knit 6 rows with a scarf pattern. Don’t forget to make a hole in the third row for a button (knit two together, yarn over one).

Step 10. Knit 6 rows with a scarf pattern and make a hole
We close all the loops, cut the thread, and fasten. We remove the protruding ends.
We knit the second one in the same way.

Step 11. Knit the second bootie
Sew on the buttons. The shoes are ready.
Step 12. Booties for the little princess are ready
- When choosing yarn for knitting children's products, it is better to give preference threads marked “baby” . This yarn is soft and hypoallergenic , so the baby will wear products made from it with pleasure, and it will not cause him any inconvenience or harm. For one pair of booties, one skein weighing 100g is enough. All other necessary information can be read on the label.
- When choosing a model, it is better to focus on options that have
During quiet evenings on maternity leave, waiting to meet your beautiful baby, knowing the gender of the unborn child, you can not only think about things that you can buy, but also make them yourself. For a girl, you can, for example, knit her first booties. What are booties for and is it difficult to knit them? This will be discussed in this master class.
A little about what booties are needed for
These little knitted slippers are needed, first of all, in order to smartly go out somewhere. This could be the first trip to the doctor or the first walk on a visit. Don’t forget about the recently popular photo shoots, where you simply can’t do without beautiful booties and other necessary accessories.
Is it difficult to knit booties?
Not at all. Having crocheting skills and knowing the basic elements of knitting, you can knit your first ones, even for an older child. And if you rely on a detailed description of knitting with a pattern and photo, then even without the skills, you can learn if you want.
The first question that arises when creating booties is their size.
It is calculated as follows.
- The length of the baby's foot and its width are measured.
- The width is subtracted from the length and the length of the chain of air loops is obtained, from which the knitting of the sole of future booties begins.
Crochet booties with a detailed description prepared by: Liliya Pervushina


