The need to give something a finished look sometimes requires the needlewoman to use various techniques. One of them is to crochet the edge of the finished product.
There are many ways to crochet an item, from the simplest to the most complex, consisting of lace several dozen centimeters wide. Even classic bindings have many variations in execution, as knitters try to bring something new - to modernize the basic patterns.
There are certain advantages to using knitted edging:
- fixes the shape of the product;
- prevents edges from curling;
- allows you to hide imperfections, such as seams;
- used as decoration;
- helps to update an old and boring thing.
Edge tying “Rachy step”: step-by-step instructions
This pattern was called “Rachy step” because the product must be tied from left to right- in the opposite direction of the usual crocheting or knitting.
At the same time, such a border retains the shape of the edge well and protects the product from deformation during wear or washing. The pattern is made in 3 variations. The choice of knitting technique is influenced by the type of product and how it will be used in the future.
Classic version of the pattern
After the thread is secured at the left edge, you need to perform a VP, then, lowering the hook into the next loop of the base, grab the thread. At this stage, there should be 2 loops on the hook crossed over each other.
 Classic pattern “Crawfish step”: how to crochet the edge of a product
 Then you should knit the working thread through both loops. The remaining loops running along the perimeter of the product are made in the same way.
Double crochet step
This binding looks voluminous, so it is recommended to use it on knitted items made from thick winter yarn. It is necessary to make a VP, then yarn over and pull the thread through the next loop of the base so that there are 3 loops on the hook. Next, they should be knitted all at the same time.

Then, in the same edge loop, you need to repeat these steps 2 more times, and then close the fragment of the VP pattern. This pattern should be made the number of times required to tie the product.
Bilateral crayfish step
A double-sided pattern is used when it is important that the product looks good from all sides. To do this, you need to tie a VP and yarn over, then lower the hook into the next loop of the bottom row.

Then you need to use a crochet hook to grab and pull the working thread through the loop. The 3 loops formed on the hook should be knitted together. Next you need to knit 1 VP and continue the pattern along the entire length of the edge of the product.
Trimming the edges with pompoms
How to crochet the edge of a product so that it looks original and beautiful - this could be tying with pompoms.

This type of tying, at first glance, seems complicated, but in the work you will only need to use air loops and double crochets, which are the basics of crocheting.
Stages of work:
- Depending on the edge of the product that needs to be tied, you should decide whether to immediately proceed to the design with “pompoms” or first tie the edge with single crochets. Tying with posts will allow you to align and stiffen the edge, which is sometimes necessary for knitted items.
- If the edge of factory knitwear or other fabric is being processed, then a row of posts is necessary, as it will allow you to secure the hem and will be the basis for the future row of pompoms.
- You should start knitting pompoms from the corner of the product, if the binding will be around the entire perimeter, or from any edge.
- Having secured the thread to the base of the product, you need to make 7 VPs.
 How to crochet the edge of a product with pompoms: step-by-step instructions
 - In the 6th VP, you need to knit 5 CH from the beginning. In this case, all the stitches should not be knitted to the end - you need to yarn over, grab the working thread through the 6th loop and pull out the loop. There should be 2 loops left on the hook. Next you need to knit 4 more columns. The 6 loops formed on the hook should be knitted together.
- The resulting bump is half of the future pompom. To make the second half, you need to make 1 VP, into which, by analogy, you need to knit 5 CH.
- To connect both parts of the pompom, you need to fold the cones together and knit them at the base of the first cone.
- Next you need to perform 5 VPs and secure the chain to the base of the product.
In your work, you can experiment by changing the number of VPs and columns. The thinner the yarn, the more stitches you will need to make an even and voluminous pompom.

This fringe can be used to decorate blankets and capes, pillows and curtains, and to decorate the edges of clothes.
Edge binding "Beads"
How to crochet a fabric or knitted item along the edge so that it looks original and unusual - this question is quite common among knitting enthusiasts.
Imitation of beads sewn along the edge is one of the ways to decorate things. Its advantage is that in this way you can finish not only geometrically correct shapes, but also any curves, for example on the neckline or armhole.

Execution of the pattern:
- The bottom row must be made of any type of columns. Beads will be made directly over it.
- Make 1 VP, then knit 4 sc into the 1st loop of the bottom stitch. Next, you need to pull the hook out of the loop and insert it behind the first (from the beginning of knitting) of 4 sc, grabbing this loop and pulling it through the indicated stitch. Then you need to knit 1 VP and after 1 column of the bottom row, in the next column from the beginning of knitting, make another “bead”.
Openwork binding
Openwork binding can give an updated look to any product. This type of border will look especially impressive on things made with simple knitting. It can get “lost” on bright, colored and openwork products.
Crown pattern
Stages of work:
- It is necessary to tie the edge of the product with a stitch over the edge.
- The first row will consist entirely of dc. The row should begin with 3 VP for lifting.
- The second row is made of arches according to the following pattern: 1 VP for lifting, sc, then you need to knit an arch formed by a chain of 4 VP, through 2 columns of the bottom row you need to close the end of the arch by knitting 1 sc.

- At the beginning of the 3rd row, you need to make 1 VP for lifting and tie the first lower arch of the RLS. There should be 4 of them. Next you need to perform 2 sc to the middle of the second arch of the previous row. Then you should knit a chain of 3 VPs and close it with a connecting loop in the middle of the first arch.
- Thus, the upper arch was created. It needs to be tied in the form of a crown. To do this, knit 1 sc on the 4th loop of the chain, then make a chain of 3 loops and secure it with a sc to the 3rd loop of the arch. Next you need to make 2 more cloves: 1 RLS, chain of 3 VPs, 2 RLS, chain of 3 VPs. The arch in the form of a crown is ready.
Above the 2nd arch of the bottom row you should also knit 2 sc, and on the 3rd arch - 4 stitches. Next, 2 sc on the 4th arch and again perform a chain of 4 loops, which will close in the middle of the 3rd arch with a connecting loop. Next you should knit in accordance with the description of the 1st crown arch.
"Sink" edge
The pattern for the border of knitted items “Shells” is also called scallops. Festoons are made simply and quickly, so they are loved by both beginners in knitting and experienced knitters. Usually the scallops are the final row in the harness. It can be preceded by a row of any columns or a more complex pattern.
Stages of work:
- The bottom row must have an even number of loops (stitches). At the beginning of the scalloped row, you need to make a VP.
- Then you need to knit 5 dc through 1 loop of the bottom row into the next one.
- At the final stage of scallop formation, you should skip 1 loop of the bottom row, and in the next row you should knit a sc.

- You need to continue, repeating the pattern according to steps 1 to 3 until the desired length. There should be a sc on the corner of the product, separating the 2 scallops.
Binding the edges of napkins
How to crochet the edge of a product if it is a thin napkin or handkerchief, the tips described below will tell you. To do this you will need a needle, thin threads, a hook and some free time.
Basic Rules:
- The thinner the yarn, the more airy the lace will be. But it is necessary to ensure that the thickness of the fabric and thread matches. The final product should look harmonious.
- To correctly place the pattern around the perimeter of the napkin, you should make a sample pattern. This will allow you to accurately calculate the number of reports required.
- A difficult-to-make or wide border does not have to be knitted right away on a napkin. It can be knitted separately and then sewn to the desired product.
- Before starting work, the fabric must be washed in case it shrinks.

Edge processing:
- If the fabric does not fray, then just tuck the edge. When the fabric is loose, it is advisable to process it using an overlocker, or hem it by hand or on a sewing machine.
- Next, you need to cover the napkin with the yarn that will be used to make the lace.
There are many options for stitching. The simplest is overstitching.

Another method will look more professional and beautiful. To overcast the edge, as in the photo, you need to turn the fabric to face you and make a SC along the perimeter of the napkin. The distance between the bases of the columns on the fabric should be 5 cm.

During work, you should monitor the thread tension. The fabric under the post should not bend, wrinkle or curl.

After the base of the napkin is prepared, you can choose any of the existing patterns.


For square and rectangular products, patterns with corners are suitable.

There are also many interesting patterns for round napkins.
Edge tying with “Caterpillar”
The “Caterpillar” type of binding allows you to create a dense edging along the edge of the product, which gives the item a finished look.

Stages of work:
- After securing the working thread at the edge of the product, you need to pass the hook into the outermost loop and, grabbing the working thread, pull it out. There should be 1 loop on the hook. Next, you need to pull the thread through the next loop of the fabric. The resulting 2 loops should be crocheted.
- The next loop must be made on the wrong side. To do this, you need to turn the product clockwise and, by analogy with the previous one, grab the loop with a hook, working from the wrong side. Next, you need to knit 2 loops at once.
- The previous points were preparatory. Basic knitting should be done following the indicated pattern.


Turning the product over with the front side facing you, you need to pass the hook through 2 loops of the previous row, then insert it into the fabric and, grabbing the thread, bring it out, knitting 2 loops at the same time. If everything is done correctly, there will be 2 loops left on the hook. Next, they need to be knitted at the same time. Then the steps need to be repeated, but from the inside out.
You need to alternate the specified knitting pattern around the entire perimeter of the product being processed. To ensure that the edges where the braids are knitted to close the row do not twist or bend, you need to grab the loops when knitting the “Caterpillars” pattern not by the braid, but by the loops of the bottom row.
Small border from one row
Sometimes, after knitting a thing, it seems that something is missing - there is no feeling of completion of the work. In such cases, a single row harness is suitable. Such a border may be difficult to distinguish on the product or, conversely, act as a bright decoration, as in the example below.


How to crochet the edge of a product so that the border is narrow (no more than 1.5 cm):
- You should start working by tying the RLS.
- Next, you need to knit 3 VP, as well as 2 DC at the base of the chain.
- At this stage there should be 3 loops on the hook. They should be knitted together, and then through 2 warp loops the RLS should be done again.

This pattern can have many variations, depending on the final goals and the thickness of the thread. For example, you can change the number of sc or use dc instead of a single crochet.
Arched harness made of air loops
Stages of making a border of arches:
- In the first loop of the bottom row you should make a sc. If the arched row is the final row of an already knitted binding, then in front of the column you need to knit 1 VP for lifting.
- Then you need to make a chain of 3 VPs and secure the sc by knitting them through the 2nd loop of the base.

- In the 3rd and 4th loops of the base you need to work according to the RLS.
- Then, along the entire perimeter of the product to be tied, you should alternate a chain of 3 loops and 3 sc.
Even such a simple way of tying can be approached creatively. For example, make arches from long chains, then they will look more like fringe. In a knitted shawl, the arches consist of a chain of 20 VPs, which are secured to the base using RLS.

In addition, air loop arches can be made in several rows. In this case, the arches will be staggered. This type of binding looks especially impressive on items made of thin fabrics - napkins or handkerchiefs. In this case, you need to use thin threads, for example, sewing threads in spools.
Pico
How to crochet the edge of a product with a Picot pattern depends only on the taste of the needlewoman, since there are several options for performing this type of tying.
| Classic picot. Pattern diagram: perform 3 sc, then a chain of 3 VP. The ring of loops should be closed in the 1st ch using a sl st. Next, make 3 sc again. It is permissible to change the number of stitches, and also instead of sc, do it with a double crochet. |  |
| Unfolded picot. With this type of pattern, the VP chain needs to be closed with a SS, knitted at the end of the RLS chain. |  |
| Big pico. The chain should be made of 5 VPs. |  |
| Triple picot. Having knitted 3 sc, you need to dial 3 ch. and connect them into a ss ring, made in the 1st ch, as with the “Classic picot”. Then knit another chain of 3 loops and close it in the same way. |  |
| Volumetric picot. To make a voluminous circle, you should knit 3 VP, then make 2 DC in the first loop of the chain. Next, you need to make another chain of 3 loops and close the resulting picot SS in the outer sc. |  |
Border Pattern Ideas
How to tie the edge of a product with crochet, a narrow border or wide openwork lace depends on the product that needs to be decorated, the thickness of the threads (since not every pattern is suitable for thick yarn), the taste of the needlewoman and her skills.

The fringe made of curls looks original. It can be used to decorate a neckerchief (not necessarily knitted), as well as blankets or pillows.

You should be careful when choosing threads for multi-colored piping so that the final product looks interesting and beautiful, especially if it is a garment design.

Complex patterns require skill from the needlewoman and a lot of time spent on work. But the result is worth all the effort. Tying clothing with a pattern allows you to create a completely new look.

Any knitted inserts and bindings for children's clothing are especially relevant. Armed with a hook and approaching the issue creatively, you can lengthen clothes, disguise a hole, or simply add a “zest” to a store-bought item.

The useful ability to tie the edge of an item with lace or a narrow crochet border provides a lot of space for experimenting with the way you wear clothes and variations in the appearance of home accessories.
Article format: Natalie Podolskaya
Video about methods of crocheting products
How to crochet the edge of a product - detailed video instructions:
From time immemorial, the border has been considered the element of knitting that gives any product true tenderness and sophistication. It can be used to decorate any crocheted items - from clothing to kitchen accessories (napkins, tablecloths, towels, curtains and much more). Moreover, not only finished knitted items are tied with a decorative border. Openwork lace, knitted along the free edge of the fabric, can breathe new life into an old, long-forgotten item from a women's or children's wardrobe.
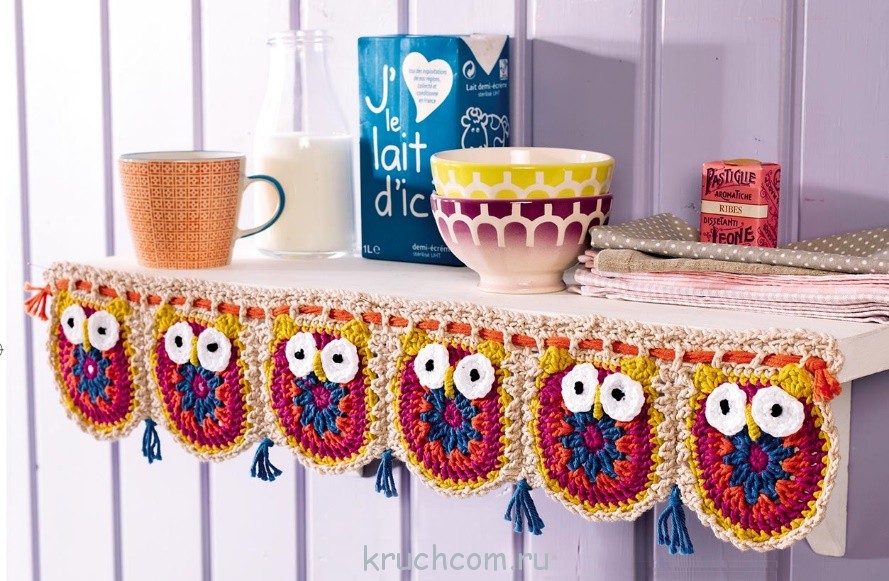
There are many ways to knit a border. It is knitted lengthwise and crosswise, in one layer and layered, using fillet, openwork, ribbon techniques, as well as in the form of a border or fringe. Each option for knitting a border has its own subtleties, therefore, if the craftswoman has just begun to master the basics of crocheting, we recommend choosing the simplest tying patterns, then gradually complicating the knitting tasks. 
Today we will talk about how to crochet a border. We offer needlewomen a large collection of patterns and step-by-step instructions for crocheting the edges of knitted items - from simple “picots” to extremely complex crocheted “butterflies”. 
Abbreviations in the text:
- VP – air. a loop;
- Runway - air. lifting loop;
- Art. s/n – double crochet;
- Art. b/n – single crochet;
- Art. s/2n – double crochet stitch;
- pet. - a loop;
- flail - chain;
- RN – working thread;
- PR – previous row;
- SS – connecting column.
The simplest picot-based border for beginners
With the help of such a border you can tie whatever you want: knitted napkins or ordinary fabric handkerchiefs. The binding is absolutely simple to perform, it consists of four rows, so even a new knitter can master it. 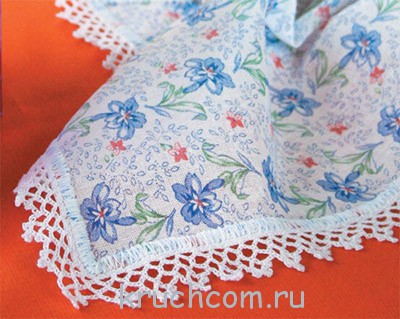

Knitting progress:
We tie the fabric in a circular manner with a row of non-woven columns. SS.
Next in a row we knit 6 VP (1 VP + 5 VP), 1 tbsp. b/n in the 5th art. b/n PR, then knit with rapports to the end of the row: “5 VP, 1 tbsp. b/n in the 5th art. b/n PR". SS.
We knit the third row in the same way, only the b/n column should fall on the central loop of the arch of 5 VP PR.
We tie the fourth row around the trace. repeating knitted combination: “1 tbsp. b/n to central. pet. arches from VP PR + 3 VP + 2 tbsp. s/n to the center. pet. track. arches of 5 VP PR, above them and between them - in picot (3 VP + 1 SS in the first VP), between picot - 3 VP, we complete the rapport with three VP and st. b/n to the center. pet. track. arches made of 5 VP PR.” SS. The border is ready!
Narrow openwork border
The most beautiful airy border can decorate women's blouses and children's tops; framed by it, a wide variety of clothing items and all kinds of knitted accessories look equally good.
Work steps:
The border is knitted transversely using openwork motifs.
We collect the flail. of 11 VPs (7 VPs + 3 VPs + 1 VPs).
Row No. 1: 1 tbsp. s/n in the 7th VP chain. from the hook, 2 VP, 2 tbsp. s/n in the 4th VP of the base from the hook, between the posts - chain. from 3 VP.
Row No. 2: 5 runways, 3 tbsp. s/n to the center. pet. arches made of 3 VP PR, 1 VP, 3 tbsp. s/n in the same pet. arches, 2 VP, 1 tbsp. s/n in next Art. s/n PR, 1 VP., 1 tbsp. s/n in the 3rd runway PR.
Next, we continue the work according to the knitting pattern until the border reaches the desired length. Semicircular motifs are knitted during knitting. b/n with pico.
Treat the finished border with a starch solution and iron it to give it an ideal shape.
Heart border in fillet knitting technique

A border made using the fillet technique is one of the most popular types of crochet bindings. The fillet border is used to decorate towels, napkins and tablecloths; in addition, it can be used to decorate kitchen curtains and other home interior elements in an original way.
A heart-shaped border with scalloped edges can be a bright accent to many knitted and fabric items, take, for example, kitchen curtains, where you want to add a little variety.
Fillet pattern diagram:

The process of knitting a fillet border is incredibly simple and similar to embroidery technology. It must be remembered that each cell of the pattern consists of three loops, the empty one is knitted “1 tbsp. s/n + 2 VP”, filled in – “3 tbsp. s/n.”
For the “heart” border we use a flail. on 55 VP + 3 VP, and knit with empty and filled fillet cells according to the above pattern.
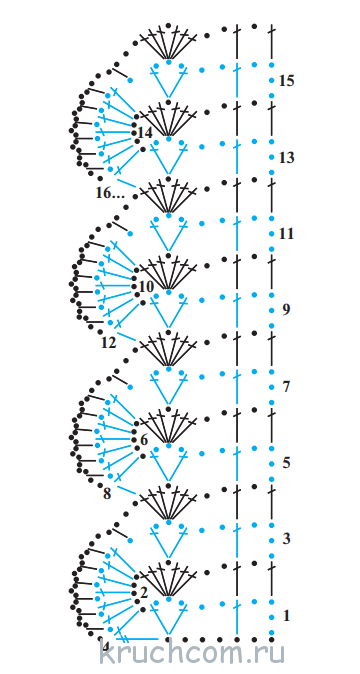
Complex openwork border
Openwork border is the leader among the methods of crocheting the free edges of a product. Openwork binding patterns are in high demand among craftswomen, so there are plenty of options: scallops, “pineapples”, shells, floral motifs, etc.
The openwork border can be narrow or wide. The latter is ideal for framing towels and tablecloths. We invite needlewomen to pay attention to the beautiful pattern of the wide openwork border, perfect for adding elegance to the tablecloth.
The process of crocheting such a border is not easy, but the results of the work will be appreciated, see for yourself! 
Knitting pattern:

Knitting order:
We knit the beginning and end of the border according to the pattern of the first motif, then alternately according to the patterns of the second and first motifs until the border reaches the desired length.
First motive: we start with a chain closed in a ring. for 5 VP.
Row No. 1: 4 runways, 6 st. from 2/n to next. 2 VP rings.
Row No. 2: 4 runways, 1 st. from 2/n to next. Art. with 2/n PR, 2 tbsp. from 2/n to next. Art. with 2/n PR, 3 VP, 2 unfinished. Art. with 2/n with one vertex, in the first VP chain. out of 3 VPs, 3 unfinished. Art. with 2/n with one vertex, in the next. Art. with 2/n PR, 3 VP, 2 unfinished. Art. with 2/n with one vertex, in the 1st VP chain. from 3 VP, 2 tbsp. from 2/n to next. Art. with 2/n PR, 2 tbsp. from 2/n to next. Art. with 2/n PR.
Rows No. 3-4: knit according to the pattern of the first motif.
Second motive: we collect the flail. for 13 VP (7 VP, 4 VP, 2 VP).
Row No. 1: 4 VP, 1 SS between the fourth and third row of the first motif, 2 VP, 8 sts. with 2/n in the ninth VP chain, 3 VP, 1 SS between the fourth and third row of the first motif on the opposite side of the chain.
Rows No. 2-4: knit according to the pattern.
Warp: knit straight and back according to the warp knitting pattern (rows No. 1-8).
Tying: we tie the border in a circular manner according to the tying pattern. Ready!
Dense border “funny hearts”
A bright decoration made of contrasting threads will appeal not only to adults, but also to children. With the help of such a border you can decorate shelves for toys in a child’s bedroom, as well as decorate clothes and accessories. 
Knitting pattern:

Knitting stages:
We knit seven hearts from 5 VPs with pink yarn, closing them in a circle with one SS. We knit two circular rows according to pattern A.
Then we make a flail using light green yarn. on 120 VP + 1 VP and knit the next one. way:
Rows No. 1-2: st. b/n;
Row No. 3: 6 tbsp. b/n, 6 rapports: “next. pet. we knit the bases 1 tbsp. b/n, 2 VP, 1 tbsp. s/2n, 2 VP and 1 tbsp. b/n, in parallel, using a column s/2n, we grab the first half of the heart (marked with arrows in the diagram), in the next. 4 pet. We knit the bases according to the 1st tbsp. b/n, next warp loop - 1 tbsp. b/n, 2 VP, 1 tbsp. s/2n, 2 VP and 1 tbsp. b/n, at the same time grabbing the second half of the heart, 11 tbsp. b/n". After last we knit 6 regular stitches for the heart. b/n. The border is ready!
Original border with pompoms

Step-by-step knitting:
- We collect the flail. for 6 VP.
- We dial 3 tbsp. s/n in the 3rd VP from the hook. Total - 4 pets. on hook.
- We make a RN yarn over and pull it through all the loops on the hook.
- Again we collect 3 VP.
- Lastly pet. the previous group of 3 tbsp. s/n again knit 3 tbsp. s/n and repeat all steps. We get another “cluster”.
- We knit a SS in the stitch from which the first “cluster” began. We do this so that 1 tbsp. s/n remained behind, and two - in front. This order also applies to the first cluster.
- Again we collect 3 VP. We attach them with SS to the place of attachment to the main canvas.
- Repeat steps 1-7 the required number of times until the entire fabric is tied with a border of miniature pompoms.

Exclusive border with butterflies
The amazingly beautiful border with butterflies as if fluttering across it captivates many needlewomen. By the way, its knitting is not extra-heavy, so not only professional craftswomen, but also beginners in crocheting can practice knitting such an openwork border.
The knitted border is knitted with cross knitting. Openwork butterflies are knitted along the edge of the fillet mesh. After the main part of the border is ready, you need to knit laces from VP, which subsequently tie the chains of air loops inside the butterflies, thereby forming a clearly defined body and antennae of the butterfly.
To knit such a border, it is best to use the finest cotton threads, then the work will look extremely delicate and airy.


Knitting pattern:

Knitting progress:
- We collect the flail. at 33 VP. From the 9th ch from the hook we begin to knit with a fillet net (st. s/n + 2 ch), skip 2 stitches between the stitches. In total you need to knit 5 tbsp. s/n.
- After the fifth st. s/n we dial 2 VP, skip two pets. on the chain and knit st. b/n.
- We cast on 2 more VPs, skip two pets. on a chain, knit st. s/n.
- Cast on 2 ch, skip 2 stitches. Until the end of the row we knit according to st. s/n in each pet.
- We knit according to Art. s/n in next 3 tbsp. s/n PR.
- We cast on 2 VP, knit st. s/n in next Art. s/n PR.
- We cast on 5 VP, knit st. s/n in next Art. s/n and then 4 more cells with fillet knitting.
- In the last loin cage PR - knit 3 tbsp. s/n.
- We cast on 4 VPs and unroll the knitting.
- We knit 3 tbsp into the empty fillet cage (after the cage with PR posts). s/n.
- Next we knit with fillet cells until an arch of five VPs (i.e. 3 fillet cells).
- We cast on 2 VP, knit st. b/n in the third stitch. on an arch of five VPs.
- We collect 2 more VPs, finishing the row: 1 tbsp. s/n + 2 VP + 4 tbsp. s/n.
- We start all rows on this side with the same knitted combination: 3 tbsp. s/n, 2 VP, art. s/n. Then - an arch of 5 VPs.
- We knit 2 fillet cells: st. s/n + 2 VP + st. s/n + 2 VP + st. s/n.
- Above the trail with the fillet cell PR we knit 3 tbsp. s/n. We cast on 4 VPs and unroll the knitting.
- We knit 3 tbsp. s/n in the first empty fillet cell PR + 1 tbsp. s/n in next Art. s/n PR.
- We cast on 2 VP, knit st. s/n in next Art. We finish all rows on this side of knitting with a trace. knitted combination: 2 VP, st. b/n in the arch, 2 VP, art. s/n in a column, 2 VP, 4 tbsp. s/n.
- We cast on 3 VPs and unroll the knitting.
- We knit according to the pattern (st. s/n, fillet cell, arch of 5 VP, st. s/n in st. PR), then cast on 2 VP, knit st. s/n in next Art. ETC.
- We cast on 2 more VPs, in the corner knitting arch - 3 tbsp. s/n, 2 VP, 3 tbsp. s/n.
- We cast on 8 VP, knit 3 tbsp. s/n, 2 VP, 3 tbsp. s/n in the lower one is another arch from VP. We cast on 3 VPs and unroll the knitting.
- We knit 3 tbsp. s/n, 2 VP, 3 tbsp. s/n into the central loop of the arch from two loops of the previous step.
- We cast on 10 VP, knit 3 tbsp. s/n, 2 VP, 3 tbsp. s/n in the arch of 2 VP step No. 23.
- We cast on 2 VP, knit st. s/n in after. Art. filled cell. We finish the row according to the pattern (loin cells, an arch of 5 VPs, 4 treble s/n).
- We cast on 3 VPs, unfold the knitting, and knit a row according to a familiar pattern.
- After 3 connected fillet cells, we cast on 2 VP, knit 3 tbsp. s/n + 2 VP + 3 tbsp. s/n into the nearby corner arch of 2 VPs (this will be the right wing of the butterfly).
- We cast on 12 VP, knit 3 tbsp. s/n + 2 VP + 3 tbsp. s / n into the underlying arch of 2 VP (left wing of the butterfly).
- We cast on 3 VP, knitting turn.
- We knit the last. row of butterflies: shells - into shells, between them - a flail. at 14 VP.
- Next we knit the row according to the known pattern. We cast on 3 VPs and unroll the knitting again.
- We knit 3 tbsp. s/n, 2 VP, art. s/n, arch for 5 VP, 5 fillet cells. Raise 3 VP, knit as the very first row. Repeat the pattern until the border reaches the required length.
- Let's start with the antennae of the butterfly. We collect the flail. at 25-30 VP, carefully hide the tails of the threads inside. We tie all 4 arches from VP with a chain (you can use a regular knot). We get a clearly defined butterfly. To decorate a butterfly, its larger wing can be tied with a picot. Ready!
A selection of border knitting patterns for your creative inspiration


Video master classes on the topic “Crocheting a border”
For those who find it more convenient to work with video tutorials, we provide detailed master classes on knitting all kinds of borders:
Faced with the need to decorate the edge of a product, a knitter may encounter several problems: the binding pulls the edge together or vice versa, it looks like a “skirt”, there is no way to carefully sew the finished border to the edge, and it is not possible to beautifully tie the decor to the knitted fabrics.
It should be noted that such a task requires patience and compliance with several rules. This article contains a definition of what edge tying is with a description and general principles.
How to finish the edge of a knitted item
Of course, we are talking about the design of hand-knitted canvases. Binding is required to ensure that necklines, open armholes, cuffs and hems of garments look their best.
The first row in such cases should always include only single crochets (SC). The following proportions should be taken into account:
- The height of one row of fabric consisting of StBN is equal to one StBN of the strapping.
- The height of the row, which is connected with double crochets (dc), is equal to two dc of the binding.
However, when processing fabrics consisting only of StN, you should be careful so that the binding does not turn out to be too wide and stretched. Sometimes it helps to alternate between two sc and one sc (instead of working two sc in each stitch).
Binding of woven fabrics
Many craftswomen are attracted to such a scheme with a description of a simple openwork border presented below. It is suitable for processing towels, napkins, tablecloths, pillows and other items:

How to work with the scheme
To decorate the corners, you will need an unusual crochet edge. The diagrams describing straight patterns given below are only suitable for straight sections.
To or the bottom edge of the shelf, you need a corner pattern. With some experience, the craftswoman can independently create a suitable pattern from the material that is at hand.

This may be required by tying the edges. Schemes with descriptions rarely include corner panels, but you can get out of the situation as follows:
- Calculate the strapping so that the angle falls between the repeats or the center of the repeat.
- Starting from the first row of the binding, triple the post at the corner. That is, from one stbn you need to knit three.
- As the decorative trim increases in height, make the corner repeat similar to the other elements. The main thing is that they are equal in size.
There is another way to crochet an edge. Schemes describing only wide patterns can be made using this method: the strapping strips are cut at an angle of 45 degrees and sewn together. This method is only suitable for creating right angles.
How the harness is fixed
Crocheting the edges tied to the product is considered optimal. Diagrams describing almost any pattern are suitable for this type of work. A convenient factor here is that you do not need to calculate the length of the first row, therefore, the probability of error is lower.
They also often resort to sewing on a separately knit border. This method takes more time, but the problem of tight or too loose fabric disappears. You can sew it by hand or on a sewing machine, the main thing is that the product looks neat.
In order to beautifully process a V-shaped or any other neck (collar) of a knitted product, such as a dress or cardigan, there are many processing schemes. A beautiful border can be made in different ways. The most effective type of design looks like crocheting the neckline. Tying the neckline to get a beautiful border is quite simple; even a novice knitter can easily cope with this task. The main thing is to carry out the tying strictly according to the pattern, then finishing the product with a knitted border will turn out smooth and beautiful.
Numerous patterns for tying a collar using crocheting can be found in abundance on the Internet and in specialized literature. Beginners are recommended to choose knitting patterns of a low level of complexity, which are accompanied by a detailed description of the work.
Crocheting the edges of a finished knitted product is one of the most important stages of knitting. Processing the collar of a product with a beautiful border is not a difficult task, but in order to correctly perform the binding, the knitter must be well versed in finishing patterns (know all the symbols) and have artistic taste in order to choose the most suitable option for processing the finished knitting from a variety of patterns.
You can decorate knitting with a decorative border in various ways, the main thing is that the chosen method emphasized the texture of the product. Before you start tying, it is recommended to study several design patterns for finished knitting, read job descriptions and choose the tying pattern that harmoniously matches the style and color of the finished product.
To make a decorative crocheted border you will need:
Crochet neckline: general description of the process
Before you begin decorative processing of the collar of a knitted product using a hook, you must calculate the required number of loops in accordance with the dimensions of the finished product. Next you need to decide on the color.
The color of the border may match the color of the finished product, or it may have a different shade, but you can also make the border from yarn of a contrasting color. It all depends on who the clothing is intended for (man, woman, child), as well as on the style. The main condition: the color of the border should harmonize with the color of the finished product and emphasize its texture.
 The decorative border can be crocheted in the following ways:
- Using the “crawfish step”.
- Using a combination of single crochets and picots.
- Using so-called “shells”.
Of these methods, the simplest option, suitable for beginning needlewomen, is "crawfish step". Despite the ease of execution, the neck tied using the “crawfish step” looks very elegant. More experienced craftswomen can choose an original combination of the “single crochet” and “picot” elements; the main thing is to strictly follow the pattern and be careful while knitting.
Gate finishing technologies using "shells" Quite simple, but requires care. In the first row, single crochets alternate with air loops, and in the second row, double crochets are inserted into the free loops, and unique decorative elements are obtained, shaped like sea shells.Beautiful crochet neckline: diagrams and practical recommendations with diagrams and videos
In order for the border of a knitted product to look beautiful and emphasize the texture of the knitted fabric, it is necessary to take a responsible approach to choosing the method of finishing the neck.
When choosing a design method, you need to consider the following factors:

Also, the craftswoman must adequately assess her level of crocheting skills. Beginner knitters are advised to choose the simplest neck design patterns. Experienced craftswomen can choose a more complex option, and can also improvise based on ready-made patterns.
Attention. The neckline and armholes of the product must be designed in the same style. If the neckline and armholes are designed differently, it will immediately catch the eye and the finished product will look tacky.
 If a novice needlewoman is not very good at crocheting, you can trim the neckline and armholes decorative braid. This finishing option will look good on children's clothing. In any case, before you start finishing the neck of a knitted product, you need to practice different tying methods and choose the most convenient one.
A knitted product with a neckline decorated using crochet immediately takes on a finished and very impressive look. The more ways a novice craftswoman tries to finish a neckline, the more likely it is that she will find her own signature method for decorating the finished garment. Decorating a neckline using crochet requires a creative approach to knitting and a developed artistic taste. The main thing is to successfully combine the neck design with the overall appearance of the product.
Crochet neck design (patterns)


Greetings, lovers of updating your wardrobe with your own hands!
Today I'll tell you how crochet a skirt or dress, which, as has been discussed more than once on the pages of the magazine site, is relevant in the summer of 2016.
I probably wouldn’t have paid such close attention to this trend if I hadn’t discovered several dresses and skirts in my wardrobe that suddenly turned out to be too short for me.
I won’t state it as the ultimate truth, but for myself I was definitely convinced that a “young woman” is separated from an “ageless woman”... by a few centimeters of skirt length! And there are no clear formulas like “at 35 years old you must cover your knees.” Christie Brinkley and at 62 years old, she looks great in skirts above the knee, but most women, including me, are better off covering their knees. And here, as if by order, decorated or crocheted clothes come back into fashion.
I went through my skirts and decided to lengthen the ones that I especially liked, tying them with linen or lace.
Was

and this is what I got

Canvas


Wrong side


So, to tie the hem of a skirt or dress we will need:
- dress or skirt
- threads
- Crochet hook
The beauty of crocheting lies primarily in the fact that you can knit absolutely any thread, from the thinnest to the very thick. The main thing is to choose the right hook size. If we are talking about tying a product, it is necessary to select the threads so that the knitted fabric is not thicker or denser than the fabric from which the skirt is made.
To do this, you need to knit a sample of the selected lace or fabric and compare it with the fabric of the skirt or dress. If the knitted fabric is approximately the same thickness as the fabric, then the threads are selected correctly, but if the lace fabric is too thick, it is better to choose thinner threads.
The most difficult part is creating the first row of stitches on the fabric.
Take your thinnest hook and poke a hole in the fabric just above the hem stitch.

Hook the thread and thread it through the hole. (Later, carefully secure the end of the thread to the fabric)

You end up with a loop like this.

Yarn over the hook.

and thread it through the loop on your hook. You have now completed your first stitch.


Continue knitting until you have completed the entire hem or neckline.


The result of tying a blue dress: How to lengthen a dress or skirt with crochet: master class with photos
My skirt


Advice. Watch the tension of the thread when pulling the loop so that the fabric does not shrink or twist, but lies flat.
If the fabric of a dress or skirt is too thick, you can pierce it with a thick needle and only then plunge the hook into the finished hole.
I decided to tie a pattern around my skirt.

In general, this ornament was proposed for tying napkins, but I removed the last row from the pattern and left the hem even, without scallops.
Immediately after the first row I knitted an additional row of single crochets.

I repeated the pattern three times, first with pistachio-colored threads, then pink and again pistachio. Each subsequent color row began and ended with a row of single crochets.
Advice. To calculate the number of ornament elements, count the number of loops in a segment, for example, 10 cm and multiply by the circumference of the hem. This approach has a small error, but it is much easier than counting the total number of loops.
Having knitted the required number of rows, all that remains is to fasten the end of the thread, carefully tuck in all the protruding threads (the tails of the ligaments when changing colors, etc.), wash the finished product, let it dry and iron it.

That's all!


