Mile Garkavenko
Master Class. Garkavenko Mili Alexandrovna.
Teacher of MADOOU Tsrr – d/s No. 587
"Victory carnation made of foamiran on the St. George's ribbon".
Foamiran- soft sheet material in a palette of 24 colors, average sheet thickness -1 mm. Foamiran- environmentally friendly, plastic, waterproof, light-resistant and lightweight.
Tools and materials.
Foamiran Iranian(no more than 1 mm thick) scarlet, dark green and white colors.
The pin is the base.
Glue gun.
Scissors regular or curly "uneven edge" (not necessary).
Iron or candle.
George Ribbon.
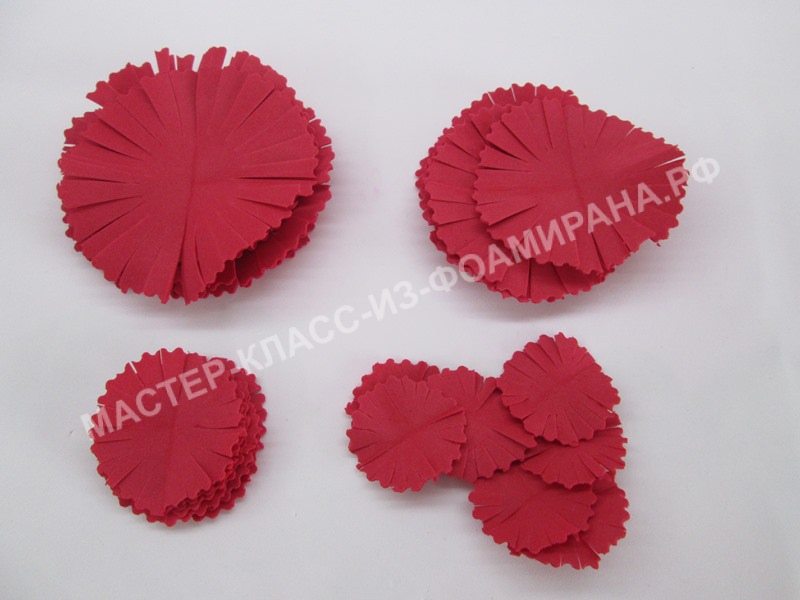
Pattern of petals. Circles with a diameter of 5.5 cm, 5 cm, 4.5 cm and 3.3 cm. You can make more - as you like. We outline and cut out the “uneven edge” with special scissors. If you don’t have such scissors, you can create such unevenness with ordinary scissors, just spend more time on it.
Fold the circle in half and cut it, not reaching the middle by about 0.5 cm. Cut our semicircle into three equal parts, also not reaching the middle half a centimeter. Then we cut each slice in two more places, but just a little bit (approximately 0.5-0.8 cm from the edge). To make it more clear and visual, I drew all the notches on the patterns. Our preparations are ready.
We heat our blanks on an iron or candle, put them in a pile and roll the edges between our fingers a couple of times. We don’t scroll too much, just slightly enliven the petals. All petals are ready. Let's start assembling.
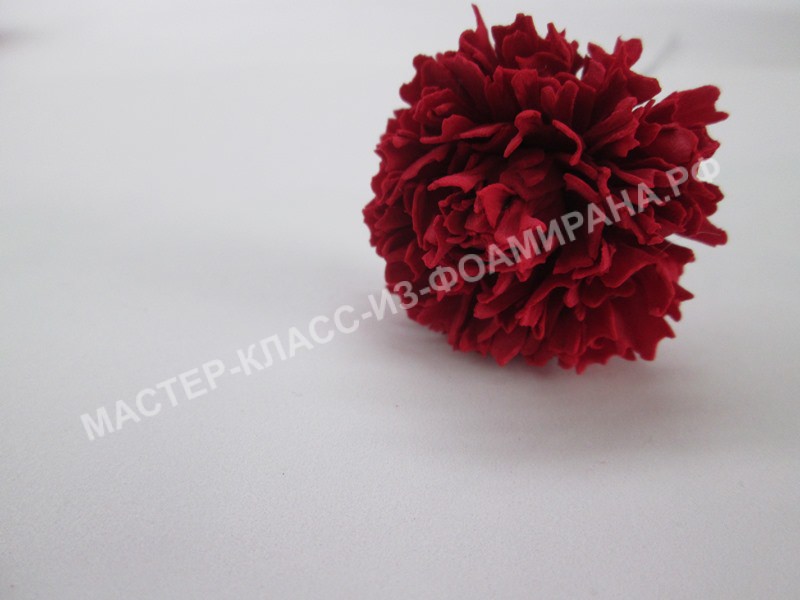
Let's take St. George's ribbon fold it in the form of a bow or loop, drop hot glue onto the base, and glue it tape and then green petals. Add some more hot glue and glue the largest part. carnations. Glue tightly and well. Similarly, glue the remaining circle petals in order of decreasing size. We get these carnations. We admire


Publications on the topic:
 It is called the "Flower of Zeus", "divine flower". Many different myths, legends, and events are associated with it. In various countries they refer to.
 Making crocuses from foamiran tools: - scissors; - wire cutters (bite off the wire); - duckbills or pliers (any tool that...
 The holidays are coming soon and I want to please my loved ones with souvenirs. I offer a master class that both me and the children really liked. For the manufacture of.
 Lovely carnation - Wonderful red color. Oh, Ksyusha, collect a bouquet for our celebration! My granddaughter Ksenia asked to perform at.
 Master class: “Carnations for decorating a music hall” The Defender of the Fatherland Day holiday is approaching and, of course, many teachers.
 Master class “Beautiful bow from foamiran”. Such a bow can serve as a good addition to costumes for children's matinees and holidays. Manufacturing.
 Dear colleagues, I present to your attention one of my hobbies: making dolls from foamiran. In appearance, foamiran resembles colored foam.
Carnation has several varieties: garden clove, Turkish, Chinese. Carnation is a flower that is very loved by gardeners. It is beautiful and fragrant. Carnation is a “divine flower”, which is usually given to representatives of the stronger half of humanity.
To create a carnation from foamiran you will need:
- red, green foamiran;
- foil;
- iron;
- second glue;
- zigzag scissors;
- green tape;
- wire 1.2 mm.
Pattern for carnations from foamiran

Using this pattern, we cut out carnation blanks from red foamiran using zigzag scissors.

The number of pieces and size are indicated on the pattern.
We cut each petal circle into 4 parts, not cutting to the middle 1 cm. Then we cut each part into 6 parts.
How to make a carnation from red foamiran

We process all the petal circles on an iron at silk-wool temperature, heat them, then fold them and rub them between our fingers.

Take a piece of foil and form a droplet for the base of the flower.

We take the petal circle, put it on the base and close the foil droplet, gluing the petals.

We take the remaining petal circles with a diameter of 4 cm and glue them to the base, slightly lifting the petals.
We take the remaining petal circles, put them on the base and glue them.
We also glue the next sized petal circles.


The carnation flower assembly is ready.

From foil we form a base for the sepals in the form of a hemisphere with a recess and make a hole for the stem.

Using zigzag scissors, cut out a circle with a diameter of 3 cm from green foamiran, heat it on an iron at silk-wool temperature, then fold it into a ball and rub it between your fingers.

Glue the sepal to the base of the flower.

From green foamiran we cut out 2-4 leaves, 2*5 cm in size. Heat it on an iron and rub it between our fingers and straighten it, slightly pulling it up.

We treat the stem of the clove with tape, wrapping it in several layers, since the stem of the clove is strong.
When processing the stem of a clove, we simultaneously attach the leaves to the stem and place the leaves opposite each other.
The red carnation from foamiran is ready.
How to make a meadow carnation from foamiran with your own hands: MK

I propose to make such a delicate meadow carnation.
To create a meadow carnation from foamiran you will need:
- white, green foamiran;
- oil pink, dark pink pastel and sponge;
- iron;
- second glue;
- scissors;
- green tape;
- wire No. 28-26.
Templates for pink meadow carnations from foamiran
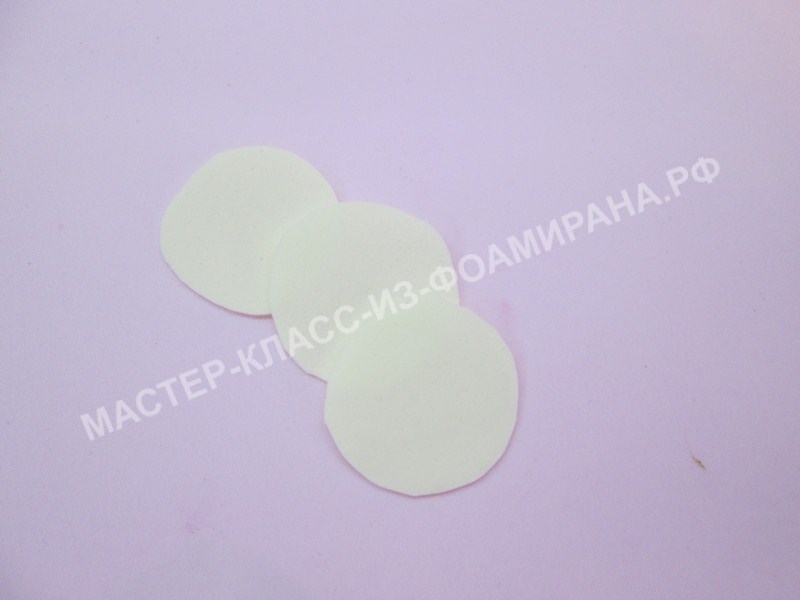
From white foamiran we cut out circles with a diameter of 2.5-3 cm.

We divide the circles into five equal parts, dividing each petal, slightly rounding the edges and cutting out teeth on each petal. You can cut out these petal circles with a five-petal hole punch with a diameter of 2.5 cm.
Step-by-step instructions with photos of tinting, processing petals and assembling a carnation flower

Take oily pink pastel and apply tint on both sides.
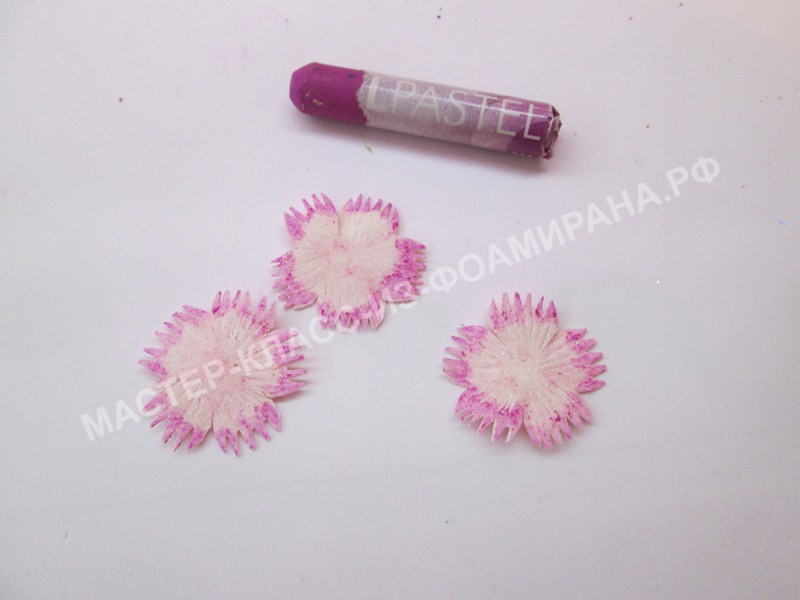
We apply the texture to the petal circles and tint the quack of the petal circles brighter on the front side. Additionally, you can tint with acrylic red and white paint, take red acrylic paint and apply strokes with a thin brush along the edges of the petals and at the center of the petal in a circle. Using white acrylic paint, randomly apply dots in the middle of the petal.

We process the petal circles with an iron at silk-wool temperature, lift the petals and lightly rub them between our fingers so as not to damage them.

From green foamiran we cut out leaves measuring 0.5*5 cm and 0.5*3, at least 5-6 pieces.

We lightly tint the edges of the leaves with pink oil pastels.

We iron the leaves at silk-wool temperature, then grind and straighten them and stretch them out a little.

Using a hole punch, we cut out the sepals from green foamiran and tint the edges of the sepals with pink pastel.

Take a 1.5 cm strip of white foamiran, tint it with pink oil pastel and cut the fringe. For one flower 3 pieces.

We process the stamens with an iron and slightly grind them.

We glue the stamens onto floral wire, then we glue the petal circle to the stamens, slightly lifting and pinching the petals.

We glue the sepals to the base of the foamiran flower.

We take the flower and treat the stem with tape, cutting the tape into three parts. After the sepals, we process the stem in several turns, as if making a thickening, we attach the second flower below the first and at the place where the flower is attached we glue and wrap the tape with tape. We attach the third flower below the second one and also attach the leaves at the attachment point.

We collected this branch of meadow carnation from foamiran. Such branches are good additions to floral arrangements of wildflowers; they will look good in headbands as an addition to other flowers.
Master class: Spray (Mini Carnation) from foamiran

This is the kind of carnation I propose to make at this master class.
To create a bush carnation from foamiran you will need:
- pink, green foamiran;
- red acrylic paint and thin brush;
- iron;
- second glue;
- regular and zigzag scissors;
- green tape;
- wire 1.2mm
Using scissors, cut out zigzag circles with a diameter of 3 cm from pink foamiran. For one flower, cut 8 circles.

Cut the circles into 6 parts.

Using a thin brush, apply a strip along the edge of the petal circle and also in the middle of the petal circle. We apply tinting on both sides.

We process the petal circles on an iron at silk-wool temperature and put all the petals together and grind them.

Then we put on one petal circle and glue it onto the wire, first we make a loop on the wire. And then around the center we glue the unstraightened petal circles in circles, like funnels. So we glue 6-7 petal circles.

From green foamiran we cut out 2 circles per flower, according to the diameter of the flower. And we cut out a fence in a circle. Fold it and rub it between your fingers and make a hole in the middle of the sepal.

Glue the sepals to the base of the flower.

We treat the stem with green tape and glue the second sepal.

From green foamiran we cut out 3-4 leaves per flower, size 0.5*4 cm, 0.5*2 cm.

We attach the leaves to the stem, as if hugging it.

This is the kind of carnation we collected at this master class. There are 3-5 carnations on one branch. These carnations will look good on a hair tie or a badge for May 9th. Bush carnations also come in pink, burgundy and red.
Boutonniere “Carnation of courage and bravery.” Master class with step-by-step photos
Master class with step-by-step photos dedicated to the Day of Remembrance and Sorrow.
“...The beginning of May. Red carnations, like the tears of those distant terrible
years. And the righteous faces of veterans, especially those who no longer exist..."
Peter Davydov
In the history of our Motherland there are two memorable dates that have passed through the destinies of every family in our country. This is June 22 - Day of Remembrance and Sorrow and May 9 - Victory Day. Every family lost a loved one in that war, and no matter how many years pass, the pain of loss is unlikely to subside, but the memory remains for descendants and an example for the younger generation of true patriotism and loyalty to their people.
Children and adults, all citizens of our beloved Motherland should never forget the feat of our grandfathers, which they accomplished in the name of the future of their people. And as long as we remember, we exist!
By instilling in children in the association’s classes a sense of gratitude and respect for Veterans through creative activities, the student’s continuous education as a citizen and patriot of his country is carried out.
The symbol of the Great Victory and Sorrow is the St. George ribbon and the scarlet carnation. Paying tribute to the dead and as a sign of gratitude to the heroes for the great feat, we wear these symbols on our chests.
In order to develop the personal, moral and civic qualities of students in the Marya-Iskusnitsa association, a master class on making a boutonniere “Carnation of Courage and Courage” is being held. Children with special love and warmth give them as a gift to their relatives and proudly wear them themselves.
Materials and tools:
- foamiran 0.8 mm red and green;
- foil;
- George Ribbon;
- pin;
- quick-drying glue;
- templates;
- scissors:

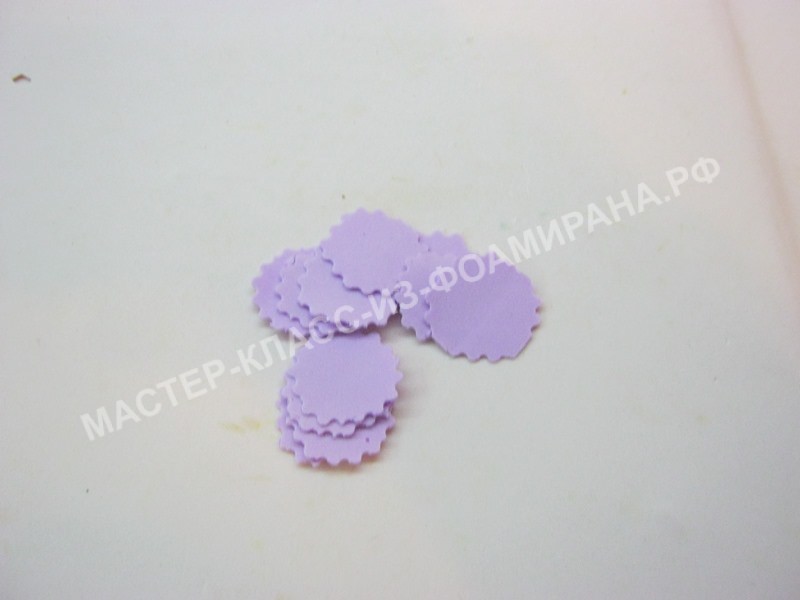
Step 1. We cut out the details.
For one carnation, we will need to cut out parts from red foamiran according to a template (3 pieces d-5.5cm and 2 pieces d-5cm) and a strip of green foamiran measuring 1x4cm. The figure also shows a sepal template because the carnation can be made on a stalk if desired. Foamiran is a soft material and the templates should be outlined with a wooden stick. The contour is clear, without unnecessary marks.

We cut out the parts with ordinary scissors.

Step 2. Preparing the petals.
The cut out parts must be made in relief. We cut the edges of the workpieces with thin strips from the edge to the center, alternating two short ones - 1 mm and one long 2-3 mm.

Fold the cut petal in four and knead it thoroughly between the thumb and forefinger for several minutes. The finished petal retains its given shape well.

We subject all workpieces to this treatment, after which we carefully straighten them.

Step 3. The middle of the flower.
We fold foil measuring 5x5cm in the shape of a “drop”; this will give our flower volume. For the middle of the carnation, take one of the small petals. Using quick-drying glue, glue a “droplet” of foil to the middle of the circle.

Apply an additional layer of glue to the top of the “droplet” and press the edges of the petal evenly to form a bud.

The middle is ready.
Step 4. Assembling carnations.
Lay out all the details of the flower in front of you. Apply a drop of glue to the middle of the small petal, distribute it evenly, and glue the bud to the middle. Glue all the blank petals in the same way.

If you are making a flower with a stem, then next you should glue a semicircle of foil and cover it with a green sepal. In our case, we need a flat flower.
Step 5. Shutdown.
We fold a ribbon 15 cm long in three. We place a strip of green foamiran perpendicular to the middle of the ribbon, pull the edges of the strip tightly together, and glue it.

We glue a metal blank for a brooch to the back side of the ribbon bow, and a flower to the front side.


The boutonniere is ready!
Due to its high resistance to moisture and the ability to hold its shape well after heating, foamiran is perfect for creating flower arrangements. Such flowers can be used to decorate an apartment, create jewelry, and hair accessories. How to make a delicate, unusually attractive carnation from foamiran - read below.
Carnations are sophisticated flowers that enchant with their delicate petals and variety of shades. Carnations look especially attractive in a decorative wicker basket: such a floral assemblage is excellent both for apartment decor and as a gift for a birthday, anniversary or any other holiday.

In order to get started we will need: foamiran in three different pastel shades, oil pastel a tone darker than the selected pieces of foamiran, regular and zigzag scissors, paper, table knife, roll, foam sponge, glue gun, wire, toothpicks, an iron, a small basket and a sheet of foam according to its size.
Collecting carnations from foamiran in a flower basket
In order to make a floral assemblage in a basket, you need to first prepare the carnations. You can take a decorative, wicker basket or make it yourself from colored cardboard.

Let's start making carnations:
- We take paper and draw two circles of different diameters on it (for example, one circle with a diameter of 7 cm, the second - 6), cut out the shapes with ordinary scissors.
- We apply the resulting templates to the foamiran and trace them with a toothpick.
- Along the contour we cut out three circles of different diameters.
- To make the edges of the flowers more torn and look more natural, take ordinary scissors and go along the diameter of the workpiece, leaving small (about a millimeter) cuts.
- Fold each circle in four and cut the workpiece in the middle, leaving about a centimeter of uncut material to the center of the circle.
- We open the workpiece and divide each sector into two equal parts.
- We cover the protruding edges along the perimeter of the circles with pastels, shading the color towards the center with a dry brush, napkin or finger.
- We cut strips (15 pieces) of foma in the color of future flowers, about 7 cm long and 1 cm wide.
- Fold the strips in half and secure with wire.
- Heat the iron (not too much) and briefly apply the round piece to it.
- We place the blank on a foam sponge and go over it with a boule on top, in the center.
- Using the non-sharp side of a table knife blade, we draw veins on the leaves (draw a line in the middle of the petal).
- We string all the pieces, starting with the smaller ones, onto wire with stripes and tightly fix them to each other with glue.
- We cut off the excess length of the strips so that their height does not differ from the height of the flower and lightly crush them with our fingers, giving them shape.
In this way we make as many flowers as necessary to fill the basket. We stick the resulting multi-colored flowers into polystyrene foam and place our flowerbed in a decorative wicker. You can hide the foam peeking out from under the flowers using olive sisal.
You can heat foamiran with an iron, curling iron, or hair dryer for embossing.
Carnation from foamiran: making a flower
It will take a little more time to produce flowers with decorated stems and cups, but such a product will look more aesthetically pleasing and complete. To work, we will need a template with graphic images of circles for flowers, leaves for the stem, stars and cups. To make a carnation, you will need to stock up on foamiran of the desired color (for the flower and green stem), regular and zigzag scissors, a toothpick, hot glue, “Second” or “Moment”, floristry wire, if desired, oil paint for the edges of the flowers (for example, for white carnations - red paint), iron, green tape, foam balls in the number of future flowers.

Making flowers:
- We prepare blanks for carnations (the first master class explains how to do this) and cut out all the details for the stem using templates.
- We string the smallest flower blank-circle onto the wire, bend the end of the wire and apply a drop of hot-melt glue to it, glue the blank tightly so that the wire is not visible.
- We “put” the remaining petals on the wire from smallest to largest, while fixing the parts with glue.
The flower is ready!
We collect the elements of blanks into one flower
From the received bright buds and templates prepared in advance (can be ordered on the Internet), we assemble a flower.

For this:
- Using the templates, we cut out cups and subcups for the number of resulting flowers.
- We take the bowl and cup blanks, heat them with an iron and form the middle with your finger, pencil or roll.
- We string foam balls onto the wire and glue them to the flower with “Second”.
- We put a cup on the balls and glue them.
- Next to the cup we glue the cups.
- We heat the blanks for the leaves with an iron, fold them in half and stretch them out a little. You should get an arched leaf.
- We wrap the wire with tape and glue it onto the leaf stem.
The carnation is ready! From these flowers you can make a decorative bouquet for a small transparent vase or use carnations to decorate a hairpin or hairband.
You can form flowers without a bubble, by rolling the workpiece between your fingers, without squeezing the material too much.
Beautiful carnation from foamiran: master class (video)
Foamiran carnations are an excellent hand-made gift that will emphasize your special relationship with the recipient; an extraordinary element of apartment decor and exquisite decoration that will highlight your creativity and originality. Be inspired by photos of flowers from Thomas and create beauty!
Today, the St. George ribbon is a symbol of victory and a sign of memory: “I remember, I am proud.”
In our master class we will tell you how to make a St. George ribbon with an apple tree branch from foamiran with your own hands.
Materials and tools:

- St. George Ribbon;
- foamiran in white and olive colors;
- templates;
- stamens;
- floral wire;
- light green tape;
- pin;
- scissors;
- glue gun;
- non-writing pen;
- pliers;
Step 1

We cut out paper templates for future flowers - three tiers of petals and a sepal.

We transfer the contours of the petals onto white foamiran; the easiest way to do this is with a non-writing pen or a toothpick.
We cut out 2 pieces of large petals, 3 medium ones and 3 small ones, because... we plan to make three flowers (one 2-tier and two 3-tier).
From olive-colored foamiran we cut out three sepals and leaves (cut them in different sizes without a template).
Step 2. Processing elements made of plastic suede

To do this, we lean the petals against the iron to warm them up, then fold them in half.

And then use an accordion and vigorously rub it between the thumbs and forefingers.

Straighten again and slightly stretch the middle of each petal in width.
Step 3

We first cut small notches on the sepals with scissors. The photo shows in which direction they need to be done.

Then we apply it to the iron, fold it like an accordion and vigorously rub it between the thumbs and forefingers.

We also first make notches on the leaves and apply them to the iron.

Then we put the warm sheet into a double-sided mold and press it.

In mold, foamiran acquires the texture of a sheet.
If you don’t have mold, then after ironing, on a still warm piece of paper, you can manually draw veins with a non-writing pen.
Step 4

We fold the St. George ribbon and fix it with hot glue.
Step 5

We cut the floral wire into 5 pieces of 7-9 cm each.

Bend one end of the wire using pliers.

We fold a couple of stamens in half and wrap them to the wire using tape.

The tape has a weak adhesive effect and requires little tension when wrapping to get a quality result.

Thus, we get three bases for flowers and two for leaves.
Step 6

We put the first tier of petals on the wire with the stamens and fix it with hot glue.


Then we do the same with the second and third tier.

Lastly, we secure the sepals. The first flower is ready!

In the same way we make another 3-tier and one 2-tier flowers.

Then we form two branches with leaves.
Step 7

We twist the resulting flowers and leaves into a twig, the end of which is wrapped with tape.
Glue a pin to the back of the brooch.

And here’s what the result of our work looks like on the lapel of a jacket.

Lena (MymiMama) is a long-time forum member of our site. She is the mother of two wonderful children and a talented needlewoman. She sews according to Burda for herself and her family, she knits very skillfully. For the last few years, she has been interested in making Tilda, textile dolls using mixed media and other types of needlework. Each of Lena’s creations has its own story, its own world. By creating them, Lena gives them a piece of her soul and endless warmth.
You can get acquainted with Lena’s work in more detail on her pages


