Autumn inspires a desire to capture the play of colors not only in memory, but also in the house, where on long winter evenings you can see, touch, breathe in such a beautiful charm of autumn with a slight touch of bitterness.

Decorate your home, succumbing to the impulse inspired by autumn landscapes, you can simply and unpretentiously pick up multi-colored maple leaves in the nearest park and place them all over the apartment one by one (using tall narrow glasses or vases) or in armfuls, like blazing bouquets.

But with a little time and a minimum of effort, you can build real works of art from them, which will delight the eye for a long time and serve as a real decoration for your home.


Other crafts from the autumn gifts of nature:
— Crafts from chestnuts, spikelets and other gifts of nature
- Crafts from acorns
— Crafts from a pumpkin
- Crafts from cones
- Crafts from twigs and twigs
- Crafts from dried flowers
Maple leaf pendants and garlands
You need to take two or three leaves, preferably of different sizes, cover them with transparent varnish or dip them in paraffin melted in a water bath, and then tie them together with a thread that can be decorated with beads to match the leaves and, making a loop out of it, hang, for example, under the ceiling of the children's room.

You can complicate the task by collecting the leaves processed in this way into a garland. From which it is easy to build an intricate pattern, fixing it on the wall, or around a picturesque branch placed in a vase, or placing it in a high-hanging flower pot, just let it hang freely along the wall. If several of these garlands are combined, then a bright curtain will come out on the window.


Maple leaf wreaths
Also a popular fall craft is maple leaf wreaths. You can either simply weave a wreath of leaves, as you wove from flowers in the summer, or do something more intricate. In this case, the wreath is made from birch or other branches, and leaves, acorns, ribbons, cones and other gifts of nature are used to decorate it.
Read also:
What else can be made from cones.


Decorate candles and candlesticks with leaves
Leaves dried under a press or iron can be pasted over a glass jar, covered with a transparent varnish for decoupage, and a candle placed inside. You will get an original lamp that can decorate any romantic evening. Thick candles are decorated in the same way - the leaves are simply glued or tied to their surface. It looks very unusual, especially if you use candles of light, soft colors.


Roses and maple leaf bouquets
Roses from maple leaves deserve a separate topic, from which you can collect not only bouquets, but also tie them into wreaths, decorate wickerwork with them, and lovers of vintage style can easily fit such decorations into their interior, covering flowers from maple leaves with gold or silver paint.

It is very easy to make roses from maple leaves, which are then collected into one big bouquet. These flowers will delight you all winter. Plus this is an interesting idea for a little surprise for a girl from a guy. These roses are made in an elementary way - just fold the maple leaves and wind them on the workpiece. Do not forget to bend the edges, like a real rose. Here is a detailed step-by-step master class on making roses from maple leaves and a bouquet of them:


And here are some more ideas for crafts - already from these roses. After all, you can make a topiary from them, which you can read about below, a wreath, decorate paintings and much more, and even bouquets of dry leaves can be quite diverse:


Hello dear readers. Autumn is one of the brightest, most colorful and beautiful seasons of the year. Around the beauty, trees in colorful leaves. Autumn is a generous time of the year, rich in harvest, the morning is cold, and the day is hot. Here it is, a varied autumn. In autumn, very beautiful leaves: yellow, red, orange, brown. When my son went to kindergarten, we often made autumn crafts from leaves for kindergarten. Educators ask to bring crafts for the autumn festival, which is held in the garden every year. But at school, only in the primary grades, crafts are needed.
Today let's look at a wide variety of children's crafts from autumn leaves that are suitable for kindergarten and school.
Crafts from simple to complex, which you can do with your children. But in most cases, autumn-themed crafts are made by parents, children only help.
You can show creativity and imagination and do work of any complexity, but if the child is 4, 5, 6 years old, he is unlikely to be able to make something himself. Therefore, as I always say, there is a competition among parents who has the prettiest and best job.
And at a holiday in kindergarten, I make an exhibition of works and each parent looks and takes a photo. I want to say that all the works are beautiful and original.
How to make a rose from maple leaves - the original flower
Many interesting things can be made from colorful maple leaves. For example, a rose from maple leaves. It is very easy to make, but looks very nice.
The very first sheet needs to be folded in half, across the central vein, and then, you need to roll the sheet into a tight roll, this will be the middle of the rose.
We place the rose petals by folding the sheet in half. located just above the middle. We evenly arrange the leaves in a circle, forming a rose.

Continuing the theme of flowers, you can make such wonderful flowers from autumn leaves. They are located in paper rolls that remain after using toilet paper.

The middle of the flower is a circle cut out of colored paper. And there are leaves all around. With a felt-tip pen or marker, you can draw a funny smile for a flower and big kind eyes.
Application hedgehog, wolf, owl, butterfly from autumn leaves
You can make a wonderful hedgehog out of paper by decorating it with autumn leaves. We print the hedgehog template from the Internet or draw it by hand.
You need cardboard, white cardboard is best. Cardboard is the base and we glue the leaves on it. Here is such a beauty.

Continuing the theme of applications from autumn leaves, you can make not only a hedgehog, but also a wolf. Leaves can be glued with PVA glue or super glue or hot glue.

Everything is presented as a craft option, because many people make different crafts from leaves, you can choose the one that suits you to school or kindergarten.
Sometimes, we choose by difficulty level. It happens that there is no time to mess around, you want to make it simpler, but it happens that you want creativity. This is the creative spirit.
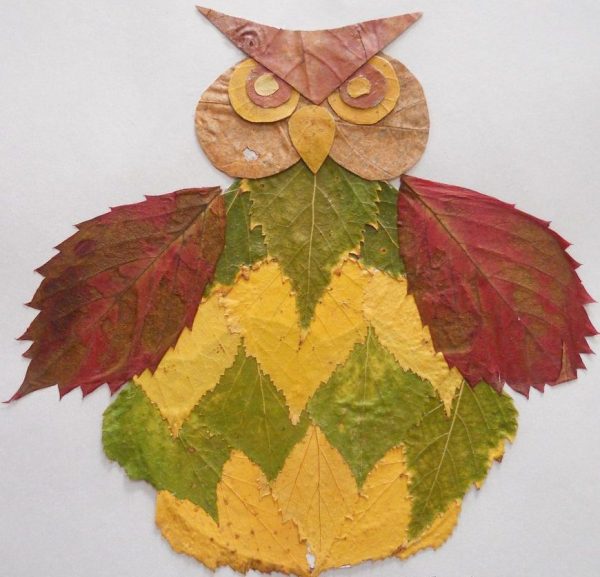
From the leaves you can make a wonderful owl. Make eyes and beak out of paper.

Who likes what. Sometimes, the child himself asks to make an owl from autumn leaves, a hedgehog or any other animal with him.
Another wonderful application of leaves is a butterfly. You can draw on paper or white cardboard.

Continuing the theme of crafts, you can make more complex options if you need to take them to kindergarten for the autumn festival, which is held every year.
Autumn crafts from leaves to kindergarten - surprise educators
Educators enthusiastically accept crafts, and what I noticed is that every parent tries to bring, to make it beautiful, of high quality. In our group, almost every child proudly brought his creation (or not his own) to kindergarten.
It is very beautiful to arrange a spider of leaves and twigs, here the child cannot cope on his own, and he will need the help of his parents. But in the end, it turns out a very beautiful craft for the autumn holiday in kindergarten.

You can make a more original craft by showing your imagination and allocating a little time. To do this, you will need not only leaves, but also acorns, chestnuts, mountain ash, rose hips.
It will turn out a clock from the leaves, we take cardboard as a basis. The clock hands do not have to be real, they can be drawn with a marker, or separately made from colored cardboard.
This is a craft made from leaves and acorns, complemented by berries and cones.

Also decorate the dial, and decorate the clock with the gifts of autumn.

Talking about how to make crafts from autumn leaves on the theme of autumn. With your own hands, you can make a whole forest from autumn leaves, and animals from natural material.
We'll have to collect chestnuts, acorns, rose hips, rowan fruits in advance. Leaves of maple, birch, oak and others.

Our daughter is already collecting beautiful leaves and drying them in an old book. Collects chestnuts, walnut shells, cones, acorns. All the autumn gifts that are lying under our feet.
Beautiful DIY crafts from autumn leaves to school
We brought beauty to this educational institution, only in the 1st grade, we didn’t ask for anything else. Maybe we go to a special school, or they don't have an autumn festival.
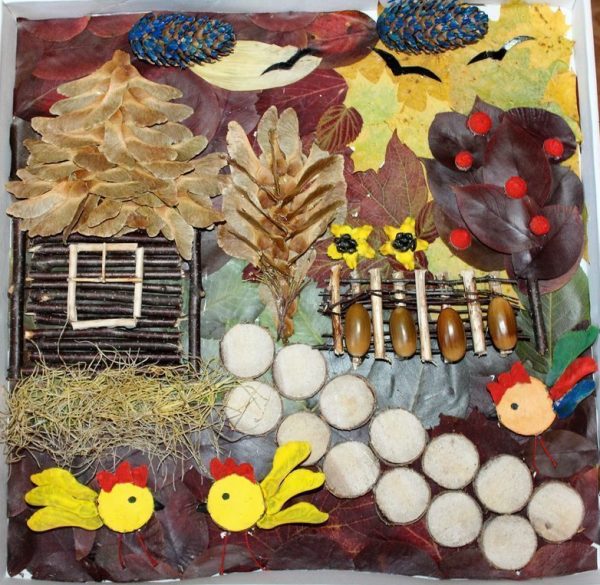
To school, you can do something more complicated and prettier. Having issued a whole composition, which will include not a single leaf or flower. It turns out a composition with meaning.
Here, for example, hedgehogs are decorated on the basis of leaves, twigs serve as trees.

Among other things, you will have to stock up on cones and hawthorn fruits. The muzzle of a hedgehog, eyes, can be made from plasticine.
Arrange the composition on cardboard. We often used shoeboxes to decorate fall-themed crafts. And you can convey, and there is a basis for creativity. Since in the manufacturing process, you can add a lot.
If dad is a jack of all trades, then you can make a house out of branches and leaves. It is difficult, in any case, the child can not do without the help of parents. The craft is very beautiful.

Also, having shown imagination, where without it, you can make little men out of cones. The head is from a walnut shell, the body is from a cone.

These are my ideas for crafts on the theme of autumn for kindergarten and school today. Often you have to think about what to do, what to create, what to invent.
Children are happy to help and take part in the work. Let them not create anything, but they are happy to serve natural material for crafts, offer their ideas.
You should not refuse the help of children, and you should not be angry if you need to do crafts, just think with your child, take a walk in the park, go to the forest. There's plenty of good stuff out there. Plus, you will be inspired by nature to create an original autumn craft.
Leaf crafts are a great way to instill a sense of beauty in your child. There are a wide variety of leaf crafts that you can create with your kids. A photo of leaf crafts allows you to imagine the whole variety of available creations.
Applications
In autumn, it is best to create with dry leaves. Material for creating future crafts can be found on the alley or in the forest park area. To prepare the leaves for use, it is best to dry them in the pages of multipage books. With simple glue and paper, you can create unusual crafts.

When creating crafts, many people think about which leaves can be used to make crafts? For variability of crafts, you can use leaves from different trees or shrubs of various tones.

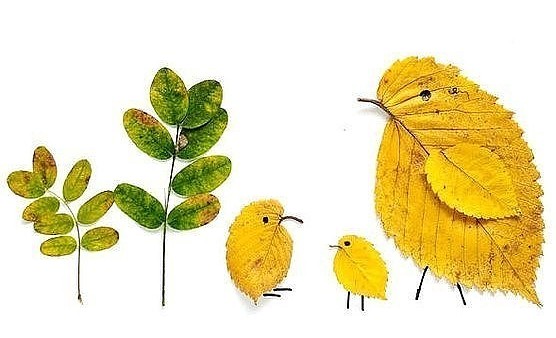
leaf chicks
To create an autumn application, you need to take a yellow leaf that looks like a small chicken. Glue the leaves to the surface of the paper. Next, take a felt-tip pen and draw a few additional lines with a felt-tip pen.

By a similar principle, we can create other animals.


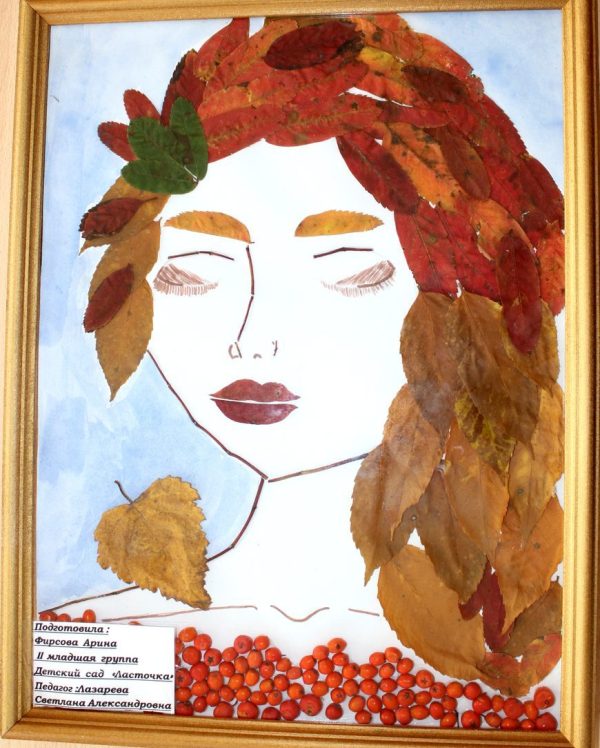
Portrait
It will be very unusual to create human faces from leaves. Not so often natural materials are used to create portraits. To make a face, you need to glue several fragments at once, and then cut out an oval of the desired size.

As a hairstyle, you can use plants that are coarser in texture. For example, spikelets or stems of various herbs are suitable for creating hairstyles.

simple drawings
Another way to use leaves is to draw simple patterns. For example, you can draw a lion's head in the entire landscape sheet. You can also use cardboard. As a mane, autumn yellow leaves can be used, which will create a certain entourage for the craft.

Owl from leaves
Let's consider the step-by-step making of crafts from leaves with your own hands. An unusual leaf craft will be an owl created on the basis of leaves. To create it, you need to take cardboard, the size of which is A3. Over the entire perimeter, it is necessary to glue the leaves with an overlap.

The leaves are glued with PVA glue. No need to create an oversized figure of an owl. Extra elements can be trimmed along the edge. An acorn can be used as a beak.

Mosaic
With the help of dry leaves and flowers that have dried up, you can revive the drawing by filling it with a palette of colors. To do this, we apply a drawing of a hedgehog or snail on hard cardboard, and then glue decorative elements to certain areas of the drawing.

Hairstyle
You can create unusual hairstyles from leaves. For example, you can collect a person's face (lips, eyes, eyelashes can be separate blades of grass). A shock of hair is made from whole twigs that have several dry sheets at once.

If these leaves are dried in volume, and not in one plane, then the work will acquire scale and a certain charm. These are real children's crafts made of leaves for the exhibition.


Fallen leaves figurines
Fallen leaves can act as material for cutting out some shapes or numbers and letters. But it is necessary to cut exactly until the moment when the foliage is completely dry and begins to turn into crumbs.

Initially, you need to cut out the figure you need, and then dry it in the usual way. You can cut out small cars, letters and numbers, which can later be used when teaching children the basics of the alphabet and counting.

The presented technology and instructions on how to make crafts allow you to quickly and accurately make a postcard as a gift to someone.

Note! 
All these beautiful leaf craft options allow you to create beautiful things using simple materials. Leaves that have fallen from a tree are perhaps the most massive material that can be found everywhere.

You can conduct a master class on crafts from leaves for your children, becoming a real artist and magician in their eyes. Such a pastime will allow children to develop their own imagination, creativity. With the help of autumn leaves, children will be able to realize all their fantasies.

Photo crafts from leaves


Note! 


Note! 


Autumn is not only cloudy days, raindrops that constantly drum on windows and roofs, but also a time of bright colorful landscapes. During a normal walk. which takes place in a city park or square, it is easy to collect a whole collection of material of various sizes, shapes and colors (yellow, brown, green, red, orange), with the help of which craftswomen, and even children, create crafts from tree leaves with their own hands for a gift or decorations for home, interior, for school exhibitions, presentations for teacher's day or autumn holiday.
Step-by-step instructions for crafts for children from tree leaves
The variety of forms, and with them the stunning colors of autumn leaves, give you the chance to create many compositions, equibanas, herbariums, applications and crafts. If we talk about plots, then birds, zodiac signs, fairy-tale creatures, animals, decorative elements and decorations are considered popular. It is especially interesting to involve a child in such creativity, because the creation of masterpieces develops his imagination and creativity. Use the following step-by-step instructions to teach your child how to create interesting DIY crafts.
Volume application Owl from birch leaves
To create an owl, birch leaves are best suited, they are small in size, have a smooth contour, due to which they easily fit onto the drawing, making it voluminous.
Required materials and tools:
- landscape sheet of white cardboard;
- stationery scissors;
- birch leaves;
- simple pencil;
- black buttons or toy eyes;
- PVA glue;
- 1 sheet of white, black, red paper.
Step by step:
- First, draw on cardboard or print on a printer the silhouette of the future owl.
- Next, carefully cut out the cardboard bird.
- Visually divide the owl into horizontal rows, apply glue to each in turn and lay the leaves. It is recommended to start gluing the sheets from the bottom row, gradually rising to the topmost one, until we completely paste over the entire owl. Lay the leaves overlapping each other.
- For the eyes, we take white paper, cut out two circles, glue it on the owl with glue. As the pupils, we use black buttons that need to be attached to the paper eyes with glue.
- We use red paper for the legs and beak, cut it out, glue them to the owl with glue.
Autumn craft hedgehog from cones and leaves
Not only leaves are used for crafts, other natural materials are added to them - chestnuts, cones, acorns. Try to make a funny hedgehog with your child. Necessary materials:
- Pine cones;
- plastic bottle (0.5 or 1 liter);
- stationery knife;
- a sheet of thick cardboard;
- plasticine brown
- glue "Moment";
- two bottle caps;
- black acrylic paints.

Progress:
- It is advisable to take a dark-colored bottle (brown or black), if there is none, a transparent one will do, but then it must be completely painted with acrylic paints.
- We attach bumps to the painted bottle with glue, starting from the back of the future hedgehog. Make sure that the cones are firmly fixed on the bottle. We paste over the entire bottle with bumps, except for the “muzzle” and “tummy” of the future little animal.
- When the hedgehog's body is ready, we proceed to create a spout - for this we glue the bottle cap with brown plasticine.
- For the peephole, we take two white bottle caps, in the center of which we draw pupils with acrylic paint.
- Glue the finished eyes to the muzzle with glue.
- The craft is almost ready, it remains only to decorate it. To do this, spread the moss on a piece of cardboard and plant a hedgehog on it.
- Put leaves, rowan berries on the back of the animal.
Composition of leaves Firebird
With the help of autumn leaves, children's fairy tales can come to life in original compositions. For example, we suggest trying to create a Firebird. Required materials and tools:
- a sheet of white cardboard;
- yellow and black acrylic paints;
- PVA glue;
- red and green maple leaves;
- scissors;
- birch leaves;
- stems with ash leaves;
- stems with white acacia leaves;
- birch leaves;
- simple pencil;

Step by step:
- Draw on cardboard the silhouette of the Firebird with a magnificent tail, cut it out. Paint the body of the bird up to the tail with yellow acrylic, draw an eye in black. Wait until the paint dries.
- Then we proceed to decorate the Firebird, starting from the bottom of the tail. We apply glue to a strip of cardboard ponytail and tightly fasten the golden ash stems.
- The next layer, a little higher, we glue a row of red maple leaves, 3 row - green maple leaves, the fourth - birch leaves, the fifth - green maple, the sixth - white acacia stems, the seventh - birch leaves, the final row - red maple leaves.
- When the tail is ready, we proceed to create the wing. Again, we begin to fasten the leaves with glue from the bottom row in the following sequence - ash stem, red maple leaf, green maple, birch leaf, maple red.
- Fairy Firebird is ready!
tree leaf mask
For a children's holiday of Autumn in a kindergarten or school or a masquerade ball, make an original mask with your child. You will need:
- maple leaves of different sizes;
- cardboard;
- strong rope, ribbon or elastic band;
- stationery scissors;
- glue;

Step by step:
- Draw a blank for the mask on a cardboard sheet, cut it out along the contour.
- Make small cuts along the edges of the mask and tie a thread so that in the future the product will keep well on the head.
- Glue the cardboard blank with glue and leaves. Start fastening first large sheets at the edges, in the middle - small ones.
Vase of autumn leaves
Autumn leaves are used to make not only children's crafts, but also to decorate home interiors. We offer to make an original vase for sweets or fruits. Required tools and materials:
- PVA glue;
- balloon;
- petrolatum;
- brush for glue;
- scissors;
- Maple leaves.

Step by step:
- We inflate the balloon to the required size, the larger the vase is needed, the larger the balloon will be.
- So that the leaves are well behind the ball, lubricate it with petroleum jelly before work.
- For convenient work, we fix our ball in any container and begin to make a vase.
- Generously coat each maple leaf with glue with a brush, attach in turn to the inflated ball.
- Lay out several layers of leaves.
- Once again, completely grease the almost finished product with glue and wait until it is completely dry (48-72 hours).
- Then deflate the balloon.
photo frame
All children love to decorate the walls of their room with photographs or hand-drawn pictures. Help put your child's favorite photo into an original DIY frame. Necessary materials:
- cardboard;
- glue;
- leaflets;
- simple pencil;
- scissors.

Step by step:
- Prepare a cardboard frame of the required size. In the middle of the frame (where the picture will be), we make the photo a little smaller.
- Before making a frame, dip the leaves in hot water, they will become soft.
- Next, using PVA glue, glue the frame with leaves.
- We put the finished craft under a stack of heavy magazines or books. We are waiting for the frame to dry.
- We insert our favorite photo into our composition, fixing it at the back with tape.
Application Lion and fish on paper from dry leaves of trees
Colorful and bright applications are obtained if whole leaves are used for their preparation. Children love to create different animals and birds - a bunny, a fox, a horse, a cockerel, a cat, a dog, etc. We offer to make a funny lion cub and a fish. Required materials for the lion:
- yellow linden leaves;
- black felt-tip pen or marker;
- ash seeds;
- fruits of horse chestnut;
- PVA glue;
- a branch of dry pine;
- scissors;
- yellow colored paper;
- orange cardboard.
Step by step description:
- Print or draw a lion's head on yellow paper, cut it out.
- In a circle, glue the mane with glue in several rows with linden leaves.
- With a black felt-tip pen, paint over the nose of the lion and stick one chestnut to it with glue.
- We use needles from a sprig of dry pine as antennae for a lion.
- The tongue will replace the glued ash seed.
- When the product dries, the craft will be ready.

Required materials for the fish:
- yellow linden leaves;
- PVA glue;
- brown quince leaves;
- marker;
- ash seeds;
- acorns;
- stationery scissors;
- blue colored paper.
Step by step description:
- Print the fish template on blue paper or draw with a marker, cut it out with scissors.
- Cut off the stalk of each leaf of linden, using glue, attach them to the frame in the form of fish scales.
- Glue a few quince leaves on the tail of the appliqué and decorate with ash seeds.
- Attach the acorn caps to the fish with glue along the line of the head. Craft from tree leaves with your own hands is ready!
How to dry leaves for crafts
Dry leaves are an excellent free raw material for various herbariums, applications, crafts. To keep your crafts for a long time, you need to learn how to properly dry the leaves. To do this, study the following rules:
- Collect natural material only in dry weather.
- Choose yellow or green leaf color.
- Pay attention to the appearance of the leaves. The most suitable will be smooth, beautiful and clean, without damage and black dots.

There are several options for drying leaves. Let's consider each:
- Long and high-quality way (takes 14-30 days). Carefully flatten each leaf and place between the pages of a notebook, which must be placed in a large thick book. Press something heavy on top of the book.
- Accelerated. If you did not have time to make a blank, and you already need leaves for tomorrow, this method is the most suitable. Place the leaves between the newspapers and iron with a warm iron 3-4 times. Then let the plants cool and repeat the procedure a few more times. It is worth saying that when using this method, the plants become fragile and cannot be stored for a long time, the green leaves immediately darken, and the yellow ones remain bright.
- Alternative. Some craftswomen got used to harvesting leaves with a hair dryer. They claim that with this method, the plants do not darken, but there is a chance that the leaves will curl up into a tube.
Video tutorials: how to create crafts from tree leaves for children
Nature in autumn fascinates with a riot of colors, so children often bring bouquets of colorful leaves from a walk. Invite your child to make crafts from tree leaves with their own hands, because this is not only an interesting, fascinating idea, but an easy way to introduce the baby closer to nature, expand their horizons, and teach them to develop their imagination. Creating such compositions is not difficult, use the following step-by-step instructions as an auxiliary video.
A panel of acorns and autumn leaves for elementary school
Master class on creating a butterfly and a mouse for children in kindergarten
Craft - an autumn bouquet of roses from maple leaves for schoolchildren
Beautiful pictures on cardboard for the autumn holiday for kindergarten
Do-it-yourself hedgehog in the grass from leaves and flowers
Crafts from leaves, cones, chestnuts and acorns for activities with children
Photo of crafts made from tree leaves, made by hand
Decor elements made of natural materials will help create an atmosphere of celebration and comfort in your home. Such products will fill the house with a positive charge and favorable energy. To create a real masterpiece with autumn leaves, you will need patience, accuracy and imagination. For inspiration with interesting ideas, we recommend viewing a selection of hand-made photographs by boys and girls under the guidance of adults.
Autumn, fallen leaves crunch underfoot ... What a pity for this yellow-red fading beauty, crumbling and trampling into the mud. Here is a birch leaf - gently yellow, serrated, here are alders - ribbed, but mountain ash - a family of long leaves on a thin stem. Let's take them home and make beautiful autumn crafts, appliqués. We will also need a piece of colored cardboard for the background and glue to stick the leaves.
How to make an application of autumn leaves
Autumn leaves that have dried on the street are not even and rather fragile, so first we dry the leaves ourselves. We find freshly fallen, bright and beautiful, undamaged leaves, and put them between the sheets of some thick book. We put the book under the press (under something heavy). After a week or even earlier, even autumn leaves for application are ready, they can be easily glued to paper or cardboard with PVA glue.
Sequencing
A real artist sees living images in nature, so we will dream up. Let us lay out before us all our harvested and dried wealth and see what it looks like. Take suitable leaves and lay them out on cardboard until you get a picture. You don’t need to glue it yet, at first just spread it out until everything starts to suit you.
When the picture is brought to the ideal, you can stick it. We take one leaf at a time, remembering where it lay, spread it on the back side, glue it in place. If the application is multi-layered, first glue the lower leaves, then a layer of the upper ones. The craft is ready! You can admire!
But what if, well, the ideas of application do not come to mind, and the leaves look only like leaves, and not at all like bunnies and chanterelles? Then use our ideas.
Leaf Craft Ideas
Applications with animals
Leaf Owl:


Red cat


Bird with chicks:


And even an eagle:

landscapes from the leaves
For a landscape, the background can be painted with watercolors.


still lifes

portraits


The finished application (if it is not voluminous) can be put under the press so that after drying it remains even. Store in a dry place, can be framed under glass.


")
