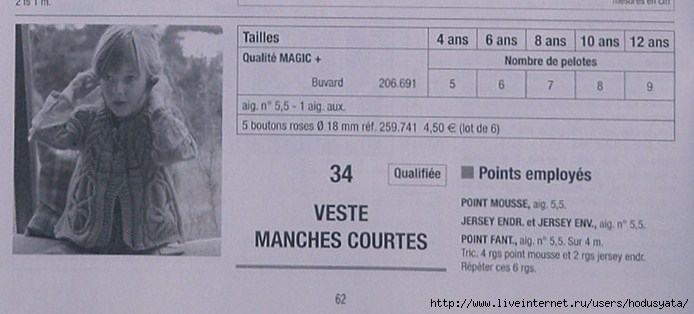
Every girl wants to be a little lady, and this does not depend on age. Remember yourself as a child - everyone wanted to become adults as soon as possible and have a beautiful and fashionable wardrobe. A knitted vest for a girl is what your princess needs. We have selected the most interesting sleeveless vests and knitted ponchos; all patterns with detailed descriptions are presented to your attention. A knitted vest for a girl is not only beautiful, but also necessary. A knitted sleeveless vest with a collar is very practical - it will always keep the child’s throat warm - and this is a big plus.
Knitting is always in fashion. This stylish vest for girls is knitted with large knitting needles 9 mm thick. This model is well suited for those who have just begun to master knitting techniques. This sleeveless vest for a girl is knitted in one piece; in the middle of the fabric we make a neckline in a very simple way. If you think that such a neckline will be inconvenient for a child, reduce it as usual: smaller on the back, larger depth of the neckline on the shelf. Only in this case it is better to knit such a poncho for a girl using knitting needles from 2 halves, and then sew the shoulder seams. The knitted sleeveless vest is suitable for a 5-6 year old girl.

To work you will need:
- Knitting needles 9 mm thick.
- Thick yarn Bernat (acrylic 100% 100 m/100 g) - 5-6 skeins.
- Additional spoke.
- Circular knitting needles for collars.
- 6 buttons.
Before work, it is better to take basic measurements so as not to bandage the product. Measure your child's hip volume and back length: from the top of the shoulder to the bottom of the product. Measure the volume of your neck. In order to determine the width of the sleeveless vest, divide the resulting hip volume by 2. And add 5-7 cm. for a loose fit. At first we will knit not just with an elastic band, but with an offset simple elastic band (row - knit, row - knit, purl, knit...). We will also have an offset elastic band on the sides.


Main pattern: stockinette stitch.
We start knitting from the back. We put 55 loops on the knitting needles and knit:
1st row: knit the entire row.
2nd r.: remove 1 p., 1 p., 1 knit., 1 p., 1 knit., and so on, until the end of the r.
3rd row: knit the entire row.
4th r.: Slip 1 p., P1, k1, p1, k1, etc., until the end of the r.
5th row: knit the entire row.
Row 6: slip 1 st, p1, k1, p1, k1, then purl 45 stitches, p1, k1, p1, k1, p1 .
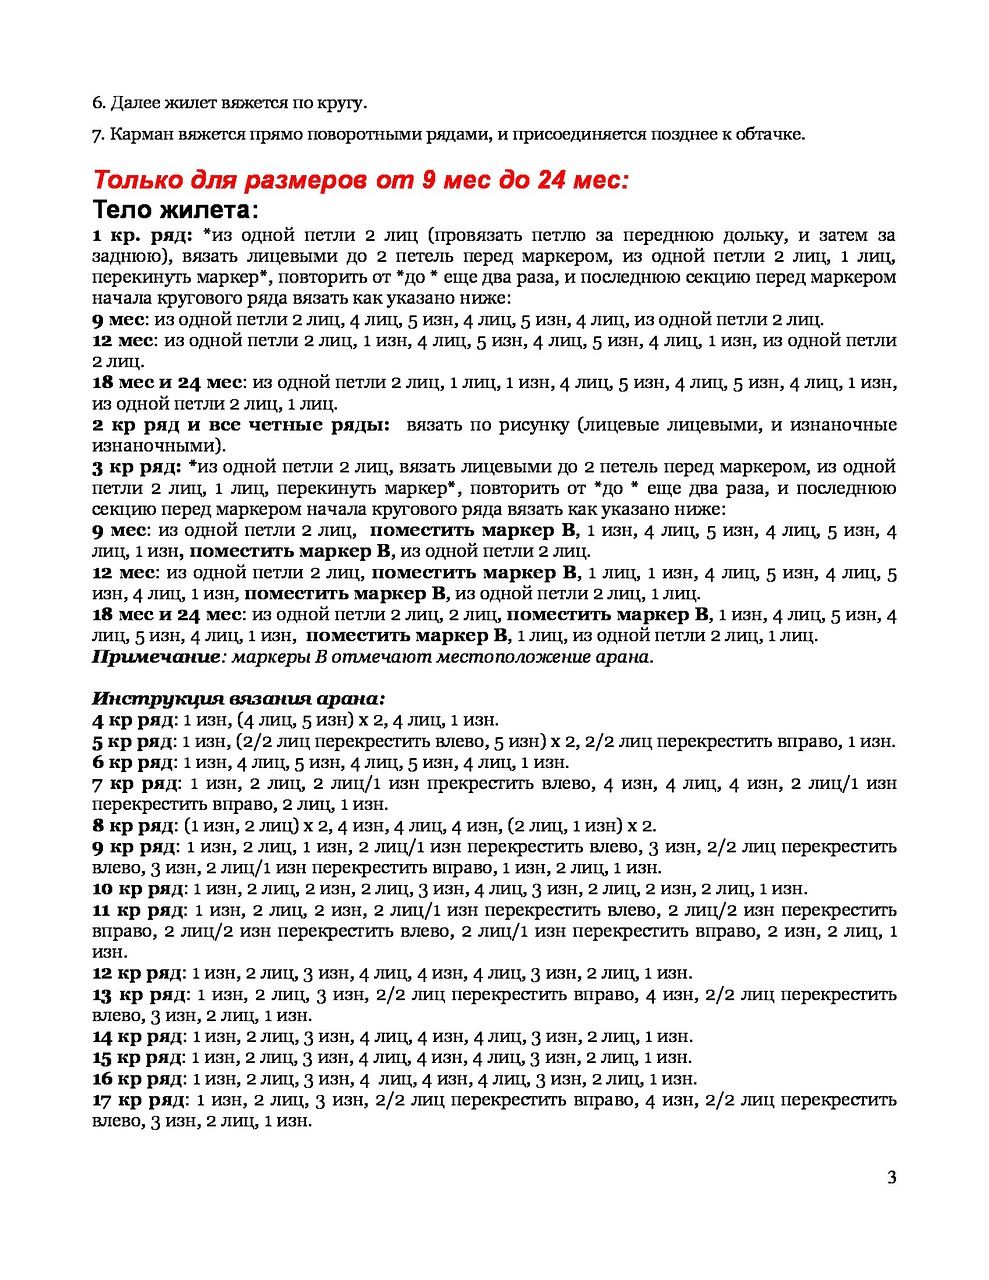
So we knit as many rows as the length of the child’s back. For our model it is 58 rows. Divide 55 in half and mark the middle with a pin. Next: 5 offset loops. with an elastic band, 12 sts as the knitting looks, close 21 loops, 12 sts as the knitting looks, 5 sts offset. res. Next, leave one shoulder on an additional knitting needle. We knit 2 more rows on the second shoulder. We return to the 1st shoulder - we also knit 2 rows. Then we dial for additional. knitting needle 21 new loops, and then we knit the front. We tied the front to the end, closed the loops, and sewed the side panels for 15 rows. We cast on gate loops on circular knitting needles, knit 20 rows, bind off the loops.
Sew on the buttons.
The video shows in detail how to make a vest neck with knitting needles for a girl.
Vest with ribbons - French chic
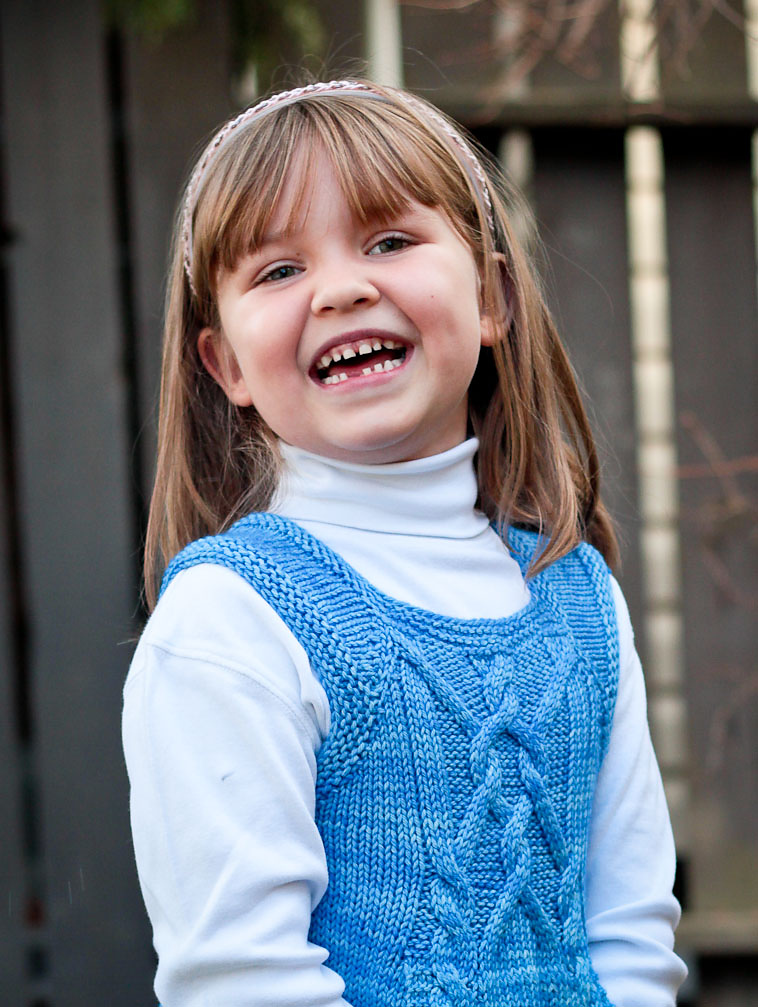
Knitting a vest for a young lady is an interesting and creative activity. Especially if the vest is so elegant. The children's sleeveless vest is decorated with a satin ribbon that ends in bows. After the knitted sleeveless vest is ready, cut the satin ribbon in half, and thread it through the crossing braids on each shelf (see diagram), tie and secure a bow with thread. Sizes: 4,6,8,10,12 years.

To work you will need:
- Yarn ÉCLAIR (50 g/100 m), wool+mohair+acrylic, 4-4-5-5-6 skeins.
- Knitting needles 4.5 mm and 5 mm thick.
- 1 extra sp.
- Tape 3 meters long.
- Patterns: 2/2 elastic band, braided pattern.
- Pattern: Cross rib: 2 rows of faces. satin stitch, 2 r. purl ch.
- Sample: 10 cm. front section. = 16 p./21 r.

Braid pattern
The pattern of this knitting is 16 loops.
We knit the 1st and 3rd rows with facial rows
2nd, 4th, 6th, 8th, and the rest are even. R. - purl
In the fifth row we knit 8 stitches, with a cross. to the right like this:
remove four sts to auxiliary sp. for work, four stitches for persons, four stitches with auxiliary joint. faces., eight stitches are knitted with a cross. to the left: remove four sts for extra. sp. in front of the worker, four sts., four sts with extra. sp. persons
7th, 9,11,13, 15 rows - knit.
17th: again we knit from the 5th row.
Back
First you should take 4.5 mm. knitting needles, and cast on 70-74-78-84-88 sts. We work 18-20-20-24-24 rows with a simple regular elastic band 2/2, (7-8-8-9-9 cm).
We start: for 4 and 8 years old - with two purls. p., for 6 years - from two persons. p., 10 l. - from three purls, 12 - from three faces. We switch to 5 mm knitting needles. Continue with knit stitch, decreasing 16 stitches evenly. 54-58-62-68-72 stitches remain. We knit. Ch. to the very beginning of the armhole.
Armholes
We begin to design the armholes. Starting from the 44-50-56-64-70 row from the beginning of the vest, at a distance of 19-22-25-28-31 cm from the beginning of knitting, close on 2 sides in every second row:
- 4 years old: once two loops, three r. one loop at a time.
- 6 and 8 years old: two rubles. two p., two r. one point at a time
- 10 and 12 years: one rub. three p., one r. two p., two r. one point at a time
In total we have 44-46-50-54-58 stitches left.
Shoulders and neck
We knit up to row 76-84-92-102-110 from the beginning of the sleeveless vest. At a height of 15-16-17-18-19 cm from the armholes, we close it on 2 sides in every 2nd row:
- 4 years old: two r. four p., one r. five points each
- 6 l.: one r. four p., two r. five points each
- 8 l.: three r. five points each
- 10 l.: two r. five p., one p. six p.
- 12 l.: one r. five p., two r. six p.
During the first decrease of the shoulder, we close off 14-14-16-18-20 sts in the center, then we make each side separately, closing the neck 1 time, 2 sts each.
We start knitting with a 2/2 elastic band on 4.5 mm knitting needles. Cast on 40-42-44-48-50 sts. Knit 5-6-6-6-6 sts. Cross rib pattern, 35-36-38-42-44 sts with a simple 2/2 rib. Next we work with 5 mm knitting needles. At a distance of 7-8-8-9-9 cm from the beginning of knitting, knit 5-6-6-6-6 stitches with the Cross cut pattern, 3-4-4-5-6 stitches with knit stitches, two stitches purl ., 16 loops, braid pattern, purl two. p., 10-1012-14-15 knits., decreasing 2-2-2-3-3 p. in the first row. 38-40-42-45-47 sts remain.
Armhole and neckline
We close at the same distance as on the back, continue to work on 33-34-36-38-40 p. Neck: at a distance of 12-13-14-14-15 cm from the armhole 70-78-86-94- 102 rub. from the beginning of knitting, leave the first 5-6-6-6-6 sts on the right for extra. knitting needle, close the trace. 7-6-7-8-9 p., then in each 2 r. 2 r. 2 p., 1 p. 1 p. Shoulder: at a distance of 12-14-14-14-15 cm, 70-78-94-102 r. close from the armhole to the left in the 2nd row:
- 4 years old: two times five points, one p. six p.
- 6 years: once five p., two p. six p.
- 8 l.: three r. six p.
- 10 l.: two r. six p., 1p. seven p.
- 12 l.: one r. six p., two r. 7 p. each
Left half front
We knit the same as the right one, but in a mirror image.
Finishing
Sew the shoulders and trim the edge of the neckline. We take 4.5 mm knitting needles in our hands and knit 5-6-6-6-6 sts, left for extra. knitting needle on the right shelf. You need to cast on 56-58-62-66-70 sts along the neckline of the vest, then again knit 5-6-6-6 sts for the lion. floor. front Next, we knit 8 rows of 6 stitches with a “cross rib” pattern, 54-58-62-66-70 stitches with a simple 2/2 elastic band, 6 stitches with a “cross cut” pattern, bind off the loops. Sew side seams. Sew a button.

Cozy and fashionable vest with a headband made from the same yarn. Decorated with a pocket, more like a knitted poncho. Knitting a poncho in garter stitch is a good idea. Descriptions and sizes are given for different ages, sizes correspond to: a) 2 years, b) 4-6 years, c) 8-10 l., d) 12-14 l. Knitting technique: garter stitch and stockinette stitch. Pattern knitted with satin stitch: 10 cm = 11 p./16 r.

To work you will need:
- Yarn (75% acrylic, 25% wool), 50 g/40 m, 6-8-10-13 sq.
- Knitting needles 7 mm thick.
- Additional spoke.
- Buttons - 3 pcs.
Back
Type a. 48 p., b. 52 p., p. 58 p., d. 66 p. We knit 6 rows (3 stripes) in garter stitch. We continue to knit this way: 4 sts in garter stitch, 48-44-50-58 sts in satin stitch, 4 sts in garter stitch. mating At a distance of 36-42-49-57 cm (58-68-80-92 r.) from the boards. knitting, decorate the neck, closing. center: 4 - 6 - 6 - 8 p., then continue to close from the first side: a, b - 1 time 3 p., c, d - 1 p. 4 p. At a distance of 39-45-52-60 cm, (62-72-84-96 r.) from the boards. knitting we close for the shoulder 19-20-22-25 sts. We finish the second half of the neck.
We cast on 48-52-58-66 sts and knit a board. viscous high 3 cm (6 rubles, i.e. 3 stripes). We continue persons. satin stitch and boards. knitted like this: 4 stitches. knit 44-48-50-58 sts. ch., 4 p. plates. mating

At a distance of 6-7-9-10 cm (10-12-14-16 r.) from the boards. knitting we make a pocket: leave on each side for extra. knitting needle: 12-13-15-16 sts, and knit on central needles 24-26-28-34 sts next. arr.: 4 p. plats. knitted, 16-18-20-26 stitches in satin stitch and 4 stitches in plat. mating 11-13-14-16 cm high (18-20-22-26 r.), leave these loops for extra. knitting needle We select 12-13-15-16 sts on the right, restore 24-26-28-34 sts, pierce the center at the base: 24-26-28-34 sts of the first row of the pocket, select on the left: 12-13-15 -16 p. As a result, we got: 48-52-58-66 p.
We knit faces. satin stitch and boards. knitted like this: 4 stitches. knitted, 40-44-50-58 stitches in satin stitch, and 4 stitches in plat. mating high 11-13-14-16 cm. (18-20-22-26 r.). At a distance of 17-20-23-26 cm (28-32-36-42 r.) from the boards. we knit one row like this: 4 stitches. viscous, 8-9-11-12 sts. ch., then knit together 24-26-28-34 p. together with loops with additional. knitting needles 24-26-28-34 sts, then knit the remaining sts as they are presented. We continue straight to 48-52-58-66 p. At a height of 17-20-23-26 cm (28-32-36-42 r.) from the boards. knitting, we knit one row like this: 4 p. plats. viscous, 8-8-11-12 sts. ch., then knit together 24-26-28-34 sts with loops with extra. knitting needles 24-26-28-34 sts, then knit the remaining sts as they are presented.
We continue to knit directly at 48-52-58-66 sts. At a height of 24-29-36-43 cm (38-46-58-68 r.) from the boards. knitting, make an opening like this: knit on the first 22-24-27-31 sts, add 4 sts, it turns out 26-28-31-35 sts. Leave for now on the left: 26-28-31-35 sts. At a distance of 36 -41-48-55 cm (58-66-78-88 r.) from the boards. knitting, decorate the neck, closing the open side: a, b - 1 p. 5 p., c,d -1 r. 6 p., then in every 2nd row a - 1 p 2 p., b, c - 1 p. 2 p. and 1 p. 1 p. d - 1 r. 2 p. and 2 p. 1.
At a height of 39-45-52-60 cm (62-72-84-96 rubles) from the boards. knitting we close the remaining 19-20-22-25 sts for the shoulder. We select those loops that were left on the left 26-28-31-35 sts, finish as the previous one.
Assembly
Sew the shoulder seams. We make the edging of the neck: cast on 38-42-46-51 sts, knit a board. knitting 6 rows. Sew the side. stitches with a “back needle” stitch on the faces. side slave at 12-15-19-24 cm. 13 cm. from the top, starting from the bottom. Sew on the neck strap. We make 2 loops along the hole. throat, sew on buttons.
Bandage
Bandage size: height 7 cm, width 42-44-47-50 p., which is resp. env. heads 48, 50, 52, 54 cm. Knit shawls. viscous. You can find a lot of information on how to knit a decoration.
An interesting sleeveless vest model with a large collar with snaps or buttons. The children's sleeveless vest is knitted from wool and acrylic on knitting needles 7 mm thick. The description is given for a) 2 years, b) 4 years, c) 6 years, d) 8 years, e) 10 years. You can knit a sleeveless vest from any wool or wool blend yarn.

To work you will need:
- Yarn 50 g/40 m, (25% wool, 75% acrylic), 4-5-6-6-7 skeins.
- Knitting needles 6 and 7 mm thick.
- Add. spoke.
- Buttons or buttons - 6 pieces.
Pattern: stockinette stitch, 1/1 rib, fantasy pattern.
Sample: 10 cm faces. smooth = 11 p./16 r.
Back
For 6mm knitting needles. cast on 29-33-37-39-41 sts, knit with 1/1 rib. 5 cm high. Continue with 7 mm knitting needles. persons satin stitch At a distance of 8-10-10-11-13 cm (12-16-16-18-20 r.) from the elastic band a, b - close on both sides 1 time, 1 p. Next, we make a raglan, closing on both sides sides in every 2nd row:
- 8 times 1 p.
- 9 times 1 p.
- 11 times 1 p.
- 12 rub. 1 p.
- 13 rub. 1 p.
At a distance of 19-23-25-27-30 cm (30-36-40-44-48 r.) from the elastic we leave the remaining a - 11, b - 13, c,d,e - 15 sts on an additional needle .
Right half front
We cast on 7 mm knitting needles. 23-25-27-28-29 sts, knit with a fantasy pattern according to the diagram. At a height of 18-20-20-21-23 cm (28-32-32-34-36 r.) from the beginning, mark the left edge. loop (defines the side seam), then we form an armhole, as in the diagram. At a height of 29-33-35-37-40 cm (46-52-56-60-64 r.) from the beginning, leave additional loops. knitting needle Knit the left half of the front in a mirror image.
Collar
We knit with a 1/1 elastic band on the ones left for extra. sp. loops on the right half, continue to add 5 loops 1 time, then on the left half of the front. We get 55-59-63-63-63 sts. Continue knitting for another 9 cm, close off the loops.
Assembly
Sew the side seams. Sew snaps or buttons at equal intervals.
Even for the youngest girls at one year old it is very important to remain beautiful. A knitted baby vest is a beautiful garment that can be worn to school or for a walk. A school vest is the dream of all girls; it is very easy to knit, and you can also find patterns and designs for such projects on the Internet.
It is very important for even the smallest girls to remain beautiful.
A knitted sleeveless vest is an excellent children's clothing that can be worn both in autumn and spring. Of course, sleeveless vests are also worn at other times of the year, even in summer, when the evenings are quite cool.
Knitting sleeveless vests is an easy and interesting activity. Mothers love to pamper their children, so why not learn how to make vests yourself?
Description of work:
- Before you start knitting, you need to determine the number of loops you need to cast on. To do this, knit a sample and take measurements from the child.
- After this, you can start casting on loops. The vest will be knitted in two parts - front and back. This means that the number of loops obtained during the calculation must be divided by 2.
- In order for the sleeveless vest to fit well, you need to make an elastic band. We knit an elastic band about 3 cm long. This is quite enough. You can make an elastic band 1 by 1 or 2 by 2 (alternate the front loop with the back loop). It depends on the thickness of the thread; if the thread is thin, then it is better to make a 2 by 2 elastic band, and vice versa.
- Once the elastic is knitted, you can start knitting the part. The vest is knitted in a straight line up to the armhole.
- When the product is knitted to the armhole, you will need to decrease the loops in each front row. This will allow the vest to be comfortable. The craftswoman must determine for herself how many loops she needs to remove; if the yarn is thick, then she should remove a few loops.
- Then the rest of the loops are divided into 3. The two parts are the shoulders, and the part in the middle is the neck. The shoulders should be knitted above the neckline. It is recommended to use a auxiliary needle to remove the stitches for the neckline, since this part just needs to be closed.
- It is enough to knit the shoulders 2 cm above the neckline. They can also be closed.
- The front part is knitted in the same way as the back. They should be the same.
- At the last stage, you should sew two products to get a sleeveless vest.
Knitted vest for girls (video)
How to knit a vest for a girl under 2 years old with knitting needles
Girls under 2 years old are very sick (especially girls under 1 year old), they can catch a cold from any hypothermia, which is why it is recommended to use wool yarn for such work.

Knitting beautiful vests is impossible without first knitting a sample
Master Class:
- The first step is to take the child’s measurements. Length is measured from shoulder to bottom. The length of the product depends on this measurement. The chest circumference is also measured. The obtained values need to be written down on a sheet and pay attention to them as you knit.
- Knitting beautiful vests is impossible without first knitting a sample. This is necessary to determine the knitting density, as well as to determine the required set of loops.
- When the loops are cast on a long knitting needle, you should make a small elastic band. Since the product is small, the width of the elastic should not be more than 2 cm.
- Then comes garter knitting, that is, the front row is knitted on the face, and the purl row is knitted on the wrong side. You can do it differently, but this is the simplest option.
- Don't forget about the armholes. Several loops will need to be removed from the right and left edges. The back and front parts should be rounded due to this.
- When the back part is ready, you can start knitting the front part.
- Both parts must be sewn together on the wrong side.
At the last stage, the protruding threads are cut off.
Beautiful sleeveless vest for school knitted
Things knitted by parents always delight children, especially little girls. How to knit a beautiful sleeveless vest for school?
Diagram below:
- The girl's measurements are taken. After that, they are written out on a sheet. When a craftswoman knits a vest, she must pay attention to the written measurements in order to avoid mistakes in her work.
- First, the back part of the sleeveless vest is knitted. The entire fabric should be made with a 2 by 2 elastic band. This product stretches very well. What thickness of thread should I use? Either thin or medium.
- There is no need to make armholes in such clothes. The product, knitted with an elastic band, sits very well on the shoulders without armholes. Therefore, you can knit it to the neck and cover the knitted shoulders, and then the neck itself.
- Important: the shoulders should be 3-4 cm higher than the neckline.
- The front part is knitted a little differently. The head should be knitted in a triangle, forming a small neckline. When the working needle is in the middle of the product, you should turn the work to the wrong side and decrease 1 stitch. Next, only this part, half, is knitted. It is knitted to the shoulder. In every 3 rows you need to decrease 1 loop.
- The second part is knitted similarly.
At the end of the work, the two blanks are sewn together.
Knitted vest for a 5 year old girl
Master Class:
- Measurements are taken and stitches are cast on.
- It is recommended to use 2 colors of yarn. Each product will be knitted with stripes.
- After knitting an elastic band, you need to alternate one color of thread with another. This will make the work colorful.
- When the knitting reaches the armhole, you need to decrease a few stitches on the right and left sides.
- After the back part, the front part of the vest is knitted. They should be the same.
- Both blanks are sewn inside out. You can use a hook for this.
- At the last stage, excess threads are cut off.

You can choose a variety of colors
What materials and tools do you need to prepare?
For this type of work you will definitely need:
- Yarn. It is selected individually. It is recommended to make winter sleeveless vests from warm woolen threads, and summer ones from viscose or acrylic.
- Knitting needles. The main tool in knitting.
- Hook. It is convenient for them to sew products by pulling loops.
- Scissors. Using scissors, trim off excess threads.

You don't need many tools for this job.
How to correctly calculate the required number of loops?
When knitting clothes, it is very important to cast on the stitches correctly, because if there are too few of them, the product will turn out dense or small, and if there are too many loops, the clothes will hang shapelessly on the body. So, in order to make the correct calculation, you need 2 numbers: chest circumference and the length of the pre-knitted sample.
The following proportion is drawn up:
- number equal to chest circumference - x cm (unknown number)
- a number equal to the number of loops of the sample - n cm (we measure the sample)
The number x is the desired one. The identity of the chest circumference and the size of the sample must be divided by the number of loops that were needed to knit the sample. The result will be the number of loops that need to be cast on.
However, there is one nuance that is not in the formula. The sleeveless vest is knitted in two separate parts, which are then sewn together. That is why the first number in the formula (chest circumference) must first be divided in half.
More professional knitting involves knitting the front part, the number of loops in which would be 2 or 3 more than the back part. Why? The little girl's chest is slightly wider than her back. That's why you need to knit a pattern.
Knitting a children's vest is easy. Choose a model, buy yarn, knitting needles, and get to work.
A beautiful and warm knitted vest is a great option for autumn and winter. In such clothes the girl will be warm both on a walk, in kindergarten, and at home. She will gladly wear something that her mother knits for her. We have made a selection of the most beautiful and stylish vests for girls with diagrams and descriptions.
White color adorns not only women, but also little girls. It symbolizes purity and freshness. Therefore, mothers often buy or knit clothes for their daughters in this color. Below is a diagram, pattern and description of a beautiful, fashionable children's vest for a girl. The product is white with a hood and knitted with knitting needles. Spend some free time and create a soft and warm masterpiece for your princess with your own hands.

- To knit such a cute vest you will need 250 grams of white wool blend thread and knitting needles No. 3.
- Cast on 200 stitches on the needles. First, knit 10 loops - this is the bar. It can be knitted in any way you like: “honeycombs”, “bumps” and so on.
- Then work 180 stitches in garter stitch: all knit stitches behind the back wall.
- Knit the remaining 10 stitches again in the placket pattern.
- So perform exactly 60 rows.
- Now let's start knitting the yoke. Below is shown how to make braids “with holes” - on every fifth row, 2 loops through one, and then adding 2 loops again according to the pattern.
- The sleeves should be knitted separately and then sewn or tied to the yoke.
- Knit the hood separately: cast on 100 stitches, knit 30 rows in garter stitch and finish.
- Sew the hood to the yoke, insert the thread with pom-poms - the vest is ready.


Here are a few more patterns of white vests that you can knit for a girl:
The entire vest is made in braids. On one side there is an elastic band with buttons. The neckline is also knitted with 1x1 elastic.


A cute sundress vest made with garter stitch and thin “flagella”. The straps are 2x2 elastic, like the shuttlecock.


It is difficult for novice craftswomen to complete a complex vest model on their own. If you are just learning the basics of knitting, do not try to make a complex pattern right away. Try using garter stitch and create your own vest model without intricate patterns. So, a diagram and description of knitting a simple children's vest for beginners:


This red vest is knitted in stockinette stitch: knit the front rows with knit stitches, and the purl rows with purl stitches. This thing can be done in a couple of hours even with the hands of a novice craftswoman.
Clothes with buttons are convenient to wear, especially for children. This item is easy to knit. You can choose any sleeveless sweater pattern and knit it in a reduced size. Make a placket using 2x2 elastic and sew buttons to it.
The knitting pattern for a children's vest for a girl with buttons will help you complete all the rows correctly and assemble the product together. Stock up on threads and knitting needles and get to work.

If your child is older than the baby in the photo, then you should cast on 10, 20 or 30 more stitches, depending on the size.
A knitted openwork sleeveless vest is made from cotton threads, as well as linen or viscose yarn. Such a product will not protect against the cold, but will be an excellent decoration for the image of a little fashionista. The vest will be useful for a cool summer evening when you need to warm yourself up a little.
How to knit an openwork vest for a girl? Below is a diagram and descriptions of a beautiful and fashionable sleeveless vest. This model is advantageous with its thin threads and simple but interesting openwork pattern. You need to buy yarn, knitting needles No. 3 and you can get to work.

When the sleeveless vest is finished, sew 3 hidden hooks on the top of the yoke from the inside out. You can buy them at any craft store. If you can’t find such hooks, sew regular small buttons.


All pink shades are girly colors. If future parents know that they are having a girl, they buy pink clothes in advance and also decorate the baby’s room with accessories and toys of this shade. Every girl has a lot of pink clothes: tights, dresses, blouses, coats and hats.
Knit a pink vest for a girl with your own hands and give it to your daughter for any occasion. She will be delighted, as girls have liked this color since childhood.


You can try to make such a vest - a regular model, simple knitting. Decorate the finished product with a belt made of thin satin ribbon and crocheted flowers, but you can do without decoration.

 Knitted pink vest for girls - diagram
With the onset of spring or autumn, the school becomes cool. The heating has already been turned off or has not yet been turned on, and the child has to stay at school for 6 or more hours. Knit a vest for your daughter, and she can put it on when she feels cool. Such clothes can be worn with blouses and shirts, skirts of various models and trousers.
What vest to knit for a girl for school? Here are a few models with descriptions:
School colors are brown, gray, black, blue, green. Therefore, buy yarn in these colors and get to work.


This short bolero vest is perfect for the spring season. It is better to wear it with a black sundress and a white blouse.

If you are worried that the lilac shade of your clothes may not be approved by your school teachers, then knit a blue or brown vest. This model is suitable for every day - simple and uncomplicated.


If your daughter is in the 10th or 11th grade, you can knit such an elongated vest for her. Blue or brown yarn is also suitable for it.


This green vest is suitable for a girl who studies from 5th to 11th grade. This model can be worn open or fastened with hand-knitted buttons.


You can knit a grass vest for a girl with knitting needles, like the girl in the photo, or you can come up with your own model. Knitting with these threads is a simple process: stockinette stitch. Below is a knitting pattern for a more voluminous vest. It will be warm and cozy.


Knit one of these sleeveless vests for your daughter, and this item will definitely become her favorite, which she will never want to part with.
When it’s a little cool outside, but you don’t want to wear a warm jacket, you can throw a vest-coat over your shoulders. This sleeveless vest is easy to knit yourself. If you also make a hat, then you will get an original set.
A beautiful knitted cape vest for a girl. We can say that this is already a real coat, but this product looks very beautiful and stylish.


This cape is easy to knit. Even a novice needlewoman can do this. Buy some yarn and knitting needles and you'll have a fashionable set in one day.

 Knitted cape vest for girls - diagram
Previously, only sophisticated ladies wore ponchos. Now such a cape can often be found on women in the park, on the embankment, in the cinema, theater and other places. A little girl wants to be as fashionable as her mother, sister or aunt. Therefore, many little girls demand that they knit a poncho.
A poncho vest for a girl is knitted according to the following pattern:

A teenage girl already feels like an adult, despite the fact that she is still small. Therefore, it is unacceptable for her to wear children's clothes, and her mother should buy her clothes as if for herself. If you know how to knit beautifully, then please your princess with a stylish and fashionable new thing.
A beautiful model with a knitting needle - stylish, fashionable and youthful.
Important: In this photo the model is already an adult girl. She has a vest with a knitting needle, and the children are very active, so instead of a knitting needle it is better to make an original button.


 Knitted vest for a teenage girl - diagram
 This model is comfortable and stylish. It can be made in any color. Knitting is easy and quick.


This vest looks impressive with trousers or jeans. You can wear it to school or for a walk with your friends.

In the extended vest model, your daughter will never freeze. This sleeveless vest looks like an adult. Knit an openwork pattern according to the pattern. A belt is required here, otherwise the model will not look so beautiful and impressive.


Did you have a daughter or granddaughter? So you want to knit a lot of beautiful things for her? Take some time and create a beautiful sleeveless blouse. Clothes should be warm and comfortable, and who can knit things better than your own mother or grandmother. You will spend 1-2 hours knitting, and everyone who looks at your baby will admire his new clothes.
This model can be made in pink, red, lilac or other colors at your discretion. You will need 50 grams of white and colored yarn. Buy soft threads so that the baby feels comfortable in the knitted product.

For small children there is no need to come up with sophisticated patterns of knitted items. Keep it simple so that your daughter is comfortable but warm. How to knit a vest for a 2-3 year old girl with knitting needles? Schemes and description:
This vest serves more of a decorative function, decorating the image. It can be worn with blouses of different colors or plain T-shirts.


If you don’t like the previous model, it seems that it is too open and your daughter will be cool, then tie a vest with a hood. It can be worn in any bad weather in spring or autumn.

A beautiful sleeveless vest model with an original yoke. Button fasteners are located on the front yoke panel. Convenient and original.

The most beautiful knitting pattern is openwork. Try to learn how to knit even the simplest openwork pattern, and you can create a unique vest model for your baby. Here are a few samples of a knitted vest pattern for a girl:


You don't know how to knit, but you're good at crocheting? Crochet a baby vest for a girl. The result will be such beauty - a cute and delicate product.


 Crochet children's vest for girls - diagram
 You can make this model. This vest is perfect for summer when it gets cool.


Knitting is easy. You just need to not be afraid and buy yarn and knitting needles. Try it, knit simple patterns first, and then move on to more complex patterns, and you will succeed!
Video: Vest with knitting needles for children Winter vest with buttons Knitting according to patterns
A vest, or sleeveless vest, is traditionally associated with something warm, cozy and beautiful. A simple and beautiful sleeveless vest will warm both a woman and a man, a newborn and an older child. Craftswomen who are just starting to knit are quite capable of making a vest, guided by the simplest pattern. Schemes and descriptions of various vests, both women's and children's, are presented on the Internet in large quantities.
Before you start knitting a vest, you need to carefully study the sleeveless vest pattern.
Before you start knitting the simplest sleeveless vest (it is recommended to start with a women's or children's model), you should prepare everything necessary for production fashionable sleeveless vest, you can study a lesson about this. To make knitting easy, you need to carefully study the pattern and description of the model. When knitting a fashionable vest for a woman or child, beginning needlewomen will need:
- Knitting needles. The spoke number is usually indicated in the model description. The coarser the yarn, the thicker the knitting needles, and vice versa.
- Yarn. The number and recommended color of yarn is also indicated in the description. The entire vest must be knitted with yarn of the same thickness, but there can be several colors and shades, especially if the sleeveless vest, knitted with knitting needles, is intended for a child.
- Scheme and description of the sleeveless vest. If the diagram is in a small format, it can be printed enlarged for convenience.
- Needle and thread for tying finished parts of a women's or children's vest together.
- Decor elements. Having finished knitting a vest for a woman or child, you can decorate it with beads, sequins, and crocheted decorative elements. The vest can also be fastened with buttons, in which case the buttons can also play the role of decorative elements.
How to knit a vest for a woman
Vest for women differs from a men's vest mainly in its color scheme and richer decor. If you have made the final decision to knit a women's vest, you should choose yarn in pastel or warm colors. The same applies to vests for children. Before knitting a women's vest, you need to know what elements it consists of.
Traditionally, a vest for a woman or child consists of a back and a front. The front can be solid, or it can be divided into two parts and fastened with buttons, it all depends on the chosen style. Having finished knitting, you need to tie the finished parts together using a needle and thread.
A women's vest, like a sleeveless vest for a child, can be decorate with geometric patterns, fabric appliqué, beads and sequins or knitted decorative elements. Craftswomen who know how to crochet can decorate a women's sleeveless vest with original crocheted flowers.
How to knit a children's vest
Before starting to work on a male or female model, novice craftswomen are advised to practice on models for children. Children's sleeveless vest may have the same style as the men's (women's) one. The main difference between a children's vest and an adult's vest is the size. Children grow quickly, and therefore you can make a vest one or two sizes larger than the child’s current size. If the sleeveless vest is a little longer than necessary, it will provide more warmth on cold winter evenings.
To knit a children's pattern, you need to choose natural yarn in natural colors, because synthetic yarn that is too brightly colored can fade when washed and also cause allergic reactions in children. Synthetic yarn can cause irritation on a child's delicate skin. Colors should be chosen from pastel (a vest for every day) to bright (a holiday vest). Children's sleeveless vests in turquoise, crimson, and light green colors look elegant, and orange and yellow vests look cheerful. Orange and yellow are equally suitable for both girls and young boys. Another advantage of bright colors is that wearing a bright vest makes a child easier to spot on his face and on the road.
Master class on how to knit a sleeveless vest correctly and simply! In order for the knitting result to meet expectations, it is necessary to observe certain practical recommendations:

A knitted vest (sleeveless vest) will serve as a wonderful gift for a woman, child or beloved man. Also knitting a vest will become great practice for those who have only recently learned to knit. But if the question of how to knit a vest scares you, don’t worry. Uncomplicated execution technique and ample scope for creativity – these are the obvious advantages of a knitted vest for lovers of handicrafts.
Knitting is an ancient craft that has long served not only for practical purposes. Even in our time it has not lost its value. After all, every woman can show her imagination, ingenuity and skill here. Even novice needlewomen can knit an original item for themselves or their child. And if you wish, you can improve your skills, develop your skills and learn to create real masterpieces.
For every woman, the greatest pleasure is knitting for her child. The best knitted items are created by mothers and grandmothers for their babies. After all, it is very important that children’s clothing is not only beautiful, but also warm and comfortable.
In addition, related products can grow with your children from year to year. Besides, knitted items never go out of style. Their variety is great. These are sweaters, sleeveless vests, dresses, suits, sundresses, tunics, hats, mittens. On our website you will find patterns for every taste and age, as well as models for beginner needlewomen. Knitting a sleeveless vest is easy!
An item in the wardrobe of a child aged one year and older
Every mother knows that a sleeveless vest is an essential element of every child’s wardrobe. It will come in handy on cool summer evenings and cold winters, and in the off-season you simply cannot do without it. After all, sometimes you don’t know how to dress your baby so that it is not hot or cold, and most importantly, comfortable. In addition, you can’t have too many sleeveless vests; you can find the necessary patterns for every season on our website.
See below for an excellent pattern for beginners on knitting vests for children:


Also, knitted sleeveless vests are perfect for schoolchildren’s wardrobes. The assortment in stores is not particularly encouraging with the variety of school uniform models, especially for boys. With the help of a vest, you can not only provide your child with warm clothes, but also emphasize his individuality and distinguish him from the gray mass of clothes of the same type.
On our website you will always find many original models of vests knitted using knitting needles. Our collections are constantly updated, don't miss out on new items.
Before starting knitting, especially beginner knitters, you need to familiarize yourself with some nuances. We suggest starting your creativity by creating a children's sleeveless vest with knitting needles.
It consists of only two fabrics, which are then sewn together, and for beginner knitters it will be easy.


And after you have a vest, you can move on to knitting more complex things. 1. To knit a vest for children, we will need two sets of knitting needles of different thicknesses, for example No. 4 and No. 6. Thinner knitting needles need to be used to knit elastic, and thicker knitting needles will be used to knit the main fabric of the product. Next, you need to take measurements from the person for whom the sleeveless vest will be knitted. Based on the desired length of the item, we take measurements of the circumference of the hips, waist or chest. We divide the result in half and get the width of our product.


2. Next we knit a sample of elastic. To do this, just knit a piece of 10 by 10 centimeters. We measure the width of the resulting sample. For example, there are 3 loops in one centimeter. We multiply the required width of the canvas (ours is 30 centimeters) by three. We get 90 loops that we need to cast on. We add 2 edge loops to them, for a total of 92 loops.
3. We cast on the loops on 2 knitting needles folded together. Then we take out one of them and start knitting an elastic band. To do this, alternately knit 2 knit and 2 purl loops, about 10 centimeters high. In the last row you need to switch to thicker knitting needles.


4. It is necessary to knit the front from the desired length of the product. It is recognized by simply measuring the person for whom you are knitting a sleeveless vest. You also need to measure the length from the hip to the armhole and from the armhole to the shoulder. Based on these dimensions, the first shelf, usually the back one, is knitted. For the armhole, we begin to close the loops evenly on each side of the shelf, 1-2 loops in each row, in the amount of 6-7 loops. Next, we knit the product according to the measurements up to the shoulder. We close the row and the first shelf is ready.
5. The front part of the sleeveless vest for children is knitted in the same way. The only difficulty is that you need to make a neck in it. Its shape and depth must be decided in advance. For a beginner knitter, the easiest way to make a v-neck. Having measured the length from the hips to the beginning of the neck in advance, we carefully monitor so as not to miss the right place.


6. Having reached it, we divide the knitting into two halves, marking it with a pin. We knit one half, gradually closing one loop in each front row. Having tied it to the shoulder, close the last row. We put the loop remaining on the pin on a knitting needle, tie a thread from a skein to it and knit it in the same way as the right half. Our product is almost ready.
7. Next, it is recommended to wash and steam the two halves, then carefully sew them together. To finish the product, you need to process the armhole and neckline. To do this, you need to tie 4-5 centimeters of elastic, having previously measured the width and sew it into place.

This was the easiest option for knitting a sleeveless vest for just beginning needlewomen. Subsequently, you will be able to diversify your work with interesting patterns, complex cuts and your own original styles. They will delight you and all your loved ones.
Watch a video about knitting vests for children.
Here is another pattern for knitting a children's vest from a year and older:


 Vest for girls


