Products woven from wicker can serve their owners for many years, performing not only a practical, but also a decorative function. They are successfully used as a piece of furniture both in the countryside and in the metropolis.
Making willow with your own hands is a science mastered by our ancestors several thousand years before our era. In historical documents from around the world there are references to various wicker boxes, fences, baskets and much more. The products that can be made by learning how to weave are beautiful and varied. Nowadays, willow weaving is not related to the everyday needs of a person; rather, it is a fashionable hobby and a way to bring beauty and style to the interior.
General information about wicker weaving
Modern willow baskets are not only accessories for the garden, they are full-fledged inhabitants of apartments. They not only bring practical benefits, but are also a highlight, a kind of accent in the design of the apartment.

It is important to note that collecting vines for weaving does not cause any harm to nature, but, on the contrary, rejuvenates the thickets.
Willow weaving is popular today both in rural areas and in large cities. Another advantage of this hobby is that there is no need to purchase materials for work. You can easily prepare them yourself. Willow is a very common plant and grows in almost all regions of Russia. If you love the outdoors, then going for the willow vine will be a pleasant and interesting adventure for you. In some large cities, shops that provide goods for various hobbies are beginning to sell wicker rods. There are not many such stores yet, but this is an excellent option for those who do not know where to find willow thickets in a large city.
Blank for weaving
Not only willow vine is suitable for weaving, but also walnut vine and other flexible species of shrubs and trees. It is better to choose thin, long shoots. Take those twigs that do not branch.

For this type of hobby, both unbarked and peeled vines are suitable. Large products are woven from the unrefined wood: fences, large baskets for fruits and vegetables. Peeled vines are used to make vases, trays, laundry boxes, bread bins and much more. An unpeeled vine is called unrooted, a peeled one is called debarked.
The preparation of materials for weaving is carried out in autumn or spring. In summer, willow shoots, due to active growth, are very brittle and are not suitable for weaving.
Shoots harvested in spring are cleared of bark immediately, without additional preparation. Shoots harvested in the fall are boiled before cleaning. Harvesting and preparing vines for weaving is not a difficult task, but it requires time and effort.
But when willow weaving for beginners will captivate and draw you in step by step, and the finished wicker item will become a source of pride for you, the time and effort spent will be fully repaid by the charge of positive energy that you will receive.
Required Tools
What will we need during the work process? Willow weaving for beginners, described step by step in the article, requires at least a good amount of patience. Making a basket from wicker is more difficult than weaving it from newspaper tubes. Natural material is less pliable to work with and can break.
You also need some tools for the job.
Prepare:
- Awl.
- Secateurs.
- Side cutters.
- A spray bottle filled with water to spray the vines.
Technology
Classically, baskets are woven starting from the bottom. Then they weave the walls and the bend. Handles come last.

For beginners, it is advisable to start step by step with willow with round-shaped product models. To make it, you will need to learn just a few techniques:
- Round bottom manufacturing technology.
- Rope weaving.
- Layer weaving technique.
- Bending.
During the weaving process, the work must be compacted and pressed down so that the basket does not turn out to be too flimsy. The rods should be laid tightly and evenly, without covering each other.
Once the technique of making a round basket has been mastered, you can move on to more complex openwork products made from wicker. Experienced craftsmen decorate their baskets with braids, weaving birch bark, straw and wooden beads into them. The design and shape of such baskets are limited only by the imagination of the master.
You can weave almost anything from a vine. Often landscape designers order wicker figures from vines to decorate the garden. They decorate the garden plot with wattle fences, and on the open veranda it is quite possible to place a rocking chair made of wicker. You can also weave stools and a small table made of willow for outdoor gatherings.

Even decorations and New Year's gifts are made from this affordable, eco-friendly material. A cradle made of untreated twigs is suitable for a children's room. Children love to sleep in such natural, environmentally friendly cradles.
Rectangular wicker baskets placed on shelves and racks are suitable for storing clothes, magazines and newspapers, and all sorts of household items.
Any housewife can find use for wickerwork in her home. The ability to weave from wicker will definitely be useful to you in life, at least for arranging your own life, and maybe it will become a source of additional income for you.
Now that you have learned about what wicker weaving is and how to weave from willow, the master class below will teach you how to weave round baskets from wicker. With such a basket you can go on picnics with friends or to the dacha with children.
Weaving willow baskets for beginners (master class)
Let's start making the basket by preparing the willow vine. It is best to cut the vine in May, before the willow begins to bloom. You can also cut the vines in August, when new long shoots grow on the willow.

Preparing a vine from willow branches
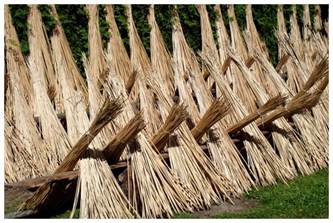
We immediately remove the bark from the cut branches and leave our vine for five days in the shade in the open air.
After the vine has been prepared and rested, we begin weaving willow baskets. The technology is as follows: we weave the bottom and edges of the product with whole round twigs, and the walls with vines split into several parts.
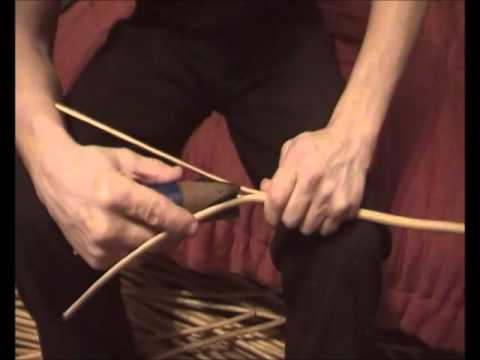
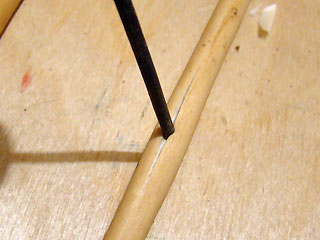
How to split a vine
To split the vine into pieces, you will need a special hardwood cleaver. An incision is made at the end of the vine with a knife, a cleaver is inserted into it, and the vine is split into 2, 3 or 4 parts.
The split branches are soaked in water for several hours, and then the brown center is removed. It is recommended to use a plane to process split vines.
Before weaving from the vine, it needs to be moistened. This can be done with a spray bottle or by lowering the branches into water for a few minutes.
Having prepared a sufficient amount of vines, we begin weaving willow baskets.
Carefully consider the process of creating a basket in the figure. First, the bottom of the basket is woven, then the ribs are added and the sides are woven along them. At the very end the handle is done.
If you know the technology of making baskets from paper tubes, then know that willow weaving for beginners step by step is almost the same.
We carry out the work in this order:
- To make the bottom of the basket, split five rods in the middle with a knife and insert five other rods into the holes. We insert the tips of the first two into the same holes.
- We make a braid of the bottom. The first rod needs to cover the split twigs from above, and the second one needs to cover those threaded into the split twigs from the bottom.
- We also perform the third and fourth turns.
- We spread the crosspiece rods in the shape of a fan and braid them with two willow branches.
- We press the twigs together using an awl.
- When the bottom reaches the size we need, we install the ribs of the basket into our willow weaving. For beginners, we will explain this process step by step. For the ribs we use round twigs. We cut their ends obliquely to a distance of about 5 cm. We insert the sharp ends into the bottom braid. We cut off the excess ends of the vine. The edges of the bottom are woven from four round twigs, which are inserted 4 cm near the side ribs of the basket. To give the basket the required shape, we make a blank, as in Fig. 9. Nail the bottom of the basket to it using small nails.
- We finish the braiding of the bottom and cut off the excess twigs.
- Let's move on to weaving the sides. We cut off the ends of the new twigs. We take twigs of medium thickness. We insert new branches along each twig of the base.
- We bend the new rods under the two adjacent ones to the left, down, and then up.
- We also bend the remaining branches of the vine. The last two branches cannot be bent. We simply wrap them around the first ones. We weave the sides of the basket until they reach the height we need.
- We begin to weave a handle. We take thick shoots of the vine, bend them and determine the length of the handle. We cut off the excess vine.
- We sharpen the ends of the vine and insert them into the walls of the basket. We insert five branches next to the handle and wrap them around the handle. We hide the extra ends of the vine between the walls of the basket.
- We take a thin twig and wrap it around the edges of the handle. We hide the ends of the twig and cut off the excess.
- Weaving a willow basket with your own hands is completed. A simple round willow basket is ready.

Follow the procedure shown in the pictures. A little practice and you will succeed.
Conclusion
Having mastered the technique of weaving round baskets from wicker, you can then learn how to weave square and oval baskets and boxes, learn how to weave a willow fence for beginners step by step, then move on to making wicker furniture and more complex products. The growth of your skills and mastery depends only on the amount of your free time and desire to engage in wicker weaving. Willow weaving is an interesting and accessible activity for everyone.
Wicker weaving is probably the most ancient of crafts. It appeared even before pottery and related, to a greater extent, to the everyday needs of humans. Houses, utility structures, fences, cradles and toys for children, cart and sleigh bodies, boxes and kitchen utensils were built from tree branches. But the ideal material from which to weave a basket was willow twigs. They are very flexible and great for this type of creativity.
History of the craft
Willow weaving was common in Rus'. There was no peasant who could weave baskets. There were also master basket makers who were engaged in weaving professionally. They wove a wide variety of products: round and oval, rectangular and conical, with complex or simple weaving, large and small. In those days it was simply impossible to do without baskets. Women in them carried clothes to rinse to the river, took food on the road, harvested crops, and went to pick mushrooms and berries.

In the modern world, wicker baskets are also popular. It's hard to imagine a mushroom picker without a basket. The branches of the weeping willow contain tannins, thanks to which the mushrooms do not spoil longer, and the spaces between the twigs promote air ventilation.
If you have even the slightest idea and a little skill, then easy to learn weaving from willow. For beginners, step-by-step study and independent repetition of all stages of weaving products will bring a lot of positive emotions.
Selection of materials for weaving
The main advantage of basket weaving is the availability of consumables. Willow is a common unpretentious tree found in many regions of Russia. Usually craftsmen procure raw materials themselves. Some people grow willow in their garden. And in individual stores you can even buy materials ready for weaving.
Willow twigs growing on sandy and loamy soil are best suited for wicker weaving. The shoots are cut using pruning shears or a sharp knife, choosing the longest ones without branches. Cut at a slight angle, leaving a few buds so as not to harm the plant.
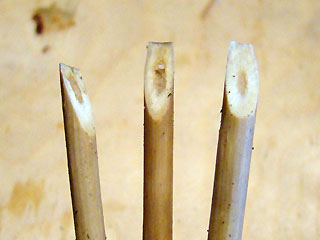
Shoots with a wide and loose core are not suitable for weaving; it should be small in size. Young shoots are usually used.
To check whether the plant is suitable for work, you need to cut the branch and bend it 180 degrees at the butt - if it is cracked, it is not suitable (which means it will break during weaving); if not, then you can safely proceed to further processing.
Time of year for harvesting and processing rods
Rods for willow weaving are harvested all year round, but preferably in early spring and late autumn. The bark of spring shoots can be removed very easily without additional processing. Twigs collected in another season need to be soaked or evaporated.
To soak, the shoots are dipped into running water - a river or stream, having previously been secured to the shore with a rope so that they do not get carried away by the current. You can use it in a trough or barrel, but in this case a daily change of water is required. Tied bunches with shoots are immersed in the bottom, and a load is placed on top (a stone or any other heavy object except iron) and leave for 1–2 weeks.
To reduce processing time from several weeks to several hours instead of soaking the rods are evaporated in any of two ways:
- The shoots are placed in a tank, rolled up around the perimeter, filled with water and put on fire. After boiling, cook for 1–2 hours. Then take it out, let it cool and begin removing the bark.
- The vine is no longer poured with cold water, but with boiling water, brought to a boil and boiled for 20–30 minutes. Take it out, cool it and remove the bark.
It is better to clean the rods raw, starting from the butt (root part). During cleaning, to prevent the material from drying out, it is better to leave it in water and remove it in small bunches. After the willow has been debarked, to finish the job, it must be laid out in the sun until completely dry. For ease of use, the rods are sorted and folded into bundles of equal size.
Barked rods are divided into two types - those prepared in the spring and those obtained by digestion. Boiled during use, they acquire a bright, glossy appearance, are easy to clean, and become better each time. Uncooked ones, on the contrary, darken over time, acquiring a nondescript appearance.
Weaving tools
Making a basket from willow is more difficult than making it from newspaper tubes, but the principle of operation is the same. Natural material is more brittle and less pliable. Willow weaving is not that difficult for beginners. By repeating all the steps step by step and collecting a set of tools, you can achieve good results. For work you will need:
- pruner;
- sharp knife;
- large scissors;
- utensils for soaking or boiling rods;
- pliers;
- clothespins;
- tweezers;
- Ruler and pencil;
- drill;
- jigsaw;
- water-based stain and varnish;
- tassels.
These tools are useful not only in making baskets, but also more massive products - such as a rocking chair, table, flowerpot, fence, and so on.
Basket making method
To understand how to weave a willow basket for beginners, you first need to delve into and study the lessons, patterns and techniques for making them. After preparing the tools and materials, when the rods are soaked or evaporated, debarked and dried, the most interesting stage begins - weaving. The bottom is woven first, then the sides, and lastly the handle.
Formation of the bottom
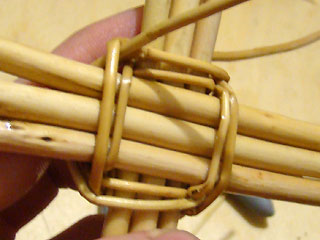
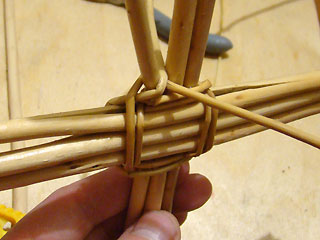
To properly weave the bottom with your own hands, you need to prepare 8 twigs (knitting needles) of medium thickness (Fig. 1). They are divided in half - four are left untouched, and in the other four a gap is made in the middle of each (Fig. 2). Then rods are inserted into the cracks in the form of a cross (Fig. 3). Next, two more thin rods are inserted into the same slots and wrapped around the base in two rows (Fig. 4 and 5). Then the knitting needles are spread apart and wrapped around each one separately (Fig. 6).

Every time a rod comes to an end, it needs to be extended by another. You should not extend both rods at once; it is better to do it one at a time. To do this, the end of the rod is sharpened and inserted into the hole between the last two rows, it is bent and weaving continues, and the end of the old rod is cut off.
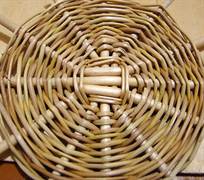
Weaving is continued in two more rows (Fig. 7). This is where the twisted weaving method ends and continues with the usual one - bypassing the knitting needle inside and outside (Fig. 8). In this case, an odd number of knitting needles is needed; for this, an additional rod must be inserted into the weaving.

Manufacturing of walls
Having reached the desired diameter of the bottom, you finish the first stage, the next one begins - the transition to the walls. To do this, you will need medium-diameter willow shoots, which are called racks. Each of them must be pointed at the end and inserted between the knitting needles (Fig. 9). Old rods are cut with a knife at the base. Now they take one stand and hook it behind the other two, after which they bend it upward (Fig. 10). Do the same with all the other racks (Fig. 11). The racks are braided in several rows, then in the usual way (Fig. 12 and 13).

When the height of the basket has reached the desired size, you need to take one stand and bend it down, placing it behind the other two (Fig. 14). The same must be done with the following racks, removing the ends inward and pushing them outward (Fig. 15). Then the protruding ends are cut with scissors at the base (Fig. 16).
Handle weaving
The last step left is to make the handle. For this you will need thick willow shoot, which is cut to size. The ends are sharpened and stuck into opposite sides of the product (Fig. 17 and 18). Next, take 4-5 rods and stick them into the weaving at the end of the handle (Fig. 19). They are braided several times and threaded into the weave from the other end. Then they take a few more shoots and do the same thing (Fig. 20 and 21). Another rod is stuck nearby and braided around the handle at the base, tightening it with a knot (Fig. 22 and 23). The end is cut with a knife (Fig. 24). The cart is ready!

Over time, you can learn to braid braids and ropes in two or three rows with more complex weaving, for example, openwork. Sometimes, for the convenience of making wickerwork, wooden templates of round or square shape are made, which greatly facilitate the work.
It is believed that wicker weaving is one of the oldest crafts, predating the art of pottery.
Our ancestors mastered the skills of weaving, perhaps, before they learned to hunt and fish.
The easiest way was to twist the branches and leaves of plants on hand to get a container for collecting roots, berries and mushrooms. Later, by coating wickerwork with clay and firing them over fires, a clay promise was obtained. In many ancient paintings you can see a lot of wickerwork: baskets and vases, cradles and swings, suitcases, furniture, toys and much more. In any local history museum there will be exhibits that reflect the local features of the use of vines, reeds, bast and other natural materials.
Nowadays, wicker weaving is a type arts and crafts, which almost anyone can master. Products made from wicker are not essential items, but they are found in almost every scrap, are used in everyday life and bring practical benefits. It’s hard to imagine a mushroom picker without a basket, and wicker furniture has always been a chic addition to a barn.
A nice feature of this type of art is its accessibility. Material for weaving can be found very easily. More than 150 species of various willows are found on the territory of Russia. True, not all of them are suitable for weaving, but you can always find suitable material. Willows can be divided into two groups: trees and shrubs. Willow bushes are more common; they grow along the banks of rivers, lakes, in wetlands, and in parks. It is very convenient to harvest material in areas under high-voltage lines and near railways, since scheduled pruning of trees and shrubs is constantly carried out. A year after pruning, the best twig grows on the stumps, suitable for weaving. We offer you several practical lessons that may open up new opportunities for you and allow you to spend your time profitably.
Rod and its blank for weaving
Various materials are used for weaving. Most often this is willow vine, but sometimes others are added to the main material to create decorative elements. In addition to willow twigs, stems of reeds, rushes, cattails, linden bast, rattan, hazel and turf, as well as willow bark removed from the twigs, which will later be used for hoops, are used for weaving.
There are several terms for harvesting vines. In the autumn-winter period, the material is harvested after the leaves have fallen, from late October to April. The twig collected during this time reaches the required ripeness and uniform woodiness; the wood of such a twig is still elastic, but already elastic and strong, which means its bark is suitable for weaving. Boiling is necessary to remove the bark. The spring-summer harvest period is from May to August.

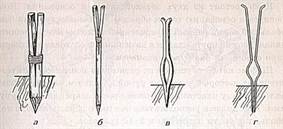
This is the time of sap flow and vegetation. A twig cut during this period can be easily cleared of bark without additional processing, but the wood at this time has not yet reached sufficient maturity, and the twig often breaks. When harvesting vines, it is always worth checking its quality. To do this, take one rod from the bush and bend the butt 90° through a large pale (photo 1) or wind the rod around the pale, starting from the tip (photo 2).
If the rod does not break, you can trim it. It is done with a garden knife or pruning shears at an angle of 45 degrees; you need to leave four buds to the base of the rod.
Tools and devices needed for wicker weaving

The set of tools is simple and is likely to be found in every household.
1. Awl. To make wickerwork, a set of awls of various diameters is used. An awl is necessary when weaving bends and installing handles; it is impossible to do without it when decorating the edges of a wicker product. The edge of the awl is dulled so as not to injure yourself while working.
2. Knife. When weaving bowls, a garden knife is used. They use it to trim the ends of sticks and twigs, cut off knots, and plane them.
Z. Secateurs. The main tool for working with vines and for harvesting material. It is better to use two tools: one for collecting material, the other for working while weaving. This will preserve the service life of the tool and allow you to make neat cuts when working with the vine.
4. Wire cutters. They are used to cut off the protruding ends of the rods in the finished product.
5. Mallet(izer, beat). A metal or wooden mallet is used when weaving large products to compact the walls. An uncleaned rod dries out over time and weakens the entire structure of the product. To prevent this from happening, you should periodically knock down the already woven part and ensure that the density is uniform.
6. Pliers used for pulling rods in hard-to-reach places and removing broken, already braided rods.
7. Round nose pliers necessary for bending the rod, especially in weaving the bottom and bends.
8. Templates allow you to weave the walls evenly and accurately, and adjust the increase and decrease in the diameter of the wicker product.

Types and methods of weaving from wicker
Usually weaving is done from left to right. The working rod is almost always the left one. There are several types of weaving. The most common types are:
Simple weaving
This weaving uses one rod. The risers go around one by one: one from the back, the other from the front (photo 3). Continue this way until the end of the rod. The next rod is joined to the previous butt to the top, simply placing one next to the other at the riser inside the weave. When joining the thin ends, both old and new are woven simultaneously between three risers (photo 4). For simple weaving along a closed contour, an odd number of risers is required. In this case, on one circle the riser will be braided from the outside, and on the next – from the inside. Simple weaving is convenient for braiding bottles and vases. In this way, semicircular, corner and rectangular bottoms are made.
Two-strand rope
Weaving is carried out alternately with two rods at once. With this method, the rods not only intertwine the risers, but also intertwine with each other, forming a “figure eight” and increasing the reliability of the product (photo 5). The first braid rod, let's call it A, is placed from the inside to the first riser, the second riser is wrapped around the outside, the third – from the inside. Rod A is brought out between the third and fourth risers (photo 6). The second rod B is placed to the adjacent, second riser from the inside. The butt of rod B should be located below rod A. Rod B goes around the third riser from the outside, the fourth from the inside and is brought out between the fourth and fifth risers (photo 7).

Thus, the left and right rods of the rope are obtained. Continue to weave with the left rod, braiding it to the right one step at a time. They weave like this until the end of the circle or until the end of the rods, depending on which ends first (photo 8).
Three-strand rope
This weaving is used to increase the strength of the product, as well as to make the transition from the horizontal base to the vertical sides of the product.
To perform weaving, rod A is laid behind the first riser, then it goes around the second and third risers from the outside, and the fourth from the inside (photo 9). The end of the rod is brought out. Behind the adjacent riser on the right, rod B is inserted under rod A (photo 10), in the same way they go around two risers from the outside and one from the inside, then bring the rod out. The third rod C is treated in the same way as with rods A and B. As a result, three working rods are obtained (photo 11).
Start weaving with the left rod, then repeat the same manipulations with the other two: two posts on the outside, one on the inside, the rod on the outside. This is how they weave until the end of the first row (photo 12).

The transition to the second row should be smooth. To do this, instead of the left rod, take the right one. They go around two risers from the outside and one from the inside, the rod is taken out (photo 13). Then they work with the middle rod, then the left. Three protruding rods will form, which will be the beginning of a new row (photo 14).
Layer weaving
This weaving is done with several rods through one stand (photo 15). To weave one layer you will need a number of rods equal to the number of risers. It is necessary to take rods of the same length and thickness. Weaving begins with the butt end of the rod, which is inserted between the risers. They braid the second riser from the outside; the third - from the inside; fourth - outside; the fifth - from the inside, etc. This weaving resembles a simple one, but the rod needs to be directed upward diagonally at an angle of 10-15 degrees. The greater the slope and the number of rods, the higher the weaving layer. Each new rod is inserted to the left of the previous one and weaved between the next risers, alternating weaving from the outside and from the inside (photo 16). Thus, the product is woven around the entire perimeter.
Wicker furniture creates a special sunny mood in the house. It is not only beautiful and elegant, but also durable and comfortable. Despite the apparent complexity, you can make such furniture yourself. The main thing is to know some of the features of weaving.
The most popular material for wicker furniture is willow.
Preparation of raw materials for work
The branches of many plants are used for weaving, but the most popular is willow. The thinner the core of the rod, the better the quality of the raw material. Rods with a thick core are also suitable for work. They are used to make the basis for large products. But for openwork and airy creations, it is best to choose a material with a thin “heart”. When harvesting, you should also pay attention to the width of the willow leaf. The narrower it is, the more elastic the vine will be and the more openwork the weaving will be.
Raw materials can be harvested from October until the onset of severe frosts, as well as in the spring. During this period, the rods are well cleaned.

Tools for weaving from willow: A - knife, B - pinch pin, C, D - splinter and work with it, D - flat planer, E - edge planer.
Before you start making furniture from willow, you should decide how it will be made. There are two types of wicker furniture: frameless and stick. The peculiarity of the first type is that ordinary sticks are used in the manufacturing process. In the finished structure they play the role of stiffeners. In products made by the second method, a supporting structure is constructed from sticks.
You can weave furniture in different ways. The main types are single, openwork and combined weaving. They allow you to create both integral surfaces and create patterns.
To fasten parts of wicker products, two types of joints are used: detachable and permanent. The first method will be convenient when you plan to disassemble the furniture, for example, for transportation. However, it should be noted that it is rarely used. The second type of connection is more popular. In this case, conventional fasteners (nails, glue) are used, which makes the finished structure more durable. Plus, this method is much easier to use, especially for a novice weaver.
Return to contents
Frame making
You can make any thing from willow branches with your own hands. A small wicker sofa will always be appropriate both in a country house and on a balcony in a city apartment. To do such a necessary thing, you need to prepare. To work you will need:
- Willow twigs.
- Strong sticks with a diameter of 25-30 mm.
- Sandpaper.
- Hammer.
- Sharp knife.
- Secateurs or scissors for cutting twigs.
- Roulette.
- Self-tapping screws and small nails for fastening.
- Hacksaw.
- Glue.
- Screwdriver.
- Stain.
- Foam rubber and fabric for draping the seat.
First you need to prepare the material. Remove the bark from sticks and twigs and leave them to dry. Before starting work, lightly sand the raw material to protect your hands from splinters.

Elements of wicker furniture frames: 1 – sub-brace, 2 – sub-brace, 3 – crosspiece, 4 – horseshoe-shaped leg, 5 – U-shaped leg, 6 – I-beam, 7 – I-beam with two longitudinal rods.
Making a sofa begins with creating a frame. For the future seat, 4 blanks are cut from prepared sticks: 2 x 600 mm and 2 x 400 mm. You need to fasten them together with self-tapping screws to form a rectangle.
To make the sofa more stable, it is better to install 3 legs in front and behind. For the front legs, cut blanks of a length that corresponds to the distance from the seat to the floor, for example, 400 mm. They should be attached with self-tapping screws to one side of the seat frame at an equal distance, in this case every 200 mm.
As for the rear legs, then the height of the backrest must be added to the height from the seat to the floor. For example, a height of 250 mm is selected. Then you should prepare 2 legs of 650 mm each, which will be fixed on the sides. It is better to make the leg that will be installed in the middle higher, for example, 750 mm. This will allow you to make the back with a beautiful curve. Attach the legs to the seat frame.
To decorate the backrest, you need to cut a blank that will be longer than the seat. Using self-tapping screws, secure it to the upper ends of the rear legs. The result will be a back in the form of an arc.
The frame needs to be stiffened. The same sticks that were used for the frame itself will act as stiffening ribs. Be sure to mount them at the same height. First, the lateral and middle legs are fastened together. To secure these stiffeners, it is necessary to attach 2 blanks along the length of the seat. The next step is to connect the outer legs with the middle back one. The blanks are attached diagonally. The edge that will be attached to the outer legs should be positioned at the level of the rib that fastens the back and front legs, and the other should be slightly below the seat.
Wicker weaving dates back to Ancient Egypt and Ancient Rome; wicker chairs and boxes were found during excavations. In ancient times, various baskets were woven from willow. During the Renaissance and the Middle Ages, boxes, bread bins, baskets and baskets, baby cradles, and carts were created using wickerwork. A master class on simple and quick weaving from dense wicker will help beginners quickly master the technique.
In Russia, initially, in most cases, baskets and fishing gear were woven; later, with the development of trade, weaving began to be used for packing transported goods into boxes for sale. In the 19th and early 20th centuries, before the Great Patriotic War, many factories were created in the country for growing cultivated willow and weaving furniture and household utensils from it. Entire plantations abandoned during the war began to be revived and weaving factories, mainly baskets, were created anew. There were entire villages that were engaged in wicker basket weaving.


Initially, grapevines were used for weaving, but more often in Europe and Asia flexible willow twigs were used for weaving. In addition, in Asia they weave furniture from materials such as rattan and bamboo.
Due to the fact that in today's Russia there are few masters in wicker weaving, some have become interested in how they can weave a basket from willow vine with their own hands, because there is a desire to have such a natural thing with a special aura in their everyday life or in the interior. The natural energy of this item brings coziness and comfort to your home.
Harvesting vines for weaving products for beginners
Before you start creating a wicker item, you must first prepare a vine for weaving.
You can, of course, buy ready-made rods to start weaving right away, but it’s better to learn how to prepare the material yourself, this will help later in working on the product.
For weaving, shoots of the first year of growth are used, and they are collected all year round. The branches should be cut at a sharp angle with a knife or pruning shears, so as not to harm the tree; it is more useful to leave 3-4 buds on the branch remaining on the tree. When collecting twigs, it is important to check them for flexibility: the first twig cut from the tree must be bent in the place where the thicker end is; if it is not cracked, then it is suitable for decorative weaving. Spring shoots have a very soft bark, so the bark can be removed without pre-treatment, and if the shoots were collected at another time of the year, then the rods must first be soaked for 1-2 weeks or steamed for 1-2 hours, or boiled for 20 minutes, removed bark After peeling the bark, the shoots must be dried, otherwise the rod in the finished product will delaminate and break. The rods should be sorted to make it convenient during painting and weaving. Before work itself, the vine is again soaked in water to gain flexibility.
Painting can be done with aniline dyes, a solution of potassium permanganate or herbal decoctions, immersed in the dye for a while, then the rods are rinsed with clean water and dried on a flat surface, preferably on the floor, so that there are no stains in the color.
Some rods are too thick for weaving small to medium sized items, so you will need some tools to cut the rods into narrower strips.

And a pinch or pinch helps to remove the bark from the twigs.

Mastering weaving with a simple master class
Immediately before weaving, it is necessary to soak the willow twigs in hot water, and also during work it will be necessary to moisten them with water - all this to maintain the flexibility of the twigs.
For beginners in wicker weaving, it is better to start with a simple element - from the bottom, this is the basis of many wicker items, using a photo or video master class.
It is better to take rods for weaving with a reserve, because... for beginners, the rods often break during work; soaking or wrapping with a wet rag for the bottom requires seven or more sticks with a diameter of 4-7 mm, about 20 cm long, more is possible, depending on the desired size of the bottom and thin rods (up to 3 mm in diameter) 30 pcs. and more, the length of which must be at least 50 cm. The thicker ones are used to create the skeleton (rays), and the thin ones in the form of a rope braid all the ray sticks.
The first step is to make a cross, around which weaving will then be carried out. You need to take 3 thick sticks (you can take four for each side of the cross), cut off a third of the thickness on them in the middle part and sharpen the ends from the thinner edge, for the convenience of inserting other sticks into the crack. The other three or four sticks must also be split in the middle with a knife or awl.
This should be done carefully so as not to split too much or the entire stick, because this cannot be corrected, and the product will be defective.
Then it all comes together.


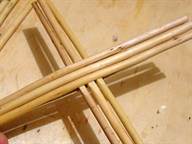
It is imperative that all the inner sticks, on which part of the thickness was cut off, be turned to one wrong side, and the fit of the outer sticks to the inner ones, in the place of the crack, should be as tight as possible.
Now you should take two thin twigs and begin the braiding process. The ends of the so-called rope must be hidden in the crack of the axial sticks.

Two twigs diverge in directions, one will first go above the axes, an arc will go under the axes, then they change position. The inner guides must be braided first.
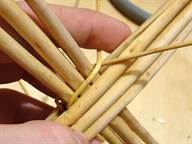

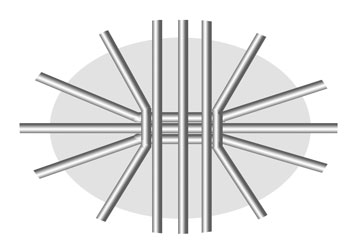
Two rows are braided (you can make three such rows of braiding), then you need to move the axes to the position of the rays, like the sun, in a circle so that the distances between all the rays are equal. The diagram in the photo below:

The braiding begins not of three sticks at once, but of each one separately in the same manner.

When the twig used to braid ends, you need to weave the next twig of similar size and color, as shown in the photo.

We must try to ensure that the ends of the finished twigs come out on the wrong side, then the front side of the bottom will be smooth and beautiful.


The twigs must be taken of different lengths so that the growth occurs evenly in different places. The larger the bottom of the product, the greater the distance between the beams of the cross, so if the product is large, you need to use more beams.
For the oval bottom of a basket or cradle, use a similar cross pattern:
Furniture for skilled hands with job description
Weaving of furniture is done by skilled craftsmen in this craft with their own hands, because it was necessary to weave a lot of different bottoms and baskets for these bottoms and gain experience. Also, to make furniture with your own hands using wicker weaving, you will need not only experience, but also a greater variety of materials and tools. Furniture requires strength, because... a greater force of gravity will act on it than, for example, on the bottom of a basket or cradle, so first a frame of sticks (2 cm thick or more) is built. Next, you need to attach racks to the frame, which will later be braided with thinner twigs or strips/ribbons of twigs; during the weaving process, perpendicular racks are regularly added for rigidity. You can braid with different types of weaving.


