And crocheted bedspreads can be called a very popular trend in needlework. There are several advantages that this type of work has. First of all, this is the obvious ease of manufacturing the fabric, as well as greater freedom of action in choosing yarn, its color and texture.
A crocheted blanket can be intended for adults or children, serve as a decorative element for a bed and sofa, or warm all family members on cool evenings.
Types of bedspreads and blankets that can be crocheted
The good thing about creativity is that you can make something out of nothing. This fully applies to the manufacture of bedspreads. As many craftswomen there are, there are as many options for making this product. However, we can list a few of the most common types of bedspreads that are available for crochet:
It’s worth mentioning the last point right away: such blankets are most often knitted for children, so they have the shape of a butterfly, ladybug, bear, or just a huge flower with petals. The production of such products does not lend itself to any patterns and is planned individually in accordance with the craftswoman’s idea.
Other types of bedspreads can be square, round or oval. They are knitted from cotton (if using an openwork crochet bedspread pattern), wool or wool blend yarn (if the product should be not only beautiful, but also functional).
Square bedspread: circular rows
The rectangle is the most common and convenient shape to use in crochet. It is difficult to spoil it, since you need to try very hard not to build four identical faces with the simplest expansion at the corners. There are a wide variety of square crochet bedspread patterns. They are suitable for composing a fabric from fragments, and for knitting one large square. 
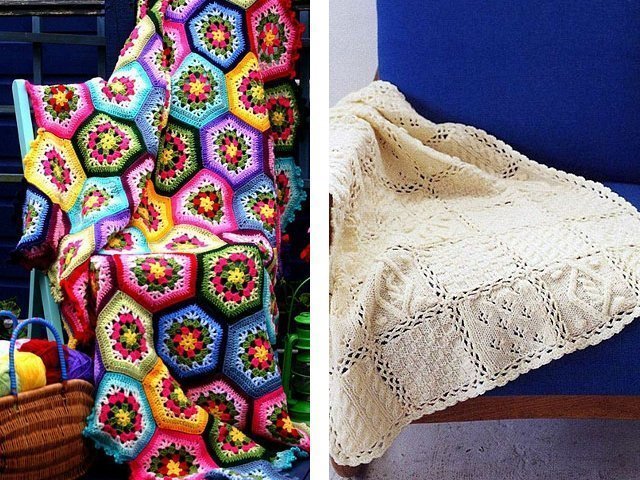
Don’t be afraid that the square patterns have no more than 20 rows. They can be very easily adapted to your needs, for example by repeating several openwork or continuous rows as many times as needed. You can use rows not only from one scheme. The beauty of this technique is that all circular rows in square patterns are designed taking into account the correct expansion, so you don’t have to worry about violating the proportions of the future bedspread. When working on a large square, you need to ensure that the colors are balanced. The photo above is a great example of good shade selection. Here two colors of the same tone are used (blue and green), light green and white, which gives them all contrast and brightness.
Bedspread knitted in one piece
Literally every craftswoman can do this kind of work. All you need to do is make the right calculations and make sure you have enough yarn. Next, you should cast on the required number of loops and knit according to the chosen pattern until you obtain the fabric of the required size. 

The only subtlety when performing such work is maintaining a smooth edge. Accidental reduction or addition of fabric should not be allowed.
Crocheted square bedspread: working with motifs
A square or rectangular bedspread, consisting of several dozen fragments, always looks very impressive. For many household members and guests of the house, the enormous amount of work that the craftswoman has done is obvious.
Square crochet bedspread patterns can be found literally everywhere, and it is not at all necessary to use the old classic patterns. To be honest, everyone is already tired of them. Modern openwork or solid patterns used for such a traditional thing as a crocheted bedspread will be the key to creating an extraordinary product. You won’t be ashamed to show off his photos on social networks!
The diagrams below offer patterns for knitting bedspreads. 
Here is the simplest diagram with a flower in the center. It is perfect for making a bedspread from The fragment is small, and if desired, it can be expanded using the method described above. However, if the craftswoman plans to use the remains of different yarns for knitting a product, you can use this pattern in its original form.

The next motif is designed to obtain a dense fabric. Such crocheted bedspread patterns can be extended indefinitely, repeating the penultimate row. The last row is performed only at the end of knitting the fragment, as it smoothes out the corners formed when knitting the previous rows. This scheme is quite complicated at first glance, but it is not difficult to understand. For convenience, the rows are painted in different colors. A diagram of an openwork fragment for creating

Connection of motives
The stage that completes the crocheting of a bedspread is the assembly of the steamed fragments. This can be done with a needle or crochet. It is highly not recommended to knit motifs while knitting the last row. Quite often it is necessary to adjust the shape or size of fragments, especially if they are made of different patterns and from different yarns. It is more convenient to make any adjustments before the motives are collected.
At the end, the bedspread can be tied with a beautiful border or several rows of a dense pattern. This “frame” gives the product a finished look.
A blanket crocheted from squares will decorate any interior. This product looks stylish, beautiful and quite original. Don’t know how to crochet a blanket from squares because you don’t yet have experience creating such hand-knitted items? Making it is not difficult at all, just follow the following scheme.
Crochet blanket from squares: materials and pattern
For such a product you will need the following materials:
- yarn - thick thread is best, which contains both synthetics and wool; for this blanket you will need 200 g of gray yarn and 100 grams of red and yellow yarn;
- a hook with a number that matches the yarn you have chosen;
- needles with a large eye (if you decide to sew motifs rather than knit them together).
This blanket consists of individual squares of different colors, knitted according to the “Granny Squares” pattern shown below:
A total of 20 such elements need to be connected. A product consisting of such a number of squares is small and suitable for a child. If you want the blanket to be larger, the number of individual elements must be increased.

Description of the pattern: there is nothing complicated in knitting a blanket; the element consists of air loops, single crochets and double crochets.

Everything is very simple, so this is the best option for a blanket crocheted from squares for beginner needlewomen.

Start knitting the product with yellow yarn. Cast on five air loops and close them into a ring.

First row: dial 3 v. p. (chain loops) to lift a row, knit 2 tbsp. With. n. (double crochet), 2 in. p., then repeat ⃰ 3st. With. n., 2nd c. n. ⃰ - three times.

At the end of the row, it is important to move to the hole that was formed at the beginning of knitting using air loops.

This is done by knitting connecting posts.

Second row: switch to red yarn. Make 3 in. lifting point. Then knit according to this pattern: ⃰1 in. p., 3 tbsp. With. n., 2nd c. p, 3 tbsp. With. n. ⃰ - repeat rapport 4 times.

Third row: knitted with yellow yarn. Follow the pattern above, the knitting principle is the same as the previous two rows.

Fourth row: change the yarn color to red.

This row is knitted in single crochets; 2 chain stitches must be knitted at the corners.

Fifth row: switch to gray yarn. It is knitted in single crochet stitches in each stitch of the previous row.

Two air loops should be knitted in each corner of the square.

Be sure to ensure that there are the same number of posts on each side of the square.

Row 6: Return to the Granny Square pattern.

As before, you need to knit “fans” from 3 tbsp. With. n., on each side of the element there should be five “fans”.

The last row consists of single crochets, they are knitted with red or yellow threads.

For a children's blanket, you need to knit ten squares with a red and a yellow edge.

A blanket crocheted from squares using this pattern can be assembled in several ways.

You can crochet them by first placing the elements tied with yellow and red yarn one after another.

You can also use a thick needle to sew granny squares together.

The finished blanket needs to be steamed with an iron so that all seams are even and smooth.

This processing allows you to align all the elements, so you don’t need to worry if some squares are slightly deformed when joining.

When all the elements are combined into one product, the finished blanket should be tied in single crochets with yellow yarn.
Blanket of squares crocheted from a corner (with diagram)
A crocheted blanket made from squares knitted from a corner is another favorite product of many knitters.
To make such a product yourself, you need to follow the diagram on how to crochet a blanket from squares, presented below:

Knitting a motif must begin with a ring of four air loops.


1st row: 3 in. p., 2 tbsp. from N., 2nd century. p., 3 tbsp. With. n., 3rd c. P..


When these elements are knitted, make 3 air loops and turn the knitting over.


2nd row: it consists of double crochets in each loop of the previous row, and in the corner of the square above the “arch”, consisting of 2 chain loops, you should knit: 2 tbsp. With. n., 2nd c. p., 2 tbsp. With. n.


So you should knit all subsequent rows to the desired square size.


If desired, the colors of the yarn can be changed at your discretion.


The finished squares must be tied with double crochets with yarn of a contrasting color in relation to the main product, and connected with a hook or needle.
Floral plaid made of squares

If you have a little daughter or niece, knit her a beautiful floral blanket from squares.
First you need to knit the chamomile:

First row: ⃰st. from 1st century, 2nd century. n. ⃰ - repeat rapport eight times.


Second row: above each “arch” of air loops, knit 5 tbsp. from 1 n., between them 5 c. P.


Third and fourth rows: knitted in a spiral according to the pattern, one row smoothly transitions into the other.


From the fifth row, start knitting in reverse rows on both sides of the square motif.


When you have knitted the required number of flowers in a square to make a blanket of the appropriate size, sew or crochet them.
These and other ways to crochet a blanket from squares are in the video below:
We always associate a blanket with home comfort and warmth. On a cold day, it’s so nice to cover yourself with a blanket or wrap your frozen feet with it.
Plaid can play not only its main role - keep the owners warm. It can also become an integral part of the interior. A crocheted blanket, multi-colored or plain, wool or cotton, will look great in the living room or bedroom and will give your home a unique and unusual look.

Such a cozy design detail will be appropriate both in warm and cold seasons, in an apartment and, especially, in a country house or in a house in the village.


You can cover your bed in the bedroom with a blanket. It will perfectly emphasize the comfort of the room where you relax. During the day you can lie on top of a blanket with a book or take a nap, and if it’s cool, you can cover yourself with it without dismantling the bed. A blanket is sometimes used not as a bedspread, but as an addition to it.

A neatly folded handmade blanket will create a cozy atmosphere in the bedroom or living room. Knitted with contrasting threads matched to the color of the upholstery, it will look great on a sofa or deep armchair. You can choose or make sofa pillows to pair with the blanket. The blanket can also be the same color as the furniture - so it will not be conspicuous as an addition to textiles or carpet.
In addition to the fact that this way you will focus on the color spots in the design, it is also possible to hide some furniture defects if they exist. It will also be great to cover upholstered leather furniture with a beautiful blanket - it will be elegant and not so cold to sit on it.

What can you knit a blanket from?
You can knit a blanket from wool, cotton and acrylic threads, or combining these threads. In the latter case, the blanket will not only be warm, but also practical - after all, synthetic threads are more wear-resistant. A blanket made only from acrylic threads will last longer, it may have a richer color palette, but it will accumulate static electricity and will not warm you up like a natural one.
![]()
For winter, it is better to knit or purchase a wool blanket. At the same time, the looser the blanket pattern is, the more air there will be between the fibers, and the better it will warm.

For ethnic decoration of a room - bedroom or living room blankets with bright national patterns in cheerful colors will be nice. For a classic interior, an elegant, discreet blanket made of cotton or linen yarn in natural colors with a geometric pattern or relief patterns is more suitable. You can decorate a plaid with fringe, a deliberately “disheveled” edge, or fringe gathered in a tassel.

Crochet blankets - photo

In the general knitted trend, which triumphantly appeared a couple of seasons ago, it stands out especially clearly in its beauty and functionality. knitted blanket. Although, on the other hand, we don’t know how it is in Western countries, but we have traditionally used this technique, giving preference to skillful needlework over faceless textile bedspreads. Today in the article we will not only look at beautiful examples of what can be made using knitting needles and a crochet hook, but also at ideas for simple products that you can easily make with your own hands.
Knitted bedspreads
As mentioned above, they are experiencing a real boom in popularity. They are used next to the most expensive furniture and home textiles; not only sofa cushions, but also all kinds of interior details are decorated in canvas. But exactly knitted bedspreads and a sofa have become the best ways to both follow a fashion trend and get a truly functional item that will serve you for many years, despite the variability of fashion.
Size knitted bedspread, buy which you can not only in specialized stores, but also order from craftswomen on an individual project, ranges from a very large one, which can cover an entire double bed, to a small blanket. A small product is placed on top of the main bedspread, for example, cotton or quilted (which perfectly protects the bottom layer and bed linen from dust and dirt). A small blanket has a number of advantages, and, first of all, its price. It is directly proportional to the size of the rug, since the work and material are doubled, and working with a huge canvas will be much more difficult.
If knitting is not one of your skills, then you can do things a little differently and find a compromise between buying and sewing. The fact is that many fabric stores sell ready-made knitted or knitted fabric, which is made by machine knitting. You can buy the required number of centimeters in width for yourself, and if the roll has a standard length, you will get a wonderful blanket. All you need is to process the cuts using an overlocker or, for example, a satin bias tape. The combination of knitted fabric with light silk or fabric of bright, colorful coupons also looks very nice. In this case, the fabric is simply sewn to the knitwear and on one side the bedspread will have one look, suitable, for example, for, and by turning it over, you can give the bedroom a spring-summer mood.

For those who held knitting needles and a hook much later than in school craft lessons and understand diagrams and step-by-step recommendations no worse than the plots of their favorite TV series, it will be more financially profitable to make the entire product with their own hands. Judge for yourself, all you need is a master class on knitted blanket, diagram which is in any issue of the knitting magazine. You can not only choose threads that perfectly match the color and texture, but also cover exactly the surface that you need, that is, knit a blanket according to individual sizes.
The ability to knit yourself is especially valuable if you want to make beautiful and large knitted blankets for the sofa, which, as you know, has a very individual shape. Using the measurements taken from the sofa, as well as additional fasteners in the form of elastic bands or special tapes, ribbons and ties, you can make a cover that will not fall or slide off the back of the sofa, while it will have a fashionable knitted texture. Buying a ready-made cover that will fit exactly your sofa model is an almost impossible task. We have already discussed this in one of the previous articles.
Knitted blanket
The easiest and fastest way to transform a room in accordance with fashionable design is to do knitted blanket. Even simple rows of columns, in which there is nothing complicated or intricate, end up looking very elegant and this will be confirmed by the photos that you will see below.

There is one secret that will help you complete the task in record time. We are talking about large yarn and large knitting needles. Knitting on them can be equated to physical exercise on a small exercise machine. Yes, and some skill is needed. But it will appear in the process of needlework quite quickly. Of course, there is nothing complicated in such a canvas and the centimeters will simply grow before our eyes with each new row, but even here you need to remember the main rule. The simpler the pattern you choose for the product, the more standard the pattern, the more accurate the knitting overall should be. Try to ensure that all the loops are the same size and do not be lazy; if any loop in the row is knocked out or different, tie the entire row. Due to its large size, each loop will be examined as if under a microscope, so flaws will definitely be noticeable.

You can see how beautiful such handicrafts can be in the photographs illustrating this section. As you can see, large loops do not require any additional decor and the main trend for them is light, neutral shades, which make it possible to examine and appreciate the wool texture. Such a thing is indispensable for a fashionable interior in the Scandinavian style or in the loft style; it is something that brings the right mood, and is relatively inexpensive.

Crocheted bedspreads
And here crocheted bedspreads will be useful to us if we want to learn, or Provence, that is, in such styles for which the spirit of antiquity is rather a plus than a minus. Such blankets often do not have the function of blankets in which it is pleasant to wrap yourself up on a cool autumn evening, since they cannot be too warm due to their openwork. But their appearance, which in some way makes them similar to lace, allows you to get a very interesting visual effect and transform a bed or sofa.

It is worth creating a continuous fabric with crochet when we are talking about a small-sized product, because with crochet you will have to make many more loops and it will be more difficult to keep a straight shape. But in this case, you can use the technique of connecting parts, when you first make many circular motifs, and then, with the help of additional columns, they are connected into a single whole.

When choosing a suitable pattern for yourself, you should know that each of them can be embodied on yarn of any quality; the overall size of the future craft will depend on the thickness of the thread, but the pattern, scale, and ratio of all elements will remain the same. So you can even take a pattern that is suitable for a small tablecloth, just knit it not with iris threads or other similar cotton material, but use thick woolen threads and you will get a great crocheted bedspread. Scheme There are both simple and complex ones, choose them depending on your skills. You just need to remember that even a simple scheme can give a spectacular result if you take care of the appropriate decor. For example, in one example you can see the bottom of the canvas decorated with small tassels. You can make them yourself; there is nothing complicated in making them, or you can buy them ready-made at a hardware store. There you can also buy fringe, twisted cord, complex piping, and appliqués that you can sew on the bottom of the blanket.

DIY knitted bedspread
You can make sure if you dare to make hand knitted bedspreads that it is no more difficult than sewing fashionable ones. It is these techniques that will allow you to get a completely individual interior, unlike any other. However, often for inspiration we need a serious reason or a small task in which we could practice beforehand. An excellent reason can be the need to make a small blanket for a baby in a stroller or crib. Its size is small, the degree of ostentation also allows you to experiment and train, but having mastered a small product, it is quite possible to move on to larger ones.

Price for baby knitted blanket, which they offer to make to order according to the chosen model, turns out to be quite high. And for those needlewomen who have already developed a certain circle of clients, having proven the quality of their work, you will also have to wait a considerable amount of time until it’s your turn to order. It’s much easier to try knitting a small blanket that will help you decorate a stroller or create a warm corner for your baby.
An important condition for any such work is the responsible choice of yarn. It’s even good if you still do everything manually, since this will be the best way to control the quality of the material. Stores sell special hypoallergenic yarn that does not irritate children's delicate skin. In addition, you must buy such material for children's knitted bedspreads so that they do not shrink or become deformed during washing, since they will need to be washed as often as other children's things, especially if you take the bedspread outside.
Knitted blankets and bedspreads

Beautiful knitted blankets and bedspreads, which you saw in today’s article, should definitely inspire you to new handicraft achievements. If you are confused by the number of patterns and lessons on the Internet and in magazines and want to choose just one, then we offer an excellent option - a bedspread with a pattern of squares.
![]()

In fact, such grandmother’s handicraft is a traditional craft, akin to those openwork bedspreads that are crocheted. It was easier to make several squares and then combine them into a single canvas. You can make identical squares, you can play around with colors, or even make them individual for each square. The good thing about this product is that you can increase its size and length even as you use it.
Hello dear readers.
For craftswomen who are looking for patterns for a crocheted bedspread, I present a whole selection in which you can find motifs for every taste and color.
The work will be painstaking, but it will be worth it.
Crochet bedspread patterns
I found this selection in the English crochet magazine Crochet Monthly . For beginner knitters, let me clarify that all bedspreads are assembled from motifs, the diagrams of which are provided in the article. The motifs can be crocheted or sewn with a needle.
Crochet bedspread "Chamomile"
Crocheted blanket made from motifs. It is advisable to do it in light colors.

Crochet bedspread "Lily"
The motifs need to be connected using single crochets, which need to be knitted from the wrong side of the product.


Crochet bedspread “Floral romance”


Crochet bedspread “White tenderness”
Bedspread made of motifs. Made with crochet.
The number of motifs for the bedspread pattern is not determined; this nuance will depend on the width of your future bedspread.
In this example, 12 motifs are connected.


Crochet bedspread "Ruby"
For this knitting pattern, a cross means: four single crochets in a row. Next comes fillet knitting.


Bedspread “Spiderweb”
It is advisable to make this knitted blanket with a strong thread (like “Iris”) so that it does not become deformed later.
Also, after finishing knitting (and after each wash), it is advisable to starch it.


The motifs shown in the knitting patterns can be used. The difference between them will be in the threads used.
I hope, dear readers, that something caught your eye and you can make your dream come true.
Good luck with your knitting and good mood!!!
Some craftswomen prefer to knit large items only with crochet, since the peculiarity of this method allows them to achieve beautiful openwork patterns on blankets, and the delicate, almost jewelry-like work is very much to the liking of those who like to create beautiful things from details.
Crocheted blankets will perfectly warm adults and small children, the main thing is to choose the right yarn. Another important function of blankets is to decorate the home and create the right mood. All this directly depends on the shape and method of crocheting, which we will look at in detail in this article.
Crocheting a blanket with patterns and descriptions
There are a huge variety of crocheted blankets, as are the styles of knitting these warming blankets. Even the simplest patterns look interesting on blankets, and are sure to be associated with one’s father’s home, warmth and care.
But you won’t surprise experienced needlewomen with simple patterns; interesting openwork motifs, patchwork-style blankets of incredible complexity and beauty, thin and delicate bedspreads for newborns, which are so interesting to pore over, have been invented for them. In this type of needlework there is a job for every interest and request. But let's start learning from the basics - the simplest patterns and patterns for crocheting blankets.
Master class for beginners
In any business you have to start somewhere to learn. And to learn how to crochet a blanket, a master class for beginners is ideal. This blanket, completely made in the “granny square” style, will delight both adults and children. Let's look at how to knit it using step-by-step instructions as an example.
Popular articles:
Tools:
- Yarn (in this case bright green, yellow and brown);
- Hook;
- Needle.
Abbreviations for knitting pattern:
- VP - air loop;
- RLS - single crochet;
- CCH - double crochet;
- SS - connecting column.
Work progress with step-by-step photos:
You need to start knitting with the main color of the blanket. We close six loops into a ring, then make three VPs and knit two more Dcs into a ring. We make two VPs (photo 1). After this, we crochet three DCs into a ring and make two VPs. We repeat two more times, resulting in a square being knitted (photo 2).

After this, we make three VPs (this is the first CCH) and in the corner in the arch we will make three CCHs, two VPs and again three CCHs (photo 1). We will knit this into the remaining arches. We will finish the last one with two dc and sl st (remember that the first stitch at the very beginning was knitted in the form of three VPs) (photo 2).

We knit a new row of squares and make three VPs from the arch in which we have the hook. We knit two dcs into it. Next we move on to the corner. And we knit into it everything that we knitted in the previous row: three DCs, two VPs and three DCs (photo 1). In the next arch we simply knit three DCs. And so on in a circle (photo 2).

In the corners you will always need to knit the same thing. And in the arches that are located on the sides of the square, we always simply knit three DCs. As a result it turns out to be a so-called granny square. We knit several rows for the desired size of the blanket. And, completing the granny square, we will change the color of the thread to yellow (photo 1). We knit two rows in yellow. And one more row in green. And then we’ll tie the edges. We will knit seven sc in one arch, and one sc in the other. And so we alternate the binding throughout the blanket (photo 2). Let's finish tying it in green. We will make three VPs and knit one sc in each stitch (photo 3).

Plaid decoration
To decorate this simple, but undoubtedly cute blanket, you can crochet a small decorative element, for example, a butterfly. This is how you can create it:
- We knit five VPs and close them into a ring. Next we knit three VPs and another DC. We make two VPs. And two more CCHs. In total we need to knit this eight times. That is, we will get sixteen CCHs.
- Let's move on to the arch from the VP. SS We knit three VPs and perform two DCs here. We perform three VPs and under the same chain we knit three CCHs. This is how we knit under all the arches from VP.
- Now let's attach the brown yarn. We knit six DCs under the VP chain. We make one VP and here we perform six more CCHs. We skip the bottom three dcs and knit a sc.
- And in the next chain we knit everything the same as we knitted before.
- We tie our butterfly with yellow yarn. We knit one sc in the six underlying stitches and one sc under the VP. We make picot from three VPs. And so we tie the whole butterfly.
- Fold it in half and secure it with a brown VP chain. Now you can sew it to one of the corners of the finished blanket.

How to knit a baby blanket with a simple pattern
Very often, people resort to knitting just to create a crocheted children's blanket with an original design for their baby. Many people try to crochet a blanket with a pattern and color that will not look like any other blanket. And this is a completely doable task, because when crocheting a blanket, the result will definitely be an interesting and beautiful product, even if made with the simplest pattern - for example, with embossed columns.

Tools:
- 8 skeins of 50 g of wool mixture or bulky synthetic yarn in white (A);
- 8 skeins of 50 g of wool mixture or bulky synthetic yarn in blue (B);
- hook No. 3.5.
Knitting density: 20 loops x 11 rows = 10 x 10 cm (raised stitches).
Size: 75 x 100 cm.
Basic pattern
A raised stitch is crocheted like this: yarn over, insert the hook (from front to back) under the post (leg) of the previous row, pull out a loop, grab the thread and pull it through the first 2 loops on the hook. Grab the thread again and pull it through the remaining 2 loops.
Work progress and knitting pattern

Using white yarn we knit the initial chain of 145 VP.
Base range: 1 dc in 3 ch from the hook, 1 dc in each ch to the end, 144 loops are knitted. 1st row: 2 VP for lifting, *relief. Art. around stitch of previous row, dc in dc of previous row, repeat from * to last stitch, 1 rib. Art. around the loop of the previous row.
Let's turn the work around.
Next we knit 7 rows according to the pattern. Cut the thread (A). We knit thread (B) according to the pattern of 8 rows. Cut the thread (B). Next, knit 8 rows using thread (A) according to the pattern. Repeat the stripes until 96 cm are knitted.
Harness
To tie the edge of the finished product, use thread in color (B).
1st-4th rows(wrong side): 1 VP, sc to end of row. In the corners of the finished product, knit 3 sc in the sc of the previous row.
Then knit 1 row in a crab step (sc is worked from left to right, not right to left) around the entire outer edge of the product.
Finish knitting a double crochet stitch (half crochet) in the 1st sc. Fasten the thread.
Made from soft yarn for newborns
A very responsible job is to crochet a blanket for a newborn. A warm blanket for a baby should be soft, warm and definitely beautiful. The airiness and delicacy of the yarn for a newborn will give the product a special look that will be remembered by young parents for the rest of their lives, because they will remember the baby during discharge from the hospital in this very blanket, created by caring hands. This blanket is suitable for both girls and boys. It can be used both at home and for walks with a stroller.

Tools:
- 325 g of white yarn for knitting children's clothing;
- hook No. 3.5.
Knitting density: one motif = 4.1 x 3.8 cm (fancy pattern in the central part).
Work progress and knitting pattern
central part
It is knitted as follows: a chain of 171 loops is cast on and 73 rows are performed in a fantasy pattern in accordance with the diagram and explanations for the symbols accompanying it. 
Harness
At the end of the 73rd row, without cutting the thread, knit the 6th circle. rows of shells (2 dc (dc), 3 ch (chain loops), 2 dc), making additions in each corner, as shown in the diagram. Replace the last 2 VPs of the 1st and 2nd rounds. rows of 1 hdc (half double crochet), knitted in the 3rd of 3 ch, replacing the 1st dc. Close the 3rd - 6th circle. rows 1 SS (connecting stitch) in the 3rd VP from the beginning, and move forward, knitting extra. SS on the arch of the 1st shell.
After this, knit 4 rounds. a row of arches of 6 loops without increases or decreases, 1 circle. a row of simple shells (1 dc, 5 ch, 1 dc) separated by arches of 5 loops. Make fans of 13 DC in each simple shell. Replace the last 3 VPs of the 7th - 9th circle. rows of 1 dc, knitted on the 1st sc, and the last 4 ch of the 10th circle. row - 1 C2H, close the 11th and 12th circle. rows like the 3rd circle. row, and perform another SS in the 1st arch at the end of the 11th round. row. Complete 1 lap. next to the “crawfish step” pattern, as stated in the explanation, close 1 SS in the 1st RLS and cut the thread.

Openwork of motifs
Lovers of beautiful designer items will love the openwork plaid made from crocheted motifs, which is fun and interesting to work on. The result will be a very beautiful product that will decorate the sofa in the living room or the bed in the bedroom, while warming and giving warmth on cold evenings. For example, you can knit a blanket from large floral motifs, which then need to be combined into a single whole.

Tools:
- Novita Isoveli yarn (75% wool, 25% polyamide, 65m/50g) - 2300g yellow-green color (334) or Novita Napko yarn (50% cotton, 50% acrylic, 104m/100g) - 1800g blue (013);
- hook No. 5-6.
Finished product dimensions: blanket made from Isoveli yarn -140 x 210 cm; blanket made from Napko yarn -110 x 180 cm.
Knitting density: the diameter of one motif is 17 cm.
Work progress and diagrams
The blanket consists of separately knitted full and half motifs. For a complete motive, dial a chain of 6 VPs, close it in a SS ring. 1st row - cast on 3 VP lifts, knit 1 DC, 2 VP, *2 DC, 2 VP* into the center of the ring, repeat *-* 4 more times, close the SS row. Next, knit according to pattern 1 from the 2nd to the 5th rows. Cut the thread and fasten. Knit 104 motifs with Isoveli thread or 67 motifs with Napko thread.

For a half motif, cast on a chain of 4 ch, close it in a SS ring. 1st row - VP, 2 SSN, 2 VP, 2 SSN. Next, knit in straight and reverse rows according to pattern 2 from the 2nd to the 5th rows. Cut the thread and fasten. Knit 8 such motifs with Isoveli thread or 6 motifs with Hanko thread.
Assembly
Lightly steam each motif. Connect the motifs to each other according to diagram 3 (motifs made from Hanko yarn are highlighted in grey). For a blanket made from Isovely yarn, crochet the fringe. To do this, cut the threads 45 cm long, fold them into 3 pieces and tie them at the edges. Make 7 tassels for each motif.

Knitted blanket made of squares
A very fashionable phenomenon that is loved by designers and tasteful housewives is a crocheted blanket made from squares in . There are a huge number of crochet patterns in a wide variety of geometric shapes for patchwork, most of which look very interesting in their mishmash of colors and patterns, while others are elegant in one color but made with different complex motifs. Such a playful and uplifting blanket will look good not only in the nursery, but also in the living room, and in a chair on the balcony. In addition, you can give it to friends or relatives - let them also be happy.
Let's look at this blanket made of squares, which is easy to knit according to step-by-step instructions.

Tools:
- yarn - 200 g dark blue SMC BRAVO;
- 100 g each of beige, orange, red, lilac, green, blue, brown, yellow and pistachio yarn SMC BRAVO;
- hook number 3.
Main pattern - square
Knit a chain of 6 VPs and close it into a ring using 1 SS. Knit a circle. in rows. Every circle. The row begins with 3 VP lifting and ends with 1 SS in the VP lifting of the previous row. Attention! 2 CCH + 2 VP + 2 CCH are designated in the instructions as a group of CCH.
1st circle. row: 3 dc, 2 ch, * 4 dc, 2 ch, repeat from * 2 more times.
2nd circle. row: 3 CCH, in an arch of 2 VPs, tie a group of CCHs, * 4 CCHs, in an arch of 2 VPs, knit a group of CCHs, repeat from * 2 more times.
3rd circle. row: 5 Dcs, in an arch of 2 VPs, tie a group of Dcs, * 8 Dcs, in an arch of 2 VPs, tie a group of Dcs, repeat from * 2 more times, 2 Dcs.
4th circle. row: 7 CCH, in an arch of 2 VPs, tie a group of CCHs, * 12 CCHs, in an arch of 2 VPs, knit a group of CCHs, repeat from * 2 more times, 4 CCHs.
5th circle. row: 9 CCH, in an arch of 2 VPs, tie a group of CCHs, * 16 CCHs, in an arch of 2 VPs, knit a group of CCHs, repeat from * 2 more times, 6 CCHs.
6th circle. row: 11 CCH, in an arch of 2 VPs, tie a group of CCHs, * 20 CCHs, in an arch of 2 VPs, knit a group of CCHs, repeat from * 2 more times, 8 CCHs.
7th circle. row: 13 CCH, in an arch of 2 VPs, tie a group of CCHs, * 24 CCHs, in an arch of 2 VPs, knit a group of CCHs, repeat from * 2 more times, 10 CCHs.
8th circle. row: 15 CCH, in an arch of 2 VPs, tie a group of CCHs, * 28 CCHs, in an arch of 2 VPs, tie a group of CCHs, repeat from * 2 more times, 12 CCHs.
9th circle. row: 17 CCH, in an arch of 2 VPs, tie a group of CCHs, * 32 CCHs, in an arch of 2 VPs, tie a group of CCHs, repeat from * 2 more times, 14 CCHs.
10th circle. row: 19 CCH, in an arch of 2 VPs, tie a group of CCHs, * 36 CCHs, in an arch of 2 VPs, knit a group of CCHs, repeat from * 2 more times, 16 CCHs.
11th circle. row: 21 CCH, in an arch of 2 VPs, tie a group of CCHs, * 40 CCHs, in an arch of 2 VPs, knit a group of CCHs, repeat from * 2 more times, 18 CCHs.
12th circle. row: 23 CCH, in an arch of 2 VPs, tie a group of CCHs, * 44 CCHs, in an arch of 2 VPs, knit a group of CCHs, repeat from * 2 more times, 20 CCHs.
Cut and fasten the thread.
Assembling motifs into a plaid
Knit 54 multi-colored squares. Connect the edges of the squares to each other, working across each other. side 1 row sc with dark blue thread. For the blanket, assemble 6 x 9 squares in the desired order.
Make a circle around the perimeter of the blanket. a row of dark blue thread border. Every circle. start the row with 3 VP lifting instead of 1 SSN (or 2 VP lifting instead of 1 SBN) and end with 1 SS in the last VP lifting of the previous row. Attach the thread to the beginning of the corner square and knit as follows.
1st circle. row: ** 2 dc, * 4 ch, skip 2 base loops, 4 dc, repeat from *, before the next corner knit 4 ch, skip 2 base loops, 2 dc, then tie a group of dc into an arch from 2 ch of the previous row, repeat from **on each side of the bedspread.
2nd circle. row: perform 1 dc in the next loop, ** 4 dc, * 4 ch, skip 4 base loops, 4 dc, repeat from *, before the next corner knit 4 ch, skip 4 base loops, tie a group of dc into an arch from 2 ch of the previous row , 4 VP, skip 4 base loops, repeat from **.
3rd circle. row: ** 1 Dc, 4 VP, * 4 Dc, 4 VP, skip 4 base loops, repeat from *, before the next corner knit 4 VP, skip 2 base loops, tie the Dc group into an arch from 2 VP of the previous row, 4 VP, skip 2 base loops, 3 dc, repeat from *.
4th circle. row: ** 1 RLS, * 4 RLS, 4 RLS, repeat from *, 4 RLS, 2 RLS, 4 RLS in the arch of 2 VPs of the previous row, 2 RLS, 4 RLS, 3 RLS, repeat from **. Cut and fasten the thread.
Video lesson
For beginning needlewomen, it is always better to first watch several video instructions on how to work with a crochet hook, especially when it comes to such an important task as a blanket for a newborn baby.
Video “crocheted blanket for a newborn”:
Knitting blankets- it’s a pleasure, during this process, you can imagine what a beautiful result will be, which will not only decorate your favorite sofa, but also give you cozy warmth in the evening in front of the TV. Knit a blanket simply from motives, then combining them into a whole canvas.
When knitting motifs, you can use different colors of yarn; these can be accumulated remnants of threads in contrasting colors - they will make a bright, cheerful blanket or selected halftones of the same color to knit a more restrained blanket.
I suggest linking plaid of square motifs with a lush flower in the center, which is highlighted with orange yarn, the orange will be accompanied by yellow yarn and, to balance this variegation, gray yarn for the base. About 1000 grams of yarn made a small blanket measuring 80 x 125 cm. Select a large hook.

Crochet square motif:
At the beginning of knitting the motif, it is necessary to form a ring of thread.

Then insert the hook into the ring, pull out the working thread, grab the thread with the hook again and knit the first stitch from the ring. Do 2 more airs. lifting loops.


Knitting the first row of the motif forms a flower, the petals of which are lush columns, there are eight in total. To knit the first lush stitch, yarn over the hook, then insert the hook into the ring, grab the working thread and pull the loop to the height of the instep loops. Yarn over again, insert the hook into the ring, grab the working thread and pull out the second long loop. Next, grab the working thread with your hook, knit all the loops on the hook and complete the fluffy stitch by once again grabbing the thread and knitting it.


Between the lush columns, knit arches of three air. loops

For the second puffy stitch, repeat 3 times: yarn over, pull out a long loop. Then knit all the elongated loops on the hook and again to complete the fluffy stitch.


Having knitted 8 lush columns from the ring, finish the first row with 3 air. loops.

Now tighten the ring by pulling the free end of the thread.

Secure it by knitting a connection from the center. a column from which you pull the end of the thread.

To complete the first row of the motif - a lush flower, make a connection. column from the top of the first lush column. Cut the thread and secure it by pulling the end out of the loop. You can disguise the end of the thread by pulling it through the loops of the next arch.


First knitting the second row let's attach a new thread. To do this, make an initial loop on the hook, insert the hook under the arch, grab the working thread, pull out the loop, grab the working thread with the hook again and knit the first stitch.


To hide the tip of the new thread, turn it in the direction of knitting, and then make 2 more air. lifting loops. When knitting the next two double crochets from under the arch, tie the ends of the threads and then cut them.


Having knitted the first group of stitches, make one chain loop and *knit 2 groups of three double crochets from the next arch, with 3 chain loops between them, thereby forming the first corner of the square. Next is one air loop, group of 3 tbsp. s/n from the next arch. Repeat from *. Finish knitting the second row by forming the fourth corner of the square.

Make one chain stitch and a connecting post from the last lifting loop. Cut, fasten the thread, and pull the tip in the direction of knitting.

A simple square for a blanket or shawl
Its beauty lies in tying an openwork border onto a classic base. You just need to connect such patterns using small motifs (crocheted) and squares. Their schemes are as simple as possible.
In a ring of five loops, tie 8 connecting posts. Eight chain stitches, two double crochets. Then repeat 5 chain crochets and two double crochets three times. Complete the row with another column and close it into the third air stitch of the first eight.
The next row starts with three stitches and two double crochets. Behind them are 5 airborne ones. The row continues with six double crochets. Two repetitions: 5 air and 6 columns. Again five double crochets and 3 double crochets, close the circle.
Last row of square: 3 chain stitches, 4 double crochets. Then 5 chain stitches and already 10 double crochets. Continue with two repetitions of 5 air and 10 columns. Complete the row with 5 chain stitches, 5 stitches and close it into the third chain stitch of the beginning of the row.
Now the openwork binding begins. The first is the “slide”: a connecting stitch, 4 chain stitches, 3 double crochets closed with one loop, 4 chain stitches and a connecting stitch in the last stitch of the previous row. After 6 connecting posts in the arch of air loops, tie two more such “slides” in a row. Repeat this pattern until the end of the row.
In the next row above the slide you need to knit: 3 air stitches, a connecting stitch at the top of the slide, 3 air stitches, a connecting stitch at the base of the slide. The corners of the pattern are formed by three arches of three air loops and connecting posts between them.
For filling small squares. Knit 8 connecting posts into a ring of 5 loops. This is the first row. The second (also the last) will be formed by arches of 5 air loops, completed with single crochets.
Such motifs are connected in “slides”, and small squares are sewn in the voids between them.
Openwork round pattern
A ring of six loops is the basis of this crochet pattern. The motives may then be different. One of the options is presented below.
The first row needs to be filled with 15 alternating with one air. They will require 4 lifting loops. In the second row, at each chain and top of the column, work a single crochet. Here you will need 2 air planes for lifting.
The third row consists of a double crochet in every third stitch. They will need to be alternated with three air loops. The rise in this row is equal to three air moves.
In the fourth, each arch is the basis for four columns with two double crochets, finished with one loop. The space between them is filled with 4 air. Lifting - 3 loops.
Lifting - two loops. The fifth row is knitted with single crochets. The first arch is filled with the 5th, from the last one, cast on 11 air loops. Attach it to the first one and tie it with 18 stitches, making two loops for lifting. The next arch is knitted simply with five stitches. Alternate this pattern until the end of the row.
The last (sixth) row is filled with double crochets, and two chain stitches are knitted between them. Moreover, the columns need to be knitted only on eight petals. Moreover, at every second one at the top it is necessary to knit an arch of 10 air stitches, tying it with 18 single crochets.

One more square
Its pattern is the most common of those that are recommended for crocheting. The pattern may vary slightly, but the basis is the same: alternating double crochets and air stitches.
On a ring of 5 loops, knit the first row of the motif: 8 connecting posts. The second one starts from the corner. It consists of 6 chain stitches, a double crochet at the base of the cast-on chain. In the second column of the previous row, knit two double crochets and one double crochet between them. The third column will be the basis of the second corner, which is knitted from two columns and three air loops between them. In each even number, repeat the pattern described for the second, and in the odd number, for the third. This will create an angle.
Third row. Start - three lifting loops from the middle of the first corner. In the same arch: two double crochets. Air loop. Then there is a repeating pattern. Knit three double crochets into the side arch formed by one chain stitch. Air loop. In the corner arch: three double crochets, three double crochets, three double crochets. Air loop.
The fourth row is similar to the third, only you need to do 4 double crochets and do not make air stitches between them, except in the corners. There should still be 3 air elements in the very middle of the corner elements.
The last row of such a crochet pattern (the motifs continue) consists of connecting posts. Make a picot at each joint of groups of posts and the top of the corners. That is, knit three air loops and close them to the initial one. The motifs behind these picots are connected.

Triangular pattern
They are performed in the same way as they are knitted. You just need to work a little with the patterns. Namely, make sure that the sides are a little longer, and there are only three corners.
By the way, the filling of the corner patterns should be somewhat denser so that the pattern looks neater. Picot will need to be knitted only in the corners of the motif. Because the sides adjoin each other well even without them. Although they can still be done to make them more airy.

Pattern with three-dimensional flower
An excellent gift for a girl is a blanket made of squares, the basis of which are such motifs. Their patterns are simple, but the effect is amazing.

Start again in a ring of 6 loops. In the first row you need to make 8 groups, which are formed by five double crochets. Moreover, they need to be knitted from one base and closed with one loop. Knit one air loop between them.
The second row is the same groups, only you need to knit them twice as often. To the top of the previous one and into the air. So there will be twice as many of them.
The third row is necessary to create a square motif. First, knit the first corner: three loops, two double crochets, two loops, three double crochets - all this into one airy flower. The next one has two double crochets. Then two without a crochet. Continue knitting in the same way, gradually forming the remaining three corners.
Tie the square motif with single crochets. Make two air loops in the corners.

How to connect motives with each other
The easiest way is to sew them. But this is for beginner needlewomen. For those who have already become proficient in knitting motifs and finished products made from them, the crocheting option will be useful. This is how a blanket made from crocheted motifs (the diagram is presented in the article) looks neat.
In it you need to make double crochets, which you knit first in one element, then in another. Experienced craftswomen advise knitting several long strips first. Then connect them together.
Competition entry No. 15 – Children’s blanket “Tenderness” (Grigoryeva Rada)
Hello, my name is Grigorieva Rada. I started knitting relatively recently, about a year ago, mainly children's things.
I would like to present the Children's blanket “Tenderness”. It was knitted for my niece.

I needed yarn Pekhorka Children's whim 350g assorted colors, hook 2.5.

Competition entry No. 1 – Knitted blanket from granny squares (Svetlana)
The blanket is crocheted 5 from Turkish Alize yarn, wool blend, and consists of 6 giant granny squares.


Competition work No. 62 - Blanket from the motifs “First Snow” (Svetlana Alieva)
My name is Svetlana Alieva. I work as a teacher in a kindergarten. I devote all my free time to my favorite pastime - crocheting. I learned to crochet quite recently.
I found a pattern for the blanket in patchwork crochet magazine "Patchwork in Crochet". I really liked it and decided to knit it.
Knitted from Children's novelty yarn (pekhorka). I really like this yarn. I knit almost everything only from it. I used hook #3. It turned out the same as in the picture.


Competition entry No. 42 – Knitted blanket from granny squares (Tatyana Khupavka) ()
Hello! My name is Tatyana Khupavka! It so happened that in my creative life I became more friendly with knitting needles... But when I saw blankets knitted from granny squares on the Internet, I realized that this is what I need to finally make friends with crochet!😊😊😊


Competition entry No. 21 – Knitted Lego blanket (Anna Plekhanova) ()

I have loved crocheting since childhood.
A neighbor who was even 2 years younger than me taught me the basics of crocheting.
I was about 11 years old then. I remember knitting clothes for dolls and napkins as gifts for relatives.
These fond memories solidified my love for crochet. I can’t get used to the knitting needles yet, but I want to. Apparently I don't like sharp objects.
Last year I was in an interesting position - expecting my second son.

Design: Minna Metsanen
Size: 110 x 135 cm
You will need: Novita Nalle Taika yarn (75% wool, 25% polyamide, 260 m/100 g) - 600 g melange (810), Novita Nalle yarn (75% wool, 25% polyamide, 260 m/100 g) - 200 g gray ( 043) and 300 g of white (010) color, hook No. 3.5.
Knitting density: 1 openwork motif = 9 cm.

Competition work No. 30 – Knitted blanket
Hi all!
My name is Evgeniya, I am 30 years old. I really love cute, homely and at the same time interesting things that bring warmth and comfort both to the house and to life. From my mother I inherited a love for needlework, including crocheting. I decided to enter into the competition a blanket knitted as a Christmas gift for a loved one.
Knitted from motifs according to the pattern "sunny square", found on the Internet, from “Perspective” Pekhorka (50% merino wool, 50% high-volume acrylic) with crochet no. 3.5. It took about 1.8 kg of yarn and a little over a month of time.


Competition work No. 4 – Knitted blanket from motifs
Good day! I saw your letter about the competition and decided to take part.
I’m 29 years old, about 23 of which I know how to crochet, my grandmother taught me, but I started getting serious about it not so long ago. This is my first big job. I hope you like it)))
Plaid.
Material: Pekhorka “merino” yarn
Colors:
Green peas (No. 252)
Orange (No. 284)
Cyclomen (#040)
Nasturtium (No. 396)
St. violet (No. 389)
Pineapple (No. 070)

Two in one: beach blanket and stole! A colorful floral arrangement made of squares will not leave you unnoticed in any case.
Size: 90 * 156 cm without border
You will need: 300 g each of orange, pink and green Organico Lana Grossa yarn (100% cotton, 90 m/50 g), for the border 250 g of beige Organico Print yarn (100% cotton, 90 m/50 g), hook No. 4 and No. 5 .


