Even the most beautiful and expensive clothes look boring without accessories. However, not everyone can afford exclusive jewelry. What to do? We invite you to learn how to make beautiful and, most importantly, original beads with your own hands. You can make beads for all occasions based on your own tastes, in addition, this will be a wonderful gift for relatives or friends. So, the first question that probably arose in everyone’s mind: “What to make beads from?” The answer is everything! Well, or almost everything. You don’t even have to run to the store for fashionable and beautiful beads, because you can make them yourself too. So, how to make beads yourself? Let's talk about this a little more.
Make beads from wood
Firstly, wooden beads can be purchased at a reasonable price. Secondly, this method of making beads allows you to show your imagination:
- you can simply coat the beads with varnish and leave them that way. real wood creates an atmosphere of lightness and warmth;
- The beads can be painted by hand. the coating can be either monochrome or multi-colored, and the types and number of patterns are limited only by your imagination;
- if you have knitting skills, you can crochet your beads or, alternatively, braid them with beads;
- You can try covering the beads with fabric or covering them with polymer clay.

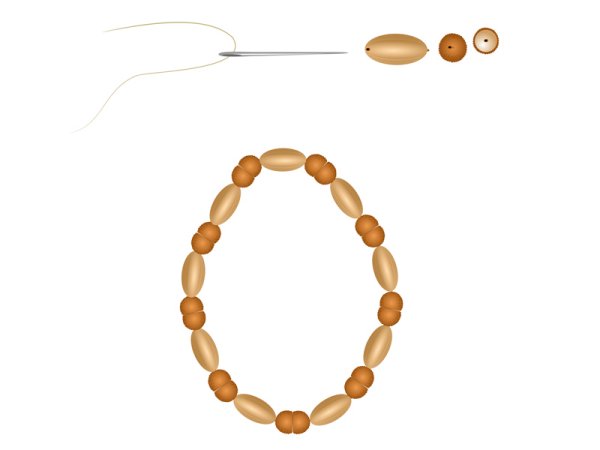
One of the varieties of wooden beads is beads made from acorns. Just find an oak tree somewhere in the park, collect acorns under it, at home separate the main part from the caps and string them as shown in the photo:
However, you can dream up your own.
Wool beads
Wool jewelry is very light and pleasant to wear. They look very cozy when paired with knitted sweaters and wool dresses. All you need to do is roll the wool into a neat ball. Afterwards you can decorate it with patterned embroidery or make inserts and patterns from beads .

Polymer clay beads
The advantage of polymer clay is that it is easy to make neat balls of the size and shape you need. In addition, it is very bright and durable, you can be sure that such beads will last you a long time. You must make a long sausage out of clay in the color you like and cut it into beads.

Paper beads
You can make paper beads in three ways.
- The first method is papier-mâché. the technique is quite complex and labor-intensive, but such beads will look unusual and extravagant;
- the second way is to cut old unwanted magazines or newspapers into long strips, and then twist them, giving them the shape of beads. do not forget to glue the tip with glue, and cover the beads themselves with varnish - this way they will last you longer;
- and finally, you can make yourself Hawaiian beads, which will become an original decoration for the party. To do this, you need to cut out flowers of different shapes, colors and sizes from paper or napkins, and string them on a long thread.


We bring to your attention a thematic video:
Fabric beads
You can cover light beads with fabric, for example, made of wood or plastic.

Dark blue denim with silver accents will look very nice. If you have a thin neckerchief, try the following technique: string one bead onto the scarf like an ordinary thread, and wrap the next one in fabric, and so alternate them until the end, as shown in the photo:

Beads made from natural materials
You can get these beads for free from nature itself. Such decorations can be made with children; it perfectly develops fine motor skills. Take your child for a walk in the fall and collect materials for a future masterpiece along the way. These could be rowan beads. To do this, you need to collect the berries in the autumn-summer period, clean them of all excess and carefully string them on a thread. It is recommended to make such beads long and wrap them around the neck many times.

Beads made from shells look very delicate and go great with light summer dresses. To make this decoration, collect some shells during your summer holiday. At home, they need to be thoroughly washed, dried and varnished. Then make holes in the shells and pull the thread through them. If you wish, you can add glass beads or metal inserts to the decoration.

Beads from a cord
It is advisable to take several different types of cord, at least two. You will also need spacer beads. There is nothing complicated about the technique itself. Gather several cords into a bundle. The number of laces depends on the desired length of the beads. Next, simply wrap your bundle with strands of a different color and string beads, as shown in the photo:

How to make beads from stones with your own hands
You can buy stones for beads at any store that specializes in handicrafts. Next is a matter of technology.
If you want to become the owner of hand-made amber beads , Try making beads from epoxy resin. Watch the video for more details:
Adding a twist to your style is quite simple - it is important to use the right accessories. Handmade jewelry is sure to emphasize femininity and attract attention. Due to their uniqueness, they have a special charm and always remain in trend.
Pearl beads
Necessary materials:
- 50-60 pearl beads;
- silk threads;
- needle;
- carabiner with clasp;
- 2 ends for fastening the fastener.

Beads are made using the knotting technique. You can, of course, simply string beads on a thread, but there are 2 reasons to make the product using this technique.
- The knots keep the beads from rubbing, thereby maintaining their shine.
- Reliability. Even if the beads break, most of the pearls will remain in place and will not be lost.
To secure the end cap, pass the needle into the middle of the device and make a knot, then make another knot on top of it, close the device and begin stringing pearls. This last knot is important, otherwise the end pearl will rub against the metal clasp.


To ensure that the knots lie end to end after each pearl, you can use silk threads, a large needle or an awl, this will help move the knot to the right place to tie there. It is problematic to do this with ordinary threads; they do not slip and are inferior in strength.

When all the pearls are strung, all that remains is to put on the second end. To do this, pass the needle through the back of the device and tie a double knot.

To attach the carabiner you will need round nose pliers.

Beaded beads
Necessary materials:
- several types of beads;
- beads of different sizes;
- spool of fishing line;
- crochet hook;
- 40 sewing pins;
- 2 spiral end caps;
- lock for jewelry;
- sheet of cardboard.

The more types of beads and beads of different sizes you can choose, the more interesting the beads will look.
Assemble the beads onto the fishing line as you like. Do not cut the line from the reel. You need to fill about 5 meters of fishing line.

When the fishing line is full, step back 15 centimeters from its beginning, take a crochet hook and knit the chain with air loops, making sure that 1 bead is placed in each loop, as shown in the photo.

Behind the last knitted loop you need to tie a knot, then step back 15 centimeters and cut the fishing line.
At the next stage, the formation of a multi-level decoration begins. Pin 2 pins to a piece of cardboard. The distance between the pins will be equal to the desired length of the beads. Stick the remaining pins in pairs under the first ones, all the time, slightly increasing the distance between them, as shown in the photo.

You will get approximately 16–20 rows in the shape of a trapezoid. Distribute them evenly. Where the air loops come into contact with the pins, they should not be pinned. There is no need to tighten the line; there should be a smooth sag.
The air loops on the right should be collected from pins onto the hook. Through these loops it is necessary to stretch one of the “tails” left at the edge of the fishing line. Place the end cap and the corresponding part of the lock on it, tie a knot and melt it with a lighter.

Do similar actions with the air loops that are on the left.

Amber beads
- 3 types of satin ribbons 5, 2.5 and 1.5 centimeters wide;
- amber beads;
- 2 decorative rings;
- 6 clamps;
- cabochon;
- jewelry cable;
- needle and thread;
- lighter;
- scissors;
- pliers.

Using the fastener, secure the decorative ring to a piece of jewelry cable.

String beads of the desired length onto the cable and secure the free edge of the cable on the second ring with another fastener. Make the second and third row of beads according to the same pattern, but slightly shortening each subsequent one so that the tiers lie beautifully.


From tape of larger and medium width, cut 7 and 6 strips, respectively. The length of the segments is determined taking into account the splendor of the future flower: the longer the pieces, the more magnificent the decorative element will be.

Using a needle and thread to match the ribbons, alternately string the pieces of ribbons folded in half. You need to start with the big ones and end with the smaller ones.

Tighten the thread so that the “petals” press tightly against each other, and roll the workpiece into the shape of a flower.

Secure the flower with a couple of stitches and decorate its middle with a cabochon.

Sew a flower to one of the decorative rings. From a thin ribbon, measure 2 strips of the same length; they will become ties for the beads. Pass them through the rings, fold them in half and tie them at the back of your neck.

Beads made from threads and beads

Required materials and tools:
- a set of identical beads;
- chain with large links;
- ribbon;
- yarn or thread floss;
- scissors, needle.
Wrap threads around the back of the chair.

Having formed a winding of the required thickness, cut it from one edge, while simultaneously holding it by the other so that it does not crumble.

Having determined the middle, fix this place with a thread of the same color as the resulting “tail”. Divide it into 3 equal parts and weave it into a tight braid.

Having obtained the desired length, shape the edges of the braid: make a bandage of the same thickness, and trim off the excess, ensuring that the free ends are the same size.

Using a needle and thread to match the braid, sew the braid with a chain.

Sew beads along the front edge of the braid through equal sections.

Instead of a lock, attach half a ribbon to the chain on its outer links with a hidden seam.

Chanel style beads
Required materials and tools:
- beads with a diameter of 14 millimeters - any quantity;
- pins 3 centimeters long according to the number of beads;
- chain with large links;
- lobster clasp;
- a pair of connecting rings;
- transparent beads;
- pliers, side cutters and round nose pliers.
String beads onto each pin (stud), then a bead.


Having determined the desired length of the decoration, cut the chain. Thread the leg of the pin with the bead into the chain link and bend it with round pliers to form a loop.

Attach several beads to each link of the chain (the number depends on the size of the link and the beads themselves). Having achieved the desired splendor of the decor, attach the carabiner parts to the edges of the chain, using rings as connecting elements.

African style textile beads

Required materials and tools:
- satin cords;
- waxed cords;
- a dozen spacer beads;
- carbine;
- a pair of connecting rings;
- a pair of limit switches;
- scissors;
- glue.
Prepare a base using cords (waxed, satin, soutache) by folding the pieces one to one. The thickness of the workpiece is determined taking into account the diameter of the separating beads.

Using thinner cords of contrasting color, tightly wrap equal intervals of the base warp, carefully tucking the ends under the wrapping layer. Decorate the beginning and end of the “insert” by gluing separating beads.

Decorate the edges of the necklace with end caps. Then attach the parts of the miniature carabiner to the rings.


Necklace made of yarn and chains

Required materials and tools:
- chain;
- yarn 3 colors;
- scissors;
- side cutter

Take 2 unequal parts of a metal chain. You can connect them into one by securing the ends of the shorter part to the edges of the longer one. Fixing is done with thread or previously removed links.


From each skein of yarn, cut 3 threads 2 meters long. Tie threads of the same colors at one end with a knot. Secure the edges of the threads in the area where the chain segments join.


Weave a braid from the threads, thread the outer threads into the links of the chain so that both the metal and soft components of the decoration form a beautiful woven crescent.


Having finished with the design of the chains, the remaining ponytails are woven into a braid of the desired length. The same braid is made on the other edge of the decoration.

Beads "Rainbow"
Required materials and tools:
- 2 clamps;
- castle-toggle;
- colored beads 8 mm;
- yellow beads 10 millimeters;
- jewelry cable - 4 meters;
- side cutters;
- flat cutters.
Weaving pattern:

Fold a two-meter piece of cable in half, thread it through the ring from the toggle lock and secure it with a clamp. To weave beads from colored beads, as shown in the diagram, it is important to follow the color sequence of the elements.

Having achieved the required length, fasten the cable according to the following algorithm: put on the lock, insert the edges of the cable into the ring of the second part of the lock, insert the tails into the lock. Press with pliers, hide the edges of the cable inside the beads, cut off the rest.

To increase the beads by a couple of rows you will need orange and yellow beads and the remaining piece of cable (2 meters). Fold the cable in half and place an orange bead in the middle. Insert one end of the cable into the green bead on the jewelry, and on the other end, put on first the yellow and then the orange beads. Insert the 2 ends of the cable inside the orange one and tighten it. Repeat the algorithm until the end of the necklace.
Fix the edges of the cable with a double knot, then pass them under a row of beads in the necklace and cut them off.

Beads "Blackberry"
Required materials and tools:
- beads 4 mm - 134 pieces;
- chain;
- pins with loops - 2 pieces;
- carbine;
- connecting ring;
- thin wire or fishing line;
- pliers, side cutters, round nose pliers.
First you need to make blanks from beads. By attaching 12 beads to the wire according to the diagram, you get a berry blank. It is important to remember that the first bead in the workpiece is also the final one. You will need 11 such blanks.


A workpiece with 2 loops along the edges is made from a pin and a bead. You need 2 such parts. The chain is divided into 3 parts.
You need to attach a bead with loops to one edge of the chain, and string all the “blackberries” onto the free edge. Afterwards, if necessary, cut off the excess length of the chain and connect its edge with the loop of the second bead with a pin. The outer beads became fixators for the immobility of the central pattern.

Attach chains with corresponding carabiner elements at the end to the loose loops.

Beads “Turquoise Bouquet”

Required materials and tools:
- turquoise beads;
- black beads with a diameter of 6 millimeters;
- metal beads with a diameter of 3 millimeters;
- clamps;
- carbine;
- wire;
- connecting rings;
- round nose pliers, side cutters, pliers.
Bend a meter-long piece of wire in half, secure it with a clamp on the connecting ring, and decorate it with a metal bead.
Place 3 turquoise beads on the ends of the wire, then cross the ends through the black bead. Repeat the algorithm, only the next time you cross the wire, put on a metal bead instead of a black one. Next, put 1 metal bead on each edge of the wire and connect the ends with the same bead. A pattern appeared. Repeating similar steps, weave the decoration to the desired length.


Make a loop on the edge of the product, as at the beginning of weaving. Attach the carabiner elements to the loops using connecting rings.

It is difficult to find a girl who would not like to have a large amount of jewelry, but with current prices, not everyone can afford it. So why not make such accessories yourself? Many girls, when they hear the word “handicraft,” say that they are not able to do something on their own; they would rather buy it in a store. But at the same time, without trying and without finding out that it is not so difficult to fulfill your plans. A beginner always wonders how to make beads with his own hands, and now there are a large number of master classes that will help with this. You can make beads from anything. Needlewomen make jewelry from beads, leather, plastic bottles, scrap materials, wire, wood, beads and fabric, and there can also be crocheted items.
Such questions are obvious when a person first encounters such desires. But everything is not so scary. The main thing is to have desire, desire and patience. A flight of fancy will always help with this. Our article will help everyone make beads in a short period of time, and the product will turn out beautiful and unique. Every year there is such a variety of different jewelry that even the most picky fashionista can find what suits her best.

Air technique
Some people like simple, light and thin beads, while others prefer more voluminous jewelry. For example, this master class will show how you can make beads using the balloon technique using beads and leki. The work is painstaking, but worth devoting your time to it. With the help of a step-by-step description, making such beads will not be difficult even for beginners.
What you need to prepare to make beads:
- a roll of fishing line with a diameter of 0.2, up to 45 meters;
- hook, it is better to take a thicker one;
- two pins with rings;
- two caps for the product;
- beads, two colors, 30 grams each;
- textile;
- tailor's pins;
- round nose pliers;
- lock in the form of a screw.


We put beads on the fishing line in any order, we do this so that the beads turn out to be multi-colored and the colors are evenly spaced. So, we dial until we get a length of about 4.5 meters.
When you get the desired length, you don’t need to cut the fishing line, just move the beads to the side while setting.
We need to retreat 5 centimeters from the beginning of the line and fold the tip and the main thread in half, make a knot, as shown in the photo below. We take the hook and pull it through the resulting loop, while pushing a few beads towards the hook and forming an air loop.
So, we knit until the very end, but it is important that there are both empty buttonholes and those with two or three beads. In this case, our “air” will be lighter and airier. We do this until the length is 40 centimeters. When the desired length is knitted, we knit five empty buttonholes.


And so we knit, taking into account that each time we increase the length of the chain, between five empty ones up to 2 cm. It turns out that the first row was made 40 cm and five empty ones, and the next one is 2 cm longer - 42 cm. We knit until We won’t run out of beads, we should get from 12 to 15 rows. We finish the last row with the same five empty buttonholes, and then retreat 5 cm, and only then can we cut the thread and tie a knot. Now lay out the resulting thread on the fabric like a snake, and where we have empty loops, we secure them with pins.
We begin to assemble the product. We take pliers and bend the ring on the pin, but do not overdo it. Next, we place the buttonhole from the first row on the hook of the pin, and so we move to each one, while carefully removing them from the pins. When all the buttonholes are on the pin, we can bend the ring so that not a single buttonhole slips out. Next, close the ring with a rubber band. Afterwards, we collect beads onto the pin, but not to the very end, but leave room for the fastener. Using pliers, we form a ring and attach the clasp there. On the other side we do the same, and now our product is ready.


Below you will find ideas, photos of which can inspire anyone to create similar products.


Beads on a cord
Previously, our mothers did not have such a variety of different decorations. Everything was standard and did not stand out. But now there are so many options that every day you can radically change your image. In this master class we will learn how to make beads from cord and beads. A rather original solution that combines tenderness and style. You can try to solve this problem together with your child, because children like to create something together with their parents, and you can also learn something new. The patterns are simple, there is nothing complicated in creating such beads.
What you need to prepare:
- waxed lace with a diameter of 0.8 cm;
- clasp;
- protectors;
- carpets;
- scissors;
- connecting rings;
- lapis lazuli beads.


We begin to make beads; to do this, without cutting the thread, we take the tip of the cord and use scissors to form an oblique cut. This is necessary so that the lace fits better into the hole of the beads. Now we string the beads onto the thread. When collected to its full length, leave 5 cm at the end. Now we form the clasp. To do this, you need to put the protector on a cord, as we see in the photo below. Next, we thread the tip of the thread through the second side of the tread. A buttonhole is formed. You need to tie a knot; to do this, hold the protector with your left hand, and tie it with your right hand, as indicated in the picture. And we tie a knot under the protector.
Now you need to trim the protruding thread. And the tail, which remains 1 mm, is burned with a lighter. Use a carpet to secure the knot. We move the beads to the end. Next, we work on the other side. Here we work in the same way, only we leave half a centimeter between the bead and the protector and form a knot. Pull tightly and use a lighter to burn the end of the thread. We put on the protector and press it with pliers. Now we attach the rings and a lock to them, and our beads are ready.


Video on the topic of the article
This article presents a video collection with which you can learn how to make beads with your own hands.
The problem “the wardrobe is full, but there is nothing to wear” is probably familiar to many. It seems that things don’t even fit into the closet, but you still want to somehow refresh your usual look. In this case, jewelry and accessories come to the rescue: sometimes one large detail is enough to completely transform the entire image. The big advantage is that the accessories do not take up much space, are practically not outdated, and most importantly, you can even make them yourself. Literally using improvised materials, you can create the same stylish jewelry that is sold in expensive designer stores. We bring to your attention several unusual ways to make beautiful beads yourself in a do-it-yourself master class.
How to make beads with your own hands from plastic bottles and other materials
It's hard to imagine, but even ordinary plastic bottles can be used as material for beads. This is a very simple decoration that is more suitable for children's games or as a bright stage outfit. To make unusual “beads” you will need bottoms cut from plastic bottles, and it is better to take containers with a volume of 0.5 liters or less. If you look closely, these blanks look like flowers. You just need to shape them using a hair dryer so that the petals bend, and paint them with acrylic paints.

Another option for jewelry made from plastic bottles looks more “grown-up”, but is also easy to make and suitable for beginners. For it we will need bottles made of green or blue plastic. It is necessary to cut out blanks that resemble petals in shape, and then punch holes in them in a random order with a hole punch. Next, heat the pieces so that they curl up a little. After this, all that remains is to string the petals on a beautiful cord or metal chain with large links.
Beads made from plastic bottles are a demonstration of what spectacular things can be made from scrap materials found in every home. For the next necklace, the plastic blanks will need to be cut into squares of the same size. Next, we heat the workpieces so that they have curved wavy edges. We connect the blanks in pairs and insert a matching bead into the center - we get a beautiful translucent flower. These beads can be used to assemble a spectacular necklace and even earrings.
How to assemble a beaded necklace correctly?
A necklace made from ready-made components is also very simple to make. You can make the simplest “choker” decoration from a cord and beads, which will go well with a sporty and country style.

If you spend a little time, beads and fabric will turn into elegant beads that you won’t be embarrassed to wear on a date.
Leather beads.Genuine leather is an unusually plastic material from which not only expensive accessories are made, but also jewelry. These can be either ethnic style necklaces, decorated with beads and natural stones, or romantic leather floral arrangements. The simplest beads that can be made from leather are simple tubes wound around wooden sticks.
Knitted beads.Knitted jewelry looks very gentle and elegant. They usually consist of several individual elements, such as flowers, tied together using ribbons and decorated with beads and beads. Simple and stylish necklaces are made with crochet - they can look like lace stand-up collars.

You can come up with patterns for finished work yourself, focusing on any knitted products with a pattern, even napkins.
In addition, using a crochet hook you can make useful sling beads for children. This is a special decoration for mom that the baby can play with while sitting in her arms or in a sling. Typically, such beads are made from bright cotton yarn in the shape of fruits or animals. However, using the same technique (crocheting wooden beads) you can also make adult beads, it is only important to choose the right design.
Beaded beads.Beads are one of the most popular materials for making homemade jewelry, with which you can make very elegant little things. This is quite painstaking work, but the result is certainly worth it. Beads make elegant necklaces of various shapes: woven, embroidered, knitted in the form of plaits. In order for the finished product to look good, it is important to monitor the quality of the material and choose only smooth beads without flaws (for example, made in Japan or the Czech Republic).
The so-called beaded air bags look very stylish. This type of necklace consists of several levels of fishing line of different lengths, on which beads, beads and crystals are strung. Usually a monochrome color scheme is used, but if you make such beads from white beads with pearls, you will get a real wedding decoration.

In general, working with beads requires some preparation and skill - this is not the kind of beads that can be made five minutes before leaving the house. For beginners, it is better to start with simple elements, gradually trying something new and more complex. On thematic websites and forums you can find detailed master classes with descriptions of how to weave this or that part yourself.
Don’t be afraid to experiment and embody your wildest ideas - photos for inspiration can be found in fashion magazines and articles about style.
Video on the topic of the article
We invite you to watch a video demonstrating in detail the process of making handmade beads and necklaces.


