Christmas tree made from salt dough. Step-by-step instructions with photos
Modeling from salt dough for schoolchildren.
Master class “Christmas tree”
This work is intended for teachers and parents, as well as for school-age children.
Target: teach how to make a Christmas tree from salt dough.
Tasks:
- teach how to knead and color the dough;
- teach how to make needles by cutting salt dough with scissors;
- develop hand motor skills,
- develop creative abilities.
Required material:
- 1 glass of flour,
- 0.5 cups fine salt,
- 0.5 glasses of water,
- container and spoon,
- gouache,
- beads, beads, sequins,
- stapler,
- cardboard.

Progress of the lesson:
Guess the riddle:Needles grow on it
Thick and prickly
And resinous cones,
Sticky, fragrant.
She's on New Year's Eve
He will come to visit us!
Slender, fluffy
With golden lights
Today we will make a Christmas tree from salt dough and decorate it with decorations. There is a very beautiful song from the cartoon “New Year's Tale” Poems: I. Shaferana
Christmas tree, Christmas tree - forest scent
Christmas tree, Christmas tree -
Forest aroma.
She really needs it
Nice outfit.
Let this Christmas tree
At the holiday hour
With every needle
Makes us happy
Makes us happy.
Stages of work
1. Take half a glass of water and pour it into a container. Pour in half a glass of fine salt and mix well. Gradually add flour until it reaches a batter consistency.


2. Add green gouache and mix to form a green batter.

3. Gradually add the remaining flour and mix.

4. Pour the resulting mass onto the table and knead the dough with your hands. The dough should be plastic, not stick and crumble in your hands. If the dough sticks, then add a little flour, if the dough crumbles, then add a little water.


5. Cut out a semicircle from cardboard. Roll out the resulting dough and cut out a semicircle from the dough using a template.


6. Use a stapler to fold the template into a cone.

7. Carefully wrap the cone in a semicircle of salted dough and glue the seam using water, slightly moistening it with a brush. Gently smooth the seam with your finger.


8. Take scissors with sharp ends and begin to cut the needles in rows. It is better not to lift the Christmas tree so that the dough does not slip, and keep the scissors at an angle of 30 degrees. You need to cut the needle from the top row.


9. Knead the dough for decorations and paint it with gouache in different colors. Proportions: 0.5 cups of water; 0.5 cups of salt and a cup of flour.

10. Make a star from red dough and glue it with water.

11.You can decorate the Christmas tree in different ways. The first method: we make a lot of multi-colored balls and toys from colored dough and glue them to the Christmas tree using water.


12. Second method: decorate the Christmas tree with beads, beads, sequins, which we simply gently press into the dough. They stick well without glue, but if the beads fall off after drying, you can glue them with varnish or glue.

13. When the tree is dry, it can be coated with varnish or gloss for children's creativity. The Christmas tree is ready!

14. Works of my students!


The most magical holiday of the year is coming, which everyone, young and old, is waiting for, and I want to please my family and friends with unexpected surprises. To do this, you don’t have to go to shopping centers and markets; you can make a charming gift with your own hands from scrap materials. Today, in our review of the site’s editors, we’ll take a look at some special creativity, namely, Christmas trees made from salt dough. All the ingredients for the work are available in every home, and additional decorations will give the souvenirs unique originality and exclusivity.
Working with salt dough is not at all difficult - the elastic mass lends itself well to modeling, and you can make decorations of any complexity and configuration.

Salt dough recipe
To work, they use several recipes for preparing dough; for beginners it is better to start with the simplest.

You need to take one glass of dry ingredients, mix in a suitable bowl, then, gradually adding half a glass of water, knead the dough well. The finished mixture should be elastic, not stick to your hands, but not too tight.
If there is any material left after work, it can be stored in a hermetically sealed plastic bag.


You can watch the video in more detail about the process of preparing salt dough:
How to make flat decorations from salt dough
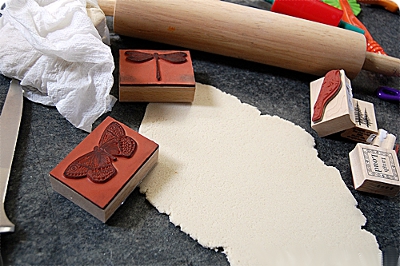
Let's start getting acquainted with salt dough by making simple flat figurines that can be used as Christmas tree decorations or interior Christmas decor.
Let's get to work.
- Roll out the dough with a rolling pin.
- Use a mold to press the figures.
- Dry the decorations.
- Paint crafts.
- After the paint has dried, coat with clear nail polish.
- Attach the ribbon.

How to properly dry and paint workpieces
There are two ways to dry.
- Natural - the figures simply dry out in the room. The drying time depends on the thickness: it will take a day to completely dry 1 mm of ordinary salt mass, for cold porcelain – up to 12 hours.
- Drying in . To begin with, heat it to maximum temperature, turn it off and place a baking sheet with crafts on parchment paper inside. The cabinet is not opened until it has completely cooled down.

Painting crafts made from salt dough
After drying, they begin to paint the products; different types of paints, markers and felt-tip pens are suitable for this. Another coloring option: the pigment is added to the water before making the dough; the dye dissolved in advance will be evenly distributed throughout the mass. Such crafts turn out bright and colorful. You can additionally pigment the composition with food coloring.
After all the manipulations, the figures are ready for final decoration. For New Year's decorations, ribbons, braid, beads and rhinestones, sequins are used - nothing holds back the imagination here.

Master classes for beginners on making jewelry from salt dough
We have become acquainted with the main features of manufacturing, it’s time to move on to practice. To work, you will need a variety of molds, shaped knives, spatulas and attachments.

Volumetric crafts made from salt dough
An unusual one can be made from several layers of dough; it will require a decorative flagellum and beads.
Step-by-step making of a Christmas tree.
- Roll out the dough and cut it into different sizes using molds or paper.
- Make a hole in the middle of each piece.
- Dry the workpieces.
- String the elements onto a flagellum and insert decorative beads between them. You can pre-sprinkle them with glitter or paint them.
- Tie knots.

How to make a pig - the symbol of 2019
Since the symbol of the coming 2019 is, let’s make a good-natured animal with our own hands.
For work we will need:
- mass of pink and green colors;
- for the eyes - a piece of unpainted mass;
- toothpick;
- water and brush;
- stack.
Step-by-step master class on making a pig.
| Illustration | Description of action |
 | Roll out the ball and make it in the shape of a pear. |
 | For the legs, take a small piece of dough, divide it into 2 equal parts, and roll each into a ball. Make an icicle out of it, flatten the wide part and cut in the middle. Hand cut the hooves. |
 | Use a brush to moisten the place where the legs are attached, attach the workpieces to the body and press. |
 | The handles are formed in a similar way, only their size is a little larger. |
 | Moisten a toothpick with water and insert it into the center of the body, a small tip should remain, and attach the head to it. |
 | Roll a small piece of green dough into a sausage, flatten it, apply the texture in the form of stripes in different directions using a stacking machine and cut the fringe along the edges. |
 | Wrap the scarf around the piglet's neck, first moistening all joints with water. |
 | For the head, form a ball, flatten it, coat the body and scarf with water and insert the workpiece onto a toothpick. |
 | For the snout, form a small ball, flatten it with a flat cake and glue it onto the pig with water to make nostrils. |
 | For the ears, divide a piece of dough into 2 parts, roll into balls, then droplets in the form of carrots, make flat cakes and flatten the gluing area. Wet the head with water, glue the ear and bend it over. |
 | Tail: form a sausage, roll it in a spiral and glue it to the body. |
 | Form eyes from uncolored dough and draw pupils with a black felt-tip pen. |
Related article:
: how to crochet, make using origami technique, applique with pigs, from plasticine, baked goods with the symbols of the New Year 2019 - in our publication.
Let's complicate the work: an owlet with openwork curls
Openwork volumetric crafts made from salt dough turn out to be very unusual and elegant. Today we will do it with a New Year's owlet.
Step-by-step master class.
- Take a small piece of uncolored dough and form it into an oval in the form of a droplet.
- Make indentations for the eyes.
- Form eyes from two small pieces, moisten the indentations with water and glue them into the eye socket.
- Use a stack to make notches around the eyes.
- Form a beak from a sausage and glue it to the head.
- Using scissors, make feathery notches all over the owlet’s body.
- Mold the paws, apply stripes and glue them to the body.
- You need to dry the decoration at a temperature of 100° for about 3 hours.
- Color the owlet.

Simple crafts for the New Year from salt dough for a preschool child
Modeling from salt dough is similar to working with plasticine and is very useful for kids. It improves fine motor skills and helps the child's early creative development.
How to make a simple snowman from salt dough
It will be easy for kids to make a simple one with their own hands, and parents will help in making small and complex parts. To work, we will need uncolored dough, a blue mass, a toothpick and a garlic press.
Let's get to work.
- Form 2 balls of different sizes, flatten them and place one on top of the other.
- Use a toothpick to draw a mouth, press down a place for the eyes and draw rays around them.
- Form small eye balls, moisten the junction and glue them to the head.
- Form the blue dough into tiny balls, flatten them and glue them into the eyes with water. These will be the pupils.
- Form sausages from the blue dough - these will be the eyebrows. Glue them above the eyes.
- Form an icicle-like nose and glue it over the mouth with water.

- Form sausages into handles with a thickening at the bottom, and glue them to the body with water.
- Form 2 elongated drop-legs, flatten them a little and glue them to the body.
- For the hat, make a cone-shaped pancake from blue dough and glue it to the head. Make a sausage, flatten it and attach it to the cap - this will be the lapel. Use a toothpick to make punctures in the cap with a lapel.
- The scarf consists of two rectangles, first make holes and fringe with a toothpick.

- For the whisk, take a toothpick, cut off the sharp end, squeeze the dough out of the garlic press and place the toothpick in it. Tie the panicle with a flagellum.

Related article:
: master classes. How to properly make a snowman from snow, from tires and plastic bottles, from paper, fabric or felt, from socks, from cotton balls - in our publication.
Panel in the form of Santa Claus made of salt dough
You can make a small one in the form of Santa Claus.
Let's look at the whole process in more detail.
- Roll the salt mixture into 2 balls. Form a face from one, and a cap from the other.
- Roll up a small pompom. Connect all parts using water.
- Press a piece of dough through a garlic press and use lacy stripes to form a beard and hair.
- Using a toothpick, press the eyes and the hole in the top part, so that you can then pull the ribbon through it.
- Form a nose and mustache and glue them onto the head.


Decorating the Christmas tree with crafts made from salt dough
You can make simple, but at the same time beautiful toys with your own hands together with your child. We offer a simple master class on making Christmas tree figures from salt dough.
| Illustration | Description of action |
 | Roll out the dough and cut out New Year's figures with molds. |
 | Make holes with an awl and leave to dry. |
 | After complete drying, paint the blanks on both sides with white acrylic paint, then with silver and gold paint. |
 | Thread the string, secure the bead and tie a knot. |
You can watch the master class in more detail in the video:
Creative New Year crafts made from salt dough for schoolchildren
Older children will be interested in more complex New Year's decorations, for the decoration of which you can use wicker elements and multi-layered formation of crafts.
Braided salt dough heart
You can surprise your friends and family with a wicker heart, the manufacture of which requires a mold or template, a thinly rolled base and intertwined flagella.


How to make angels from salt dough
There are a lot of options for making angels, today we will show you how to make two interesting figures.
Let's get to work.
| Illustration | Description of action |
 | 1st angel: roll out the dough and cut out an angel figurine and a heart in it using a mold. Draw folds on the skirt, make dots around the perimeter and use an awl to make a hole. |
 | 2nd angel: roll out the dough into a sausage shape, 5 mm thick, 10 mm long, fold it into a droplet. Form a dress, glue the edges, after moistening with water, then press a little with your hand. |
 | Form the second row of the dress and handles from smaller sausages. Cut off the edge of the neck using a round cutter. |
 | Roll out a small strip with a rolling pin, fold it like an accordion and form a frill collar. |
 | Form a ball, glue it to the body, make a loop out of a paper clip and stick it into the angel’s head. |
 | Draw a smile and eyes, glue on the nose and cheeks. |
 | Place the cake in a strainer and press it through the holes; glue the resulting paste to the head with water. |
 | Decorate the angel with a bow on the dress and peas in the folds. |
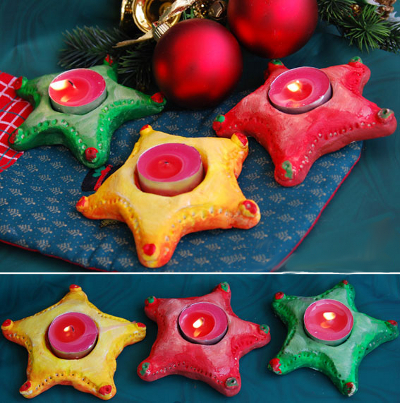
Christmas candlestick made from salt dough
It’s hard to imagine a New Year’s holiday without a magical glow, so schoolchildren should like this unusual craft.
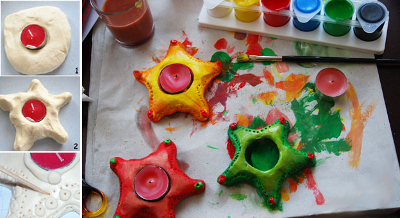
| Illustration | Description of action |
 | Form the dough into a ball, then make another one of the same size. |
 | Decorate the candlestick with snowflakes, sequins, etc. |
 | After drying, you can coat the candlestick with clear varnish. |
You can watch the whole process in more detail in the video:
Article
Most of the New Year's decorations can be done not only by craftswomen, but even by small children: Many New Year's salt dough crafts are created using cookie cutters. These “cookies” can be hung on a Christmas tree or made into garlands.
Another advantage of cookies is their safety: even curious kids or puppies will not harm themselves.
Commemorative prints
To make the simplest New Year's craft from salt dough, you only need your hands. Print your palm on a piece of dough, and when it dries, color it like a Christmas tree. You can collect memorable handprints from the whole family.
A souvenir version of the craft is a Christmas tree with fingerprints. The prints are painted in different colors, the thread of the garland is completed, and such a craft can already be given to your closest and dearest people.
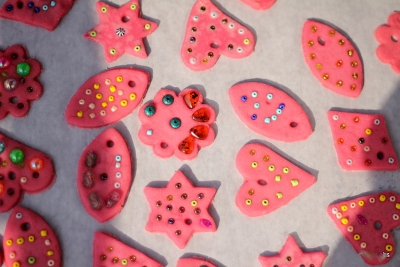
New Year's decorations - salt dough cookies
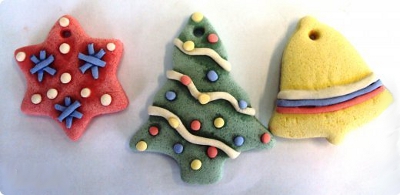
New Year's salty “cookies” can be made from colored dough, or after drying they can be painted with gouache or glitter sparkles. For example, like in these photos.


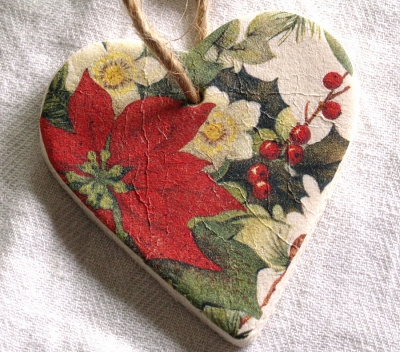
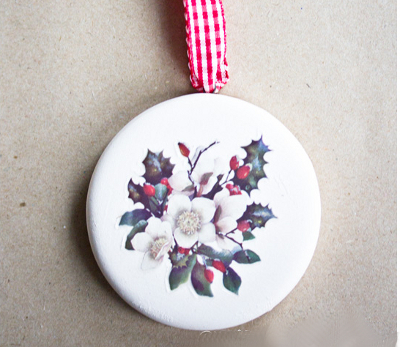
If you are familiar with first-hand decoupage, use your skills to decorate the base cookies with beautiful New Year's scenes.
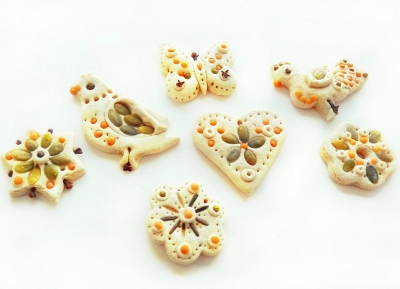
Salt dough crafts made for the New Year can be decorated with any available means - fragrant spices, beans or cereals(birds outside the window will be happy with such a gift) or even pasta(they are good for imitating the curly wool of a sheep).


Snowflakes and Christmas trees made from salt dough, painted, look unexpectedly elegant and airy markers. Such snowflakes can be collected into garlands or used as Christmas tree decorations.


To make snowflake crafts made from salt dough shine like real ones on New Year’s Eve, before coloring them you can hprime with silver paint. Another technique that will help make the salt dough more airy is to cut windows in the middle of the dough star, also in the shape of stars.


You can quickly paint Christmas tree decorations from salt dough using stamps- cut them out of eraser or use them as decorations, twigs, toys as stamps...


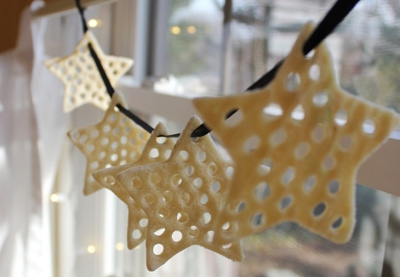
Solar garland
A simple New Year's decoration of fabulous beauty - a garland of snowflakes with transparent centers. To make it, you need to fill the middle with plastic beads and bake the craft. Of course, the whole house will smell of burnt plastic, but the result will shine in the sun.


If you want to avoid the plastic stink, put a caramel in the middle of each snowflake. When the sugar melts, you will see a colored window - or brown if you leave the snowflakes a little too long.
Salt dough is a popular and affordable material for children's creativity and making their own crafts. Just like plasticine, salt dough can be used to make products of any level of complexity, so children of any age can make crafts from salt dough.
The recipe for making salted play dough is very simple; the ingredients for it can be found in every home.
Salt dough recipe. How to make salt dough
You will need:
Flour - 2 cups
- salt - 1 glass
- water - 250 gr.
You need regular wheat flour, without raising agents, dyes or other additives. Salt - "Extra". The water is ordinary cold.
How to make salt dough: mix flour and salt, add water, knead the dough. The degree of readiness of the salt dough can only be determined by hand. If the dough crumbles, add water. If, on the contrary, it stretches too well and sticks to your hands, then there is too much water, and you need to add a little flour. Roll into a ball and make several indentations in it with your finger. If the dough does not spread and holds its shape, it is ready. It is recommended to add vegetable oil during the kneading process. Now the dough will not stick to your hands, dry out quickly and become crusty while working. However, it should be remembered that the best is the enemy of the good! If there is a lot of oil, the dough will get dirty, and final drying can take a very long time. For our recipe, a couple of tablespoons is enough.
Well, the dough is ready, now you can proceed directly to the process of modeling salt dough.
New Year's crafts made from salt dough. Christmas tree toys made from salt dough
In this article we will tell you how to make New Year's crafts and Christmas tree decorations from salt dough. We tried to select crafts made from salt dough that, on the one hand, are easy to make, and on the other hand, the end result is beautiful.
Salty dough. Crafts made from salt dough
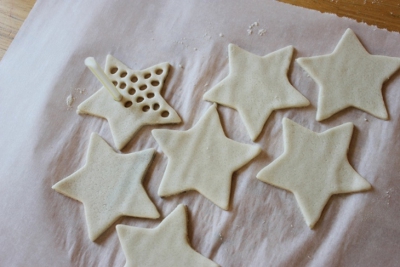
To make Christmas tree decorations from salt dough, you will need shaped cookie cutters. With their help, even a child can cut out figures from a rolled out sheet of dough.

The resulting salt dough figures can be left as is, but it’s even better to decorate them. For example, like this.
Or decorate crafts made from salt dough with beads. Just keep in mind that if you use beads made of plastic, etc., then you cannot dry the finished salt dough products in the oven, otherwise the beads may melt.
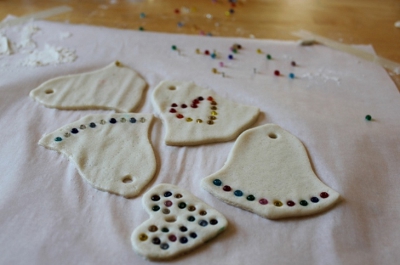
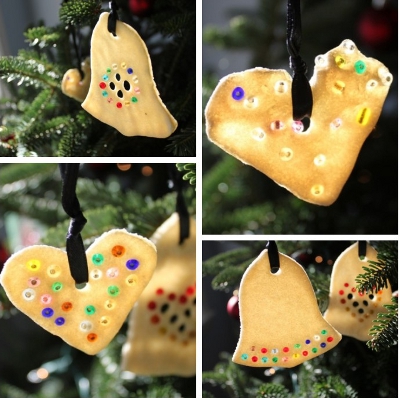

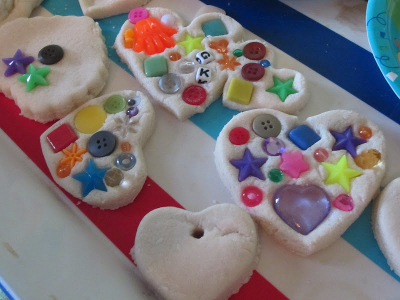
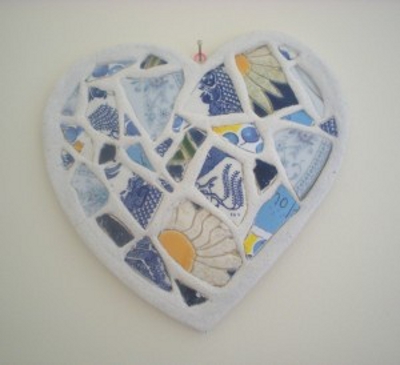
Instead of beads, you can use various cereals, shells, buttons and even broken dishes to decorate New Year's crafts made from salt dough.

You can give Christmas tree decorations made from salt dough a festive look with the help of beautiful ribbons and threads.

Note: if you do not have a suitable mold, you can cut out a stencil from cardboard and use it to cut the salt dough for the craft.
Modeling from salt dough. Salt dough photo
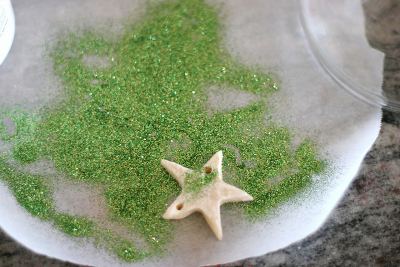
Finished, already dried salt dough products can be decorated with sparkles by applying them to a layer of glue.

Crafts made from salt dough. Salt dough master class
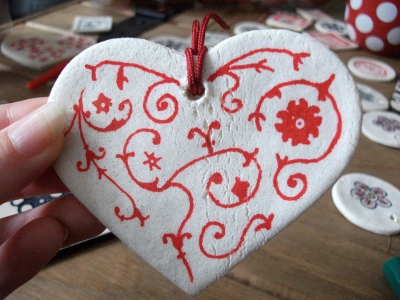
Christmas decorations made from salt dough, painted using colored permanent markers, look beautiful.


Products made from salt dough. Salt dough modeling
You can decorate New Year's crafts made from salt dough using the decoupage technique, pasting them with beautiful pictures or decals. For decoupage, you can use pictures cut out from New Year's napkins. For New Year's decoupage, regular PVA glue diluted with water in a 1:1 ratio is suitable. Cut out pictures or patterns from New Year's napkins, separate the top layer and paste it onto the finished salt dough craft. Apply another layer of glue on top.
Figures made from salt dough. Crafts made from salt dough
Here are some more examples of decorating salt dough figures.


Christmas tree decorations made from salt dough. Salt dough modeling
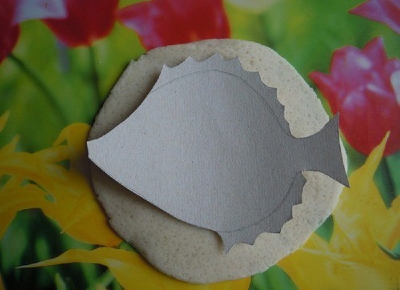
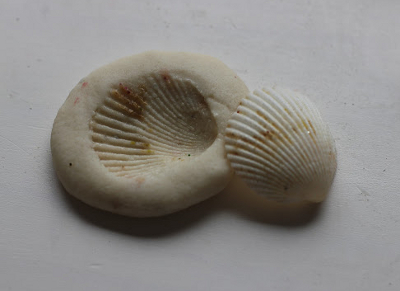
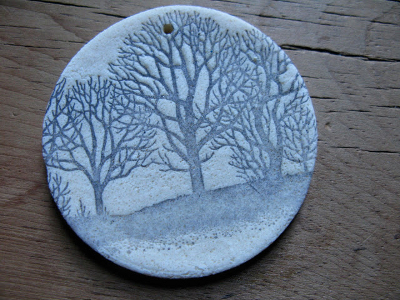
A simple and original way to decorate salt dough products is to make prints on them. Prints can be made from all sorts of objects with interesting textures that you can find around your home.

The salt dough craft “Fish” in the photo below was made using various textured items that the author of the craft found at home. For a detailed master class on making this original craft from salt dough, see the link
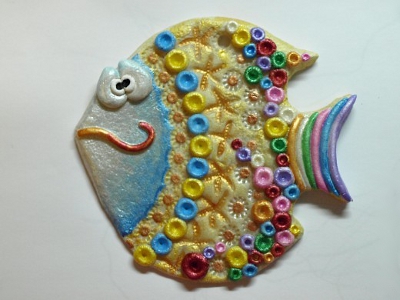
Natural materials are also suitable for making Christmas tree decorations with your own hands from salt dough: twigs, shells, leaves with thick veins.


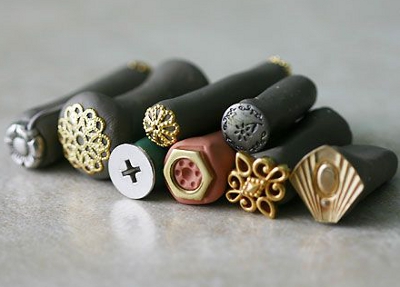
When making New Year's crafts from salt dough with your children, you can use purchased stamps for children's creativity. The ink is suitable for both black and colored.

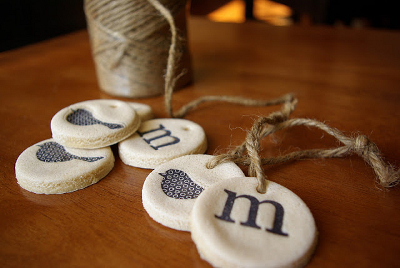
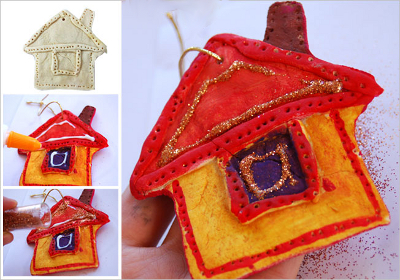
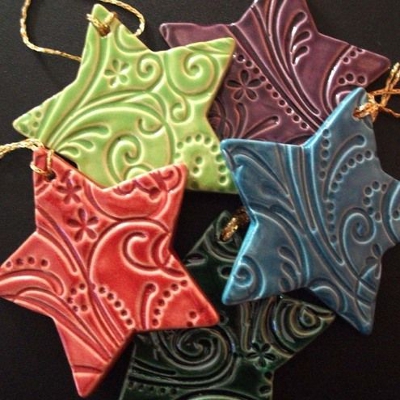
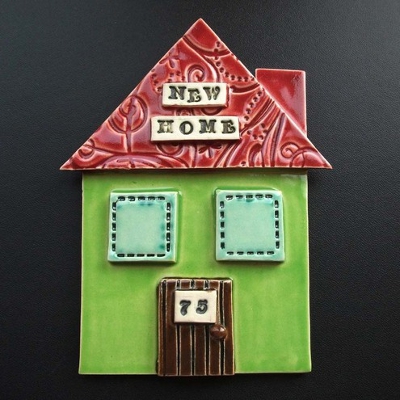
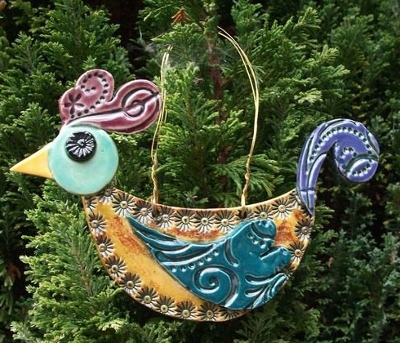
The DIY Christmas tree decorations stars, house and cockerel in the photo below are also made from salt dough using patterned stamps.
By the way, you can make stamps for children’s creativity yourself. Read about how to make stamps with your own hands on our website in a special article.
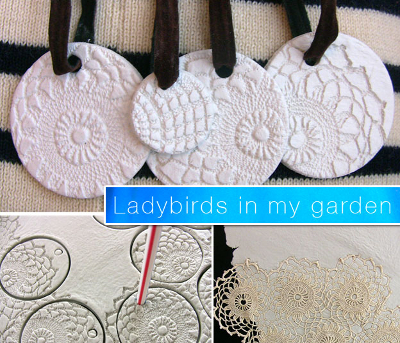
An interesting way to make New Year's decorations from salt dough is offered by the Ladybirds in my garden website. Using textile or paper lace, openwork prints are created on salt dough, from which figures are then cut out using shaped molds or a simple glass.

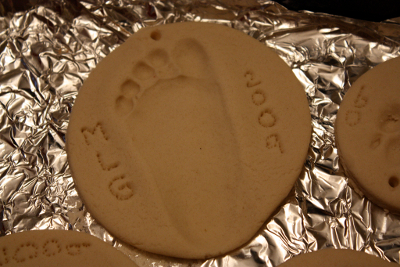
Christmas tree decorations made from salt dough with prints of children's hands or feet look touching. On the back of the salt dough craft, write the date the print was made.


From fingerprints and palm prints on salt dough you can make these memorable Christmas tree decorations with your own hands: a New Year tree and Santa Claus.
Crafts made from salt dough. Salt dough figurines
Concluding our review article on the topic “New Year’s crafts from salt dough”, here are a few more interesting New Year’s crafts that can be made from both salt dough and plasticine.
1. New Year's mosaic made of beads and bugles
To make this original New Year's decoration, you will need:
Plasticine or salt dough
- plastic covers
- beads, beads

- gold paint (optional)
Paint the lids with gold paint, then fill them with plasticine or salt dough, and lay a mosaic of beads and bugles on top.
Even kids can make such New Year's crafts.
2. DIY craft for the New Year “New Year’s candles”
To make this New Year's craft you will need:
Salt dough or plasticine

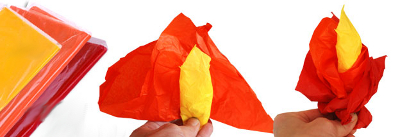
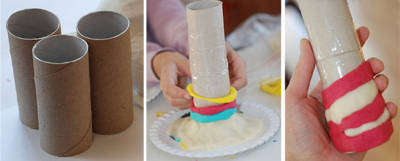
- cardboard base from a toilet paper roll
- corrugated paper in red, yellow and orange colors
Make rings from plasticine or salt dough of different colors, then put them on a cardboard roll. Make a flame from corrugated paper and insert it inside the candle.
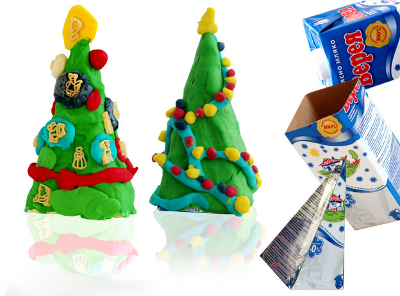


3. New Year's craft for children "Christmas tree"
You can make a cute Christmas tree from cardboard packaging of milk, kefir or juice and plasticine (salt dough). For a master class on making this craft from salt dough, see the photo below.
An interesting master class on creating New Year's compositions from plasticine by cutting has been posted on the website Country of Masters. Check out the Christmas tree below. It is assembled from individual branches, cut from one plasticine blank, and then decorated with Christmas tree toys made of plasticine, made using the same technique.

Images of burning candles will help decorate the New Year's composition.

The Country of Masters will teach you how to make original twisted candles from plasticine.

This composition is complemented by a chrysanthemum flower and a small driftwood made of plasticine.
For anyone interested in crafts made from plasticine for the New Year, we also recommend Roni Oren’s book “Secrets of Plasticine. New Year.”


