Kids love to make crafts from different materials.
You can offer your child to make a “Cat” craft with his own hands. Children will happily get to work because they love these fluffy animals. In this article we will tell you how to make a cat from different materials.
Applications
Paper is a material that is easy to cut, bend, and glue. A master class video will help you make an applique of an original paper cat.
Another option is appliqué using pieces of fabric.
For work you will need the following materials and tools:
- foam base 3 cm thick, size 50x80 cm;
- multi-colored pieces of fabric;
- marker;
- scissors, manicure file, stationery knife.
A cat is drawn on the base sheet; you can use a stencil. All details are cut with a stationery knife.


A piece of fabric is cut out a little larger in size than the applique piece, placed on top of the design and carefully tucked into the slots with a nail file. The edges are secured with glue.
Volumetric figures
It’s not difficult to make a three-dimensional cat craft with your own hands. There are options that will interest children of different ages.
Option 1
For this craft you need 2 cardboard tubes, paints and glue.
Progress:
- Fold the ends of one tube inward on one side and cut off the corners. This is the torso.
- The second tube is a cat's head. Diagonal cuts are made on the sides to create triangular ears.
- Both bushings are glued together.
- The background is tinted, eyes, nose, and mustache are drawn or pasted on.
- The tail is attached to the lower part of the body.


Option 2
A cat on springs is a toy that will interest older children. The work requires a little paper and patience.

Option 3
For the cat figurine you will need:
- white and orange paper;
- pencil, ruler, scissors;
- glue;
- markers.
Cut out the cat details:
- From orange paper:
- rectangles 6x13 cm and 7x14 cm are the torso and head;
- paws 4 parts 2x6 cm;
- oval tail 2x8 cm;
- 2 ear parts.
- From white paper:
- stripes on the body (3 elements 1x14 cm);
- stripes for the tail (6 parts 1x2 cm);
- oval muzzle 4x6 cm;
- ears (2 parts).
Glue the strips onto the body, roll them into a tube, and glue them together.
On the muzzle, draw or glue eyes, nose, mouth, glue the muzzle to the head, roll the part into a tube and fasten the ends with glue.
Glue white parts onto the orange parts of the ears and attach the ears to the head.
Connect the head and body.
Fold the paw parts, glue the edges, and glue them to the body.
Glue strips on both sides of the tail, the tail to the body.

Option 4
Their regular packaging cardboard is cut out with a cat's silhouette. Make 2 cuts at the bottom so that the figure can stand.
Glue on a muzzle made of colored paper and a mustache made from skewers.
The body is wrapped with colored woolen threads.
This cat will be warm even in the winter cold!
Origami
Origami is an interesting way to make a “Cat” craft with your own hands. This technique develops thinking, logic, and accuracy.


The master class will help you cope with this task. A three-dimensional figurine of a pet will delight a child.
Chenille wire
Required:
- 2 foam balls with a diameter of 2 cm and 4 cm;
- wire white, brown, pink;
- heat gun.
A hole is made in the ball on one side, glue is applied, and a brown wire is inserted. The ball is wrapped around it. The same actions are performed with the second ball. Then the parts are glued together - these are the body and the head.
For the paws, take white wire and twist it into a trefoil shape. One part is glued to the body.


The white wire for the ears is twisted into a spiral, and pieces of pink wire are inserted into the middle.
The ears are attached to the head.
The muzzle is formed from white wire, the tail is made from brown, the parts are glued, the mustache is secured - and the cat is ready!
Plasticine
You can make a cat from plasticine or plastic mass. To create a more complex craft you will need:
- Draw the outlines of a cat on a beautiful background, drawing all the details in color.
- Make a lot of balls with a diameter of 2-3 mm from plasticine of different colors.
- Attach plasticine parts to the drawing of the cat.


It turns out to be a mosaic cat! Using the same scheme, you can make a panel with a cat, using multi-colored sand, beads, pebbles, cereals, pasta and other small objects as finishing materials.
Important! In this case, the parts must be attached immediately, otherwise the adhesive base dries quickly and the craft will look sloppy.
Soft cats
Handsome cats are made from felt or felt.
If a child knows how to sew, then using the template he can make a phone case, an anti-stress cat or a bookmark.
Felting wool is also useful. For the craft you will need wool of 1-2 colors, 2 foam balls, beads, and tools - a needle for felting.


The balls are wrapped in wool and carefully pierced with a needle, creating an even soft layer on the surface.
Ears and paws are laid separately.
The parts are connected to each other by placing pieces of wool or gluing them together. The cat is decorated with a ribbon, beads are glued instead of eyes. The DIY “Cat” craft is ready!
Patterned cats
The quilling technique allows you to create original panels.
Required:
- strips 5 mm wide;
- scissors, tweezers;
- quilling stick;
- glue;
- basis for work (designer cardboard, beautiful printed background).
A contour drawing is made on the base.
5 turns are formed for the head, 6-7 for the body, several parts in the form of a drop.
Ears (in the shape of drops) and paws are glued on, and whiskers are attached - wound on a stick and straightened strips.
Did your child lose a glove while out for a walk? No problem, the remaining glove makes a soft and cozy cat. You can see how this is done in the video

Available materials
To create a “Cat” craft with your own hands, you will need everything you can find at home.
Option 1
A disposable plastic plate quickly turns into a cat's face. The complexity of the work is low, production time is 20-30 minutes.


The plate is the head, the eyes and nose can be drawn with paints, but it’s more interesting to do it in volume:
- For the nose, take a black or pink pompom. It can be wound from threads. A triangle cut out of paper looks beautiful.
- Chenille wire is used for mustaches.
- You can use ready-made eyes or draw them with paints or a marker.
- All that remains is to glue the triangular ears - and the cat is ready.
Option 2
The cat silhouette template is transferred to the cardboard base and pins are inserted along the contour. Then the child weaves the threads, hooking them onto the heads of the pins, filling the inside of the outline.

Option 3
There are always a couple of empty plastic bottles in the house. They will come in handy to make a bright and cheerful cat that will fit perfectly into your country house design.


To help the young master - a master class in video format.
Option 4
The vegetable cat is easy to make. You will need 2 potatoes, carrots and a little plasticine:
- The potatoes are connected to each other with skewers.
- 4 legs, a tail and ears are cut out of carrots and secured with skewers.
- Make a nose, eyes and mustache from plasticine.
Important! You can make your own “Cat” craft from other vegetables, chestnuts and nuts.


Option 5
Cotton pads will make a funny cat applique.

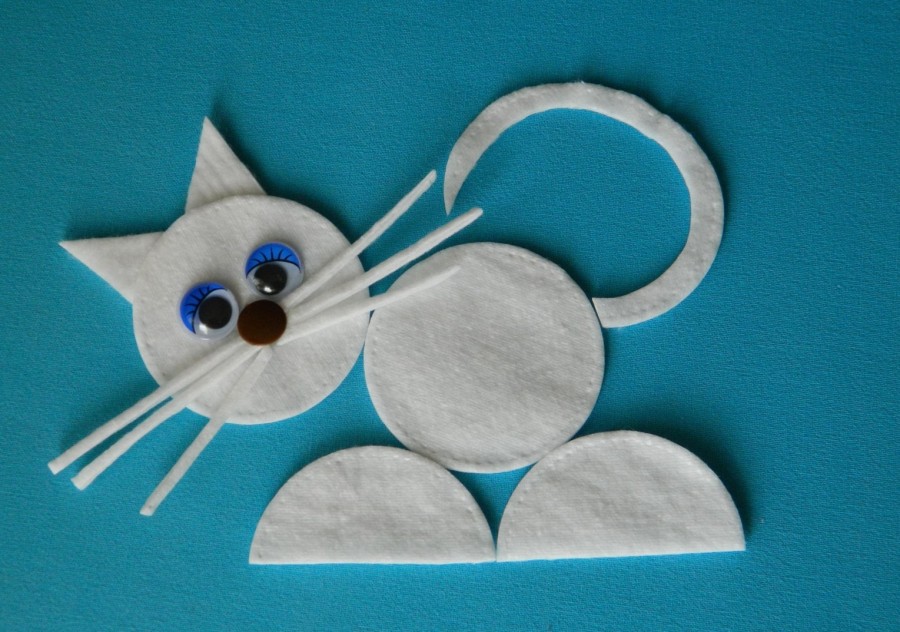
A video with a master class will help you create an interesting craft.
Another option is to use not only cotton pads, but also disposable spoons.


It’s not difficult to make such cute kittens. Look at the photo, repeat each action and within 20 minutes you will have a paper kitten on your shelf. Or even two. The hardest part of the craft is figuring out how to make the ears. And even a preschooler can handle the rest of the work.
So let's get started. Fold a square sheet of paper diagonally. Expand. Starting from the corner where the fold passes, fold the two sides of the sheet towards the middle.

Fold the craft in half, connecting opposite corners.

Bend the sides inward so that the bottom has right angles.

Unfold the craft from top to bottom.
Bend the bottom corner up strictly in the center to the edge of the folded sheet.

Bend the lower left part of the craft so that the fold runs along the edge of the triangle - the pointer points to that place.
You should end up with a figure like this.

Bend the folded part back and do the same with the right side of the craft.

Expand. You have two lines - markings.

Turn the folded sheet over to the other side.

Fold the bottom of the craft up so that the fold passes through the intersection of the lines.

Unfold the folded sheet as shown in the photo.

Bend the upper sides of the craft along the folds towards the middle (look at the pointer).
Like this.


Now we need to make the cat's head and ears. Bend the two side corners of the upper triangle so that you get vertical side lines, and the inside of the sheet (it is white in the photo) is closed.

There is a “pocket” at the top. Open it and bend the sides as shown in the photo.

Lower it down. You've got an "envelope".

Turn the right side of the craft over to the left so that the resulting “envelope” is inside.

Fold the upper right part of the workpiece in half.

Expand.
Flip the moving part of the workpiece to the right and fold the left part of the part in half.

Bend it back again.

Open the craft in the center.

Bend the two movable parts of the workpiece upward along the lines you just made. Now the kitten’s ears are visible (look at the pointer).

Now hold the kitten’s right ear with one hand to prevent it from opening, and with the other hand, pull the piece of paper and open it on the same side.

Fold the sheet along the fold as it lies.
Do the same on the left.

Fold both bottom sides towards the middle.

Fold the craft in half lengthwise so that the kitten's head is on top.

Give the cat a tail. To do this, bend the right side of the craft down, as shown in the photo.
If we talk about materials for creating children's crafts, paper probably takes first place. It is from this that we propose to make a red cat according to our master class.
To create such a paper craft we took:
- 2 square sheets of orange single-sided paper;
- plastic eyes;
- black marker;
- glue.
From the prepared two squares we will make the head and body of our cat. Let's start by creating his head. To do this, we make diagonal folds on the first square.

Then we unfold it with the white side up, and bend the top corner towards the center. You should also bend the bottom corner slightly to the reverse side.

Now we bend the upper side of our workpiece down.

We begin to bend the corners. First, fold the left corner down.

After this we bend the right corner.


Bend the top corner down slightly.

We glue all the folds. This is what the head blank looks like from the front side.

Let's form a small nose on it by bending the protruding corner down.

Now let's start creating the body. To do this, fold the second square diagonally.

After this, we straighten it and bend the sides towards the midline.

Fold the blank of the cat's body in half.

Now we will create the tail. To do this, bend the narrow corner to the side.

Then we form a fold in this place, bending the corner to the side, this will be the tail of our cat.
Cats are beautiful animals that have settled in the hearts of people since ancient times. In this article you will know how to make a cat from different materials with your own hands.
We are confident that both children and adults will enjoy this activity, as creative activity relaxes, calms and develops fine motor skills. Over time, you will be able to create amazing work.

What can you make a craft from?
You can create a figurine of a furry friend from different materials. Let's list some of them:
- Paper, cardboard:
- Textile;
- Napkins;
- Balloons;
- Matches;
- Plasticine.


There are many materials that can be used as raw materials for a cat figurine.

Simple crafts
Here are some easy cat crafts that are perfect for kids. It is especially important for little masters to engage in creativity, because it trains imagination, sense of style, abstract thinking and fine motor skills.
CD cat
A cute portrait of a cat can be made from just a DVD disc. To do this you will need:
- Unnecessary CD;
- Colored paper;
- Marker:
- Double sided tape;
- Scissors;
- Corrugated paper.

Here is the algorithm of actions:
Cut out a circle from black paper. The size of the circle should be slightly larger than the size of the hole on the disk. Glue the circle to the center of the disk so that it covers the hole - the spout is ready.

Cut out ears and eyes from paper. You can make these parts of any shape or use a special instruction picture on how to make the craft.


Glue the ears and eyes to the disc using glue or double-sided tape.
You can make a butterfly for a cat from colored paper and glue it to the disk. In this case, a simple cat will look even more elegant.

Puff pastry panel
You can hang the panel on the wall, in which case it will become a wonderful accessory for your room. In addition, creating your own work of art will definitely be to your liking.


To do this you need to prepare:
- Pattern in the shape of a cat;
- Stationery knife;
- Salt dough (mix 1:1:1 water, salt and flour)
- Foil;
- Acrylic paints;
- Frame;
- Beads, ribbons optional.

Once you have prepared all the necessary elements, get to work.

Prepare a template in the shape of a cat. You can find it in a book and redraw it from there, or search for photos of crafts in the form of cats from the Internet.

Knead the dough in the specified ratio. Pour in a little water slowly, just 300 g of water will be enough to start with, then add more later. Water is necessary, otherwise the mixture will stick to your hands, which makes it unsuitable for work.


Leave the dough to dry; in the warm season, 3-4 hours will be enough. When the dough has become stiff, sand the edges of the cat with sandpaper. Apply a design to its surface.

Start painting the figure using gouache or acrylic paints. This is a very interesting and enjoyable activity.

Make a beautiful background for your future painting, you can paint it with gouache. Glue the piece to the background and then insert the cat into the frame.

Glue the cat using a glue gun. If you wish, you can stick beads, ribbons in the form of bows and other accessories on the figurine. Don't forget to varnish the product when finished.

Felt cat
To create a figurine of a four-legged friend, prepare the following items needed for work:
- Felt;
- Scissors;
- Threads of different colors;
- Glue;
- Filler (you can use synthetic winterizer);
- Paper and a simple pencil;
- Beads and parts of old toys for decoration.


Let's get started:
Draw an outline of the cat on paper, then transfer it to felt. For greater convenience, you can connect the fabric to the paper using pins.

Make two sides of the animal and cut out its outline from felt.

Mark the eyes, nose and mouth on the cat's face. Start creating them: for example, you can use buttons or parts of old toys as eyes; you can embroider a nose and mouth with colored threads. It is worth noting that the use of threads of different colors makes the craft even more creative and bright.

Sew the felt parts to each other: the tail, the head and the paws to the body. As you stitch the pieces together, be sure to include some filling. An overcast stitch is best suited for this project.


Decorate the toy as desired: you can use ribbons to make a scarf, bow or tie. The craft is ready.

Master class on crafts on the topic: “Cat made of paper”
You can make a wonderful black cat from paper. This craft can become a desktop decoration that will lift your spirits every time you look at it.

Prepare the necessary items:
- Black and green cardboard;
- Bright yellow paper;
- Scissors;
- Black marker;
- Glue.

Let's start creating a member of the cat family:
Fold black cardstock in half. Cut it along the fold line. Fold one half of the black cardboard in half again, and cut a semicircle from the edge. This will create the cat's body.

Bend the edges of the paws to create the toes of your four-legged friend on which he will stand. Glue the cat's paws to the cardboard, which will serve as a stand for the product. You can use green cardboard to imitate grass. Make cuts in the back of the cat, into which we will then place the tail.

Fold the other piece of cardboard in half to serve as the head. Round the edges of the square. Make two cuts for the ears. Glue the animal's head to the body.

Draw two cat eyes on yellow paper and use a black marker to draw a pupil on them. Glue the eyes to the cat's head. Use the rest of the cardboard as whiskers and then glue them to the cat's head.

Cut the tail out of cardboard and place it in the slits. Place the finished product on a cabinet or desktop.

Conclusion
We learned how to create beautiful cat figurines from scrap materials. These lessons are simple, but the result of your work will definitely please you and your loved ones, because you can give the finished product to them as a gift.

Agree: it’s always nice to receive something made with your own hands, because every craft contains a piece of the soul of its creator.

Photos of cat crafts


A ginger cat made of colored paper that walks on its own and does not need an owner. The shape of her body has a static position. Therefore, you can turn the craft into a convenient and practical stand for small items.
Necessary materials:
- colored semi-cardboard;
- White paper;
- black felt-tip pen;
- office glue;
- scissors;
- pencil;
- ruler.

Stages of making a cat:
1. The cat's torso will consist of a cubic shape. Therefore, to create it you will need to cut out a 17 x 5 cm rectangle from orange double-sided thick paper.

2. Mark along the top and bottom edges 4 cm four times. Connecting the markings. On the far left side we draw a semicircle to create the cat’s paws.

3. We bend the blank of the cat's body along vertical lines and cut it along the intended contour to create paws. Let's reveal.

4. Apply glue to the side of the workpiece at 1 cm. Glue the figure and get a cubic shape of the cat’s body.

5. From the same shade of paper, cut out a tail along the contour. Glue it to one of the sides of the body. You should also take white paper and cut out a semi-oval. Glue it on the opposite side of the body and get the front part where the head will be attached.

6. Draw the outline of the head and a long strip on an orange sheet of paper. Cut out the details. We bend the strip several times and glue it together to obtain a three-dimensional rectangle.

7. Let's embellish the cat's face with details. Cut out a couple of drops and circles from white paper. Glue it. We also cut out the middle of the ears, nose and mouth from pink paper. We attach it to the right places.
Let's add small details to the cat's face using a black felt-tip pen or marker. We draw pupils in the middle of each circle, a long mustache, eyebrows, and the outline of the ears and mouth.

8. Glue a volumetric rectangle to the back of the head.

9.
Next, apply glue to the side of the rectangle and glue the part to the wall of the body, where there is a white section of the chest.

10.
With this, our cute paper cat is ready in the form of a voluminous craft with a cubic body and a voluminous head. You can complement the craft with lines and small decorative elements that will create the desired effect.


