A crown is an original accessory for a girl’s festive outfit. It will suit not only a princess costume, but also a Snow Maiden, Snow Queen, Queen of Spades or Queen of Hearts costume. There are many techniques for making elegant jewelry. If a needlewoman is used to working with a material such as beads, a crown made of wire will be the easiest for her to make.
It is not at all necessary to order the decoration; the product is made with your own hands in two steps: first, a rigid frame, then its decoration. The decoration of the crown, made of glass beads, beads and beads, artificial flowers and ribbons, makes it original and truly elegant.
Learning to weave a simple crown from wire: design options
Crowns of various types are made from wire; there are three main options:
1) “classic” crown;
2) a small crown that is attached to the side;
3) a crown on a rim, decorating a hairstyle of flowing hair.
We will look at a master class on creating the first type of crown. The time for making an original decoration will take no more than 6–8 hours. In this case, the main stage is decorating the accessory.
Let's make a list so that everything is at hand during the work:
- ruler;
- wire for the frame (diameter about 1–2 mm);
- wire for cloves (diameter about 0.1–0.2 mm);
- pliers;
- large beads for cloves - 8 pieces;
- small beads, beads, glass beads for decoration (the exact quantity is difficult to indicate, it all depends on the imagination of the craftswoman).
The color of the beads and wire varies depending on the outfit for which the crown decoration is being made.
Sequencing:- Making the teeth of the crown.
Having chosen the height of the clove (let it be 10 centimeters), pieces of the required length are cut from the wire. Be sure to make a reserve for fastening (about 3 centimeters). Thus, the length of the cut will be 2 * 10 + 3 = 23 centimeters.
The number of crown links can be any, usually a value in the range from 5 to 8 is selected.
- We make the base.
The base is made according to the size of the head. The photo shows the base for a crown with a diameter of 12 centimeters. To keep it strong, the structure should be wrapped with wire several times.
- We attach the cloves to the base.
Having divided the base into eight equal parts, we proceed to install the teeth. In order for them to hold securely, they should be overlapped.
- Decorating the “tops”.
Decorating the crown starts from the “tops”. A large bead is strung on a thin wire, then a small bead, then the wire is pushed back through the bead and wound onto the top of the crown tooth.
- Decorating the frame.
The crown, decorated with iridescent glass beads and beads, looks especially beautiful. But you can use ribbons, braid, feathers, artificial flowers - whatever is at hand. Decorative elements are attached using glue. It is convenient to use a glue gun. Fabric elements help hide the wire frame.
A small crown is made in the same way. Along with the size of such a crown, the number of teeth decreases (5 pieces are quite enough). To avoid problems with securing the crown to your hair, it is fixed on a hoop.
How to create an original daisy crown for a girl in a step-by-step tutorial
The next method of making a crown differs in that the beads are strung on wire during the manufacturing process. This fills the base and teeth of the decoration. The result is a crown in the shape of a daisy.

To decorate the product and make it more solemn, a large glass bead is attached to the center of each petal.
The basis of such a crown is a thin hoop or rim into which decorative elements are sequentially woven.

You can simplify your work by preparing branches with beads and beads in advance. To do this, several beads (from one to three) are strung onto a piece of wire 8–10 centimeters long, the wire is folded into a loop and then scrolled a few centimeters. It turns out to be part of a twig. Having made three to five such blanks, they are connected together. To make the branch voluminous, the beads are placed at different levels.
The branches are fixed to the hoop using wire (the excess is cut off with pliers) and glue.
Most often, a wire crown is made openwork. But there are options in which there are no voids, and all free space is filled with decor. The decoration looks very elegant.

In addition, the finishing of the crown is done both evenly and not. For example, you can highlight the central part with the largest decorative elements.
Useful video on the topic of the article
Using a detailed master class, making a crown from wire will not be difficult. Make sure of this by watching the attached videos. Get creative and let your little princess be the most elegant and beautiful!
Ask a little girl what she wants to be.
And she will probably answer that she is a princess.
And a princess definitely needs a crown.
You can make the crown yourself at home with your baby.
This will please her and help develop her creative imagination.
DIY crown made of cardboard
Even a child can make a crown out of cardboard without any help from adults. To do this, you need to take A4 cardboard. An elastic meter measures the circumference of the head. If necessary, several sheets of cardboard are glued together into a long rectangular shape.

Using a pencil on this cardboard, you draw the shape of a crown, which can even be of the most unusual shape: with sharp teeth, with turrets, with patterns. After the workpiece is ready, it is cut out with scissors. The craft is bent into a circle. Both edges are secured together with a stapler. In order for the crown to stay firmly on the child's head, you can pierce holes in two places and stretch an elastic band through them. It will be pulled under the chin.

The resulting cardboard crown is decorated with your own hands. Simple beads, sequins, ribbons and rhinestones can also be used. All this is attached with glue. After the adhesive base has dried, the product can be safely placed on the child’s head. It is recommended to sew a royal dress for the little princess. This will undoubtedly bring great joy to the child.
DIY crown made of wire and beads
It will take several hours to create such an elegant crown. But it is not so easy to break or dent. With one return movement, the shape of the crown will return to its original state.

To make a crown with your own hands you will need: cut beads of a beautiful golden hue (40 grams), simple beads of a golden hue (5 grams), glass beads of a golden hue (5 grams), wire with a diameter of 0.3 ml special for bead weaving, wire with a diameter of 1 ml, pliers and wire cutters.
The work begins with setting beads on wire. The wire that is thickest is taken. The picture shows a crown with a rim slightly larger than the neck of a three-liter glass jar. If desired, the diameter of the rim can be increased.
When the required amount of beads is placed on the wire, its ends are twisted.
The next step is to weave the petals of the crown with your own hands. The French weaving technique is used. Along it, a bead-cut of 15 pieces is strung onto a wire piece 70 cm long. A loop is formed on one side of the future petal (as shown in the photo).

After this, the beads are strung again and an even larger loop is made. The beads are woven in an arc until the moment comes to twist the wire at the base of the resulting leaf.
At the very top of the petal the loop unfurls. Beads and glass beads are strung on it. The end of the wire does not need to be cut. It is enough to make a few turns and carefully hide it in glass beads.
According to the described scheme, you need to make five leaves.
After they are made, they are attached to the rim at an equidistant distance. The leaves are attached to each other using beads.
So we got a little masterpiece - a DIY crown made of beads and wire.
DIY lace crown
Such a textile crown on a princess will look very elegant from the outside. The image will become completely softer and sweeter.

To make a lace crown you need lace, rhinestones for decoration, foil and glue.
The required length of lace is measured. It's being cut. In order for the crown to keep its shape perfectly and not bend, the lace is placed on foil and soaked with PVA glue on it. Leave until completely dry (about six hours).

After drying, the lace is decorated with ribbons, rhinestones, and beads. They sit on the glue. It is better to use instantly drying colorless glue.
Both ends of the lace are glued together. It should be a bright and charming crown for a girl. This craft can be of different thickness and width. A crown made of wider lace of the finest weave looks magical.
DIY felt crown
Making a crown with your own hands from felt is not difficult. It's a pleasure to work with this material. Felt holds its shape perfectly due to its density. This is an environmentally friendly material. The felt doesn't fray at the edges, so you don't have to process them.

You just need to cut out the desired pattern from paper and apply it to the fabric. It is necessary to measure the circumference of the child’s head in advance. Cut two pieces to pass the elastic inside the product.

To give a beautiful shape along the edges, it is advisable to sew a stitch on a sewing machine. Then you need to insert an elastic band of the required width. The elastic can be threaded inside using a ruler. If the head circumference is measured correctly, then in the end the elastic band will not stick out from the crown on the child’s head. Otherwise it won't be pretty. If desired, the elastic band can be replaced with a satin ribbon, which will be tied behind the head with a bow each time you put it on.
The resulting crown is decorated with artificial roses with your own hands. In the photo they are made of felt. It is important to choose a ferment for roses in pleasant pink and cream shades. To create a flower, oval and round shapes are cut out, which are then formed into a bud. They can be sewn together with thread and attached to a felt crown.
So we made a crown with our own hands from an unusual material. Really hand made.
When winter comes, there is less and less time left before the New Year - the favorite holiday of children and adults. For our little fidgets this is a time of gifts and miracles, and for mothers it is a period of Christmas trees and matinees. If you have a little girl, then you know how important it is for her to feel like a princess on a holiday. And to create a suitable image, parents go to the store to buy a ready-made suit or sew it at home. Using this tutorial, you will create an adorable wire crown for your little girl. And no matter which option you choose, any fairy-tale look will be very successfully complemented by a crown. You can easily make this decoration yourself.

Creating a frame
In order to make a wonderful crown from beads with your own hands, we will need:
- wire;
- pliers;
- multi-colored beads;
- small and large beads;
- ruler;
- glue.

If you want to make a beautiful and high-quality product, first you will need to create a base - a “skeleton”. The main thing is not to rush and strictly follow our advice. A visual diagram and recommendations will help you quickly understand everything. So, let's move on to the stages of your actions.
Create a circle of wire according to the size of your girl's head. Prepare five pieces of wire, their size should not be >12 cm.

Fold each of the prepared pieces in half, twist the tip of each and secure it to the prepared hoop.


Use a glue gun to coat each resulting element.

We design the product
Well, you already hold the base of the wire crown in your hands. And now, relying on your imagination, you will need to design the “framework” of the creation. In order for everything to work out, rely on the following steps:
- take one large pebble and a bead of any color, the main thing is that the shades in the work are combined;
- pass one of the ends of the wire through it;
- then carefully twist the wire and attach a bead to its sharp end.

Beautiful and majestic
Now you are left with the simplest and most enjoyable part of the job. It's time to show your creativity. This will be easy to do if you follow the following order:
- take a wire and string multi-colored beads of different sizes onto it;
- wrap this decoration, starting from the top, around the corner of the crown, and so on until the very end;

- pick up another piece, string another type of beads onto it and add decorative ornaments (flowers, snowflakes);

- also intertwine our frame with this wire, only in the other direction.

Well, all you have to do is put in just a little effort to complete the wonderful crown.
- in this style and continue decorating the remaining four corners of the product;
- and in order for everything to look perfect and without flaws, decorate the base of your creation with transparent hard silk.

Beaded decoration
Let's also consider a guide to creating an interesting product. It only takes a couple of hours to make a beautiful beaded crown that will be a good decoration. You will need large gauge wire, beads and a material to string them on. So, the stages of your actions:
- use wire to make a circle of the size you need;

- then take another, thinner material to work with and give it a wave shape;

- connect the two products together with a thin wire.


Now you need to add beauty to the future crown. This guide will help you do everything right:
- in a chaotic order, string beads onto thinner material, one after another. For work, choose any color, it all depends on your imagination;

- then wrap it around the frame and every element of your creation;

- All that remains is to decorate everything with large beads and stones;

That's all. The delightful crown is ready. And for this we needed very little time and effort. Now it will be a great addition to any holiday costume.
Video on the topic of the article
Here are video tutorials that show the work process more clearly.
The New Year is coming, which means it’s time for matinees and Christmas trees. Mothers of girls know how important it is for their daughters to feel like real princesses. Someone buys a ready-made dress in a store, someone sews a suit. In both cases, the image of a princess, snowflake, bead, winter girl or even a snow queen will be perfectly complemented by a crown or tiara. It turns out that you can make this accessory yourself - exactly the way you want it to be. In this master class we will make a crown for a girl out of wire and beads.
To make a crown you will need:
wire 1.5 mm, 1 mm and 0.3-0.4 in diameter,
pliers,
beads and beads of different colors and sizes.

First you need to make the base of the crown; for this, 1.5 mm thick wire is best. The diameter of the decoration depends on the child’s head; for a 3-year-old child it is 12 cm.
We cut off part of the wire and close the circle, wrapping its edges. To ensure reliability of the structure, it is better to make two bases and connect them by wrapping them with wire around the entire perimeter.
Next, we need to prepare the frame for the peak of our crown. To do this, take a wire 1 mm thick and cut it into pieces of the required length. On a product of the indicated diameter, peaks 10 cm high look good, which means you need to measure 10 cm on both sides of the crown tooth and make a reserve of 3 cm for attaching to the base, i.e. we will need pieces of wire 23 cm long. For a three-year-old child, five spades on the crown are enough. If you are making a decoration for an older child and want a royal accessory, you can safely make eight spades. 
Wire 1 mm thick bends well, and it is quite easy to make peaks of the shape we need from it. We attach the peaks to the base in a simple way - by twisting the ends onto the base. For greater stability of the product, when fastening one part, it is better to grab the other so that the peaks are connected to each other, so the parts will not wobble.
We should have a crown frame with the required number of teeth.
Then the most interesting part begins - decorating our product. To begin with, we take the largest and most beautiful beads that will crown the crown, and small beads - details in contrasting colors will look very impressive. To secure the bead to the peak, we do the following: take the thinnest wire that we have, string a large bead onto it, then thread the tip of the wire into the bead and immediately pass the wire back through the bead. The bead was on top. We attach the part to the top of the crown tooth, wrapping the wire around it. We do the same with all peaks. 
The next stage will require imagination and patience, since the work ahead will be painstaking. We string different beads and seed beads in any order onto a thin wire, wrapping them around the peaks. Details can be alternated in any order or creating a specific pattern - according to your desire. You can also use pieces of tulle or decorative flowers. 
An accessory made from wire of the specified thickness is quite flexible; the peaks can be directed in the desired direction or bent. 

You can attach the finished crown to your head in the following way: we make loops from wire on both sides of the product, then, using hairpins or bobby pins, we attach it to the hair. This way, the owner of the crown will be able to actively participate in the performance and have fun at the celebration. 
Source
A crown made of paper, beads, and autumn leaves is quickly crafted. From the article you will learn what icing is and how to make a sweet tiara from cake mastic.
DIY beaded crown
Choose any of the options presented and go for it. See how easy it is to make a princess crown.
Here's what you'll need to get started:
- 2 types of wire: a thick section for the base and a thin one, on which we will string decorative elements;
- pliers;
- beads;
- pearls;
- beads.

Attach it with thin wire to the base. This is the kind of princess or queen crown you should get at this stage.

Next, string beads onto a thin wire. Attach these decorations to the base by placing a pearl or large bead inside.

This is such a cute queen crown.

If you don’t have beads, but have other materials, you can quickly make a decoration for a girl’s head.

For this we use the following:
- various beads with large hole diameters;
- cleaning tubes - 5 pcs.;
- wire cutters

Now you need to cut the 3 remaining tubes as follows:
- the first - in half;
- the second - into 3 identical parts;
- from thirds - cut off 2/3 of its length.

Fold each piece in half and secure them to the crown as in the photo. In this case, the longest tube will be in the center.

String beads onto the decoration and the princess crown is ready.
How to make a keychain with your own hands?
If you need a crown for a girl but want to practice making a small piece of jewelry, then start by making a keychain. This thing will also certainly come in handy. You will be able to take out your keys and admire the keychain, which will be made in a single copy.
Here is a list of what you need for this craft:
- beads of three colors;
- fishing line;
- wire;
- pliers or round nose pliers.
Before purchasing beads, check to see if they have a hole large enough to allow 2 turns of wire to pass through them without obstruction.

Cut the wire to the required length and string 18 red beads onto it. Then pass the end through their holes and tighten the loop.

Place another 18 beads of the same color on this wire, also pass its free end through their holes, as a result, you will get a figure eight like this.
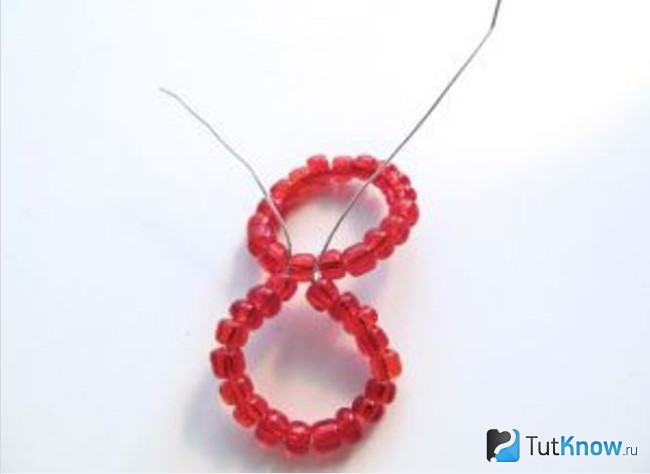
Place one circle of these small beads on top of another. Tie them together with the ends of the wire, trim off the excess edge.

On the remaining one, string 7 white beads, then one red one, then again 7 white beads. Fold this piece over to the opposite side of the ring and secure it.

Now, to the place where one red bead is located at the top, tie 2 more identical pieces of wire crosswise. Since it is bent in half, you will get 4 more fragments of the crown, string 7 white beads onto each of them, and secure with wire.

Wind another piece of wire to the top of the crown and place 12 blue beads on it. If it's a keychain, then thread the key ring through first and then secure the wire.
Here's how to make a crown so that it can become a small decoration or also a keychain.

Read how to literally make a brilliant head decoration in half an hour.
Paper crown - master class

It’s amazing how such an elegant product can be made from this simple material. Of course, in addition to this basics, you will need something else, namely:
- gold wrapping paper;
- necklace made of artificial pearls;
- glue;
- decorative large stones in the shape of hearts, diamonds and small ones;
- glue gun;
- scissors;
- and, of course, thick white cardboard for the base.
You can first measure the child's head with a flexible measuring tape, and then transfer the measurement to cardboard. Cut with an allowance so that the edges can be joined and glued.
But don't seal them yet. Place the cardboard blank on the work surface, apply a design that will be inside the crown and on top of it. Cut along these lines. If you want your work to be perfectly neat, then first apply the design to the template, then attach it to the cardboard and cut it out.
The same template will help you create the desired curls from gold wrapping paper. Lubricate it from the inside with glue, attach it to the cardboard blank, and connect it. Glue the 2 parts of the crown together and at the back.
Now apply melted silicone from a hot glue gun to the bottom edge of the crown and place the bead necklace on this spot. If you don't have one, then use individual beads, gluing them at the same distance.
A glue gun will also help to attach large and small pebbles. When the work dries, you can put it on the head of a girl or boy. After all, this product can be created not only for a young lady. The king's crown is also made for the holiday.
The templates below will help you make the top cutouts on your headdress so that they are neat and even.

Choose the shapes that you like best and make a template based on them.

Jewelry made from mastic
Housewives know that this sweet mass helps to decorate confectionery products so that they turn into works of culinary art.

At first glance, it seems that making such a cake is very difficult, but it is not so. The cakes are baked from sponge dough in a round shape. If you don't have one, a suitably sized oven-safe frying pan will do the trick. You can even bake it in a slow cooker, in a bowl.
Then the sponge cake is cooled slightly, removed from the mold, and cut into 3-4 layers with a sharp long knife. When they have cooled completely, brush them with buttercream and put them in the refrigerator. You can buy mastic or make it yourself from marshmallow candies or powdered sugar. Food coloring will help achieve the desired shade.
To make the mastic stick better, grease the cake layers with butter cream not only to connect them to each other, but also the top and sides of the cake. Cool it down.
After you have placed the mastic on the baked goods, you need to roll it out with a silicone rolling pin so that it lies flat and tight on the cake, and trim off the excess at the bottom. This confectionery product is decorated with pink fondant in the shape of diamonds. Their reverse side is moistened with water and glued to the main layer, and then decorated with sugar pearls.
Making a magic wand from mastic is just as easy as making a crown. Such children's mastic cakes will become a bright and unforgettable moment of the holiday. Let's take a closer look at how to decorate a homemade cake in the form of a crown. There are several ways to make it.
You can get a mastic crown like the one in the photo if you stick to this method. For it you will need:
- plastic bottle;
- cling film;
- brush;
- kandurin;
- mastic.

Now sprinkle the board or table with powdered sugar, roll it into thin “sausages” and immediately place them on the bottle. Place the first one as the rim of the tiara, the rest form and decorate it.

When the plan is realized, you need to leave the crown to dry for 1-2 days, then cover it with kandurin and place it on the cake.

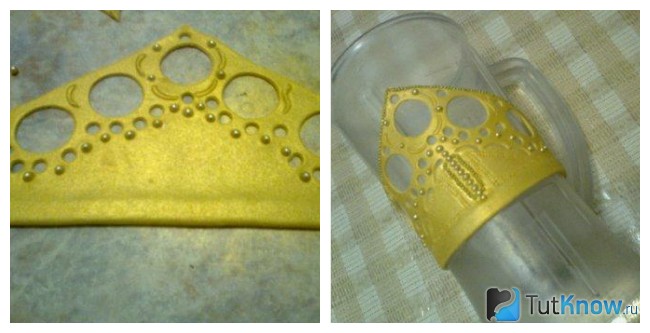
Decorations from mastic on this theme can be made a little differently. For the second one you will need gold food coloring. Roll out the mastic into a triangular layer. We cut it with a knife so that the workpiece is of this shape and is even.

Now, applying the glass, cut out identical round holes along the upper edge of the crown, and using a small stencil, cut out small circles. We decorate the crown with sugar pearls and leave it to dry well on a plastic bottle or jug.
What are icing and molds?
Very soon you will find out the answers to these questions and learn how to make incredible cake decorations from mastic. This is the product you will get if you use icing. For it, you need to draw a crown yourself or download your favorite image from the Internet.

After which it is put into a transparent file, and then the real magic begins. We roll up sweet strings from white mastic and apply each fragment to the corresponding drawing in the file.

Now you need to carefully transfer the still straight crown to a rounded surface, give it this shape and dry it for 1-2 days.

You can leave the tiara white or cover it with food paint, then you will get a golden crown.

You can get acquainted with molds - special forms right now. They will help you make a crown from mastic, which will turn out to be very elegant; a cake with such decoration will look expensive, as if it was made by great professionals.

Here is a list of what is needed for this creative work:
- silicone mold;
- glass wine bottle;
- glassine;
- food glue;
- mastic.
Place pieces of mastic in those mold elements that are most suitable for the crown. In this example, a mold was used to create a rose, you can take another one.
Start laying out the elements of the tiara on glassine paper, fastening them with edible glue.

After the crown is ready, all that remains is to cover it with kandurin using a brush and dry it.
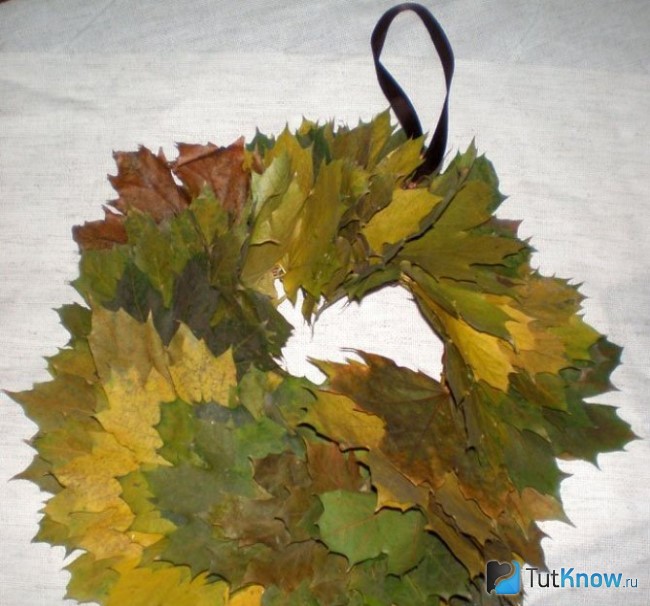
DIY leaf wreath
If you are walking with your children through an autumn park or in the yard, invite them to make a crown. Such creativity will help children develop their imagination, learn to love the surrounding nature, and grow into creative people.

You will need very few materials and equipment, here's what:
- Maple leaves;
- scissors or pliers.
Place the leaves in front of you. Use scissors or pliers to cut off the thick ends.

Now fold the sheet almost in half, leaving 1-2 cm from the central core.
With the second sheet, pierce this folded edge in several places, as if stitching it.
You can also make a more magnificent head decoration.

Here's how to make a fall maple leaf wreath. In addition to them, you will need:
- thin willow twigs;
- wire;
- ribbons.

Fold the willow branches into a ring. Secure with wire.

This wreath of leaves is woven in the same way as of flowers - the first petiole bends around the base, then the second one is woven in, and so on.

When all the branches are covered, you need to connect the petioles of the first and second leaves with wire or thread and secure. This wreath of autumn leaves can be worn on your head or hung on your door as a decoration. Then you need to make a loop.
Here's how to make a leaf wreath or home decoration. The following videos will introduce you to other interesting ideas right now:


 Stand made from newspaper tubes")

