Municipal educational institution "Gymnasium No. 7"
G.o. Podolsk Moscow region
Topic: "Volumetric appliqué from corrugated paper "Owl"
Grischuk Svetlana Vasilievna
G.o. Podolsk
Moscow region
2016
Topic: “Volumetric appliqué made of corrugated paper “Owl”.
Types of educational work: working with different types of paper and cardboard.
The purpose of the lesson : teach how to make a volumetric application.
Lesson objectives: improve the technique of work in the genre of "application"; consolidate knowledge of safety rules when working with scissors, techniques for working with different types of paper;
improve ideas about the use of templates and the technique of tracing them with a pencil;
develop imagination, spatial representations, as well as fine motor skills of the hands.
Equipment:
for the teacher: ready-made crafts made of corrugated paper, pictures of an owl (or slides), an audio recording of bird voices; a map with stations, a picture of a train;
for students: colored cardboard, corrugated paper, templates, glue, scissors, pencil.
Board layout: a record of the topic of the lesson, a travel map with stations marked on it, pictures of an owl, trains (appear during the lesson).
During the classes.
Introductory conversation.
Today in the lesson we will work with different types of paper. So, we were back in the paper craft workshop.
I propose to conduct today's lesson in the form of a lesson-travel.
In front of you on the board is a map of the future journey. During the lesson, we will get to different stations, where new discoveries and things await you. And on what we have to travel, guess?
Rushing along the rails
From the huts a string.
(Train.)
A picture of a train appears on the board.
Reporting the topic and setting the objectives of the lesson.
Today we will perform a voluminous application of a bird. To do this, we will need to repeat the technique of working in the "application" genre.
For the manufacture of crafts, we need scissors. At the same time, we will check the knowledge of safety regulations when working with this tool.
As you work, you will use different types of templates. Be careful at all stages of the application.
What kind of bird will we depict? You must tell me yourself by guessing the riddle.
Silent during the day
Screams at night.
The eyes are round
The claws are sharp
Nose of the curve -
Forest robber.
(Owl.)
(Demonstration of crafts.)
Preparation for practical work.
The first point of our journey is the station "Parad-Smot".
(During the trip, the teacher pins the picture of the train to the desired point on the map.)
We begin the parade-review of readiness for the lesson.
Everyone checks whether everything is ready for climbing the steps of a new mastery. For work, we need cardboard, corrugated paper, templates, glue, scissors, a pencil.
All accessories should be laid out in front of you so that they are convenient to use. Let the materials - in our case, the paper - be located on the left, and the working tools - on the right.
Remember one of the main rules of labor lessons:
“It’s good that in the workshop everything you need is at hand.”
Repetition of safety regulations.
The next point of the trip is the "Safety" station.
For the manufacture of crafts, we need scissors. Let's check the knowledge of safety regulations when working with this tool.
When cutting with scissors, you need to direct them with the ends away from you.
When cutting, do not put your other hand under the blades of the scissors.
Don't hold the scissors upside down.
Scissors can only be used when you are sitting at your workplace.
Do not leave scissors open and do not place them on an uneven surface: they may slip off and injure someone, etc.
5. Information moment.
We continue the journey and go to the station "Information".
Which of you has seen an owl and can tell about it?
(children's answers)
Look at the pictures of the owl.
(Demonstration of pictures or slides depicting an owl.)

The teacher's story about the owl.
Owl bird of prey. Differs in paws pubescent to the claws, dark beak, feather ears. Sitting down to rest on a tree or the ground, keeps the body upright, etc.
Carrying out practical work.
We go to the next station called "Trudovaya", where we will start making crafts.
Before this lesson, we have already worked with paper - we made various crafts out of it. Today we will perform voluminous work, because during its manufacture, sheets of paper are not smoothed, but are smoothly folded and glued.
Remember what the word "application" means.
(Applique is when pictures are not drawn, but created by gluing sheets of paper or fabric onto the desired background.)
What will be the background of our work?
Since the eagle owl is a nocturnal bird, the background for our work will be black or dark blue cardboard.
Consider an owl. How and from what is it made?

What colors of paper would you choose to work with?
Let's break our work into two stages: preparation of parts and assembly.
Think about how you can quickly cut a lot of the same feathers?
(Fold the paper with an accordion.)
We will use templates to make the details of the work.
Let's make blanks for feathers.

Let's make blanks for branches, eyebrows and beak.
It is better to tear off pieces of branches with your fingers, and not cut them out. Why?

We are going to the station "Grovaya Polyanka".
7. Physical education.
8. Continued practical work.
Ahead station "Factory".
Let's start assembling crafts.
Start sticking blanks with a branch. Then - the body from the bottom up, feathers around the head and around the eyes, eyebrows, beak. Glue the feathers on the breast with the convex side up, and on the wings and head with the convex side down.
Why do you think it is necessary to glue the parts in this way?

Pay attention to how far from the first row the feathers of each next row are glued.
What can be done for the decoration of the craft?
For decoration, crafts can be added, cut out of colored paper, stars and a month.
9. Demonstration and discussion of the finished craft.
Our train leaves for the Terminal station.
The craft is ready!
Let's compare it with the image of a real owl.
(Children name signs of similarity between birds and crafts.)
You have made a stylized image of a bird from pieces of paper.
10. Control moment.
How is this paper craft different from the previous ones, also made of paper?
What stages did the work consist of?
11. The result of the lesson.
What new did you learn at the lesson, what did you meet for the first time?
What technology was needed to make the craft?
What images from the animal or plant world could you glue together using such details and such a technique as today in the lesson?
12. Cleaning the workplace.
Bibliography:
M.A. Davydov. Lesson developments in technology: Grade 2.-M.VAKO, 2010.
N.M. Konysheva "Technology: a wonderful workshop." Textbook for grade 2. 2010.
ON THE. Tsirulik, T.G. Prosnyakov. Creativity lessons. Textbook for grade 2. Samara: "Educational literature", 2004.
We are introduced to the application in kindergarten. This type of creativity attracts a small child and undoubtedly brings a huge creative potential to development. Not only develops fine motor skills of hands, imagination, but also brings up an aesthetic perception of the world, teaches artistic taste. In this article, we will introduce you to a new type of appliqué with the help of a master class on trimming from corrugated paper.
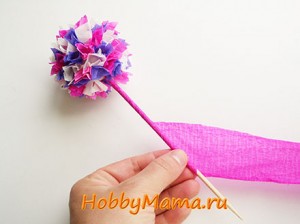
And this type of application, such as trimming, will definitely interest even needlewomen, since its technique can be used to create fakes that decorate the interior. Facing is a three-dimensional construction of twisted pieces of light paper glued to the surface with a thin stick. The use of different colors allows you to create amazing mosaics that look like fluffy carpets, voluminous figures, postcards-pictures.
Tools for work
To make such fakes, you need a very small set of materials: paper, glue, scissors and a “cutting” tool in the form of a thin stick.
Typically, this technique uses corrugated paper or, as it is also called, crepe paper. This paper can be purchased at office supply stores. Corrugated paper is cut into "end faces" - elements of a three-dimensional appliqué. Glue will be needed to cut and glue these trimmings to the base of the craft. As a base, corrugated paper can be “downed” on any surface to which this paper is glued. It can be a sheet of drawing paper, cardboard, light ceiling tiles. For voluminous crafts, blanks are made from foam, newspapers, papier-mâché, and plasticine.
Well, the main tool for trimming is a long thin stick with a blunt end. A pencil, a rod or a body from a ballpoint pen, a Chinese chopstick, a toothpick may well be suitable for the role of such an instrument.

Easy lesson
The technique of facing on a flat picture begins with the selection of a pattern. They draw it themselves or take it ready-made from any coloring book, after pasting it on thick paper. We select the desired colors of paper and make blanks from them. To do this, rolls of paper, without unfolding, are cut into strips, and from these strips the mode is squares with a side of about 1-2 cm.


When there are a lot of squares, we apply PVA glue to part of the drawing, wrap the squares tightly on the end of the stick and put it on a strip smeared with glue at a right angle. We take out the stick and so we work on the subsequent trimmings. We place one after the other tightly along the glue line. You can also fill in the background of the picture to make whole landscapes. Facing a flat picture is suitable for classes with children from 5 years old.


Volumetric method
Another interesting application method that creates velvet figures is the so-called "volumetric trimming method". It is made on plasticine. The same squares of the workpiece are cut, only glue is no longer needed. It is enough to mold the desired figure from plasticine and start sticking the ends with a stick in turn into the surface.
As a result, we get voluminous crafts:


All these crafts can be done by a group of people, creating works of a larger volume, for example, large canvases of landscapes, photo frames, decoration toys. Needlewomen in this way make interior decor items. If up to this point such an application looked like child's play, then the creation of flower balls and topiaries in this way fascinates with its magical light look.


Topiary trimming is also done with paper or napkins.
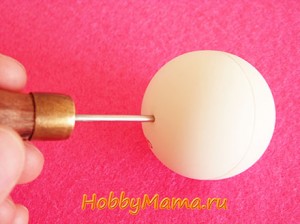
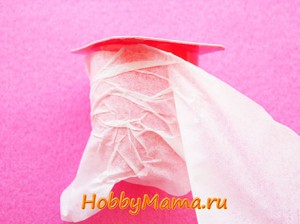
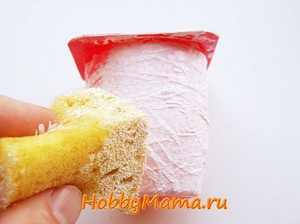
To make a topiary, we need: corrugated paper or multi-colored napkins, scissors, bamboo skewer, ping-pong ball, dry glue, PVA glue, brush, awl, cardboard, trimming stick, yogurt cup, paper napkin, acrylic paint , plasticine, a piece of narrow decorative tape.
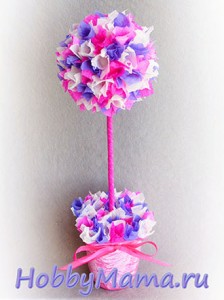
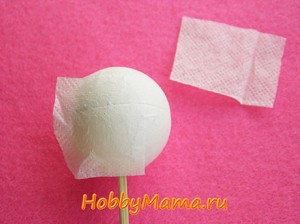
The ball, in extreme cases, can be twisted from old newspapers and wrapped with threads, cut out of foam. The ball must first be glued with a layer of napkin so that our paper tubes are then glued to it, then it is decorated using the technique of trimming with corrugated paper from top to bottom. At the same time, trimming is cut out in a larger size, so your product will be lush and airy.

The barrel is a skewer that is wrapped with decorative ribbons or a strip of paper. We glue the glass with a napkin, deliberately creating wrinkled irregularities for decoration. When the glue dries, cover with acrylic paint. We insert the cut out cardboard into the barrel, which will serve as a lid for the cup. Now we put plasticine in our pot and stick the finished crown with the trunk there. We glue the lid on the glue and decorate it with paper trimmings. Decorate with satin ribbon.

Corrugated paper is an amazing material for creativity. From corrugated paper, you can make both simple applications and real works of art. Corrugated paper flowers are especially spectacular.
In this article, we will present several photos and videos of master classes that are suitable for both adults and children.
Application "Vase with flowers"
Let's start the application "Vase with Flowers" by cutting out a cardboard blank in the shape of a vase. We make the lower part of the vase in the shape of a rectangle - this is a stand.

From corrugated paper we make flowers with a leaf.

Cut out a square from red crepe paper. Fold and cut it according to the pattern. Making such a flower is like cutting a paper snowflake out of folded paper. The straightened flower has four openwork petals.

We glue together three blanks. We will get a voluminous flower.

We glue flowers with petals and three-dimensional flowers on a cardboard vase. We decorate the craft with a ribbon. We bend the cardboard stand. Application "Vase with flowers" - ready!

We start making a corrugated paper rose by making petals. We make five large and five small petals.

Using a stick, twist the edges of the petals. We bend the petals a little, giving them a natural shape.

To form a bud, we need a stiff wire, threads and a rectangle of corrugated paper.

We wrap the wire with a rectangle, forming a bud. We fix it with threads.

Using a thread, we fix the petals, placing them around the bud.

We wrap the wire with green corrugated paper.

If you make three roses and complement the composition with corrugated paper leaves, then we will get a real bouquet of roses.

Crafts from corrugated paper roses - ready!
Crafts from corrugated paper roses video:
You can make a beautiful bouquet of flowers from corrugated paper. To do this, cut out a strip of corrugated paper and fold it in half. We twist the strip into a tube.

We fasten strips of corrugated paper around the bud one by one and fix them with glue.

We straighten the top of the bud.

We wrap the bud in green cardboard, forming the stem of the flower.

Glue the leaf.

We make several of these flowers and wrap them in a napkin. We tie the napkin with a beautiful ribbon. Bouquet is ready!

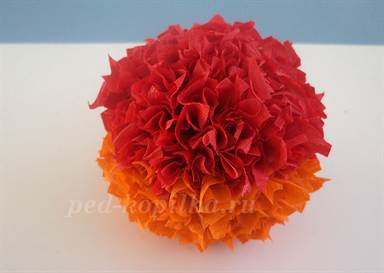
Flower ball (corrugated paper decoration)


Corrugated paper wall panel
Making a wall panel out of corrugated paper is not difficult. We cut out a wavy blank from yellow paper according to the model in the photo.

We twist the workpiece, forming a flower bud. We fix the bud with glue.

We plant a bud on a wire. We wrap the wire with green corrugated paper. We make several of these flowers.

Cut out a circle from thick cardboard. Cut out small leaves from green cardstock. We twist the leaves a little, giving them a natural bend.

On a cardboard circle we place flowers and leaves. We decorate the craft with green paper ribbons or sisal. Panel from - done!

Card with flowers from corrugated paper
Using corrugated cardboard, you can make a lovely summer card.
From green cardboard, we fold the base of the postcard according to the model.

We wrap a piece of corrugated paper around the wire several times.

We compress the paper with an accordion. Cut off the excess ends of the wire.

We fix the paper at the ends with glue. From the resulting flagella we make a butterfly.

We form flowers and leaves. We make a composition on a postcard from flagella.

Corrugated paper tulips (video)
Tulips from corrugated paper tulips video:
DIY crafts are ready!
Flowers are a universal decoration for any celebration. Fresh flowers are associated with summer, warmth, youth. Maybe that is why it is customary to give bouquets to beloved women and girls. Flowers can tell about feelings and decorate a festive outfit.


Mankind has long learned to imitate nature, and now every creative person can create inflorescences with their own hands. To do this, it is enough to prepare corrugated paper, scissors, glue. Even children in kindergarten will be able to make flower arrangements and applications in no way inferior to the original.
apple blossom
Corrugated paper is ideal for creating inflorescences and leaves. It is convenient to make petals from the corrugation: the soft material easily folds without leaving kinks and at the same time firmly holds its shape. Such a simple material gives a great field for creativity and imagination.


Using corrugated sheets, you can create decor for postcards or voluminous bouquets that exactly repeat fresh flowers.
Applications from corrugated paper “Sprig of mimosa and siren”
With preschoolers of any age, you can collect a sprig of lilac or mimosa from corrugated pellets. The creation of a small application will contribute to the development of fine motor skills, imagination, logical and abstract thinking. With the help of parents, even kids of 2-3 years old can perform the application.
For work you will need:
- base (thick paper or thin cardboard);
- corrugated colored sheets (violet lilac, and yellow mimosa);
- double-sided green paper;
- pattern of leaves and twigs;
- scissors;
- PVA glue;
- green marker.
Description of work:

These are just some examples of corrugated sheet applications. Corrugations will also make tulips and snowdrops. Creation schemes are shown below.
Corrugated paper snowdrop applique


Corrugated Paper Rose Applique


Corrugated Paper Carnation Applique
From corrugated paper you can make a beautiful lush carnation:


For this you need to prepare:
- corrugated sheets (napkins);
- scissors;
- the basis for the postcard;
- stapler;
- glue;
- green paper (for leaves, stems, sepals).
How to make a flower step by step:
Volumetric bouquet
Lush roses will decorate a birthday card. They are also made from cut circles that are stapled together. The implementation of the application is shown step by step in the photo below.


Video: Volumetric 3D corrugated paper flowers
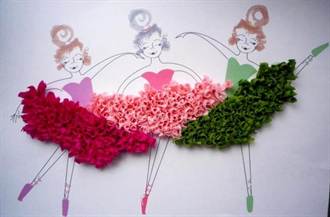
Application in the technique of trimming
A three-dimensional application always looks much more impressive than a simple paper picture. It is not very difficult to add volume to the composition using a corrugated colored sheet, both beginners and children 3-4 years old can easily cope with this task.
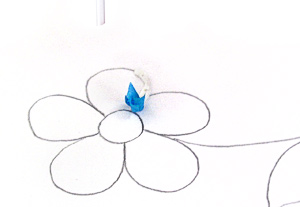
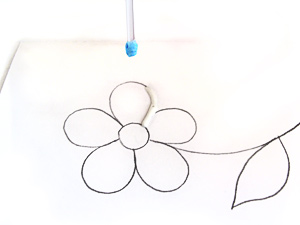
"Fluffy" flowers will be obtained using the trimming technique. The essence of such work is gluing pieces of paper or napkins with a stick (toothpick). The glued paper pieces remain upright on the base, which adds volume to the composition.


Facing is painstaking work that requires patience and perseverance. Therefore, for young children, it is enough to trim individual elements of the application. For example, in this way you can select the core of a flower. Adults can fill in all the elements of the application with different colors. You will get a real picture, as if painted with paints.


Step by step photo tutorial
To create a composition in the style of facing, you need to prepare:
- basis for the application;
- contour drawing of a flower;
- PVA glue;
- corrugated paper;
- scissors;
- stick (pen rod, toothpick, sushi stick, pencil).
Step-by-step instructions for creating volumetric flowers:
It is worth remembering that the thinner the “stick” and the smaller the elements, the neater the finished composition will look. Ideally, the middle of the twisted paper squares should not be visible (only sticking out corners are visible).
With the guys involved in the older group, you can make “fluffy” carnations or lilac branches using this technique.


Creating large, large-scale compositions using the trimming method takes a lot of time, so this work is well suited for a collective project in the preparatory group.
Video: Facing master class
Corrugated cardboard postcard
Appliqué flowers are made not only from corrugated colored paper, but also from cardboard. Corrugated cardboard gives volume and originality to the application. At the same time, working with him does not require special skills, so even children in the younger group can handle the craft.


A simple and cute creative work is a card with a flower made of corrugated cardboard. For MK you will need:
- sheets of corrugated cardboard in yellow, green, orange colors;
- PVA glue;
- pencil;
- scissors.
Detailed instructions:
Other entertaining applications of different levels of complexity are also obtained from corrugated cardboard. Children's imagination can easily suggest many options for paper paintings.


Video: Application of their corrugated cardboard
New workshops for making panels (application) - bouquets of colored paper in our piggy bank.
The diversity of the world of flowers is striking in the abundance of shapes, colors and aromas! Everyone will find in this beautiful collection a flower that is pleasing to the eye or associated with a memorable event. Our step-by-step instructions with photos will show you how to make beautiful ones with your own hands: chrysanthemums, daisies, carnations and peonies.
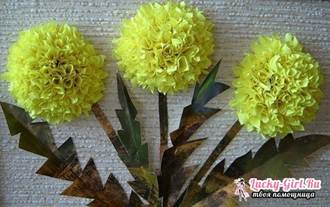
Chrysanthemums have gained popularity due to the rich variety of varieties. These flowers differ in the size of the buds, the shape of the petals, the color scheme and the number of flowers on one stem. So, anyone will find among this splendor flowers that will meet all needs and desires. The buds of pink chrysanthemums used in bouquets, flower arrangements, garlands and wreaths look very reverent and gentle. And you can also take the pink color of chrysanthemums as a basis in creating a panel, composition or application from corrugated paper. Let's explore this idea based on our master class.
Materials and tools
When creating a panel application with pink voluminous chrysanthemums, you will need:
- double-sided colored and decorative paper;
- thick pink corrugated paper;
- White paper;
- yellow and dark green felt-tip pen;
- PVA glue (silicate glue).
How to make an applique with voluminous pink chrysanthemums from corrugated paper
To create chrysanthemums, it is better to use high-density corrugated (crepe) paper - this way the flowers will keep their shape better. Prepare the necessary tools and related materials for work.

Cut out long strips of corrugated paper with a width of about 5-6 cm (the greater the width, the longer the flower petals).
Fold the strips several times as shown.

Cut out sharp petals with scissors, leaving 1-1.5 cm from the edge.

Make cuts evenly so that the width of the petals is approximately the same.

Straighten each of the strips. Apply a thin line of glue along the entire length of the strip.

Start rolling the strip into a tight roll. When the first strip is twisted, start gluing the second strip around.

Perform several blanks of chrysanthemum flowers in this way.

Gently spread the outer petals of the chrysanthemum.

Spread the rest of the petals to give the flower volume.

Using a scissor blade, twist the ends of the petals. Do this with all the petals so that the chrysanthemum becomes voluminous.

Lightly tint the center of the flower with a yellow felt-tip pen.

The number of flowers can be any, but it is desirable that the chrysanthemums differ slightly in size.

Cut out a vase of any shape from decoration paper. From dark green paper, cut out leaves that look like real chrysanthemum leaves. With a green felt-tip pen, highlight the veins on each sheet.

For the application, design the base of office paper, two considered colors. Cut out the top rectangle with curly scissors to make a beautiful frame. Glue the curly sheet onto the rectangle.
Glue the vase onto the appliqué base.

Turn the flowers upside down. Make cuts on the base of the flowers and open the edges. Coat the edges of the flowers generously with glue.
Glue three flowers over the edge of the vase. Glue the rest of the flowers on the second row.

Bend the edges of the leaves slightly with a scissor blade. Glue the leaves near the flowers and inside the bouquet. Glue a couple of sheets near the vase.

Let the painting rest for a while so that all the details are firmly glued to the base. Application with delicate pink chrysanthemums is ready!
What a wonderful original composition with pink chrysanthemum flowers we got! A little patience, diligence and time, but such a wonderful result of the work done! This master class can serve as an example for creating similar applications with chrysanthemums of any other color or using flowers to decorate an interior.
"Blossoming daisies" from corrugated paper
Spring brings warm sunny days and new hopes. Thanks to the change of seasons, everything is awakening from a long winter sleep and the world is revealed in colors! The harbingers of spring are bird trills and primroses, which inspire artists, poets, connoisseurs of beauty. And so we will devote our today's master class to creating a panel with delicate blooming daisies from crepe paper.

Materials and tools
When creating a panel with delicate blooming daisies, we used:
- crepe (corrugated) paper in pink, yellow and green;
- yellow and green office paper;
- stationery and curly scissors;
- toothpick;
- PVA glue;
- green chalk;
- pink marker.

How to make a beautiful panel with blooming daisies from crepe paper
Prepare stripes to create voluminous flowers. From pink crepe paper, cut a strip of 4 * 20-25 cm. From yellow corrugated paper, cut a strip of 1.5 * 15 cm, and from green - several strips of 1.5 * 10 cm.

Fold the strips several times and make notches on the yellow and green blanks, and deep cuts on the pink one, leaving 0.5 cm along the bottom.

Straighten the stripes. Divide the yellow blank into two parts. Connect the strips, alternating yellow and green. Apply glue along the bottom of the long piece.

Place a toothpick on the edge of the workpiece and begin to twist the strip.

Try to twist the strip so that the length of the notches on the surface is the same.
Twist the yellow-green center of the flower until the strip ends.

With a scissors blade, twist the edges of the petals on the pink blank, as in the picture.

Apply glue along the bottom of the blanks and begin to twist the strip with the petals around the core of the flower so that the petals open outward.

Twist the pink strip completely - you will get a lush spring flower.

In order to make a daisy bud, you need to twist the strip with the petals inward.

Make a few flowers and a couple of unopened buds according to the pattern.

From green crepe paper, cut out several rectangles of different lengths. Twist each rectangle into a tight stem, grease the edges with glue, and secure around the stem.

Also, cut out curly leaves from green crepe paper, as in the figure.
With green wax crayon, highlight the edges and the central vein on each leaf.

Give volume to the center of the sheets by straightening the paper.

Cut out a rectangle from green office paper, and a smaller curly rectangle from yellow office paper. Draw a bright marker along the edge of the curly sheet. Glue the curly rectangle onto the green base.

Glue the flowers to the base of the panel. Choose a layout that is convenient for you to get a harmonious composition.

Glue stems under each flower.

Glue the leaves to the base of the stems.

Volumetric panel with blooming daisies is ready!
What delicate flowers turned out of! As if by magic, spring daisies bloomed in the picture! Such an unusual panel will be a wonderful gift for a holiday or a significant date, as well as an original solution for interior decoration.
"Delicate carnations" from wet crepe paper
Bright red carnation flowers are often given to men and in, colorful ones will decorate any bouquet, while white and pink ones will emphasize the tenderness of feelings. Try to make beautiful carnations out of paper and decorate them with an appliqué. Our detailed master class will explain and show how to do it yourself.

To create an applique with delicate carnations you will need:
- pink crepe paper;
- colored paper (two-sided);
- thick paper for the base;
- curly scissors;
- stationery scissors;
- stapler;
- glue;
- spray bottle with water;
- colored markers.

How to make a delicate wet crepe paper carnation appliqué
This creative work requires the presence of different types of paper and tools, so you should prepare everything you need from the list in advance.
Cut out 4 identical squares from corrugated paper.

Lay the squares on top of each other, alternating the direction of the compressed "pattern". Use a stapler to connect all the squares.

Use curly scissors to cut out a circle from the stack of squares. Make cuts towards the center to divide the circle into petals.

Pick up the petals from the topmost circle.

Do the same with all the rows to get a lush flower.

With a pink felt-tip pen, make veins on all the petals.

Sprinkle the bulk flower with water.

Fold the flower in half, and then in a quarter circle.

Let the flower dry in a warm place, or dry it with a hair dryer.
Thus, make several flowers and one unopened bud.

Take half a sheet of light yellow paper and stick on top of a figured sheet of light green.

From dark green paper, cut three strips 2.5 cm wide and glue them into tubular stems. Cut out the sepals and narrow leaves, as in the photo.

Glue the flowers to the base of the appliqué.

When all the flowers are glued - glue the stems to three large carnations.

Glue the sepals over the flowers.

Glue the leaves to the stems of the flower. Cut off the ends of the stems.

Applique with delicate pink carnations is ready!
What lovely pink carnations we got! Carnations are voluminous, with color transitions - such an unusual technique allows you to achieve the similarity of paper flowers with the original. The application can be supplemented with a festive ribbon or multi-colored butterflies, or you can come up with other color combinations for decorating carnations.
"Scarlet peonies" from paper accordions
The world of flowers is beautiful and diverse! You are amazed - what bizarre forms, combinations in color and shades are found in the kingdom of flora. Among garden flowers, beautiful spherical peonies stand out with their magnificent forms, blooming profusely on bushes and flower beds. These flowers look wonderful in bouquets, arrangements and festive decor elements. You can also make beautiful voluminous peonies from corrugated paper and use them in the design of an appliqué or a panel.

What you need in the master class
To create an application with scarlet peonies, we need to take:
- light green and light yellow office paper;
- colored double-sided paper in yellow and dark green;
- corrugated paper of bright red color;
- corrugated cardboard orange or brown;
- green marker (felt pen);
- scissors, glue.

How to make an applique with scarlet peonies from crepe paper
Prepare the necessary tools, colored paper and cardboard to create a composition with three-dimensional flowers.
Take a piece of a light yellow sheet and glue a light green rectangle on top of it to leave a frame around the edges.
Cut out a flower basket from orange corrugated cardboard. Glue the basket to the base.

Prepare rectangles of red crepe paper, as well as small yellow rectangles to decorate the center of the flowers. Divide each red rectangle into four parts and fold them on top of each other.


