Content
It’s simply impossible to count how many different types of needlework there are, but if banal knitting or embroidery is not for you, it’s worth trying to learn something new. For example, ordinary nails and threads can create an amazingly beautiful picture using modern string art weaving techniques. Interested? Then find out: what materials are needed for this, how to draw up a diagram correctly and master a few simple master classes.
What is string art
An unusual type of needlework, string art, was invented in England almost four centuries ago. Using ordinary nails and threads, weavers of that time created decorative patterns on planks, which they later decorated the walls of their own homes with. Over time, the ancient weaving technique was reworked and improved several times, but the version of string art from Mary Bull became especially popular in the world. With her help, the English researcher taught children algebra and geometry.
What is needed for string art
The main supplies for creating a string art pattern are nails and threads. You can use thin yarn for knitting, ordinary sewing threads, floss or silk. In addition to this standard set, you will also need:
- a piece of plywood or board;
- thick cardboard if you are going to make a postcard or master string art with children;
- template, photo, spot diagram or finished image;
- paint, if the base needs to add color;
- a hammer for driving nails or an awl for making holes in paper.
Isothread technique - diagrams with numbers for beginners
If you have never tried to master string art before, then you will have to start from the very basics. Schemes with numbers in this case are a godsend for you. Arrows on them indicate the movement of the thread and the type of connection of all elements. To make it easier to work, apply the diagram to cardboard or wood in its original form, in the first case on the back side of the product.
For beginners, mastering the string art technique starts with learning the principle of filling an angle or circle. All other shapes: circle, oval, square or letters are only derivatives. To practice your skills, draw a right angle on a piece of paper with lines equal to 10 and 5 centimeters. Divide the long strip into 10 equal parts, 1 centimeter each, and number them. Divide the short strip by half a centimeter, also mark it with numbers - the diagram is ready. The thread must be led from one edge of the top to the other on both sides.
What to make from nails and threads
It would seem that simple threads, ordinary nails - well, what good can come out of such a set of tools? In fact, with the correct weave of yarn, a printed pattern can miraculously turn into a three-dimensional picture. For the string art technique, ideas can be drawn from anything. Did you like the image on the Internet? Feel free to download and print.
Using string art, you can make a three-dimensional image of a pet: a cat, a dog, a parrot. Abstraction lovers can master the technique of creating multi-colored panels. The correct geometric shapes of the lines will not become a hindrance to creating a postcard for Valentine's Day. Flowers, insects, wildlife, kitchen utensils - all this can be easily turned into paintings made from threads and nails.
Panel made of threads and nails
Instead of an ordinary purchased painting, it is better to hang a picturesque string art panel on the wall in the central room. The main feature is that the finished image should not have many small details that distract attention. In any case, you will have to make the base for the panel using threads and nails with your own hands, but you can trust children to stretch the multi-colored lines.
Painting with threads on nails
If you like plot drawings that you will have to pore over for a single day, then you should master the creation of a picture. For example, a canvas with animals, cartoon characters or fairy tales is suitable for the interior of a nursery. A DIY picture made of nails and threads with an interesting food theme will be a worthy decoration in the kitchen, and in the bedroom you can hang images of sailboats, clovers or delicate flowers.
Postcard with threads
Are you going to a friend's birthday party or preparing to congratulate your loved one on Valentine's Day? Then make an original string art postcard from threads. The pattern will have to be drawn on thick paper using a needle and thread. For these purposes, buy thick cardboard; regular printed paper tears too easily and quickly loses its shape. A postcard using the isothread technique will look beautiful if the finished template is glued to cardboard of a larger diameter.

DIY string art - master class
So, you have bought everything you need and are ready to start string art. Where to start? To begin with, you should master simple patterns, or better yet, use ready-made master classes or repeat the ideas of experienced needlewomen. Today you will learn how to make various crafts from nails and threads, learn about the basic principles of decorative weaving and creating incredibly beautiful patterns.
Heart
You should start getting acquainted with a new type of art with the simplest images, for example, making a heart out of threads and nails with your own hands. Even children can do this craft if adults help drive in carnations. In addition, this string art can be a great gift or just decorate a wall in your bedroom. This step-by-step master class will make your task easier:
- On a blank sheet of paper, draw a neat heart with a pencil.
- Place the dots where you are going to nail. It is important to make marks at the same distance; the appearance will depend on this.
- Place the paper against the plywood. Drive the nails into the places that you previously marked with a pencil.
- Remove the paper template from the nails. Use tweezers to remove any remaining clean sheet from the plywood.
- Make a neat knot on the central top nail and pull the tip of the thread diagonally.
- Continue wrapping the rope around the nails so that each new wrap creates a sharp angle.
- Once all the studs are tied, secure the end of the thread and carefully trim the tail.

Flower using isothread technique
Having learned how to embroider a circle or corner using the string art technique, you can easily move on to creating simple flower arrangements. The next step-by-step master class will teach you how to create flowers using the string art technique using the simplest example - dandelions. To work, you only need a sheet of paper, a pencil, an awl and thread of two colors: white and green. Step by step floral embroidery and thread looks like this:
- Starting at the top of the sheet, draw three circles in random order, each 5-6 centimeters in diameter.
- To get many dandelion inflorescences inside the circles, draw another small circle, from which draw 5 connecting lines upward.
- Make the stems and draw the leaves of the future flower. Make the necessary punctures.
- Embroider dandelion inflorescences with white threads in a circular pattern, starting your work from the very center. Remember that each part of the large circle is a separate inflorescence.
- To make the leaves voluminous, divide them into several triangles and embroider them with green threads according to the principle of the corner.
- At the very end, use small stitches to connect the base to the buds.
Having mastered simple pictures of a heart and flowers, you can proceed to more complex compositions and weave a portrait using the string art technique. You can take a ready-made photo of your pet, try to bring it to life, or depict the figures of movie characters with threads. As an example, take the monochrome portrait of lovers from the following master class on string art:
- Drive nails around the entire perimeter of the plywood sheet.
- Cut out a couple in love so that they represent a single whole.
- Place the image in the center of the panel and make marks for the nails with a pencil.
- Remove the paper and drive the nails in at equal distances.
- Start filling the picture according to the principle of creating sharp corners, but not from the central part, but by drawing only the general background with white thread.

Deer
Do you want to decorate your apartment in Scandinavian style? To do this, you only need an aged flat piece of wood, white threads, decorative nails with a small head, a hammer and a few hours of free time. Using the string art technique, the deer from the next step-by-step lesson will look almost like a real one. The creation principle is as follows:
- Clean the surface from excess wood chips and cover with a layer of varnish. If desired, the board can be painted any color.
- Print out a large stencil of a deer's head and cut out the design along the outline.
- Place a piece of paper in the center of the wooden sheet. Make marks for driving in at a distance of 5-7 mm. This step will be easier if you use graph paper.
- Carefully drive in the nails and start creating a masterpiece from the very bottom of the design.
- Fasten the tip of the thread to a nail and make a general outline, drawing the yarn like a snake around each nail.
- The further process is a matter of taste. You can use straight geometric lines or distribute the thread randomly inside the outline.
A DIY thread tree will look very symbolic on the wall. Coping with its creation is as simple as weaving a heart from isothreads. All you need for this picture is: a piece of smooth plywood, a hammer, chalk, green thread and nails with a beautiful head. Then simply follow the step-by-step instructions:
- Draw a sketch of the tree in chalk on a wooden board, trying not to create too many small details, but rather working out the outline.
- Then drive the nails in at a distance of about 1 centimeter from each other and erase the chalk outline with a damp cloth.
- At the base of the tree, tie the tip of the thread and start by creating an outline using the same principle as in the previous master class.
- Having completed this stage, let the thread run in a chaotic manner, first at the roots of the tree, then on the trunk and branches.
- Make as many straight lines as you wish.

Ship
This type of needlework is good because even small children can be taught it. On one of your free evenings, try making a craft out of thread and cardboard with your child. Such works are popular in preschool institutions and even take first place in handmade exhibitions. Let the boat become your first joint craft. The principle of its implementation is as follows:
- On the back side of the thick cardboard, draw a right angle with a vertical line 10 centimeters long and a horizontal line 5 cm long.
- Step back 2-3 mm to the left and repeat the size of the image in mirror image.
- Draw a semicircle below. Using an awl, make holes in the cardboard that are equal in length.
- Start embroidering with blue thread from the right corner. Pass the needle through the bottom outer hole from the wrong side.
- Draw a straight line to the top, turn the work over and thread the needle into the adjacent hole.
- So make 9 parallel lines and start working on another sail.
- To do this, change the thread to a different color and embroider the sail according to the classic principle of filling the corner.
- Use diagonal lines to fill the bottom semicircle with contrasting thread.
Birds are a symbol of flight, lightness and freedom. However, not every type of bird has such a clear and simple symbolic meaning. For example, the owl is considered a symbol of chastity, insight and the ability to foresee the future. This bird is depicted in all types of needlework; in the string art technique, the owl was no exception:
- On a blank sheet of paper, draw a general outline of an owl, make two large eyes, outline the wings and tail.
- Transfer the sketch to a piece of plywood and secure with nails, being careful not to leave large gaps between them.
- Select a thick brown thread and outline all the contours.
- Arrange the lines in a random direction so that each stud is involved in the work.
- Additionally, take a white thread. Shade the chest area and wings by making a few diagonal stitches.
- Finish the work by tying the end of the thread in a tight knot.

If, once again looking around the room, you again thought: “Something is missing!” - use your imagination and quickly start making stylish home decorations. How about an original panel made from threads and nails?
The art of making patterns and inscriptions using nails and threads, popular today, is called string art(string art). The idea is not new, but how interesting and extraordinary!
Today I will show you how to make different pictures from nails and threads, and you will choose the one that you like the most. Let's start with manufacturing heart.
You will need:
- square made of dense foam.
- pin nails,
- colored threads,
- glue "Moment"
- paints and brushes,
- adhesive tape,
- paper,
- pencil,
- beads.

1. Draw a heart on a piece of paper. To make the heart even, fold the piece of paper in half and draw the contours.
2. Cover a smooth sheet of foam plastic with acrylic paints. Choose the background color at your discretion. I chose pink.
3. When the base is completely dry, place a sheet with a drawn heart on it and pin it with pins. Instead of polystyrene foam and pins, you can take wood and ordinary small nails, but then you won’t be able to do it without your dad’s help.
4. Tear off the paper carefully so as not to damage the heart.

5. Fasten the tip of the thread to one of the nails (tie a knot) and wrap all the nails of the heart in a chaotic manner. Make sure that the thickness of the thread is uniform in all parts of the heart.

Decorate the picture with beads, sparkles, decorative stones and whatever your soul desires:)

And as a gift for inquisitive know-it-alls, you can make such a cute owl from nails and threads.

Catch an approximate drawing diagram according to which you can make this beautiful night bird.

How do you like this flame owl with crown for real princesses and convinced dreamers?

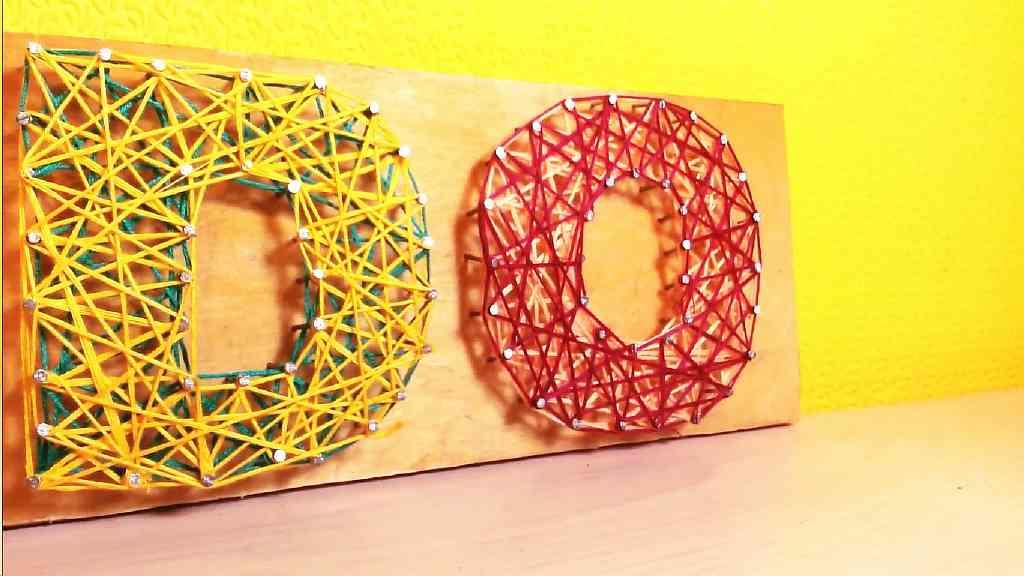
Look stylish and fashionable inscriptions made of nails and threads. On one of these panels you can write the name of your favorite girl (and the girls will write the name of the guy). The technique for making such a picture from threads and nails is identical to the previous one. But in the inscriptions, using threads, you need to clearly indicate the contours of the words.


Birds on a panel made of threads and nails- how cute it is! Lovers will certainly appreciate such a gift... for example, on the next anniversary of their acquaintance. And also an original painting with “birds of happiness” can be given to your mother on her birthday, on March 8, or on the eve of Mother's Day.


Swallow is a symbol of hope, renewal, light and rebirth of life. Give this spring painting made of threads and nails to your best friend or sister, and melt in her warm embrace!
A thread painting can serve as an unusual interior element in different styles. Weaving pictures from threads is also useful for children: this type of needlework develops fine motor skills, spatial imagination, and promotes the acquisition of basic knowledge of geometry. String art is a bit reminiscent of thread appliqué on cardboard, but differs in the technique of execution.
What threads are paintings made from?
To create a panel, you can take any threads. The type of product depends on their texture: dense or transparent pattern, its convexity and volume. Thick, but not fleecy threads (such as “Iris”) will produce images with a clear hatched outline, reminiscent of graphic works in pencil or charcoal. Thin threads of different shades allow you to create smooth transitions of shades, reminiscent of watercolor paintings.
For the first works and introducing children to the art of weaving pictures from threads and nails using the string art technique, it is better to use strong and not too thin threads. It is more convenient to work with them: adjust the tension, lay the next stitch-stitch, fasten the thread, etc. As you master different techniques, you can begin to try materials with different thicknesses and textures.
Features of weaving from nails and threads
When pulling the thread onto the warp, its elements have to withstand heavy loads. To prevent the painting from deteriorating during the creation process or after completion of the work, it is worth choosing a durable material for the thread panel, even for child labor: a wooden or cork base. For the smallest or especially decorative projects, dense polystyrene foam (EPS) and single-rod pins with colored heads are used. But most often they use wood and nails.
How to drive nails deep
The depth of driving depends on the density of the base material: it is better to drive them deeper into soft wood. Sufficient depth can be determined by how the nail is held at the base: it cannot be pulled out with your fingers.
The height of the rod above the base depends on the technique used to create the picture from threads. For a product in one level, it is enough to leave 1-1.2 cm of the length of the nail. When creating multilayer compositions, the height can be greater in order to clearly emphasize the depth of the lowest layers. Depending on the required height of the rod above the level of the base and its own structure, longer or shorter nails (up to 3 cm) are selected. Any thin wallpaper with small hats will do, but sometimes craftsmen also use decorative wallpaper.
How to change thread color
If you need a smooth transition of shades to create a picture from nails and threads with your own hands, proceed as follows:
- start weaving with the first color, tying the end of the thread to the selected nail;
- fill part of the drawing according to the diagram until the shade begins to transition;
- secure the first thread with a knot on the nail (if it is needed in the future, you don’t have to tear it off);
- tie a new thread of the desired color, trying to hide the knot under the finished strokes and make a few rare broaches on the finished background;
- continue working until the next color change.
If different threads fill individual sections of the outline (as when coloring children's books), then work with one color within the desired fragment, filling it. The adjacent one is filled with a different shade, and sometimes the direction of the strokes is changed. To clearly define the boundaries, each section is edged.

Methods for filling a pattern with threads
To make a picture from nails and threads, you need to master several simple weaving techniques:
- Corners in broken contours are filled by passing the first thread along one of the adjacent sides to the outermost nail, transferred to the adjacent one and raised to the rod located next to the one from which work began. Then the corner is gradually filled with threads, stretching them to each successive element until they reach the junction of the sides.
- A circle, oval and other rounded contours are filled, counting from the first rod with any number of nails (3, 5, etc.). The thread stretched from the beginning is attached to the next element. Observing the selected intervals, gradually fill the circle with a star-shaped pattern, in the center of which you will get a neat hole.
- Curvilinear contours can be filled using circle technology, moving the threads along the entire sequence of nails until it runs out.
- Any contours can be filled randomly, without a system, creating a uniform surface without gaps.
- You can wind threads not only inside the outline of the design, but also outside it. Against a background of thread web, the unfilled outline looks recessed into the surface. You can use different shades of thread to finish the design and the background around it.

Edging the picture
Sometimes a picture or its fragments require edging. It helps to clearly highlight the contours of the inscription, figure, etc. If the drawing consists of several fragments of different colors, then the contrasting edging of the sections will make them clear, and when using an intermediate shade, it will smooth out the border. Using different techniques, you can do the following:
- give the picture expressiveness;
- outline thin internal lines (for example, the outline of a window on a house);
- visually raise the edged parts above the remaining areas.
The main technology for making edging is a “snake” of several rows of thread. Do it like this:
- They tie a thread to the first rod (at random) and begin to intertwine all the neighboring ones, passing it on one side of the second, on the opposite side of the third, and so on until the end of the line.
- They return to the beginning, changing the sequence of passing the thread between the rods. The process is reminiscent of basket weaving.
- To make the edging more expressive, use contrasting thick threads and make more than 2-3 rows.
The sequence of creating multilayer compositions
Multi-layered panels are called such panels made of nails and threads, where individual fragments of the canvas are filled with different shades. Due to the way the yarns are wound, adjacent areas have different heights, especially when using knitting yarn and other thick materials.
You can choose a children's drawing and coloring book as a template for the picture. Filling is done as follows:
- Nails are driven into the base along the contour lines at the same pitch. You also need to outline the edges of the picture, creating a frame around the perimeter of the board.
- Determine which parts of the canvas should be the deepest, and which parts should be raised above the background.
- They begin to wind the threads from the deepest areas, trying to leave space on the rods if there is a raised fragment nearby. Having filled the low parts, they move on to those whose level is slightly higher, finishing with the highest parts.
The sequence can be chosen arbitrarily. For example, on the animal’s face, the low fragments are the main contour of the head and the inside of the ears, the whites of the eyes. The next layer can be the whisker pads (of a cat, fox, etc.), the outer contour of the ear, and the pupils. The nose should protrude above the surrounding fragments.
A design option for a multilayer composition is a silhouette against a contrasting background. In this case, the level of the image and background in relation to each other is determined. Then fill in the fragments one by one: first the lowest one, then the one that is higher.

Additional decor of compositions
Rod caps can serve as additional decoration. They go well with the edging, giving the composition the appearance of an outline framed by a string of beads. An interesting decorative option is a photo used as the bottom layer. The background serves as a frame for the unusual design.
If the picture is thematic, additional decor can be materials close to the theme: natural, improvised, etc. An example is an image of a fish, dolphin, mermaid, complemented by shells glued to the base. The flower can be supplemented with an artificial butterfly pinned to the core, etc. Rhinestones, sparkles and even LEDs inserted into pre-prepared holes and connected to a power source are suitable as decoration for inscriptions and drawings.
You can decorate the picture with a painted background. It needs to be painted in advance, before creating the web. After drying, the work is carried out according to standard rules.
There is nothing more exciting for a child than creating something with his own hands under the guidance of an adult. Creating panels from threads and nails is not only a fun activity, but a good way to develop children's creative abilities. Everything you need for such work can be found in every home, and with a little training and acquiring initial skills, you can come up with something new and give master classes to everyone.
Creating thread paintings is fun and exciting. And for this you don’t need anything super complicated, just a little patience, a little imagination and simple tools.
String art is a new and modern trend in the world of design: almost everyone can “touch” this style
There are several types of nitcography:
- Application. Using leftover knitting wool threads, scraps of embroidery thread, crocheted chains of air columns (braids) or finely chopped threads.
- Embroidery. Embroidered designs or embroidery using the isothread technique.
- String art(panel of threads and nails) using the isothin technique.
Work made using any of these techniques can serve as an exclusive interior detail or a unique gift.
Application on cardboard: thread panel “Cats”
All you need for this work is thick cardboard, felt-tip pens, glue and all kinds of leftover thread. The outline of the cat is transferred to the base and then glued with dark thread.

Everything inside this outline is well coated with glue, so that the cut remains of the threads can then be glued on. The main thing is not to go beyond the contours of the drawing.
Application made of threads and glue (video)
Drawing with threads: panels made of threads and glue
In this case, the threads are cut especially finely, no more than a millimeter in length. The finer the thread is cut, the better quality the finished work will be. The process of creating such panels takes a long time and requires a lot of patience. How to make this process interesting for a child? Divide the work, let the child attach the scraps to the panel in accordance with his idea, and the adult will have to prepare the material and cut it. It is very difficult to distinguish finished works using this technique from real paintings, so some consider this not appliqué, but thread painting.

Creating such pictures is not difficult, and the child’s pleasure from a bright and fluffy drawing compensates for all the efforts of adults. In addition, finished works, framed or matted, will serve as an excellent decoration for a nursery.
String art
Literally “string art” – threads of art. Panels made with threads and nails have a long and interesting history. According to one version, its founder was the English researcher M.E. Bull and the purpose of such panels was to help children develop spatial perception and study geometry. Other researchers insist that string art existed back in the 17th century, as a way of creating lace products.
No matter who the discoverer is, the essence is the same - the creation of various drawings, patterns or inscriptions. The technique involves the use of only straight lines, but due to interlacing and repeated overlapping, the picture acquires volume. Any threads for such weaving can be used: sewing, floss, wool, silk, synthetics.

What you need for work:
- A piece of very thick cardboard, a cork board (a cork pad for a computer mouse will do), foam plastic;
- Small nails or pins with large heads;
- Threads, colored or plain;
- Scissors and hammer;
- Auxiliary tools (markers, pencil, beads).
How to choose a pattern for a panel
For the first works, it is better to choose large single objects, placing them on the basis of A4 format. For your first job, you don't need to choose something complicated. It is easier and easier to master the technique using simple diagrams. For beginners, the most suitable would be something very simple, a circle or a polygon. After such training, you can make something more complex, for example, a heart or a Christmas tree.
Using threads of different colors for work, even in simple forms, you can achieve a volume effect. Panels with trees, flowers or plants look exceptionally decorative.

In this case, a tree trunk with skeletal branches is randomly marked, the location of small branches is outlined, and threads of various shades are selected. Work always starts from the bottom up.
Such string art may well become a decorative element in the setting, and periodic replacement of parts on the panel: fabric birds, flowers or fruits, New Year's decorations, will allow the work to correspond to the season.
DIY panel of threads and nails, where to start
Creating a panel is a multi-stage process and the first thing you need to do is prepare the basis of the work. String art can be made on cardboard, but more often a denser material is used. If a background is needed for the drawing, paint, varnish or wood stain is used. After the background has dried, the outline of the design is applied to the base and nails are driven in along them as a basis for tensioning.

The main thing at this stage is to achieve the same distance between the nails and drive them to the same depth. Now you can tighten the threads, observing the selected interval.
It is worth adhering to a certain sequence only when complex geometry is reproduced; in any other case, chaos in the weave is only welcome. The more layers of threads overlap each other, the more pronounced the 3D effect will be.
A panel of knitting threads: a simple way to make a gift with your own hands
For the little ones, you can offer a simple way to make a gift or design a card. In this case, working with nails and a hammer is not necessary. All you need to do is carefully wrap the remaining knitting yarn around some contour or pattern. It could be a sun, a star, a bell, a Christmas tree. More complex may be the design of the outline of a window cut out of thick cardboard. A child of 7-8 years old can cope with such work, and decorated with bells, snowflakes and stars, such a panel could well be an excellent gift for Christmas.

Drawing with threads, string art, string art. Work using this technique can be called whatever you like.
And this is not only an object of decorative art, it is a great way to teach a child new things and develop a craving for creativity:
- Working with threads develops abstract thinking and gives an idea of geometric shapes;
- By doing applique or pulling threads, the child develops fine motor skills, and this in turn has a positive effect on the development of speech;
- All materials are different in texture, color and texture, which means they develop sensory perception;
- By doing string art, children get an idea of modeling and mirror placement.
How to make a panel from threads and nails (video)
Such creativity has a positive effect on the development of perseverance, patience and attentiveness.
Examples of panels made of threads and nails (photo)


Creating a unique atmosphere at home is not an easy task. Although there are many finishing materials, furniture, and styles today, they are not all unique. But I want exactly something of my own, personal, personal, something that no one else has. Of course, there is a way out. Even two. The first is to order some kind of product from a master. The second is to do it yourself. And no one has yet come up with a better interior decoration than paintings, but not everyone knows how to draw. And it is not necessary. You can make paintings from unusual materials. Such works will definitely be unique and inimitable.
From felt and on felt
It’s not often that we see paintings and panels made of felt. In general, in recent years it has become a curiosity, as have products made from it. We perceive hats and some other small things normally, but felt paintings are definitely rare. So, when describing paintings made from unusual materials, let’s start with felt. To begin with, you can make a landscape, flowers. They are easier to implement. With experience you can make more and more interesting panels.
Special wool is used for felting. When creating paintings, it is laid out in layers on a base (non-woven fabric), forming the desired pattern. When creating paintings from wool, the process takes place in several stages. First, the background and relief are laid out, then smaller and smaller details.
Making the background
To begin with, take those shades of wool that create the background. We lay them out on non-woven fabric, trying not to leave any voids. It is advisable to make two thin layers. We transfer the resulting background onto a foam rubber backing (5 cm thick or more). Then we take a special needle (for felting). Holding it vertically, we often pierce the laid wool. This way we ensure that it connects to the base. If you look at the back of the non-woven fabric, the threads that have come out should be visible.

Then the workpiece is laid on polyethylene (it is larger in size than the picture itself), the wool is moistened with a soap solution (one tablespoon of grated baby soap per 1 liter of hot water) and the felting process itself begins. To begin with, knead the wet wool with your hands (press down, gradually increasing the pressure). Wet wool threads adhere to each other with pile, forming a single surface - this is the process of wet felting. The result is felt. Only for paintings we do not need to achieve high density. We stop when the base is dense enough. We blot off excess moisture with a terry towel.

Adding details
Now you need to add details of the picture to the background: trees, flowers, stones, etc. With dry hands (wool sticks to wet hands) we lay out tree trunks, bushes, and stones. We go over the new parts well with a needle, wet them, and knead them with our hands. Then they use harsher means - a wooden rolling pin. We carefully pass the wet picture back and forth with a wooden rolling pin.

Last we lay out voluminous small details: flowers, clouds, stones, thin branches, stems, leaves... To make them voluminous, we use up to eight layers of wool, we make petals from balls, stems from twisted strands. The procedure is the same: laid it out, folded it (poked with a needle), wet it, felted it, removed any remaining liquid. If the part is not voluminous enough, you can repeat the process.
Photos of works: paintings made of wool (felt)
Pictures/panels made of threads
Perhaps the most common way to create paintings from colored threads is embroidery. But this is a very painstaking and lengthy process, although the craftswomen enjoy it. But there are also faster ways. Much faster. These are glued paintings made from threads and tension (winding). So it cannot be said that these paintings are made of unusual materials. But the techniques are definitely unusual.
Gluing
We take any thread suitable for knitting. Paintings are made on a rigid base: cardboard, plastic, glass. The technology is simple. First, the outline of the design is applied to the base. It is drawn on cardboard and opaque plastic; on glass and transparent plastic you can not draw it, but put the drawing down. Next, production begins:

This is all. When everything is filled, we leave the finished thread panel to dry for several days. After the glue has dried, it can be coated with a transparent varnish (take a water-based one - it dries quickly and does not smell).

Threads make good cartoon characters, cartoon characters, pictures and sketches. Everything is stylized and very individual. An exact photographic match will not be possible, since this technique is not intended for this. But it is simple, understandable, and requires very little time. This is an ideal activity to do together with children.
From threads and nails
Interesting paintings are made from threads and nails. This technique has its own name - “string art”. From the English word string - string (thread).
In appearance, it is difficult to confuse them with something else, since the technology is original, the images are graphically clear. Depending on the object, they may be suitable for a children’s room decorated in a fantasy style or for a living room in the modern pop art, art deco style. You can find options even for minimalism... Another advantage is that making a picture from threads and nails (pins) takes a little time. The smallest ones can be done within an hour. The technique is simple, so you can involve children.

Paintings made from unusual materials: nails and threads...
What materials are needed
You can use any thread. The most commonly used threads are for knitting. Depending on the texture, different results are obtained. Smoother ones give clearer lines, “shaggy” ones create a denser background. They are pulled on small nails or pins. Carnations of any color and thickness. The main thing is that the heads are neat, but not small (not finishing nails). Length - depends on the scale of the picture. For small ones, a centimeter and a half is enough, for larger ones, three centimeters are possible.

Pins are suitable if the design has a fantasy touch: butterflies, dragonflies, flowers... In this case, we find pins with beads. They also serve as decoration at the same time.
Any base into which you can hammer nails can be used. It is most convenient to use high-density foam. It is lightweight and both nails and pins fit easily into it. Wood is also suitable (can be laminated, or sanded).
Basic manufacturing technique
The creation process itself is simple. Choose a drawing. To begin with, it is better to choose something simple, with not a very large number of elements. For example, let's take a stylized flower.

Flower, leaf... It’s easy to make
A contour is applied to the selected base. If you know how, you can draw by hand; if you are not confident in your abilities, cut out the stencil and apply it. Next, we nail nails along the contours in increments of about 1 cm. In places with sharp bends, you can do it more often.

After all the nails are filled, take the threads, make a loop at the end, and fasten it to one of the nails. The first nail is chosen completely randomly. Having secured the thread, we begin to entangle the carnations in a chaotic manner. The filling can be made more or less dense. In any case, it is desirable that it is clear that these are separate threads. This is precisely the charm of these works. When the entire volume is filled, fasten the threads to one of the nails. That's all, actually. You can only hammer in the nails a little if necessary.
Options and Variations
Now a little about the nuances. In the example above, only the shape bounded by the studs is filled. But it can also be the other way around. What is outside the boundaries outlined by the nails is filled with threads. The pictures are also interesting.

In both the first and second cases, the difference in color between the background and the threads should be significant. This gives the image clarity. In more complex versions, the threads are not tensioned chaotically, but creating a certain weave. This is far from easy; experience comes with years of practice. Such pictures look magical.

Another way to create unusual paintings from threads and nails is to draw only some elements of the picture in this way. Here it is important to split the image into fragments, the place of each nail is calculated, since they are also elements of the same picture.

This technique is a way to paint a landscape using nails and thread. You need a special vision that allows you to break the picture into lines that, in general, will create a complete image.
Photos of finished paintings made from threads and nails
Easy, creative... it's important to find threads that change color. Although, plain ones will turn out well  Beautiful panel... the texture of the wood is important. Different ideas... the result is excellent. This is already aerobatics...
Panel made of buttons, beads, beads
This is a truly unusual material for creating paintings - buttons. Different sizes, shapes, textures, colors. They all go to work. They can be used as they are, can be painted, decorated with sparkles, sequins, etc. It all depends on the idea and desire of the author. The basis for paintings made from buttons is any. Cardboard, wood, polystyrene foam, fibreboard, chipboard, MDF, sheet plastic, glass. Depends on the idea and the desired effect. The buttons are glued to the base. The glue is universal and remains transparent when dried.
Technique - let's start simple
Sometimes buttons are used only as part of a picture. Since they are voluminous, they are used to make flowers, foliage, and other small and medium-sized convex parts. The background and large fragments are made using any other technique, but in most cases it is a drawing or appliqué. Such paintings are easy to make yourself or with the participation of children.
Tree in the night... interesting effect Drawing decorated with buttons... it turns out an interesting picture for the interior
Basic technique
If desired, you can make any image, silhouette or even a picture from buttons. You should start with the simplest drawings. There seems to be nothing complicated in the process, but a lot of work takes a lot of time. To begin with, it is better to see the result in a few hours. Choose a simple shape: a heart, an apple, a moon, a sun, a large simple-shaped flower, an image of an animal, a bird. Just remember that portrait likeness is not for this technique. You should end up with a recognizable shape.

The manufacturing process is simple. First of all, apply the contour to the base. It turns out that you draw by hand. No - cut it out of paper. The drawing can be printed. Cut out the drawing along the contour, attach it to the base, and trace it with a pencil. If you need several colors, circle the boundaries that separate them (the colors).
 A bright fish will decorate a nursery... and not only
Next, use the existing buttons to fill the outline. For some designs, a clear, even edge is important. It cannot be achieved with even the smallest size buttons. In this case, you can use beads. The voids inside can also be closed with beads or beads. All this looks very organic.

With experience, you will be able to take on more serious canvases. But your patience and perseverance must be enormous. The shade and size of each button is important here.
Panels and paintings made of fabric and lace
Fabrics and lace are also quite non-standard materials for making panels and paintings. Now we are not talking about appliqué or patchwork techniques - they are difficult to perform and require specific skills. The point is that now there are such fabrics, the pattern or texture of which can be a decoration of a modern interior. Lace also ceased to be the preserve of the rich. And if you have old napkins or you know how to knit them yourself, you can make very interesting paintings and panels. The main thing is the idea and the ability to see the future panel in an ordinary piece of fabric.

Panels made of fabrics and textiles
The first idea is to find two-tone fabrics. The main condition is that the colors must be the same, the designs must be different. The easiest way to find black and white options. All other shades - you'll be exhausted from running around the shops. Although, the Internet can come to the rescue. Selected fabrics are stretched onto frames. Frames can be the same size and shape, or they can be different. Both options look good.
The main thing is the selection of colors...
Next idea: Find fabrics with coordinating colors. There may be three or four colors here, and they should appear in different combinations in the selected patches. As a rule, they take two basic colors: white + black, white + gray, black + gray, and add one or two colors to them. Just keep in mind that “additional” colors must be present in the interior design. So, firstly, the panel will not be too colorful, and secondly, it will easily fit into the interior.
The found fabrics are again stretched onto frames of different sizes and placed on the wall. One point: if it’s hard to miss with identical frames, then it can be difficult to arrange different sizes and shapes beautifully. Take a closer look at the photo and do something similar.
Black and white combinations are very popular
Third idea: find a large, bright picture and divide it into several fragments. The result will be a kind of modular painting, which has been so popular in recent years. If the fabrics you see don't inspire you, try looking for scarves. Russian, Chinese... with any ethnic motives. Such paintings are 100% unusual and will help highlight your home.


Lacy fairy tale
Lace is a work of art in itself. You can simply stretch it over a contrasting backing. Here are paintings made from unusual materials.
There is an idea that will help you make many different pictures from several napkins. The napkins, however, will be ruined. So, we cover the frame with colored plain paper of a rich tone. Apply the lace and spray paint from a can. The paint should be contrasting.

Using this technology, you can make single paintings, triptychs, modular paintings, etc. The best effect is obtained with knitted napkins. They have a more relief pattern. A pattern of factory lace is more difficult to transfer to paper, although it is also possible.


