Neck pain is a problem that almost everyone faces. It can occur episodically or disturb constantly, be aching or appear very sharply, up to the inability to turn your head.
The nature of the pain and its location will help determine and make an accurate diagnosis. But in most cases, the root cause of neck pain is an unhealthy lifestyle: physical inactivity, too fatty foods, poor posture, etc.
The main causes of the development of pain in the cervical region:
- Osteochondrosis and arthritis, which over the past decade have "rejuvenated" before our eyes.
- Injuries of the cervical spine;
- Muscle tension due to spasm. In many patients, neck pain when turning the head is associated with being in an unnatural position for a long time, for example, sleeping on a bad bed.
How to treat muscle pain in the neck?
Of course, there are many methods of therapy - from a downy grandmother's scarf to voltaine injections. But there is no single correct answer to the question: “How to relieve muscle pain in the neck? ». The most effective method of therapy is, of course, a combination of drug therapy, physiotherapy and exercise therapy.
Many doctors, as a physiotherapy method, include kinesio taping in their treatment regimen. In terms of its effectiveness, safety and availability for the patient, this technique has no analogues.

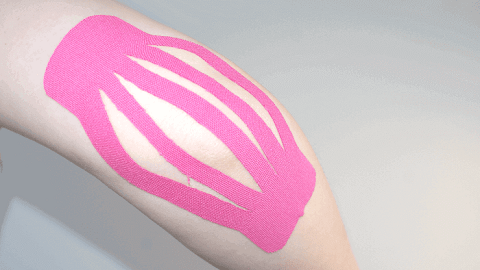
Tape is a tape made of cotton with a given elasticity on an adhesive basis. Tape pasted on the skin lifts it, increasing the intercellular space and creating pressure drops. As a result, microcirculation improves under the application, the effect on pain recipes decreases - it is possible to achieve complete disappearance of the pain syndrome. Unlike painkillers, teip not only relieves the symptom, but consistently affects all parts of the pathological process:
- reduces inflammation
- supports;
- relaxes overworked muscles.
Treatment of neck muscle strain with the help of kinesiology tapes can be carried out both “solo” and in combination with other types of therapy. It all depends on the severity of the pain syndrome. As a rule, after the first application, pain in the neck area decreases. After several procedures, you can achieve complete disappearance of the pain syndrome.
Pain when turning the neck: kinesiology taping technique

Before applying, it is necessary to prepare:
- clean the skin with a regular alcohol wipe or a special lotion;
- if possible, remove (remove) the hair at the site of application;
- prepare tape strips;
- tilt your head so that the muscles are in the most stretched state.
A partner is needed to treat muscle pain in the neck when turning the head using the kinesio taping technique. When applying, the minimum tension is used, because the neck area is extremely sensitive to it. There are two main ones:
1. Using three i-shaped tapes:
Parallel to each other along the muscles that straighten the cervical spine, stick 2 i-shaped tape strips. Tapes are glued almost without tension (0-15%) in the direction from the bottom up. Then, perpendicular to the strips, directly on the area where pain is concentrated, a decompression tape is applied.
2. Using one Y-tape
Before application, you must first prepare the tape by cutting it in the shape of the letter Y, and without tension at the level of 1-2 cervical vertebrae, stick the “anchor”. The "tails" of the tape are applied with a minimum (0-15%) tension on each side towards the back of the head. When sticking the ends, ask the patient, without straightening his neck, to turn his head in the opposite direction. Then, a transverse strip of teip should be applied to the place of maximum soreness.
After sticking, the tape is rubbed to activate the adhesive layer.
About 25% of cases of the disease occur in the cervical region. Due to dystrophic changes in cartilage tissue, severe pain, muscle spasm and restriction of neck mobility occur. Treatment of the disease is complex, one of the components of therapy is kinesio taping.
One of the most frequently diagnosed diseases of the spine is osteochondrosis. About 25% of cases of the disease occur in the cervical region. Due to dystrophic changes in cartilage tissue, severe pain, muscle spasm and restriction of neck mobility occur. Treatment of the disease is complex, one of the components of therapy is kinesio taping.
Kinesio taping is a method of applying a special plaster - kinesio tape. The technique was developed in the 70s of the 20th century by the American scientist Kenzo Kase. For the first time, taping was done to athletes at the Seoul Olympics in 1988. In Russia, kinesio taping has been gaining popularity over the past 10 years. At first, applications were used for the treatment and prevention of sports injuries. Now taping is used in various branches of medicine: traumatology, neurology, orthopedics, phlebology, gynecology.
Tape is a cotton tape treated with a special acrylic-based adhesive. The plaster is hypoallergenic and absolutely safe. The taping technique has a minimum of contraindications. This method of treatment is not aimed at limiting the mobility of the neck, but, on the contrary, at its preservation. With osteochondrosis of the neck, taping performs the following tasks:
- Fixing muscles in a physiological position.
- Relieve muscle spasm.
- Reducing inflammation and swelling of tissues.
- Normalization of the blood supply to the affected area.
The method is indicated for osteochondrosis of 1-2 degrees, if the pain syndrome is moderately expressed. The effect is noticeable immediately after the first day of wearing applications. Using treatment in combination with exercise therapy and massage, it is possible to relieve moderate pain and swelling in a few days. If the patient experiences severe pain, then his condition is greatly facilitated.
Important: the patch itself cannot restore the cartilaginous tissue of the spine, it only helps to get rid of discomfort and improve metabolism.
Types of teips
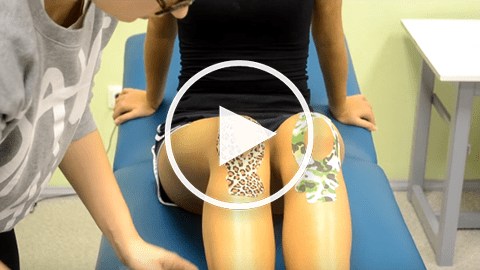
 There are several different forms of patches, each with a different purpose. The form and method of application are selected depending on the purpose of the treatment and on the place to be applied. For the treatment of osteochondrosis of the cervical and thoracic regions, teips in the form of X or Y are used. It is this type that provides reliable fixation. Also, for the thoracic region, several snowflake-shaped ribbons are superimposed. It is possible to use standard strips of tape with a width of 3.5 cm, but stick them in the manner described above.
Also, the tapes differ in the material from which they are made. The following types of teips are produced:
- Cotton. Standard type, the material is as hypoallergenic as possible and is close in properties to human skin.
- Nylon. Possesses the increased elasticity. Stretches in length and width. It is this type that is preferred for the treatment of osteochondrosis.
- Synthetic(rayon). Thinner and stronger tapes. Maximum breathability, suitable for patients with sensitive skin.
- Patch with reinforced adhesive layer. The most waterproof, so it is convenient to use for areas of skin with increased sweating.
- Tape with soft glue. Preferred for patients prone to allergic reactions.
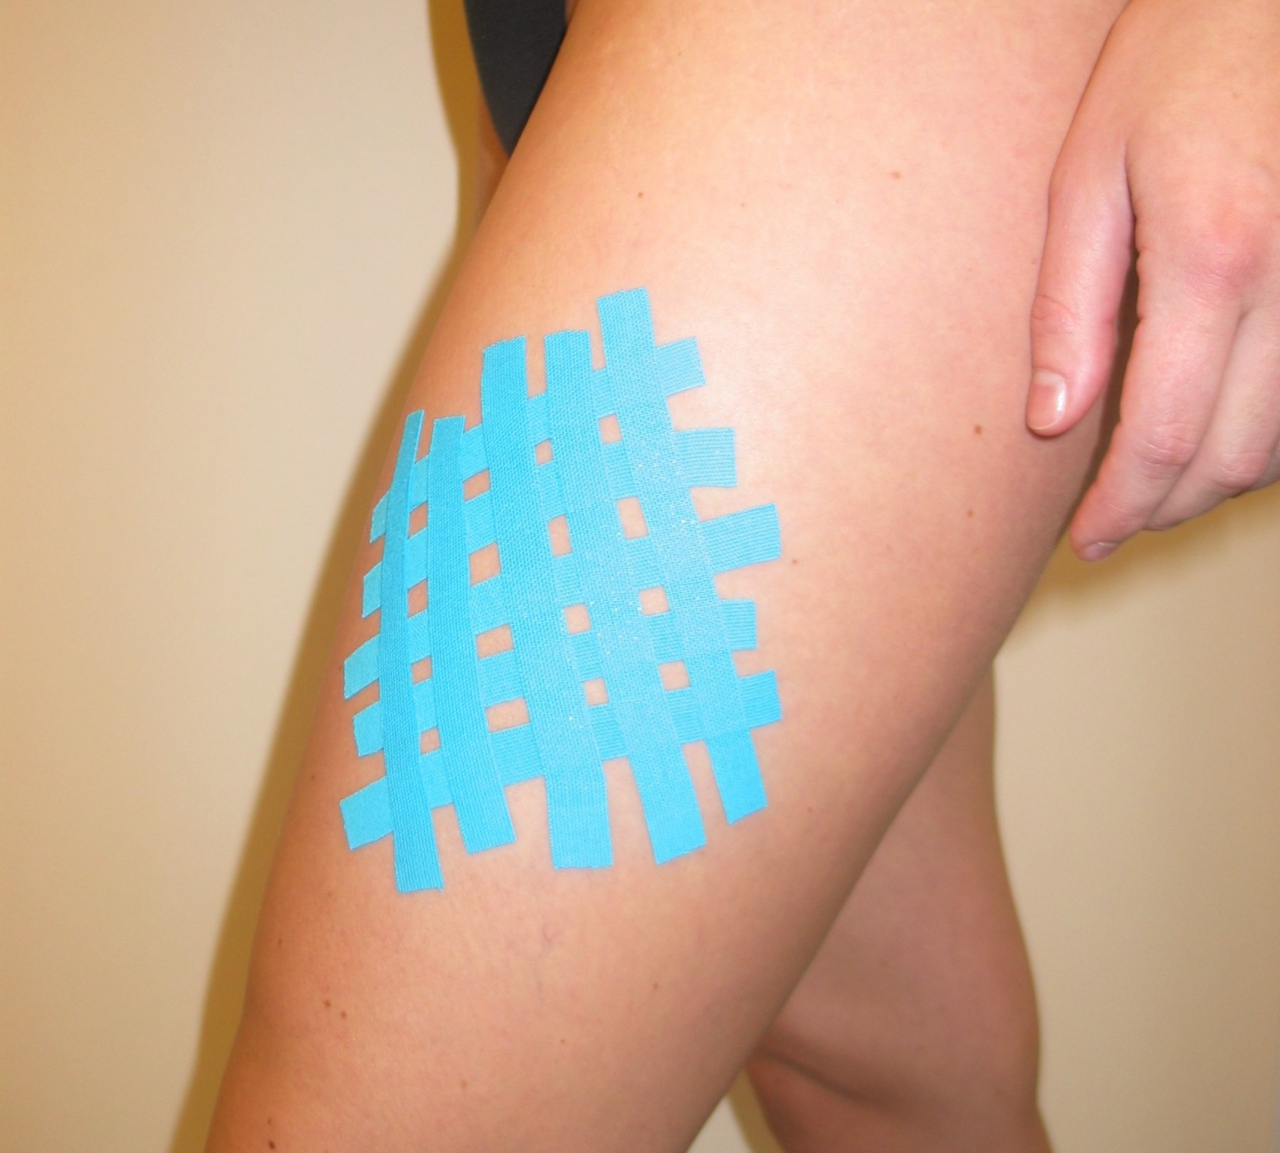
Cross-tapes are also produced, that is, made in the form of a lattice. They are convenient for application to the shoulder or thoracic spine.
How to use Kinesiology Tape?

Patches can be applied using various techniques:
- Ligamentous. The tape is stretched by 40% and fixed at the edges.
- Muscular. The tape is pulled by 50 or 60%, depending on whether you need to reduce or increase muscle tone.
- Correctional. The tension is up to 80%.
- Lymphatic drainage. The tape is superimposed in the form of a fan.
Muscular technique is used to correct osteochondrosis. To ensure the most reliable fixation of the tape, it is necessary to prepare the skin. The skin should be dry, clean and without hair.
The tape is applied to the cervical region as follows:
- Stick the tape in a Y shape, stretching the tape a little in the middle.
- Then glue another strip perpendicularly, also stretching the middle.
- The tapes need to be rubbed so that the temperature of the skin at the place of fixation slightly rises.
Two X-shaped ribbons and a third transverse strip are superimposed on the thoracic region. During sticking, the patient should round his back as much as possible. If the patient experiences pain in the shoulder, then it is preferable to stick tape in the form of a lattice or snowflake on this area.
 You can wear one patch for no longer than 3-5 days. With it you can take a shower, bath, play sports, swim in the pool, this does not affect the properties of the tape. Then the tape must be removed, as it loses its healing properties. For this reason, the patch cannot be re-glued, even if it has not lost its adhesive properties. You need to apply new tape. For the treatment of osteochondrosis, the course of kinesio taping lasts from 6 to 8 weeks.
The patch should be removed gradually, after removal the skin should be treated with a nourishing cream.
Important: Do not remove the tape with a jerk, otherwise a layer of glue will remain on the skin, which is difficult to wipe off.
The effectiveness of the technique
The kinesio taping technique has undoubted advantages:
- The tape does not restrict movement, as it has great elasticity.
- Ribbons can be worn for several days without regluing, wash with them in the shower, swim in the pool, play sports.
- The patch does not provoke blood stasis, but normalizes blood circulation.
- Tapes are hypoallergenic, so it can be used for people with sensitive skin. It can also be applied to pregnant women.
The only drawback is the inefficiency when worn on loose, saggy skin.
The effectiveness of the technique for the treatment of cervical osteochondrosis is as follows:
- The pain syndrome is removed.
- Eliminates swelling and inflammation in the neck.
- The mobility of the spine is restored.
- Metabolic processes are normalized.
Contraindications
 Despite the hypoallergenicity of the patch and the safety of the method, there are a number of contraindications for kinesio taping. You can not use this type of therapy in the following cases:
- Allergic reaction to the components in the composition of the adhesive.
- Purulent skin lesions, burns, wounds.
- Oncological diseases of the skin.
- Serious heart disease.
- Impaired kidney function.
- Endocrine pathologies, especially diabetes with complications.
- vein thrombosis.
- Pregnancy in the first trimester.
Also, do not wear one ribbon for more than 10 days without a break. This can cause excessive muscle relaxation.
Useful video
Familiarize yourself with the method of treating the neck from osteochondrosis through kinesio taping
Conclusion
Kinesio taping for the treatment of osteochondrosis has been used relatively recently, but has already received recognition from doctors. The positive dynamics of treatment is noticeable immediately after the first application. The patient gets rid of pain, returns to a full life. The safety of the method and the possibility of its use in any conditions makes kinesio taping indispensable for the treatment of back pathologies.
A bit of theory: what is kinesio taping
Kinesio taping is a kinesio taping sticker for muscle support, improving blood circulation and lymph flow. Kinesio tape is an elastic colored adhesive tape made of 100% cotton. It is coated with a hypoallergenic acrylic-based adhesive that activates at body temperature.
Kinesio tapes are used:
- for pain in the joints and muscles (back pain, knee pain, etc.)
- for correcting posture and flat feet in children
- in rehabilitation after operations and strokes
- with cerebral palsy
- to restore and protect muscles and joints after injuries
- with hematomas
- with hallux valgus
- for headaches and menstrual pain
If kinesio tape is applied to a moving part of the body (shoulder, knee, ankle, etc.), we recommend using reinforced tapes.
For the Curious: How Kinesio Taping Works
1. Improve blood circulation and lymph movement:
With inflammation of the tissues, stagnation of the lymph occurs. The accumulation of lymph increases pressure in nearby tissues and the resulting localized swelling reduces the space between skin and muscle and reduces the natural flow of lymph.
Kinesio tape lifts tissues, facilitating lymph flow and blood flow, increasing this space. The affected area of the body is stretched and therefore the tape is applied without tension.
After applying the tape, the stretched skin contracts, causing the tape to shrink. On the teip, folds in the form of waves are formed. Due to its elasticity, kinesio tape increases the interstitial space. Due to this, pressure in the skin decreases and sensitive and nerve receptors are stimulated, which leads to relief of pain. Connective tissues relax and lymph flow improves. Combined with body movements, kinesio tape stretches and massages the skin. Which also leads to the outflow of lymph.
2. Removal (stopping) of pain:
A person feels pain when signals from stimulus-responsive subtle receptors reach the cerebral cortex. Kinesio tape works on the larger receptors that the brain pays primary attention to. As a result, while the tape is pasted, the person does not feel pain. The effect appears 20-60 minutes after application.
Pain relief with taping improves functional recovery and healing. At the same time, normal motor function becomes possible again and the tissue returns to its original energy regulation.
3. Normalization of muscle tone and improvement of muscle function:
Often, muscle pain occurs due to muscle imbalance, which manifests itself as a result of poor posture, exposure to cold, overload of untrained muscles. Kinesio tapes help to normalize muscle tone and relieve pain. The muscles of the body should be relaxed and should not be tense. This means that the balance of the body must be restored. Body balance refers to a wide range of functions (energy function of the body, functionality of the body, metabolism, activity, tone, load, etc.). Deviations include loss of balance stability. Lack of balance affects the healing process.
In practice, this process often does not proceed in the most optimal way, delaying tissue healing and restoration of functions (for example, with acute pain and swelling, increased activity, motor stereotype that causes pain, etc.). After applying kinesio tape, there is an immediate improvement in muscle function. This ensures a more favorable recovery process.
4. Joint Support:
Kinesio tapes mechanically support the joints and teach the muscles to be in a position in which the load is distributed correctly. An improved sense of movement by changing the balance in a particular muscle group leads to a positive effect on joint function.
With the help of a ligament-ligament, kinesio tape provides more effective passive support for the joint (in this method, the tape is stretched to its maximum length). In the event of a joint or ligament injury, normal function is disrupted and the stretched tape helps to restore it. The feeling of support arises from the constant impact on skin receptors with the tape (constant stimulation of the nervous system).
For specialists: the main methods of applying kinesio taping
1. Muscular technique: the required length of the tape is applied with tension from 40% to 60% (depending on the indications), provided that the muscle is in a stretched state. When applying muscle tape, there is a difference between applying to increase muscle tone and applying to reduce muscle tone.
The choice of overlay direction depends on the effect you want to achieve. The base and end of the kinesio tape are applied without tension.
2. Ligament technique: The tape is applied in a stretched state up to 40% (the degree of stretching is determined depending on the indications) with subsequent fixation of the base on both sides of the tape without stretching.
3. Corrective technique: when measuring and cutting the tape, it must be taken into account that it is applied with a tension of 80% -90%. Both ends are rounded (for simplicity: fold the tape in half). Break the tape in the middle, leaving 4-5 cm along the edges on both sides. The tape is applied over the ligament. Gently but firmly press the tape, and apply the ends of the tape without stretching.
4. Lymphatic technique: The length of the tape must be measured when it is stretched. Depending on the length, the tape is cut into 4-6 long strips. The base of the tape should be 4-5 cm long. It is applied without tension in the direction of the lymph flow, the strips are applied in wavy or straight lines to the skin with minimal tension.
With local edema, after a recent injury, or a hematoma, you can apply tape in the form of a mesh. To do this, you can apply two fan-shaped lymph tapes or strips of one lymph tape in two different directions. Tape strips should be applied in such a way as to cross the edema, increasing the local pressure drop and providing a more intensive lymph outflow.
Video review of kinesio tapes from a professional athlete from SOYUZ CrossFit
Video instruction for kinesio taping
Below you will find the most common options for applying kinesio tape. click something that interests you oron the red dot right on the person.
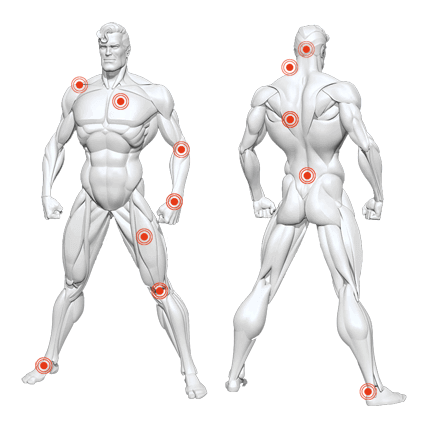
How to apply kinesio tape on the neck

Indications:
- it hurts to straighten the neck
- it hurts to move your neck
- it hurts to tilt the neck
- arthritis
Overlay technique:
- muscle technique
Video how to glue:
");">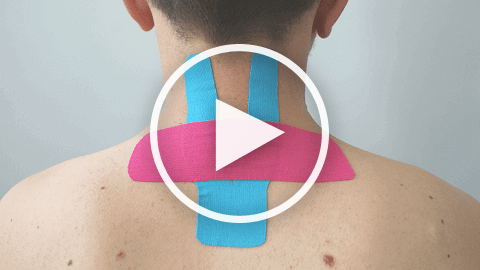
How to glue:
It is necessary to prepare 2 strips of the tape, cut one of them in the shape of the letter Y. First, apply the base of the Y tape to the spine and tilt the head forward as much as possible to stretch the muscle.
The second tape is applied with maximum tension perpendicular to the first one for a stabilizing effect. First, the middle of the tape is glued, then the ends without tension.
Important:
How to choose kinesio tape:
How to apply kinesio tape on a trapezoid

Indications:
- relaxation of the trapezium
- neck pain
- it hurts to tilt and turn the head
- it hurts to raise your shoulder
Overlay technique:
Video how to glue:
");">
How to glue:
It is necessary to prepare a tape in the shape of the letter Y. The base is glued without tension. Next, the head tilts to the side in the opposite direction to stretch the upper part of the trapezoid.
It is enough to use 30% tension. First, a tape is glued on the upper part of the trapezoid. The tip of the tape is glued without tension, returning to its original state.
Then the head again leans to the side and the second part of the tape is glued along the middle part of the trapezium. It is important not to cross the spine. The tip of the tape is glued without tension, returning to its original state.
The trapezium is a large muscle. In this example, there is an impact on its upper and middle parts.
Important:
- the base in 90% of cases is located on the edges of the tape
- the base is always glued without tension
- the adhesive part must not be touched
- tape edges should always be rounded
- after applying the kinesio tape, it is necessary to rub it thoroughly
How to choose kinesio tape:
On the page you can choose exactly the teip that you need. We have standard, reinforced, narrow and wide tapes. Read detailed descriptions and choose!
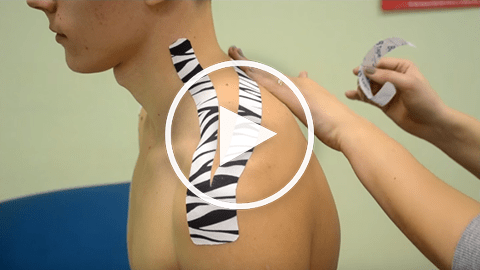
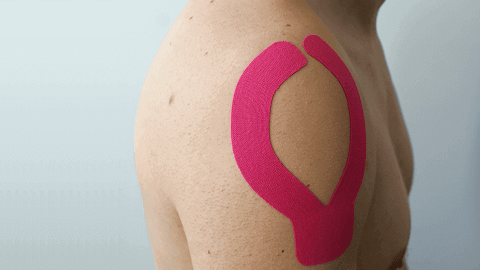
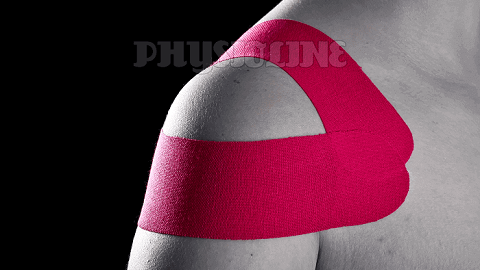
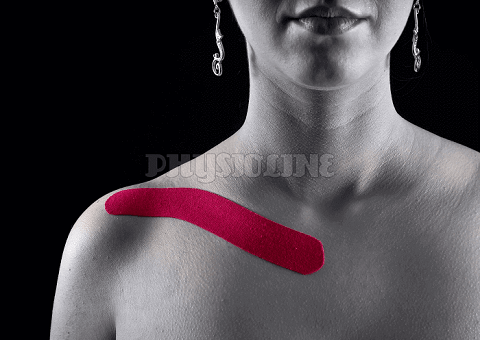
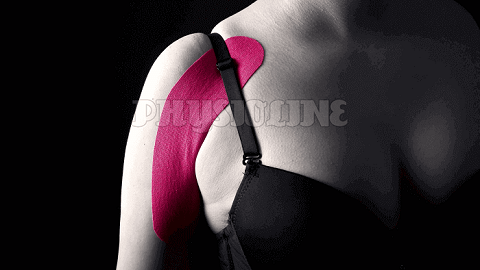
How to apply kinesio tape on the shoulder
Indications:
- sore shoulder
- rehabilitation after a shoulder injury
- to prevent shoulder injury
- relaxation of the deltoid muscle
Overlay technique:
- correctional,
Video how to glue:
");">
How to glue:
It is necessary to prepare a Y-shaped tape. The base of the tape is applied without tension to the muscle attachment point. Then the hand is placed on the opposite shoulder and the first half of the tape is glued from the back. The tip of the tape is glued without tension when the hand has returned to its original position.
After that, the arm is pulled back and the second half of the tape is glued from the side of the chest. The tip is also glued without tension in its original position. Remember to always rub the kinesio tape after application.
For example, we use kinesio tape BBTape zebra 5cm * 5m, as it keeps well up to 5 days.
Important:
- the base in 90% of cases is located on the edges of the tape
- the base is always glued without tension
- the adhesive part must not be touched
- tape edges should always be rounded
- after applying the kinesio tape, it is necessary to rub it thoroughly
How to choose kinesio tape:
On the page you can choose exactly the teip that you need. We have standard, reinforced, narrow and wide tapes. Read detailed descriptions and choose!
How to apply kinesio tape on chest

Indications:
- muscle imbalance
- angina pectoris
- shoulder joint injuries
Overlay technique:
- muscle technique
Video how to glue:
");">
How to glue:
It is necessary to prepare a Y-shaped tape. The base of the tape is applied without tension to the muscle attachment point (above the coracoid process).
We stretch the pectoral muscle, moving the arm up and back so that it becomes as long as possible. We glue the first and second parts of the tape with a tension of 30-40% to the left and right of the muscle.
Important:
- the base in 90% of cases is located on the edges of the tape
- the base is always glued without tension
- the adhesive part must not be touched
- tape edges should always be rounded
- after applying the kinesio tape, it is necessary to rub it thoroughly
How to choose kinesio tape:
On the page you can choose exactly the teip that you need. We have standard, reinforced, narrow and wide tapes. Read detailed descriptions and choose!
How to apply kinesio tape on shoulder blades

Indications:
- back pain
- it hurts to straighten your back
Overlay technique:
- muscle technique
Video how to glue:
");">
How to glue:
It is necessary to prepare 2 strips of tape. One tape is glued to the right along the spine, the second - to the left.
Starting position - tilt in the lumbar spine. It is necessary to apply the base without tension in the area of the shoulder blades and stick the kinesio tape along the spine with a slight tension. The second tape is glued similarly on the other side of the spine.
Important:
- the base in 90% of cases is located on the edges of the tape
- the base is always glued without tension
- the adhesive part must not be touched
- tape edges should always be rounded
- after applying the kinesio tape, it is necessary to rub it thoroughly
How to choose kinesio tape:
On the page you can choose exactly the teip that you need. We have standard, reinforced, narrow and wide tapes. Read detailed descriptions and choose!
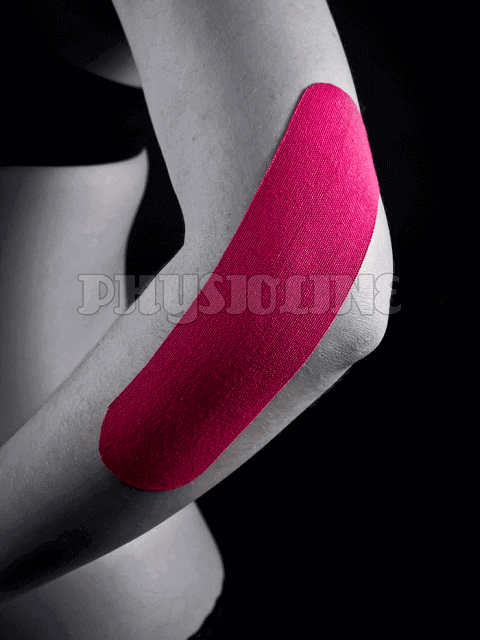
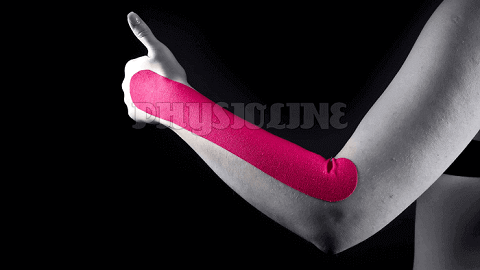
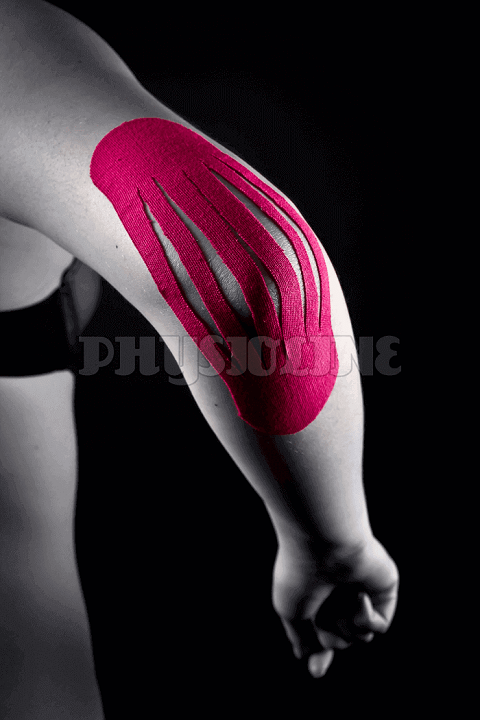
How to apply kinesio tape on the elbow
Indications:
- elbow bursa inflammation
- student elbow
- prolonged leaning on the elbow
Overlay technique:
- lymphatic technique
Video how to glue:
");">
How to glue:
It is necessary to prepare a strip of teip. Fold the tape in half and cut the middle into 5-6 strips. The ends of the tape remain intact.
Extend the elbow and apply the bases of the tape without tension on both sides of the elbow, taking into account that the tape will stretch at the bend. Then bend the elbow and apply tape strips to the corresponding area.
Important:
- the base in 90% of cases is located on the edges of the tape
- the base is always glued without tension
- the adhesive part must not be touched
- tape edges should always be rounded
- after applying the kinesio tape, it is necessary to rub it thoroughly
How to choose kinesio tape:
On the page you can choose exactly the teip that you need. We have standard, reinforced, narrow and wide tapes. Read detailed descriptions and choose!
How to apply kinesio tape on the lower back

Indications:
- lower back pain
- back hurts
- pinched back
- to protect against injury and as back support
Overlay technique:
- muscle technique
Video how to glue:
");">
How to glue:
It is necessary to prepare 4 strips of kinesio tape. Starting position - tilt in the lumbar spine. You can lean on the couch, but please note that you cannot lean on your legs with your hands.
The first tape is applied vertically. The second tape is applied horizontally. The 3rd and 4th tapes are applied diagonally. The tape is applied with a tension of 30-50%, the middle is fixed, the base is fixed on both sides without tension. When a person straightens up, folds appear on the tape.
Do not forget, each time after applying the kinesio tape, it must be carefully wiped with your hand, as the glue begins to act when heated. This type of taping is used for lower back pain, to protect against injuries during sports, it provides a sense of stability and creates the feeling that an invisible hand is supporting the lower back. The effect is achieved due to the fact that the maximum space is created in the middle and this area is unloaded.
Important:
- the base in 90% of cases is located on the edges of the tape
- the base is always glued without tension
- the adhesive part must not be touched
- tape edges should always be rounded
- after applying the kinesio tape, it is necessary to rub it thoroughly
How to choose kinesio tape:
On the page you can choose exactly the teip that you need. We have standard, reinforced, narrow and wide tapes. Read detailed descriptions and choose!
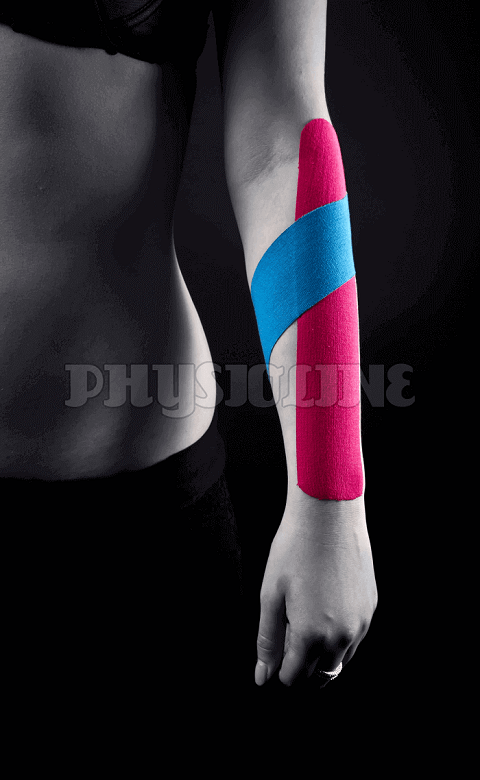
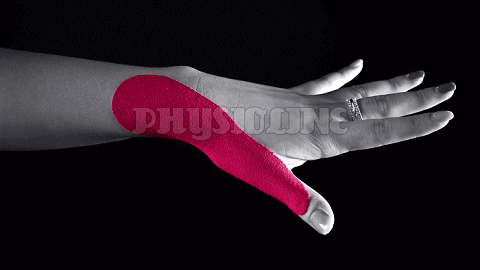
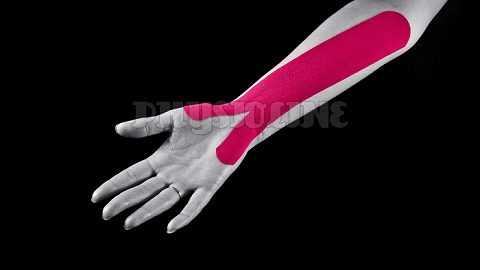
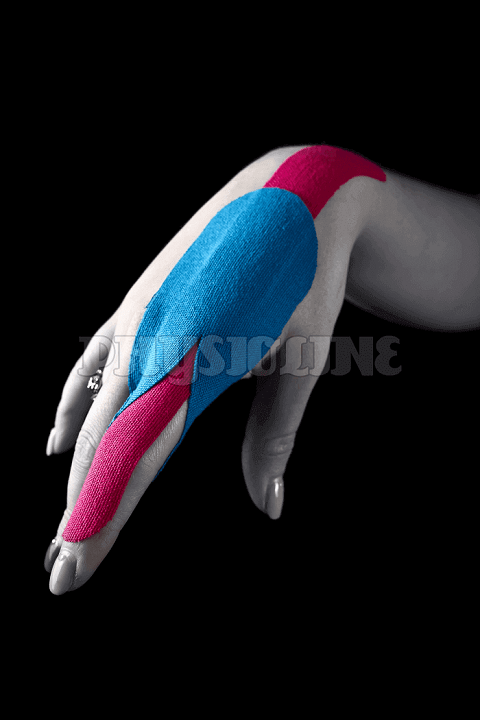
How to apply kinesio tape on a brush

Indications:
- tunnel syndrome
- traumatic epicondylitis
Overlay technique:
Video how to glue:
");">
How to glue:
It is necessary to prepare 2 strips of tape. The purpose of applying the first tape is to unload the long palmar muscle. Therefore, we measure the tape when the muscle is stretched.
We cut the tape on one side by 5 cm to get 2 small tips. Apply this tape on the top of the thumb without tension. Then, with a tension of 30-40%, glue the rest of the tape along the forearm.
The second tape is applied to unload the wrist. We stretch the wrist and glue the middle of the second tape with a tension of 30-40%. We glue the ends without tension.
Important:
- the base in 90% of cases is located on the edges of the tape
- the base is always glued without tension
- the adhesive part must not be touched
- tape edges should always be rounded
- after applying the kinesio tape, it is necessary to rub it thoroughly
How to choose kinesio tape:
On the page you can choose exactly the teip that you need. We have standard, reinforced, narrow and wide tapes. Read detailed descriptions and choose!
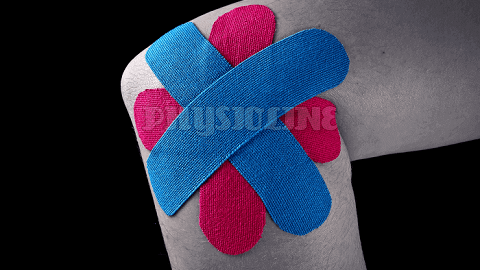
How to apply kinesio tape on the thigh

Indications:
- sore knee fold
- cruciate ligament irritation
Overlay technique:
- muscle technique
Video how to glue:
");">
How to glue:
Kinesio tape is cut in the shape of the letter X. The base of the tape is in the center. It is applied first and without tension. Then the tips are applied with a tension of 30%.
The tape should not restrict the movement of the knee joint.
Important:
- the base in 90% of cases is located on the edges of the tape
- the base is always glued without tension
- the adhesive part must not be touched
- tape edges should always be rounded
- after applying the kinesio tape, it is necessary to rub it thoroughly
How to choose kinesio tape:
On the page you can choose exactly the teip that you need. We have standard, reinforced, narrow and wide tapes. Read detailed descriptions and choose!
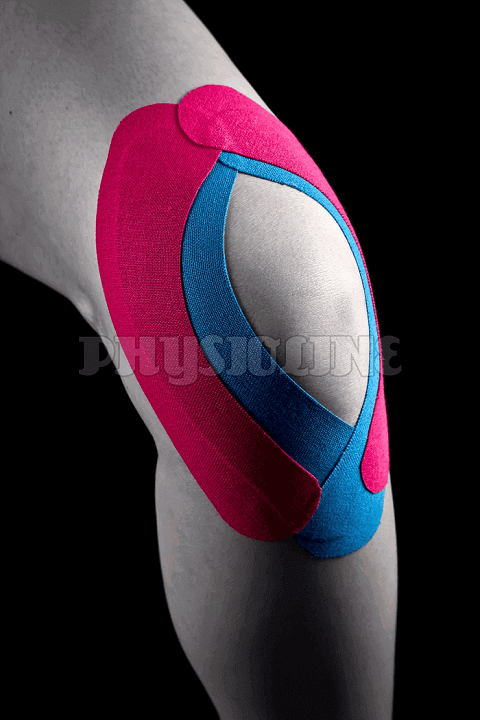
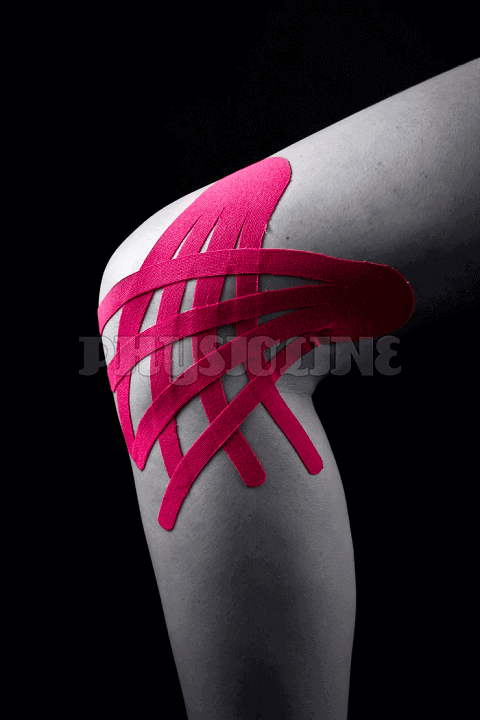
How to apply kinesio tape on knee

Indications:
- hurts in the knee
- age-related changes in the knee joint
- rehabilitation after meniscus surgery
- protection and stabilization of the knee during training
Overlay technique:
Video how to glue:
");">
How to glue:
It is necessary to prepare 2 kinesio tapes in the shape of the letter Y. The base is placed without tension over the patella. Next, bend the knee and glue the tape around the patella. We straighten the knee and glue the tip of the tape without tension. To improve fixation, we apply the second tape in the same way as the first one, only now we put the base under the kneecap.
We use designer tapes, as they hold well and are not afraid of sports loads.
Thus, we do a slight immobilization of the knee joint. Kinesio tape stabilizes and prevents pathological movements, while all physiological movements are preserved. This technique is used for pain in the knee, age-related changes in the knee joint, after operations to remove the meniscus.
Important:
- the base in 90% of cases is located on the edges of the tape
- the base is always glued without tension
- the adhesive part must not be touched
- tape edges should always be rounded
- after applying the kinesio tape, it is necessary to rub it thoroughly
How to choose kinesio tape:
On the page you can choose exactly the teip that you need. We have standard, reinforced, narrow and wide tapes. Read detailed descriptions and choose!
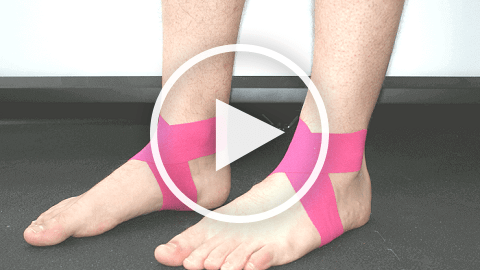
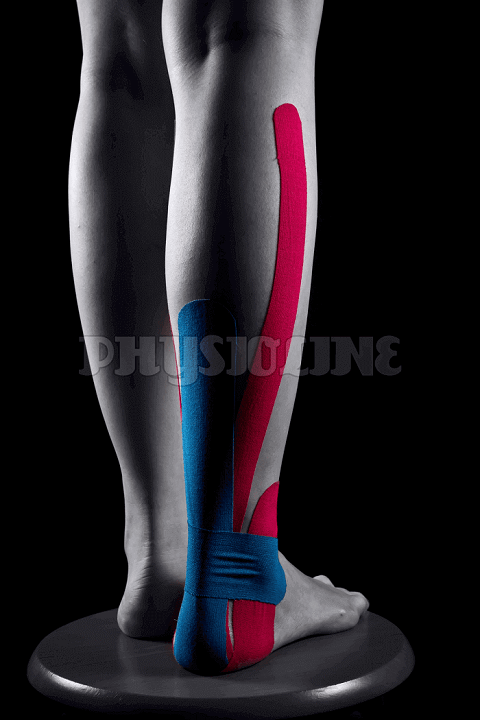
How to apply kinesio tape on the ankle

Indications:
- foot hypermobility
- calcaneal bursitis, ankle instability
Overlay technique:
Video how to glue:
");">
How to glue:
In case of instability of the ankle joint, a tape is applied, which creates support for the joint. The tape is applied in the shape of the number 8.
Can be applied in both directions depending on the mobility of the joint. Apply the base of the tape just above the side of the ankle. Then stretch and apply tape under the heel.
Continue stretching the tape and apply across the medial part of the ankle up to the dorsum of the foot. Apply across the back of the calf and back, crossing the medial part of the ankle to the sole of the foot.
Important:
- the base in 90% of cases is located on the edges of the tape
- the base is always glued without tension
- the adhesive part must not be touched
- tape edges should always be rounded
- after applying the kinesio tape, it is necessary to rub it thoroughly
How to choose kinesio tape:
On the page you can choose exactly the teip that you need. We have standard, reinforced, narrow and wide tapes. Read detailed descriptions and choose!
How to apply kinesio tape on Achilles

Indications:
- torn or torn Achilles
- Achilles tendon pain
Overlay technique:
- corrective and muscular technique
Video how to glue:
");">
How to glue:
It is necessary to prepare 2 strips of tape - long and short. The long one must be measured with a stretched muscle, from the heel up, not reaching the popliteal cup.
The base of the long strip is placed without tension on the heel, the toe is pulled up and the tape is glued with a tension of 40-50%. The end of the tape is glued without tension.
A short strip of tape is glued perpendicular to a long one, with a tension of 50-60%. First, the middle of the tape is glued, then the ends without tension.
Important:
- the base in 90% of cases is located on the edges of the tape
- the base is always glued without tension
- the adhesive part must not be touched
- tape edges should always be rounded
- after applying the kinesio tape, it is necessary to rub it thoroughly
How to choose kinesio tape:
On the page you can choose exactly the teip that you need. We have standard, reinforced, narrow and wide tapes. Read detailed descriptions and choose!
Photo instructions for applying kinesio tapes

supraspinatus muscle
Indications:
- tendinitis
- bursitis
Overlay technique: muscle technique
How to glue: apply the base of the kinesio tape without tension on the upper part of the large tubercle. Then, holding the base, apply kinesio tape in the direction of the beginning of the supraspinatus muscle. The hand is in the normal position.

Subscapularis
Indications:
- tendinitis
- in rehabilitation after injuries in the shoulder joint
Overlay technique: muscle technique
How to glue: apply the base of the kinesio tape without tension in the usual position. Extend the upper arm forward and place a Y-shaped kinesio tape over and under the shoulder blade.

Scalenus anterior
Indications:
- labored breathing
- whiplash
- scalene syndrome
Overlay technique: muscle technique with minimal tension
How to glue: apply the base of the kinesio tape without tension on the middle of the collarbone. Tilt your head diagonally to the opposite side and apply kinesio tape without tension.

Scalenus mediaus
Indications:
- labored breathing
- whiplash
Overlay technique: muscle technique
How to glue: measure the kinesio tape when the muscle is in a stretched position. Apply the base of the tape in the usual position. Tilt the cervical spine in the opposite direction and exhale calmly. During these movements, the tape is applied in the direction of the ribs.
Shoulder instability
Indications:
- period after shoulder injury
- shoulder subluxation
- shoulder joint hypermobility
Overlay technique: corrective technique
How to glue: measure the kinesio tape, while the muscles of the arm should be stretched. Arm abducted 90 degrees, elbow flexed. Apply the tape from front to back, starting from the gap of the shoulder joint, with the middle part of the tape stretched to the maximum. Apply the second tape using the ligament technique, starting from the top and then around the head of the shoulder. Vigorously move the shoulder forward and apply the back and front base without tension.

Biceps brachii
Indications:
- trigger points
- tone disorders
- tendinitis
- traumatic epicondylitis
Overlay technique: muscle or ligament technique
Arch support
Indications:
- tunnel syndrome
- chronic sprained tendons
- traumatic epicondylitis
Overlay technique: muscular technique together with ligamentous
trigger point
Indications:
- is in itself an indication
Overlay technique: ligament technique
Long extensor thumb
Indications:
- rheumatological changes in the joint
- tendinitis
Overlay technique: muscle technique

Metacarpophalangeal joint of the thumb
Indications:
- thumb injury during abduction and breeding
Overlay technique: muscular or lymphatic technique depending on the indication

Muscles of the thigh of the posterior group
Indications:
- hip arthritis
- knee instability
- posture correction
- biceps femoris
Overlay technique: muscle technique
How to glue: Measure the kinesio tape when the muscle is in a stretched position. The base of the tape is applied to the head of the fibula. After that, you need to straighten the knee and bend the hip. Finish applying the tape on the ischial tuberosity.
triceps calf
Indications:
- convulsions
- torn or torn Achilles
- violation of muscle tone (with neurological diseases)
- foot hypermobility
- Achilles tendon pain
- calcaneal bursitis
- ankle instability
Overlay technique: corrective and muscular technique
How to glue: measure the kinesio tape with the stretched muscle (the person lies face down, the knee is straightened, and the foot is in the dorsal flexion position). Apply the base of the tape under the heel, without stretching, and then apply the tape across the Achilles tendon near the middle part of the gastrocnemius muscle up to the point of origin of the muscle.

Deltoid
Indications:
- shoulder subluxation
- bursitis
- trigger points
- violation of muscle tone
Overlay technique: corrective, muscle or ligament technique
How to glue: apply the base of the kinesio tape without tension. Then put your hand on the opposite shoulder and stick the outer side of the kinesio tape. After that, take your hand back and stick the inside.

Shoulder
Indications:
- rehabilitation after surgery, injuries
Overlay technique: muscular and corrective technique
How to glue: Extend your arm more than 90 degrees. Apply the upper part of the tape to the trapezium without tension, then stretch the tape and apply the lower base to the deltoid tuberosity without tension.

Serratus anterior
Indications:
- rheumatological changes in the shoulder joint
- shoulder girdle instability
Overlay technique: muscle technique
How to glue: apply the base of the kinesio tape without tension in the usual position. Lower the shoulder blade back and apply kinesio tape.

acromioclavicular joint
Indications:
- pain in the shoulder joint
Overlay technique: ligament technique
How to glue: Kinesio tape is applied in the shape of a star.

teres minor muscle
Indications:
- arthritis or arthrosis
- shoulder subluxation
Overlay technique: muscle technique
How to glue: apply the base of the kinesio tape without tension on the lower edge of the shoulder blade. Bend your arm and apply the rest of the kinesio tape.
subclavian muscle
Indications:
- dislocation of the collarbone
- diaphragm problems
Overlay technique: muscle technique
How to glue: apply the base of the kinesio tape without tension on the connection of the first rib. Apply with minimal tension towards the bottom of the collarbone.
elbow joint
Indications:
- dislocation or hypermobility of the elbow joint
Overlay technique: corrective or ligament technique
brachioradialis muscle
Indications:
- overload or traumatic epicondylitis
Overlay technique: muscle technique
long palmar muscle
Indications:
- carpal tunnel syndrome
Overlay technique: muscle technique

carpal tunnel syndrome
Indications:
- see tunnel syndrome
Overlay technique: see tunnel syndrome

Trunk stability
Indications:
- posture disorders
- back pain
- lumbago
- lower back straightening problems and pain
Overlay technique: muscle technique
How to glue: measure the tape at the maximum slope. If it is difficult to lean forward, you can use support. Apply the basis of the tape on the sacrum in the usual position of the muscles. Tilt your back as low as possible and apply both strips on the left and right in an upward direction. Then apply kinesio tape on the transverse abdominal muscles. The base of the tape is applied without stretching. We make an oblique movement to the side and during this movement we apply a tape. The last part of the tape is applied unstretched. Tape is applied on both sides.

Lumbar
Indications:
- pain in the lower spine
- lumbar instability
Overlay technique: muscle or ligament technique
How to glue: First, apply kinesio tape to the iliosacral joint. A combination of three I-tapes, applied horizontally and overlapping each other. The smallest strip is applied first, the next strips are applied in layers in the proximal direction. Then three vertical strips of tape are applied from the sacral joint.
Knee
Indications:
- rheumatological changes
- post-traumatic period
- joint hypermobility
Overlay technique: correctional and ligament technique
How to glue: Kinesio tape should be applied without stretching to create support for lymphatic drainage from the knee joint. You will need 4 I-tapes. It is necessary to accurately establish the position of the patella. Start applying the first tape where there is the strongest pain. Kinesio tape is applied using the ligament technique, applying the middle part of the tape to the edge of the patella, and both ends without tension. Repeat this procedure for the rest of the tapes. The 3rd and 4th tapes are applied with less tension on the applied tapes. They fix the first two.
Coracobrachial muscle
Indications:
- shoulder instability
- degenerative changes in the shoulder joint
Overlay technique: muscle technique
How to glue: apply the base of the kinesio tape without tension in the usual position. Then take your hand back and apply kinesio tape in the direction of the coracoid process.

pectoralis minor muscle
Indications:
- muscle contraction (muscle imbalance)
- angina pectoris
- shoulder joint injuries
Overlay technique: muscle technique
How to glue: apply the base of kinesio tape without tension above the coracoid process. Take your shoulder back and lay the tails towards the chest.

Scalenus posterior
Indications:
- labored breathing
- whiplash
Overlay technique: muscle technique
How to glue: apply the base of the kinesio tape without tension at the level of the second rib. Tilt your head diagonally to the opposite side and apply kinesio tape with minimal stretch.

Latissimus dorsi muscle
Indications:
- trigger points
- shoulder joint injuries
Overlay technique: depends on the indication, muscular or ligamentous technique
How to glue: apply the base of the kinesio tape without tension in the usual position. Put your hand on the opposite shoulder and apply kinesio tape.

Cervicobrachialgia
Indications:
- pain in the cervical spine that radiates to the arm
- sensory disturbances in the hand
Overlay technique: muscle technique
Olecranon bursitis (tennis elbow)
Indications:
- elbow bursa inflammation
Overlay technique: lymphatic technique
How to glue: Extend the elbow and apply kinesio tape to the bursa. Keep in mind that the teip will stretch on the fold. Bend the elbow and apply the tape to the appropriate area.
Possible variant. Apply X-tape in the transverse direction of the bursa.

Traumatic epicondylitis
Indications:
- injury
Overlay technique: muscle technique

golfer's elbow
Indications:
- tendon inflammation
Overlay technique: muscle technique
Stabilization of the dorsal metacarpophalangeal joint
Indications:
- metacarpophalangeal sprain
Overlay technique: corrective technique

Lumbar hernia
Indications:
- lower back pain and pain that radiates to the leg
Overlay technique: ligament and muscle technique
How to glue: first you need to bend as much as possible in the lumbar spine. The first tape is applied horizontally. Apply both ends of the tape without stretching. Apply the second tape vertically - perpendicular to the first one along the lumbar hernia. Apply the third and fourth tape diagonally.
Drainage tape of the knee
Indications:
- ligament injury, tendon or meniscus injury
- arthritis or overload that caused inflammation
- swelling of the knee
Overlay technique: lymphatic drainage technique
How to glue: cut off two teips in the form of a fan. Apply without stretching the base of the first tape along the direction of the outflow of lymphatic fluid. Stick without stretching the base of the second tape also along the direction of the outflow of the lymphatic fluid. Apply the ends of the tapes at an angle, one on top of the other.
The neck taping technique generally gives excellent results for brachial plexus injury or flexor neuralgic symptom. There is a lot of evidence for this from practicing kinesiologists. Using a bonding technique to increase volume would be a good treatment option for thoracic outlet syndrome. When taping the neck, we recommend using a combination of tapes, as described in (§ 8.6) of the book “The Concept of Manual Taping”. In addition, this taping method corrects posture by acting as a shoulder girdle, which is very useful in such cases.
| M. scalenus anterior |  Mm Pectoralii Mm Pectoralii |
 M. biceps brachii M. biceps brachii |
There are several ways to influence the problem with Physiotape No.1 and CureTape® kinesiology tapes. It is possible to act both directly on the affected muscles of the neck, and, indirectly, through the nervous system, treatment of reflex points or a combination in the future.
Advice: McKenzie's therapy and the Concept of Medical Taping is a good combination for this problem.
First, an extensive mesh is applied, as described in (§ 5.6 p. 88), The Manual Taping Concept book, thus reducing the pressure fairly quickly, causing symptom relief. As a rule, this should be repeated for several weeks in a row (3 to 5).
The combination of taping is done in exactly the same sequence as described in (§ 08.16) in the Manual Taping Concept Book, which has a big impact on the problem. First of all, the mesh is always superimposed diagonally on the seal, then the rest of the tapes.


In the treatment, taping of the cervical spine is used, without tension, using a cross-tie technique on the affected area of the vertebrae. In osteoporosis, the vertebrae may be involuntarily affected at several levels, in which case a slightly modified ligament technique may be applied. It is possible to apply a combination of teips applied in the transverse direction, in which the stripes, like tiles, slightly overlap each other. Thus, a large area is taped.  |
Although there are many treatments for this disease in Medical Taping, it is sometimes very difficult to achieve improvement with this form of therapy. This is because it is often not clear what exactly caused the tissue damage that is causing the symptoms, and therefore it can be difficult to find the right taping combination for each individual case.
However, in whiplash, techniques that are not common can sometimes give very good results. Therefore, the use of PhysioTape No.1 and CureTape® is recommended.
It is also preferable to choose a physical therapist who is experienced in Medical Taping. Thus, the problem will be addressed at various therapeutic levels.
More:

Neck taping for osteochondrosis is an auxiliary method of treatment that allows you to get rid of overexertion in the affected area. This method of therapy cannot completely eliminate the disease, but it alleviates the symptoms.
How teips affect osteochondrosis
Kinesio tapes were developed by the Japanese to eliminate inflammation and pain in osteochondrosis. Such products resemble a large elastic patch made of cotton, less often synthetics. When fixing with teips, the muscles in the affected area are relaxed, spasm is eliminated, which increases pain.
This type of therapy does not have a constraining effect. Tapes adapt to human movements. The glue that is applied to the plates reacts to changes in body temperature, which also changes the elasticity of the material.
Types of kinesio taping
There are such types of taping:
- With damage to the upper spine. Kinesio taping for cervical osteochondrosis involves the use of strips in the shape of the letter Y. Tapes are glued with the wide side up. In this way, maximum fixation can be achieved.
- With osteochondrosis of the lumbar. Apply ribbons in the shape of the letter X and "snowflakes". For lower back pain, wide tapes are used for taping the back, which are glued near the site of the lesion.
- With damage to the thoracic region. Long and wide strips are used, which are fixed along the spine.
Indications for taping in cervical osteochondrosis
The kinesio taping method is used to relieve muscle tension in the cervical spine. This reduces the risk of exacerbation of the pain syndrome. Indications for applying teips:
- intense pain in the neck and head;
- stiffness of movements in the spine;
- muscle damage in the cervical region;
- tendon stretch.
How is the procedure
The muscle taping technique consists in gluing strips along the massage lines.
It is advisable to take a shower or treat the affected area with an antiseptic. Basic rules of taping technique:
- Attach the adhesive strip only to dry skin.
- If there is a large amount of hair on the back, then it is advisable to remove them first.
- Fixing ends should always be rounded off.
- The base of the tape should be distributed first, and only then the ends.
- The same tape can only be used once, even if the adhesive properties are preserved.
- One tape is intended for use for a period of not more than 5 days.
- When applying the tape, it is important to ensure that wrinkles and creases do not form.
- For each individual pathology, apply strips of the required shape.
The tapes are waterproof, so they do not exclude bathing, swimming and other water procedures.
Kinesiology taping can only be used in the absence of acute symptoms of unclear etiology. When sticking the strips, the back should be flat, you can not slouch. It is necessary to fasten the tapes only in a vertical position, hands should be lowered, knees straightened. The spine must not be bent.
When Tape Shouldn't Be Used
Before resorting to this method of treatment, it is recommended that you familiarize yourself with the rules for the use of taping. Adhesive tapes should not be used in severe blood diseases, including those with a tendency to form blood clots. Taping is contraindicated during pregnancy. During breastfeeding, the appropriateness of this method of treatment should be discussed with the doctor.
Do not stick the strips if there are wounds, abrasions and other types of damage on the skin. Tapes should not be used if there are dermatological diseases. With a tendency to an allergic reaction, adhesive strips should be used with caution.
With increased pain in the back area, it is necessary to stop treatment and consult a specialist. Do not use the strips if there are a large number of moles, otherwise they can be easily damaged during the process of peeling off the tape. Strips are not used in the postoperative period.
The opinion of doctors about the effectiveness
The opinions of doctors about the effectiveness are ambiguous. Some experts believe that this method of therapy can give a positive result, while others indicate its uselessness. However, doctors agree on one thing.
Tapes should be used only in the complex treatment of osteochondrosis.
If you do not act on the cause of the disease, then there will be no result.
Experts say that in order to get the maximum benefit from the treatment, it is necessary to combine the application of tapes with conservative therapy, i.e. take medications that eliminate inflammation and promote the restoration of cartilage tissue.
George, 42 years old, Podolsk
I have been treating osteochondrosis for many years. I believe that taping has a positive effect on the spine. I recommend combining this method of treatment with conservative therapy and physiotherapy.
Anastasia, 50 years old, Syzran
I do not think that taping can give a positive result with advanced osteochondrosis. Assign such a method of treatment only in the initial stages of the disease. The result can be seen within a few weeks.


