Optimizing your site for search engines should start with the right setup meta tags and headings in all articles, pages and sections of the blog, special SEO plugins like WordPress SEO by Yoast are suitable for this task. In this article, we'll take a look under the hood of this powerful machine called WordPress SEO by Yoast, talk about setting it up correctly, and some useful tricks.

Figure 2. WordPress SEO by Yoast plugin tab in WP Admin
After the plugin is installed, it needs to be activated. To do this, go to the page of installed plugins:

Figure 3. Activating the WordPress SEO Plugin
Click on the Activate button, now the plugin is activated, and a menu item will appear in the Admin panel SEO.
Note! If yours doesn't, then the WordPress SEO by Yoast plugin will swear!
To check if everything is in order, go to the menu item SEO >>> General... If you see such an inscription, then you need to set up permalinks for your blog:

Figure 4. URL error
The plugin swears that the URL does not contain the postname variable in the WordPress settings. This variable indicates that the title of the post will be included.
You can go to the Fix button, you will be taken to the permalink settings in WP. Here you need to set everything as in the screenshot:

Figure 5. Configuring the view of permalinks
But that won't be enough. In more detail about setting up permalinks on the WP engine, I told in the article, follow the instructions in this article and the WordPress SEO plugin will not be angry with the settings of your blog.
That's all, the plugin is fully functional, let's move on to the next chapter.
I'll add on my own: before switching to the WordPress SEO by Yoast plugin, I recommend testing it on an experimental blog.
Benefits of WordPress SEO by Yoast Plugin
WordPress SEO by Yoast is an all-in-one SEO plugin. Its functionality is comparable to at least 4 separate plugins.
Let's see what useful functions the SEO by Yoast plugin can do:
- Import all settings from other popular SEO plugins. If you have previously used plugins such as All in One SEO Pack or Platinum SEO Pack, the transfer of all title and meta data can be done automatically;
- High level of security;
- Wide range of metadata and title settings. Everyone can customize WordPress SEO by Yoast with metadata for their site. There is a separate editor for Titles and Descriptions of articles, which allows you to speed up the work on filling them out;
- SEO customization for various post types, including taxonomy;
- Page analysis on;
- Creation of XML sitemap for search engines;
- Creation ;
- Removing duplicate links from the site code.
These are the main advantages of this plugin.
Importing data from other SEO plugins
Tool data import Allows you to migrate all titles and meta tags from your old seo plugin to WordPress SEO automatically, so you don't have to do it roguishly.
If your blog has good traffic, then switching to the WordPress SEO by Yoast plugin, for example, from the All in One SEO Pack module, at first may negatively affect the position in the results of both Yandex and Google. Therefore, in this case, I do not recommend drastic changes.
If you just started creating a blog or created not so long ago, and your blog does not have high performance, then feel free to go to WordPress SEO.
After installation and activation, if you have articles with filled metadata, you need to import the data.
To do this, go to the tab SEO >>> Tools >>> Import and Export:

Figure 6. Importing data into WordPress SEO by Yoast
In Figure 6, we see the settings import and export page. I showed 4 tabs with arrows:
- Import... In this section, you can download SEO settings as a .ZIP file;
- Export... Export WordPress SEO settings to back up data or import it to another site;
- Import from other SEO plugins... If you have used SEO plugins such as HeadSpace2, All-in-One SEO or WooThemes SEO framework, then in this section you can transfer all settings to WordPress SEO by Yoast;
- Import from other plugins... Importing data from other plugins;
Let's take a closer look at the Import from other SEO plugins tool. This tool allows you to transfer all the titles and meta data that are filled in for each article in one click.
Let's see the transfer of SEO data using the example of the All-in-One SEO Pack plugin:

Figure 7. Importing data from the All-in-One SEO Pack plugin
Figure 7 shows the data migration settings. To do this, just put a tick in front of Import from All-in-One SEO... And click on the Import button.
Important: when importing, both plugins must be activated.
Regarding the item Delete old data after import, I would not recommend ticking this box. For two reasons:
- the risk of losing all data in the event of a plugin conflict;
- after the data transfer, you will need to deactivate and delete the old SEO plugin, which will most likely be accompanied by the deletion of all data.
In a separate article I will tell you how to transfer settings from various SEO plugins using the SEO Data Transporter plugin.
General plugin settings WordPress SEO by Yoast
Let's take a look at the WordPress SEO by Yoast plugin management menu:

Figure 8. WordPress SEO by Yoast Plugin Menu
All plugin settings are distributed in 6 menu items:
- General;
- Headers and metadata;
- Social networks;
- XML Sitemap;
- Advanced;
- Tools.
In this chapter, we will focus on general settings. After going to the General menu item, you will see the settings divided into 4 tabs:

Figure 9. General WordPress SEO by Yoast settings. Tab: general
In the General tab, we can manage three tools:
- Tracking. Enabling this feature will allow plugins to send some data to plugin developers to upgrade plugin;
- Presentation. If you missed the introductory presentation after activating the plugin, you can watch it here at any time;
- Restore default settings. Factory reset button.
Personally, I did not allow anonymous tracking of the parameters of my site, this is everyone's business, but personally I do not recommend enabling this option.
The presentation would be a very useful tool for beginners if it was fully translated into Russian, otherwise I was able to view only 2 steps and closed it.
Tab: Your Info
The next tab of the general settings of the WordPress SEO by Yoast plugin is responsible for editing personal settings:

Figure 10. General WordPress SEO by Yoast settings. Tab: Your Info
As you can see in Figure 10, in this tab you can specify the Site name, as well as its alternative name. I did not notice the particular importance of this function, so I recommend not filling it out.
Here you can also select the owner of the site. It can be a Company or a Person.
These settings are mostly for the Google search engine.
Webmaster Tools Tab
This tool allows you to verify the rights to own a website in services for webmasters.

Figure 11. General WordPress SEO by Yoast settings. Tab: Webmaster Tools
This tool allows you to verify the rights to the site in 4 services:
- Alexa Verification ID;
- Bing Webmaster;
- Google Webmaster;
- Yandex Webmaster Tools.
To do this, you need to fill in the meta tags of these services in the empty fields.
I'll show you using Alexa Verification ID as an example. To add a site, you must be registered and authorized in the service.

Figure 12. Adding a website to the Alexa service
We click on the continue button and go to the page for confirming the rights to the site, where we see 3 methods:

Figure 13. Confirmation of rights to a website in the Alexa service using a meta tag
Select method 2, as shown in Figure 13, select and copy the specified verification meta tag, you can copy only the content attribute code. In my case, I copied this code:
rBoyYmIBTRbOJLqZXFTU9CYcJd8
Now you need to install it in the required field of the WordPress SEO by Yoast plugin and save the changed parameters:

Figure 14. Adding a Meta Tag Using the WordPress SEO by Yoast Plugin
After pasting the code, you need to check the code of the main page of the site. The following meta tag should appear in it:

Figure 15. Meta-tag of Alexa verification in the site code
Now you can safely confirm the installation of the meta tag on the service website. If everything went right, then the following inscription will appear:

Figure 16. Successful verification of site rights
In other services, the process is almost the same.
Security tab
Setting up security in the WordPress SEO by Yoast plugin comes down to setting one checkbox:

Figure 17. General WordPress SEO by Yoast settings. Tab: Security
Checking this box will disable access to the WordPress SEO meta box for users of the roles authors and editors.
Customizing headers and metadata
This section is the main one in setting up the WordPress SEO by Yoast plugin. The promotion of the site as a whole, as well as individual articles, headings and possibly tags, if you decide to open them for indexing, will depend on how you configure the display of titles and metadata.
In the plugin menu, select Headers and metadata(Figure 8). And we see that this section of settings has 6 tabs.

Figure 18. Headers and Metadata - WordPress SEO by Yoast General Tab
In the General tab, you can activate forced rewriting of article titles, which in general I did.
Also here you need to select delimiter for titles title.
Home tab
Let's look at Figure 19, which shows the settings for the header and metadata templates for the blog home page:

Figure 19. Headers and Metadata - WordPress SEO by Yoast. Tab: Home
The figure shows the default settings. I do not recommend filling out the meta description field. Since for the main page SEO by Yoast plugin will automatically fill in if you have filled in Short description site.
In the template of keywords, we indicate the keywords by which you are promoting the main page.
Let's take a closer look at the title template, by default it looks like this:
%% sitename %% %% page %% %% sep %% %% sitedesc %%
As you can see, the template consists of 4 parts:
- %% sitename %%- Name of the site;
- %% page %%- page number;
- %% sep %%- delimiter;
- %% sitedesc %%- description of the site.
Let's look at the example of page number 2 of this blog, which is responsible for what:
Figure 20. Elements of the header template on the example of a blog
The exclusion of any element will entail its removal from the title of the site. You can experiment with the order of the elements, but I recommend leaving it as it is.
Record Types tab
This section is roughly the same as the previous one, but now we'll be setting up posts, pages, and media. Figure 20 shows the settings I recommend:

Figure 21. Post Type Settings in the WordPress SEO by Yoast Plugin
Everything is clear with templates. Let's analyze the rest of the points:
- Meta Robots - if you check the box, for example, in the page post types, then all pages will have noindex and nofollow meta tags, these meta tags prohibit search engines from indexing the web document. In no case do we check the boxes for posts and pages.
- The date in the preview of the fragment is a given function for Google. This search engine in spinnets can display the date when the records were updated. This does not give much advantage, but it is possible that this search engine better ranks frequently updated sites;
- WordPress SEO Meta Box - hides the plugin panel for setting titles and metadata.
I think I took it all apart. If you have any questions, please contact us in the comments.
Taxonomy and Archives Tabs
Exactly the same as in the previous section, only for taxonomy elements: categories, tags, formats. And archives of authors and dates.
This is how the Taxonomy section of my blog is configured:

Figure 22. Taxonomy Settings in WordPress SEO by Yoast Plugin
So archives:

Figure 23. Archive Settings in the WordPress SEO by Yoast Plugin
Nothing complicated, you can navigate by the prompts. The only thing I have opened for indexing is the label. This is an experiment, so I don't recommend putting tags into the index.
Rest tab
At first glance, the rest of the settings are not so important, but I recommend activating them all, since their functions are useful specifically for SEO.

Figure 24. Headers and Metadata - WordPress SEO by Yoast. Tab: Rest
Let's take a look at each point, starting with the first:
- Noindex for subpages and archives - check the box to avoid dubbing the content;
- Use in meta keywords - if you are not going to prescribe keywords for posts and pages, then this function can be left off;
- Add tag noodp meta robots throughout the site - prevents search engines from using the DMOZ description for the site;
- Add tag noydir meta robots throughout the site - the same only the Yahoo directory.
This completes the setting of the title and metadata. Let's go further.
Integration with social networks
I can't say anything special on this point. Since he himself has not yet used it. But nevertheless, I dug a little on the Internet, and the plugin's tips explain everything well.

By checking the box Add Twitter metadata we link the site to the twitter account.
Set the type of card (tweet). There are two types of tweets available:
- Final content - the tweet will be in and out of text;
- Final content with big picture - Tweet will have text and picture.
In general, this is how I configured for myself:


Figure 27. Twitter username
We copy it. The username is also available in the profile under the avatar, but there it is displayed with a "dog", and we do not need it. Now the copied name needs to be pasted into the field Twitter Username in the Accounts tab:

Figure 28. Adding a username to the Twitter Username field
We save and again check the code of our site, something like this should appear there:
Figure 29. Twitter Meta Tags in Site Code
Just like that, I linked my website to Twitter using the WordPress SEO by Yoast plugin. This is done in a similar way for other social networks.
Create XML sitemap
Any site should have a sitemap in XML format, which is especially important for sites with a lot of content. This type of sitemap is intended exclusively for search engines and helps them in the correct indexing of the site structure and all content.
The WordPress SEO by Yoast plugin is endowed with a tool with which you can create and customize an XML sitemap in a couple of minutes.
Let's go to the XML sitemap setup page:

Figure 30. Generating an XML Sitemap Using the WordPress SEO by Yoast Plugin
Check the box to enable the sitemap. To view the created sitemap, click on the XML Sitemap button, and the sitemap will open in a new window. This is what my sitemap looks like:

Figure 31. My XML Sitemap WordPress SEO by Yoast
Please note that the XML sitemap generated by the WordPress SEO by Yoast plugin is available at:
https: // site / sitemap_index.xml
Let's go through the rest of the tabs and analyze all the available settings.
Tab a list of users... Enabling this function will add a list of users to the sitemap, if any. The function is activated by unchecking the checkbox:

Figure 32. User List function for XML sitemap in WordPress plugin SEO by
If there is no registration on your site, then feel free to check the box and disable this function.
Configuring post types for the sitemap
The next tab is the setting for displaying post types in the sitemap. Let's take a look at the screenshot:

Figure 33. Configuring the output of post types in the XML sitemap
As you can see in Figure 33, the WordPress SEO by Yoast plugin settings allow you to add 3 post types to your XML sitemap:
- Posts (post);
- Pages (page);
- Media files (attachment).
Posts and pages must be present in the site map. But media files need to be added in certain cases:
- If you have a large number of photos in your articles. Suitable for travel blogs based on beautiful photographs;
- If your blog template is tailored for creating a gallery;
- If your blog has video files.
If your blog meets one of the conditions, you can add media files to the sitemap and open them for indexing in the Titles and Metadata section.
Taxonomies
We continue to customize the sitemap for search engines and now we will understand the structure of the blog in the sitemap.

Figure 34. Configuring taxonomy for XML sitemap
Figure 34 shows my settings, as you can see I have excluded the Tags and Formats sites from the map in order not to create similar content on different pages.
Advanced settings
The advanced settings include 3 functions: Bread crumbs; Permalinks and Rss... All of these tools are useful and for good reason are included in this plugin. And the feature for setting up permalinks will help newbies save a lot of time and nerves by avoiding setting up workarounds.
Breadcrumbs WordPress SEO by Yoast
Breadcrumbs are a breadcrumbs that show the user where they are at the moment. Another undisputed function of breadcrumbs is to help search engines understand site structure and weight distribution.
Let's take a look at the screenshot:

Figure 35. Setting up WordPress SEO by Yoast breadcrumbs
So, to enable breadcrumbs, check the box and set the PHP code for outputting breadcrumbs to the site code, namely to the file single.php (sometimes this file may have a different name, for example loop-single.php ).
Most often, breadcrumbs are placed above the heading of the article so that visitors can immediately see which heading or sub-heading they are in.
Figure 36. Example of Breadcrumbs
Figure 36 above the article title shows Bread crumbs which have a rather interesting design and undoubtedly attract the attention of visitors. The breadcrumbs for this article are represented by 3 buttons, which are links:
- Home page. We see the domain of the site;
- Heading. The article is in a section called CSS Lessons;
- Article title.
Permalinks
Essential WordPress SEO by Yoast Plugin Tool. How I set up this tool on my blog, I will show in the screenshot:

Figure 37. Setting up WordPress permalinks SEO by Yoast
I will not repeat myself about each point, since everything is clearly described there. I'll tell you that for me the most important tools here are 2:
- Delete variables? Replytycom;
- Hide short link of posts.
Both functions are aimed at protecting your blog from duplicates.
Removing duplicates ? replytycom a rather complicated process, and in the WordPress SEO by Yoast plugin it is reduced to setting one checkbox, for which the developers have a lot of respect from all webmasters.
How to hide a short link or rel = ’shortlink’ in another way, I talked about in a separate article. In it, I recommended a rather complicated method, and SEO by Yoast allows you to do this by setting one checkbox.
Tools Tools
I have already talked about one of the tools in the Tools group. And there are three of them:
- Bulk editor- in this tool you can edit (add titles and descriptions) articles and categories together:
- File editor- allows you to edit Robots.txt and .htaccess files directly from the admin area. If I'm not mistaken, only the WordPress SEO by Yoast plugin can do this;
- Import and Export- carries out import and export of SEO data.
This completes the basic settings of the WordPress SEO by Yoast plugin. Now the plugin should work correctly and have a positive effect on the promotion of your blog or website.
Setting up and filling in the WordPress SEO Meta Box
Let's take a look at how to set up WordPress SEO Meta Box at the time of article writing. After activating and configuring the WordPress SEO by Yoast plugin, a section with SEO settings for a separate article or category should appear in the WP article editor.
Look at the example of a regular article. Here's a screenshot:
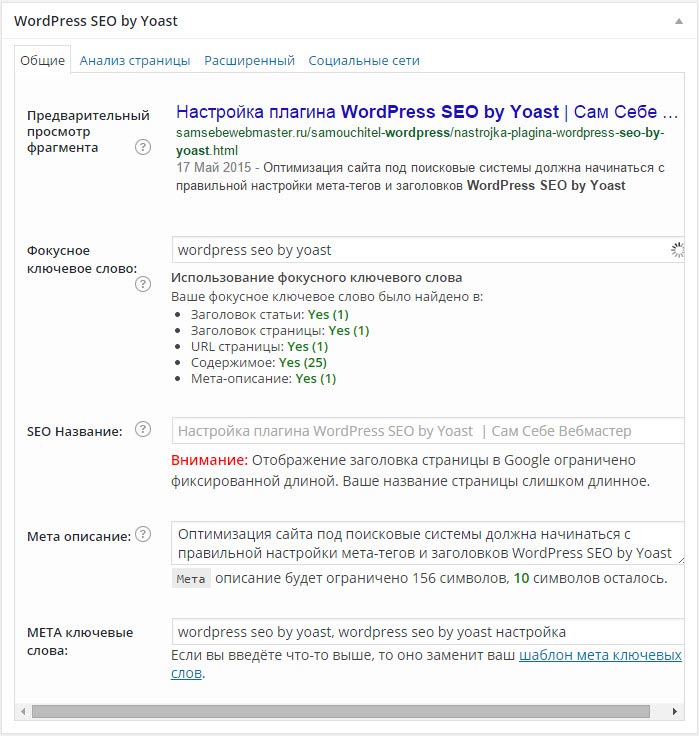
Figure 38. WordPress SEO Meta Box
Let's take a look at Figure 38, anyone who has previously worked with SEO plugins will see a “familiar picture”: Title, description, keywords, and preview. Everything is familiar except for one - the Focus word field and the analysis of the article on it. As you can see, I have green words YES on all counts. This means that the article is perfectly SEO-optimized.
Let's go over the rest of the tabs.
Page analysis
Sometimes this function does not work. If this suddenly happened, then the reason may be in the focus word, perhaps it just has not loaded yet. To fix this, select the keyword and click on the Enter button.

Figure 39. Page Analysis
As you can see in Figure 39, the WordPress SEO by Yoast plugin provides a fairly broad and detailed analysis of the page, and I still have a lot to do.
Extended
This section of SEO settings includes several useful tools, but in principle I hardly use them.

Figure 40. Advanced
I would especially like to highlight the 301 redirect and canonical URL features. The WordPress SEO by Yoast plugin is the only one that allows you to do this manually. In certain situations, this will be irreplaceable.
Social networks
Remember that, while writing this blog, I linked my blog to my Twitter account, so in the social networks section I had settings for this social network.

Here you can specify a Title and descriptions for the tweet, as well as, most importantly, set a picture. After that, the tweets of all shares will have a picture.
That concludes that WordPress SEO Meta Box setup is fully covered.
Conclusion
Don't think that the WordPress SEO by Yoast plugin is all about SEO in WordPress systems. No, this is just one tool, but it is one of the most important, so do not hesitate and install it on your blog.

I will say right away that you made the right choice by deciding to create your own project on WordPress. Matt Cutts himself (Google's leading internet spam and optimization specialist) said that WordPress is a great CMS for search engines.
An analogue of WordPress SEO by Yoast and also a very popular SEO plugin: all changes are implemented on one page. The settings should be made by analogy with the previous plugin, since the names of the functions are the same.
Paid SEO plugin SemanticWP SEO
SemanticWP SEO has similar features to the free plugins we talked about above. But! If you have a large project with many sections and subsections or an online store with product filters, this plugin is indispensable, as it has the Multi Taxonamy function (meta tag template engine for all possible URL generation options).

Yes, this plugin was developed by our company. We have been working a lot with the promotion of WordPress sites, projects of varying complexity (portals, stores, corporate sites. In this plugin, we took into account all the problems and complexities of the CMS that we encountered in our work. We also added functionality that we really do not have) enough in free options.
BUT plugins are just a tool and opportunities for implementing the tasks that a specialist sets for himself. Having a plugin alone does not solve problems and does not achieve results.
What else do you need for initial SEO optimization?
The following plugins will come in handy:
apple-touch-icon.png (and variants).
favicon.ico (and variants).
browserconfig.xml.
feeds that don't / shouldn't exist.
invalid page / date ranges.
broken internal links / missing http links
Alternate sitemap and metadata URLs.
pages and images with violated parameters.
security probes
To promote the project, you need to integrate it into the services of search engines, you need to add YANDEX METRIC, GOOGLE ANALYTICS, YANDEX WEBMASTER, GOOGLE WEBMASTER to your site on wordpress.
There are several ways to add Yandex Metrics and Google Analytics
1. By FTP to the template itself
The WP-CONTENT folder, then to the THEMES folder, then to the folder with the template name, to the FOOTER.php file

2. In the template(especially in premium themes) there are always special fields where you can add the Yandex Metrica and Google Analytics code.
3. In all SEO plugins there are also special fields for inserting Metrica and Analytics code.
Ways to add your WordPress site to Yandex Webmaster and Google Webmaster
Option 1- the opportunities provided by the search engines themselves
Option 2- most seo plugins have the ability to integrate in the plugin itself
Option 3- special plugins Webmaster Yandex and Google Webmaster Tools
And now you have made the initial project settings, worked on SEO optimization, then you need to start working on promoting the project. Without buying links, it is possible to achieve good indicators in website promotion only by working on:
- the relevance of the content;
- behavioral factors;
- redistribution of weight between pages and records (linking).
To achieve a successful result on all three points, you will need additional plugins.
WP-PageNavi - plugin for pagination output - improves the indexing of your project.
SEO Smart Links is a plugin for linking on your site.
Yet Another Related Posts Plugin (YARPP) - “Similar Posts” - will also help to relink the project.
Broken Link Checker - plugin checks for broken links.
Cross-linker - plugin automatically replaces words with links.
Simple Tags - expands the ability to add information to tags - which will improve their text relevance.
Look like that's it! If you have other useful and interesting plugins for WordPress or optimization techniques for this CMS up your sleeve, it will be great if you share them in the comments.
One of the main questions that a novice webmaster faces when creating a website is the choice of a CMS. In this article, we will look at the main features of CMS Wordpress in terms of SEO promotion.
Let's start with the main advantages that determine the widespread and popularity of the WordPress CMS:
- A simple, intuitive interface that makes it easy to post articles / blog posts even for a completely untrained person.
- A huge number of free templates and modules, and not paid either.
- Convenient text editor.
- Large Community, it is very easy to find the answer to any question.
This is why WordPress is so popular for creating blogs, article / news sites.
But, of course, the disadvantages are also worth noting. The main ones are perhaps the following:
- Difficulties in adding any non-standard functionality to the site.
- The versatility of the system, which often leads to the presence of a large amount of unnecessary content on the site. At the same time, all the functionality is written in the CMS core and is difficult to remove.
- Free solutions already mentioned above. As you know, free cheese is only in a mousetrap, therefore, in many modules, developers sew in the possibility of unauthorized access to the site by the owners. Any installed module is a potential security threat, even among the paid add-ons there are unsafe ones.
- The downside of popularity: constant problems with spam, hacking sites.
As you can see from the list of disadvantages, you shouldn't use Wordpress for a large and even medium-sized online store.
Now let's move on to the actual issues of website promotion on WordPress.
Optimizing template source code
CMS WordPress is generally not very SEO friendly, and there are a lot of bugs in any free WP template.
External links. Almost always, the developer of the template (also concerns plugins) leaves in the code a link to his own site, often in a hidden form. Why you need to remove it: a part of the weight is transmitted by the link, hidden parts of the code are generally bad for promotion.
Getting rid of such links can be very difficult, often the developers make them as elusive as possible.
Duplicate / unhelpful content. WordPress constantly creates duplicate pages, which can also negatively affect the promotion - the overall quality of the site decreases. What can be attributed here: separate pages for each comment, separate pages for pictures, archives. All of these pages are of no use whatsoever for promoting your VI site, so you need to get rid of them right away.
Wrong location of h1, h2, h3 tags. In SEO promotion of a WordPress site, you can face difficulties due to the incorrect use of headers in the template. In the overwhelming majority of templates, you can see overspam (for example, the title of all articles on a page in a heading in h2) or incorrect use of headings in cross-cutting elements (some forms, menus). It is necessary to remove all unnecessary h: h1 tags - always once on the page as the main heading, h2 and h3 are subheadings of content blocks, using h4-h6 does not make sense at all, so it is better to refuse these tags.
Choosing the main WordPress site mirror
In principle, it is not important to use the site address with or without www, the main thing is to stop at one option so as not to create a duplicate of the site. Here you can praise WP optimization for having built-in one-click main URL setting functionality (In the Wordpress admin panel, go to Settings> General).
Installing the necessary plugins for promotion
Unfortunately, you can hardly do without plugins when SEO website promotion on WordPress, however, due to the popularity of the engine, a plugin can be found for almost any occasion. Of course, if you have sufficient development skills, then all the functionality can be added on your own, but for an ordinary user, at least the following additions are needed:
- RusToLat / CyrToLat. CNC (links containing human-readable text) must be on the site, and this plugin will transliterate the title of your articles into a URL.
- All in One SEO Pack / SEO by Youst. The standard functionality for managing headers and metadata in WordPress is very poor, so you need crutches.
- Akismet. In order not to drown in spam (comments and any other forms will constantly be filled with bots), you just need some kind of protection, this plugin will save you from problems for the most part.
- GoogleXMLSitemaps. Plugin for creating XML sitemap, if you have chosen Yoast to manage SEo, then it already has such functionality.
Setting up addressing

By default, the URLs of pages on a WordPress site look like this: site.ru/?p=123, which is not very correct for SEO. To customize the display of links, you need to go to Settings> Permalinks. It is better to choose the option "Post name" - then the name of the article will be displayed after the domain, which, as we remember, will be translated into transliteration by the plugin.
When placing an article on the site, you must follow the following recommendations:
- It is advisable not to copy from the article and Word to the WordPress editor, because in this case the engine generates extra code. You need to get rid of them. This happens only when copying is done in a visual editor, not a text one.
- The main article image should not contain a link to the page. On many blogs, clicking on a thumbnail will open the full article. This is not worth doing, since the weight will be divided into 3 links at once: To the "Read more" button, to the Title of the page and a picture. By using images as a link, we lose the weight that could have been passed on to the keyword in the Title.
- When adding the main picture to the article, you need to use the "Thumbnail" function. Adding an image without this function will not keep track of all the main images.
Many of us, both developers and marketers, site owners, not to mention SEOs, have to deal with SEO in one way or another.
I will make a reservation right away that WordPress in this regard is a very flexible and friendly system, but just like any other, it needs some manual debugging in order to achieve maximum efficiency. This is what will be discussed.
From this article, you will not learn about the methods of building a link mass, about the correct optimization of page text, as well as about many other components of SEO. What will be discussed here? About the basics, about basic optimization, preparing WordPress for further, so to speak, "fine" settings.
Answering immediately to the question "What is it in general - basic optimization?"
Basic optimization is the correct settings for the options offered by the system, these are plugins that automate most of the work, they are putting straws ahead of time where your butt could theoretically land.
Without further ado, let's get to the point.
Links
Permalink or CNC
Don't torture visitors and search engines - give meaning to your links and increase the importance of the keywords you use in them. For example, I prefer to use this view:
Feel free to use it, or use the list of available tags and create your own expression.
Cyrillic
For starters, if you are working with a website with Cyrillic content, then the names are Cyrillic by default, as well as the URL. And all would be fine, we can even forget about the aesthetic side (http://www.mycoolbigshopoftea.com/green-tea/in-packets/ - "Hello, dear Vasily! How are you?"), But the search engines are still do not understand Cyrillic as well as we would like.
Plus, when transcoding Cyrillic characters, they give more characters in the URL than Latin ones. Whether to make it easier for search engines and those who do not use UTF encoding, the task or not is up to you, but I would recommend using, for example, the Cyr to Lat Enhanced plugin and translating the Cyrillic alphabet into Latin automatically, or writing links in English manually.
"Is yours mine to understand?"
If you publish a really important article and use transliteration in the URL - do not be lazy and check if the main search engines understand you correctly.

![]()
Moreover, a positive result in one is not a guarantee of a positive result in the other. Unfortunately GOST does not work here and search engines use their own understanding of transliteration.
Decide on your primary mirror
The problem is as old as the search engines themselves, nevertheless, it still requires attention, since they still sometimes make mistakes, and because of this, you don't really want to lose weight. We define for WordPress (Settings → General) which kind of presentation we need - with or without www.
After you have decided, be sure to check the result by entering an address with and without www. If the redirection does not occur, or your hoster is too clever with the settings, or you will have to delete / rewrite some of the plugins yourself. In the worst case, add a 301 redirect to .htaccess manually, but do not ignore this point.
Canonical links
Since canonical links have been supported by such companies as Google, Yahoo and Microsoft since 2009, and Yandex since 2011, it would not be correct to ignore them. To the question of what it is: canonical links are beacons that show search engines which page with the same content is real. For example, for a person, a page with addresses:
- http://somesite.ru/page/
- http://www.somesite.ru/page/
- http://www.somesite.ru/?p=1234
They may seem the same, but for a search engine, all these URLs are different pages with the same content.
In order to suggest the correct link to the search engine and not to lose irrevocably link weight when gluing, we put down canonical links on each page in the form of such an entry in the section
:
Plugins such as, for example, WordPress SEO by Yoast or All in One SEO Pack can make life easier in this regard and put everything right and automatically.
Taxonomies by WordPress SEO
WordPress offers you taxonomies by default with vertical (categories) and horizontal (tags / tags) hierarchies. Do not hesitate to use them to the fullest.
Think over the vertical structure so that it is easy for users to find the necessary content (so that the nested categories are logically arranged) and use tags / tags wherever possible, think over them so that the situation does not arise “each tag is just one post, and there are 300 of us ".
WordPress suggests the tags you use frequently on your site - use it. And, of course, do not spam with unnecessary tags where they are out of place.
A logical division along the vertical hierarchy will give some plus both in promoting the main thematic queries of the site, and will make it easier for search engines in those cases when they want to highlight the main sections on the site and show them next to the snippet in the search results.
Duplicate content
As always, there is a lot of controversy on this topic, but everyone agrees that it is better to avoid duplicating content on the site.
Firstly, the link mass is scattered (people like the article, but the links are put by the presenters not on one, but on several different pages). Secondly, duplicates usually indicate that you are too clever with the logic of building the site and users will be perplexed.
Well, and the main disadvantage: even if you do not fall under any sanctions from search engines for duplicating content (in particular, Google promises not to punish if there is no criminal intent), then only one of the duplicates will get into the search results anyway and it is not a fact that the one you need.
This problem is almost completely solved by using canonical links, as you read about earlier, but better think about it and double-check the structure of your own site. Is it really necessary that the same news / article fall into several categories at the same time, instead of just adding several tags / tags to it?
Another step towards basic optimization that you can take is not to output entire recordings to tapes. Use the_excerpt () function instead of the_content ().
Thus, first of all, you will make it easier for a user who can get to the page in search of a certain phrase from a search engine. It would be better for him not to wind a solid canvas, but immediately see what he is looking for on the page. Secondly, by not displaying all the content of the post in the feed, you will reduce the amount of duplicate content on the site.
To enhance the latter effect, you can write a summary of the post in Excerpt instead of its first paragraph (as you would if you had used the_content () with a clipping linein content).
One final tip: exclude date archives from indexing. They do not carry any useful thematic load, but they duplicate the pages of regular categories.
Robots.txt
This well-known WordPress file is presented in virtual form. That is, it will appear at the address http: //your_site/robots.txt, but in fact there is no such file on the server by default.
In the default settings, WordPress only offers to enable or disable site indexing completely. If you want more subtle settings, everything is simple:
- create a physical file at the root of the site. No conflicts will arise. If a physical file exists, priority is automatically given to it;
- or use a plugin that will allow you to make advanced changes to the virtual file.
In terms of working with robots.txt, for example, plugins such as DL Robots.txt, WordPress SEO by Yoast or All in One SEO Pack will help.
Sitemap.xml
Without a doubt, the right file to speed up indexing by search engines. There is no default in WordPress, as there are too many options for what exactly you want to include in this file, and therefore the options are:
- use a plugin (for example: Google XML Sitemaps, WordPress SEO by Yoast, All in One SEO Pack), configure and generate automatically;
- use any online service (just type in an XML Sitemap in the search engine), generate it upon request and post it;
- write the output yourself.
HEAD fields
Of the usual trinity (Title, Description, Keywords), WordPress by default for posts and pages only supports Title (function wp_title ()), which reproduces the title of the post / page. For everything else, you need specialized plugins, or the use of custom fields.
The following plugins can help in this case:
Let's not forget about other fields that can help distinguish our site from the gray mass of competitors. In particular, about Google+ Author Link. Create a Google+ page and link to a section
, even if you do not have an author's blog, a sufficiently large logo of your company with additional displayed information fields in the search results will clearly not be superfluous.And finally - Favicon, the very familiar icon for a long time. By default, WordPress is not supported in the core, so we place it in the root of the site ourselves and add a link to the section
, or use a plugin, for example: Heroic Favicon Generator.HTML code
Recall that we are talking only about basic optimization, and not about how to sharpen the page for a key request, and therefore only specific recommendations suitable for general cases.
Check and make sure that you only use one H1 title per page / post, either automatic using wp_title (), or handwritten in the page content. This tip also applies to categories, archives, and the homepage, unless the site uses HTML5 markup and the headings are not tagged.
Optimize image tags - list all the attributes (alt, title). WordPress provides this option by default. Don't be lazy and the keywords in the image attributes will pleasantly surprise you with an increase in the thematic weight of your pages. The main thing is how much in vain without spam.

Notify everyone (ping)
Do you want search engines to react faster when you have fresh content? Welcome to the wonderful Update Services (Settings -> Writing) available in WordPress by default. Here you can add the addresses of the resources that you would like to notify about each new publication.
By default, only one service is registered in WordPress - Ping-O-Matic. For many, this is enough, but for aesthetes, I would recommend adding a couple of additional services:
- http://ping.blogs.yandex.ru/RPC2
- http://blogsearch.google.ru/ping/RPC2

Finally
This concludes our steps on the path of basic WordPress search engine optimization and I want to believe that most of the tips described in the article will be applied by you and will save your time, effort and money in the future.
The next step in setting up is displaying the URL in Latin letters. Remember from the last step that the URL is generated from the page title and category. This means that the URL of the article titled "Which smartphone to choose" will be: site.ru/what-smartphone-choose.html.
Such a page address is bad because it is not held in high esteem by search engines due to difficulties with encoding, and by users because of the need to change the keyboard layout.
For automatic URL translation into Latin, use the popular plugin Rus To Lat. I prefer the Cyr to Lat plugin which has Ukrainian and Belarusian language support.
After installing and activating the plugin, it will start working automatically, without additional settings. If you have any problems, please contact support.
5. Setting up the SEO plugin
There are two of the most powerful WordPress optimization plugins: All in One Seo Pack and Yoast SEO.
All in One Seo Pack is one of the pioneers among all WordPress plugins. Since 2007, it has been installed over 30 million times. Yoast SEO- a younger plug-in and somewhat superior to its main competitor. Since 2010, it has been downloaded over 25 million times. Fewer downloads than All in One, but a higher rating - 4.6 stars.
To install the plugin, go to Plugins> Add New... In the search form, set the name All in One Seo Pack... Install and activate. The All in One SEO section will appear in the admin panel, go there: you need to make the basic plugin settings.
Basic plugin settings
To protect the site from duplicate content, put a checkmark in front of the items Canonical URLs, Disable pagination for canonical URLs, Include custom canonical URLs... Otherwise, search engines will swear at duplicate content on the site.

- Use default title - Disable(to set the title and description of the site through the plugin);
- Use markup Schema.org - Checkmark(to allow search engines to create rich site snippets in search results).

Next in line - "Setting up the main page".
In the fields "Title", "Description" and "Keywords" you need to set title, description and keywords respectively. This is what it is:
Title and description (meta tags) are important to search engines and visitors. Search engines use meta tags to determine the topic of the content on the page. Users get to know them in the search results and if they are attractive, they go to the site.
Writing good meta tags is also important for website optimization, because the better you do it, the more visitors from search engines you will get. Here's how to create good meta tags.
For example, if you have a blog about personal finance, you might write a headline like this: “Out-of-the-box formulas for effective personal finance management” or “A blog about effective personal finance management”.
You need to meet 60 characters. Also come up with a short description - here you are limited to 160 characters. Key words (keywords) can not be specified - they no longer affect the ranking of sites.
If you are using a static master page, enable the appropriate setting:

Moving on to "Customizing Headers".
The first option in this section of settings is “Title Overwrite”. I advise you to enable it. This way you can set a separate title for each page. In the next paragraph - "Capitalize labels", you need to check the box so that the title starts with a capital letter.

In the paragraph "Format of page titles", I advise you to leave only % page_title%... Otherwise, the title of your blog will be added to the page titles and the title will exceed the required 60 characters. If you want to see the title of the blog in the title of the page, you can add it with a vertical bar or hyphen. This is how it looks for me:

In search results, it looks like this:

In the last two paragraphs, I advise you to write the text in Russian so that the titles of "404 pages" and navigation are clear to readers.

Then we move on to "Setting up custom post types"... In this section, we enable the ability to manage WordPress SEO settings for different site elements. To set titles and descriptions for each post and page on the site, specify the following settings:

In chapter "Webmaster verification" you can sync the plugin with Google Search Console. To do this, you need to enter the verification code in the field, which is issued at the verification stage in Search Console:

In the next section - "Google Settings", You can:
- Link your Google+ account to the site (recommended for website promotion);
- Display the main links of your site in the search results (it is recommended to quickly move users from the search to the desired section of the site);
- Indicate to Google the preferred name of your site (recommended for ranking for branded queries);
- Enable advanced attribution settings;
- Connect Google Analytics.
This is how my settings look:

Small educational program:
Close from indexing means asking search engines not to add this or that page to their base. But why is this necessary?
Firstly, search engines do not like to add web pages that are useless for users to their database.
Secondly, there is duplication of content in WordPress, which search engines really hate. For example, article announcements can be in headings, tags, date archives, author archives.
I recommend closing date archives, author archives, tag archives, search pages, 404 pages, pagination pages and posts from indexing.
In order for the weight of the pages not to go into the sections closed from indexing, do not put links to them from the footer, menu and sidebar (cross-links).


