Braided hairstyles look elegant, feminine and romantic. And if regular braids may seem too traditional, a seductive French braid will put you in the spotlight. You can make sure that the fashion for braids is back by flipping through glossy magazines full of photos of stars with just such stylish hairstyles.
A French braid is suitable for absolutely any woman, regardless of age and type of face. This hairstyle goes well with clothes of any style and color, visually filling the image with youth, amazing freshness and charm.
There are a lot of options for French weaving, each individual weaving differs from the other not only visually, but also in the complexity of the technique. Someone likes a cute French spikelet, someone likes a sophisticated French braid on the contrary. The only condition is sufficient hair length. True, you can use artificial or natural strands, hitting friends and acquaintances with an unexpected hairstyle for one evening.

In any case, the admiring glances of others are guaranteed, because few people believe that such a masterpiece can be created with one's own hand. However, this is true, you will not need special devices or expensive cosmetics. All you need is a fine-tipped needle comb, rubber bands, hairpins, and a little patience.
French braid on the contrary, from the bottom up with your own hands

As the name indicates, this braid is braided from below, from the neck.
1. Tilt your head down and carefully comb your hair.
2. Start weaving with thin strands at the neck, in the middle of the back of the head (at the top of the ears). Divide the wide strand into 3 sections, start weaving a French braid - the side strands cross over the middle one, with a new binding, new strands are picked up on both sides. If you chose the opposite French braid, then the side strands intersect under the central one. As you approach the crown, grab the larger strands.

3. At the crown, when all the hair is collected and a ponytail remains, braid an ordinary braid out of it, secure the end of the finished pigtail with an elastic band and wrap it in a bun. Or, if you like the bun better, go for a ballerina bun or a messy bun.

4. Fix the resulting bundle with hairpins or stealth pins.


For special occasions, the braid can be decorated with decorative accessories with rhinestones or flowers.


The original French braid will create a unique charm and help you gain confidence in your attractiveness. After all, this feeling is the main secret of female charm.

Reverse French braid video from bottom to top
Video of a regular French braid from the bottom up
Braids are always in trend. Weaving looks beautiful on hair of any length. There are many variations of this hairstyle. At the peak of popularity, the French braid has been holding on for a long time.
Today we will talk about a variety of reverse weaving - an inverted braid. It is slightly different from the classic, but it looks very impressive. The main thing is to follow the step-by-step instructions and carefully study the photo.

Classics of the genre
In Russia, a long braid has long been considered a symbol of femininity. Many rituals were associated with it. Nowadays, such rituals are no longer practiced, but pigtails are still in vogue. Previously, there were not many varieties, but now you will not surprise anyone with a simple oblique.

Weaving an inverted braid at first seems difficult, but with a little practice and you will understand the technique. Then this hairstyle will be a matter of minutes for you. You will need:
- massage hairstyle;
- spray bottle with water;
- elastic;
- hair spray.
Step by step weaving pattern

Technique:
- Comb your hair well. Separate a small section of hair above your forehead. You can experiment with the thickness, from this the appearance of the braid changes significantly.
- We divide the separated strand into three equal parts. We lightly sprinkle the hair with water from a spray bottle, so it is easier to separate one strand from another.
- We put the left strand under the middle one, the right one on top of the middle one, then the left one on top of the right one.
- After each crossing, tighten the strands very tightly, they will look neat, the hairstyle will last longer.
- We release the left hand from the hair, we hold everything in the right. Lower your palm down, turn the two extreme strands up. So the left strand is the middle one.
- We dive under the extreme strand from the left side, take a little from the mop of hair and put it on the middle one. Take a strand approximately the same size as the main one.
- With your left hand, fix the base of the braid, release the two extreme strands and turn it upside down. Again, put the extreme strand on the right side on the middle one with a small curl from the main hair.
- Braid the rest of your hair in the same way.
- You can make a voluminous braid by securing the end of the curved pigtail with invisible ones at the very bottom. This hairstyle is decorated with shiny hairpins or hairpins.
- At the end of weaving, sprinkle your hair with hairspray.
With the help of a French braid, you can make a lot of beautiful hairstyles for every day and for any holiday.
Reverse braid on bangs

If you want to leave the curls loose, but you also want a braid element, then you can only braid the bangs. To do this, you will need to do the following:
- Comb your hair. Separate a bang or a small section of hair from the forehead.
- Start weaving according to the pattern above, from one ear to the other.
- Secure the end under the hair with invisibility so that it is not visible.
- Twist the rest of the head of hair a little, sprinkle with varnish. You will get an original, simple hairstyle for every day.
Hairstyle with a bun

A great hairstyle for every day: start weaving an unusual French braid from the back of your head, finish at the crown, collect the strands there in a careless bun. In front, it is recommended to comb the curls a little, to create volume.
Decorate such a hairstyle with a bow or a bright elastic band. At the end of weaving, fix the laid hair with varnish. Buy a medium hold hairspray, then your hairstyles will always look natural.
original flower
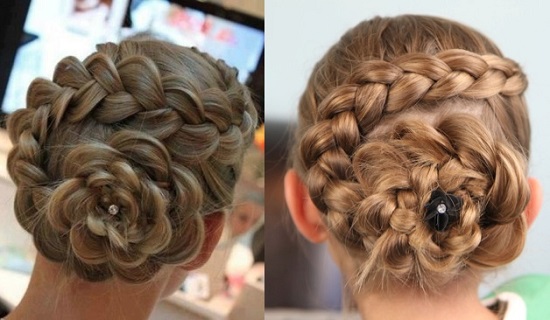

Many have seen such weaving at brides' weddings. And they didn’t even know that you can make a miracle of hairdressing art with your own hands.

Step by step:
- Part your hair with a side parting.
- From the side that is larger, separate the strand, start weaving an unusual French braid.
- In the pigtail inside out, lay the side strands from below.
- Continue to weave, do not forget to pick up strands from each side.
- The braid weaves from the parting to the side. You can stretch the pigtail a little along the way, so it will become more voluminous.
- When you have finished braiding to the other end, make a smooth turn back. Then finish weaving.
- Fasten the finished braid with an elastic band, wrap it in the form of a flower, secure with invisibility.
- Place a shiny hairpin or hairpin in the center of our flower.
- Do not forget about hairspray, thanks to it, your masterpiece will last a long time and will please everyone around you.
Five-strand weaving option


Laying looks spectacular at any event:
- Comb the curls, divide into five parts. In the middle, the strand should not be parted.
- Gather each strand into a ponytail.
- Braid each section into a topsy-turvy French braid. Start weaving not from the bangs, but closer to the crown.
- Secure each braid with a small rubber band, after stretching the strands.
- Wrap all the ends of the braids in a ring, fasten at the very end of the back of the head, cover with braids on top.
- Decorate your hair with a bow and sprinkle with glitter varnish.
Malvinka from hair with a bow


Making a hairstyle is a little more difficult than an ordinary malvinka, but read the instructions, look at the photo and you will understand that everything is not so difficult.

Weaving technique:
- Comb your hair back, separate the top part, tie a ponytail. Wrap it with a small amount of hair, secure with invisibility.
- Remove the tail forward, secure it with a special clip.
- From the remaining hair, start weaving an inverted French braid.
- As you weave, pull out individual strands, so the design will become more openwork.
- Weave the pigtail, secure with a small rubber band or a beautiful bow.
- We divide the strand remaining in front into a couple of parts.
- We comb each part, then smooth it.
- We wrap the strand in a loop, form part of our bow, fix it at the base with an invisibility, but do not hide it.
- We do the same actions with the second strand.
- From the bottom of the bow, you should get two small tips, connect them together and cover the center. We fix it with invisibility.
- Straighten the bow, smooth out protruding hairs or style with gel / wax.
- Fix this design with varnish.
Everyone will be delighted with such a bow with a scythe. You will certainly become the most beautiful lady at the holiday, all men will not be able to distract their eyes.


An inverted braid is an alternative to a regular braid. It can be woven to the side or in the form of a rim. To begin with, just master the technique, then it will be easy for you to cope with any complexity of hair.
On the basis of French weaving, you can invent many unusual styling. It looks interesting if you start weaving not from the crown, but from the back of the head. The main thing is to find a little time, then the flight of fancy will do its job.
How to weave a French braid: video
Video tutorial of weaving a reverse French braid:
A braid is the simplest and most common type of hairstyle. Thanks to a variety types and methods of weaving, braids are very popular. Neatly braided hair is a comfortable hairstyle in everyday life, relevant in an office setting and beautiful at a celebration.
To make the hair obedient and easy to weave and style, you can use various products in the form of foam, gel, or fix uneven strands with hairpins. You also need a good one.
Plain braid weaving
The most common and familiar from childhood has become an ordinary pigtail, braided from three strands of hair. Dividing the hair into three parts and following the sequence, we twist the hair between each other.
First, we intertwine the third part with the first and second strands, then the first with the second and third, and the second strand with the third and first. It is important to ensure that the strands are tightly pulled together and the hair does not break out. Having finished such a hairstyle, you can use an ordinary elastic band, a beautiful hairpin or weave a ribbon.


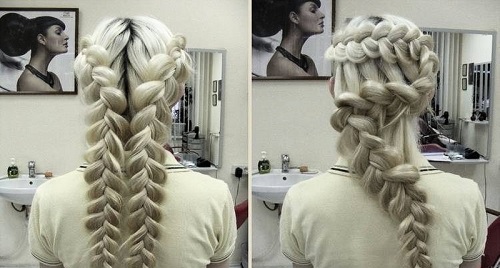
Weaving two braids
On thick heavy hair, two braids will look great and original.

In the photo, hairstyles with weaving two braids
For such a hairstyle, the hair must be divided into two equal parts. Now each of them needs to be braided in the usual way, only it is important to check that the weaving of both braids starts from the same level.
Weaving braid Spikelet
Braiding a “spikelet” pigtail will be a little more difficult than usual, but the weaving technique is very similar, so you can do it. Weaving should be started in the same way as with a regular braid, only it is necessary to take not all the hair, but only the upper part and divide it into three equal strands.
It is important to evenly distribute the strands so that in the end the braid looks even. We begin to weave the strands like a regular braid and slowly weave in new small strands of hair from the side of the remaining hair. thus, continue to weave strands into the main braid until the hairline on the head ends.

Loose hair can be collected in a ponytail or braided into a regular braid. If the “spikelet” turned out to be not voluminous enough, you can slightly fluff it with a comb. "Spikelet" will last a very long time in excellent condition if it is braided as tightly as possible.
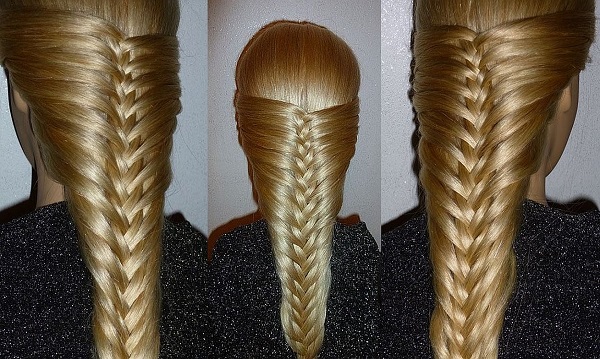
Braiding Fishtail
We comb the hair back and divide it into two equal parts. We take each of the strands in our hands. With the index finger of the left hand, select a thin strand of hair (about 2.5 cm) from the side and transfer it to the right side, securing with the right hand. Then, with the index finger of the right hand, separate the same strand on the right and transfer it to the left, securing with the left hand.


We repeat these steps until we reach the end. Tie the end of the braid with an elastic band or decorate.
French braid weaving
We comb the hair and separate the part of the hair from above from the parietal zone. We divide the strand into three equal strands and begin to weave, first putting the left on the center, then the right on the center. Then put the left strand on top of the center one and add the left strand to it. Now put the right strand on the center one and add a strand of hair on the right to it.


In the photo weaving a French braid on the side
In this way, alternately add strands to the weave on the right and left. Tighten the loose tail with an elastic band or braid it into a regular braid. With the beginning of weaving a "French" braid, you can easily experiment. This french braid pattern, also suitable for two braids, side French braid and weaving from the temple.
This hairstyle is very comfortable for everyday life, having learned to braid a “French” braid, it will become your favorite.


French braid from bottom to top
Weaving this braid must begin from the back of the head, moving towards the crown. Use the pattern of weaving a regular French braid. You can complete the hairstyle by gathering the ends into a bun or ponytail.

Inverted French braid
Comb your hair. Separate a section of hair and divide it into three equal parts. Place under the center strand, first the right and then the left strand. Place the right section under the center section, adding the right section of hair to it. Now put the left one under the center one, adding to it the part of the hair on the left.


A loose ponytail can be braided into a simple braid or ponytail. By stretching the braid a little, you can make it more voluminous.
Weaving braids Waterfall
Part your hair in a side parting and begin to weave a regular French braid horizontally from the forehead towards the temples. Then we put the upper strand on the middle one, separate a small strand from the top of the free ones and put it on the middle one, while releasing the lower part.
Near the thrown lower strand of free hair, we separate a small strand and put it on the middle one. We repeat this each time adding a free hair to the top strand, place it on the middle one and let go of the bottom strand, replacing it with a new one.


Weaving a braid of 4 and 5 strands
Weaving this requires special skill and skill. To begin with, the hair must be combed back and divided into five equal strands. We cross the right strand with the strand closest to it.
We cross the most central strand with the strand that was on the right. Then we cross the central one with the left of it (not the extreme one). Now we cross the leftmost strand with the neighboring strand on the right. When braiding, try not to pull the braid too tight. Now braid the second row following this pattern. Such actions must be performed until the braid is woven.


The “Swiss” braid is woven in the same way as our usual three-strand pigtail, but at the same time, each strand must be twisted with a bundle. This hairstyle looks quite unusual and elegant, so it will be a godsend for both work and leisure.

Weaving braids tourniquet
First you need to collect the hair in a ponytail, then divide it into two equal parts. Then twist the right section of hair, towards the right, about 3-4 turns, and hold it firmly with your hand. Do the same with the left strand.
Now you need to carefully cross both strands, making sure that they do not unwind. Fix the ends, as usual, with a tight elastic band.

According to the scheme of twisting one braid, a tourniquet can be braided, two can be braided. To do this, comb your hair in a straight parting, following the pattern, twist one part of the hair, then the second. Loose hair can be twisted together, braided, or left loose.


Weaving braid "Wreath"
Separate a small strand of hair from the temple and divide it into two equal parts. Then wrap the bottom part around the top and connect the strands into one. Now separate a small strand from the loose hair below and wrap it around the upper double strand.

Weaving braid "Crown"

Weaving "Linno Russo" with a ribbon
At the top of the head, we separate a small strand of hair and put a ribbon on top of it and cross it. Next, select a strand below the previous one (Fig. 3), divide it into two parts and wrap each with the ends of the tape, so that the strands are at the bottom of the hair, and the tape is on top.


Knot braid
A braid of knots is very easy to make, and it will look elegant and neat. Separate the top section of your hair and divide it into two sections. Tie these parts together from right to left or vice versa (Fig. 1) as a normal knot. Next, add strands to the remaining free edges of the hair and tie the knot again, do this until all the hair is woven. The end of the braid can be fixed with an elastic band and wrapped to the bottom.


Weaving braid "Bow"
This weaving is rather a decoration of an already woven braid, it is quite simple to make it. First you need to braid the braid, leaving a thin strand of hair parallel to it, it is from it that you will later form bows.
After the braid is braided, from the free hair left for the bow, we separate a small strand and sprinkle it abundantly with hairspray, then bend it in half to form an eyelet. Gently thread the ear with a hairpin under the braid, holding it with your hand.


Weaving braid "Snake"
Separate the top strand of hair from the side and divide into three equal parts. Start with a regular French braid with just a strand added at the top. Braiding, you should lead the pigtail along an oblique path, bring the weaving to the temple and turn the braid, weave the braid further, adding a strand as before from above, ignoring the bottom.
If you have long hair, you can do turns along the entire length, depending on your desire. Braiding the lowest braid, the hair pickup is done already from below and from above. The ends of the hair can be braided or left free.


Weaving braid "Basket"
On the top of your head, highlight the hair area and collect it in a high ponytail. From the weight, we begin to weave an ordinary French braid, each time adding strands of free hair on the right, and on the left from the tail, you need to take them of such a thickness that it is enough for the entire weaving.
Thus weave in a circle. Having reached the place where weaving began, we begin to weave an ordinary braid. We fix the end with an elastic band and hide it under the base of the tail; for greater fixation of the hairstyle, you can also fix it with invisibility.


Weaving braid "Snail"
We separate a small strand from the middle of the head and divide it into three equal ones. Then we begin to weave the usual French braid but with one pickup on the right. At the beginning, it is important to take small strands so that there is enough hair for subsequent circles. Next, weave a braid all over the head, moving in a circle. We carefully fix the tip of the hair and mask it under the hairpin.

Weaving braid "Flower"
To create a flower out of hair, you need to braid an ordinary braid, but only you need to whip it not up, but down (an inverted braid), you need to weave it without tightening it too much.


Hairstyle weaving "Butterfly"


The braid can be woven not only from the crown, temples, in a circle or diagonally, but also from the back of the head. This hairstyle looks original, but it is quite simple to perform. You can braid it on your own hair and add it with a ponytail, a bun, a bow. Find out more about how the braid is woven from the bottom up, and who is best suited for this styling.
Hairstyle characteristics
In addition to playing sports, attending school or work, styling is also suitable for other occasions. It can be friendly gatherings, a date, going to the cinema or a club. It is enough just to add styling with interesting accessories to make it more elegant. But for especially important celebrations, such as a wedding, graduation, etc., a braid braided from the bottom up is almost never chosen.

The hairstyle also has other limitations:
- short hair - with the exception of haircuts, in which the occipital strands can be woven into a pigtail;
- features of appearance in which high styling is not recommended. For example, protruding ears;
- mature age. A braid from the bottom up is a more youthful option, and it risks looking ridiculous on an adult woman;
- for the same reason - official, business events, a strict dress code in the office, when the hairstyle may seem too frivolous.

One of the advantages of a pigtail braided from the back of the head to the crown is that you do not have to go to the salon for this styling. You can independently braid it for your sister or girlfriend, and after several rehearsals - for yourself. The following life hacks will help optimize the process:
- Divide your hair into two sections with a horizontal parting. Temporarily remove the upper hair with a hairpin. So you will be guided to what level you need to weave a braid. With the help of the upper curls, it will be possible to mask the parting line.
- First, practice the braiding technique from top to bottom, from the crown. Select or .
- Prepare a brush for smoothing hair, a thin comb for dividing strands and forming a parting, elastic and other fasteners: hairpins, stealth.
- Thin curls, devoid of volume, can be pre-combed at the crown.
- Lightly moisten the strands: they will become more obedient.
- Styling products make styling easier and more durable.
- Do not fix the braid too tight. This can disrupt blood circulation in the root zone, provoke a headache or hair loss. For the same reason, do not do high styling very often.
- If desired, woven from the back of the head up. Beautiful elastic bands, hairpins and other accessories will become decoration.

Step-by-step instruction
The traditional version of this hairstyle is considered to be a French braid with a bun at the crown. After a few workouts, you will be able to do it yourself. It is only important to first master the technique of French weaving.

Step by step algorithm:
- Take a comfortable position. For example, you can lie face down on the bed or just lower your head.
- Comb all your hair to the front.
- Separate the wide part at the back of the head, form 3 identical strands.
- Start French braiding, alternately adding curls to the right and left.
- Having reached the top of the head, weave a pigtail without pickups.
- Together with all the loose hair, collect it in a high ponytail.


Thereafter . It can be loose, tight or sloppy - depends on the remaining length of hair and your preferences. Braid the tail into a pigtail or braid and wrap around the elastic. Secure with hairpins, invisible. Or pull through the elastic band not the entire tail. You can also lay curls on the top of your head with a special roller for a beam or decorate it with ribbons, hairpins, and other accessories.

Weaving and styling options
An even simpler option is not to form a bun, but simply collect loose hair in a ponytail. This hairstyle can be done for every day.

An interesting type of styling is a braid braided diagonally from the back of the head. Fix it on the top of the head on the side. Secure the resulting ponytail with an elastic band, which you additionally wrap with a strand of hair or decorate in another way. For little girls, you can first braid the bezel from one temple to another.

An option for those who know the technique of multi-strand weaving. Such a pigtail looks luxurious, but requires considerable skill.

Dutch (Danish) braid
It is also called reverse or everted. The main difference between this hairstyle and the classic version is the weaving of the braid itself. Otherwise, the technologies are very similar:
- Lower your head. Comb all hair from the back of your head forward.
- Separate behind, at the growth line of curls, three strands.
- Start forming an inverted pigtail. Interlacing strands, stack them under each other. Observe this condition when adding side curls, which should go under the bottom. This is the main difference between the Dutch weaving technique and the French one, in which all the strands overlap each other.
- Having reached the crown, tie the braid with a thin rubber band.
- Gather it with the rest of your hair into a ponytail.
- Form a loose bun with invisible or hairpins. You may not completely pull it out during the last turn of the gum.
- Lightly stretch the braid sections with your fingers to make the braid more full.


Advice. At the very beginning of weaving, make a horizontal parting from ear to ear. Remove the top part of the hair with a hairpin. Form a braid to the parting. So weaving will come out more accurate.
Weaving with thin braids
It is believed that this option is quite complicated for independent execution. However, if you have mastered the basic technology, difficulties should not arise. Detailed description:
- Comb all your hair forward with your head down.
- Braid 3 spikelets at the back of the head. Tie each with a thin rubber band. The braids should not be located at a considerable distance from each other.
- Add some loose hair to each spikelet.
- From the formed parts, braid the French braid from the back of the head to the crown, picking up the curls from the right, then from the left.
- Having reached the crown, collect all the hair in a ponytail.
- From its very base, braid 3 spikelets again. Tie them with thin rubber bands.
- Divide the entire tail into 3 parts so that each of them contains a spikelet.
- Braid a loose three-strand braid and wrap it around the base of the ponytail.
- Pin with hairpins or stealth.


Bow styling instead of a bun
It looks perky, playful and suits little girls, young women. The technology practically repeats the classic weaving. It remains only to learn how to form a flirty bow on the crown instead of a bun.
Hairstyle process:
- With your head down, French braid up to the top of your head.
- If necessary, treat the hair with a styling agent - the bow will turn out stronger and neater.
- Gather all your hair into a ponytail. During the last turn of the elastic, do not pull out the curls completely. You will get a bun and a small tail.
- Divide the resulting bun into 2 identical parts - fragments of the future bow.
- Take a wide strand from the ponytail.
- With its help, separate one element of the bow from the other: wrap the place where the beam was divided in two.
- Fix the edge with a hairpin or invisible.
- Wrap the base of the tail with the remaining free strand and secure.
- Straighten the bow, sprinkle with varnish if necessary.


Weaving from 2 braids
Numerous options make it possible to diversify everyday or festive styling. The algorithm is simple:
- divide the hair into two parts with a vertical parting from the back of the head to the crown;
- from each form a French or Dutch pigtail;
- reaching the crown, fasten the weaving with an elastic band.
If the hair is not very long, you can leave the ponytails as they are. This option is suitable for young princesses. Decorate your hair with beautiful elastic bands.

Using the same algorithm, you can make an original hairstyle in the form of two volumetric horns. To neatly braid the braids, tie off the half of the hair that you are not working with yet. After completing the weaving and securing the pigtails with elastic bands, wrap the resulting ponytails around their bases.

Attention! Don't make your hair too tight. Hairpins, invisible hairpins, varnish or other styling agent will help to securely fix it.
A festive option is to divide the hair not with a straight line, but with a zigzag parting and additionally decorate the hairstyle to your liking.

Pros and cons
The advantages of hairstyles are obvious:
- looks great;
- easy to perform;
- has several options;
- suitable for different occasions;
- opens a beautiful neck;
- removes hair from the back of the head, which can interfere in the summer heat or during sports;
- lasts a long time.
Disadvantages of a braid braided from the bottom up:
- has restrictions on the length of curls, age, etc .;
- may unfavorably emphasize defects in appearance;
- not designed for long-term wear.
Star examples
Such a braid is not the most common hairstyle among celebrities. The peak of its popularity came in 2012-2014, when models demonstrating collections of famous brands began to walk the catwalk with a similar styling. For example, Badgley Mischka.

At one time, the styling was chosen Jessica Alba and Alicia Keys.

Julianne Hough complemented the styling with a careless bun.

BUT Maria Menounos I chose a hairstyle with several braids braided from the back of the head.

Actress Mina Suvari I preferred the option with thick bangs and extra volume at the crown.

A back-to-front braid is a good solution for girls who want to stand out from the crowd and show their individuality. Thanks to the variety of styling methods, this hairstyle will perfectly fit into a casual, sporty or festive look.
Useful videos
French braid from bottom to top with a bun at the crown.
French braid upside down.
Weaving braids is not at all difficult to master. To do this, you need to understand the principle of each technique. The main part of the braids is based on the French braid, which can have a lot of different variations. At first glance, the technique of weaving it may seem difficult for beginners, but if you understand its principle, then you can master it very quickly.
In the article you will find step-by-step videos and photos that will help you learn how to create beautiful ones with your own hands.
Different types and patterns of weaving braids
Today, every girl, if desired, will be able to learn how to weave braids. To do this, it is not at all necessary to attend expensive courses, because with the Internet, you can learn weaving lessons without leaving your home. To do this, you only need to purchase a training head (dummy) for training. You can buy such a blank in a specialized store or order it on the Internet.


Beautiful and simple hairstyles 2019 with weaving
Braiding for long and medium hair
First you need to master the classic weaving of the French braid. Weaving starts from the very top of the head. In its execution, it is close to a simple braid, but has its own characteristics. Three strands are not enough to create a French braid. To complete it, you will need to always add new strands on each side. This turns out to be very strong and at the same time quite interesting. This version of weaving is especially fond of girls who prefer an active lifestyle.

How to make your own french braid Step by step instructions with photos and videos

Photo of the finished hairstyle

Weaving a French braid step by step photo for beginners (diagram). We take three small strands and start braiding the braid as usual.

Then add another thin strand to the right and left. They should lie neatly on top of the main ones.


When all the hair is braided and only the tail remains, we continue to weave an ordinary three-strand braid.

We fix the ends with an elastic band or a hairpin.
Step-by-step video for beginners on weaving a classic French braid
The second version of braid weaving is more interesting and at the same time easy to learn, it is called the French braid "Return". This option is suitable for owners of thin hair. Due to the peculiarity of weaving, the finished hairstyle is voluminous. It is often used to create a festive look. The peculiarity of weaving lies in the fact that the interlacing of the strands is performed from below, and not reconciliation.

Step by Step Photo for Beginners: Reverse French Braiding


We separate three even strands and start weaving an ordinary braid just the opposite (the strands are not placed on top of each other, but taken down).


When the braid is braided, we fix the ends with a clip and pull out the strands to give the braid splendor and volume.

Video for beginners: weaving a reverse braid
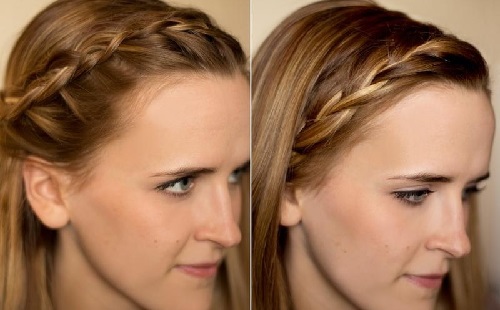
A French braid in the form of a headband looks harmonious when creating a romantic look. She gives the girl charm and tenderness. Weaving a bezel is not difficult. This hairstyle is easy to weave on both long and medium hair. With this, you can remove the bangs, leaving the face as open as possible. Weaving the braid starts from the right temporal part of the head, and ends at the left temple (the order can be changed).

Fashionable hairstyle 2019: one and two braids Dragon
Weaving braids with ribbons
Braids with ribbons do not lose their popularity. This hairstyle looks original and always attracts the attention of others. Tapes can be of various thicknesses and made of various materials. A satin, silk and lace ribbon looks especially beautiful in a hairstyle.

To weave a braid, you need a ribbon that will be twice as long as the strands. The easiest option is to weave three strands. To do this, you need a silk or satin ribbon and two elastic bands.
Stages of weaving a braid with a silk ribbon
- Comb your hair thoroughly and tie it into a ponytail.
- Fasten the tape on an elastic band, stretch it and fold it in two parts. Fasten the knot, while the ends of the tape should be the same length.
- Secure the resulting braid with an elastic band.

Four-strand braid with a ribbon: step-by-step photos

We separate four strands, tie a ribbon to one of them.

We weave a four-strand braid in the usual way, only instead of one strand you will have a ribbon.

The tape should run in the middle of the pigtail.


At the end of weaving, we stretch the loops at the pigtail a little.

Video tutorial on weaving a four-strand braid
Hairstyles with braids
Any everyday hairstyle can be supplemented with weaving, thereby giving novelty to a familiar look.
Loose hair lovers will appreciate the Waterfall hairstyle. This option looks great on both straight and wavy curls. Weaving can be done in a straight line or diagonally.


Weaving braids of 4 strands looks spectacular. It turns out a beautiful 3D effect. To create a hairstyle, you need to select a strand at the crown and divide it into four equal parts. The last strand must be brought under two strands and back to the previous one. The same, on the other hand. Further, the outermost strand taken from the bulk is added to the outermost strand from the braid. You need to continue to weave until you run out of free strands.

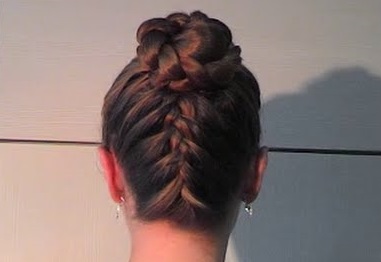
Business ladies can diversify the classic bun by making it from braids. To do this, you need to tie well-combed hair into a high or low ponytail. Divide it into two equal parts from which weave ordinary three-strand braids and secure them with silicone rubber bands. Next, the braids need to be twisted into a bundle and secured with hairpins or stealth. After that, the beam must be fixed with medium fixation varnish. It is recommended to decorate the finished hairstyle with accessories. For this, scallops with decor, ribbons, clips with bows are suitable.


Fashionable combination of 2019 braids and bun

The openwork weaving of braids looks elegant (photo below). The weaving technique is very simple. To do this, you need to weave any braid without tension. Then from each tier you need to pull the loop. The elongated hairs should be evenly distributed on each side. Spray with varnish.


Learning to weave braids at home
Weaving braids is a creative activity that requires accuracy and perseverance. But the result is always pleasing and a pleasure. In addition, the ability to weave braids will help each girl look different every day. If you are ready to start learning, then a step-by-step photo for beginners will help you.
Braid with rubber bands: how to weave? Photo and video lesson
If you're having trouble braiding, try a simple but equally effective version of braiding with elastic bands. With this weaving, the braid turns out to be very neat, the strands do not fall out due to repeated fixation with rubber bands. Such a braid can be easily braided, even if you have a cascading haircut.

Scythe with rubber bands, photo
Step-by-step photo of doing a hairstyle with a braid with elastic bands


The second version of the hairstyle based on weaving braids with elastic bands

Step-by-step photo of performing an evening hairstyle with weaving

Video lesson weaving braids from rubber bands
Collection of photo hairstyles with braids


Take it to your wall:


