"House in a forest clearing" - a master class for the stage-by-stage production of a house from natural material.
Molchanova Olga Ivanovna, educator, Kindergarten No. 24, Krutoy Log, Belgorod District, Belgorod RegionDescription: this master class is intended for educators, teachers of additional education and creative people who like to make crafts from natural materials.
Purpose: handicraft made of natural material, decoration for a corner of a home courtyard.
Target: Development of aesthetic feelings in children.
Tasks:
develop compositional and aesthetic feelings; develop manual skill and creative imagination.
In kindergarten, I made a model for a home courtyard, when everything was ready, it remained to make a house for a farmer who looks after pets. Here's how it turned out.
Materials:
1.apricot pits;
2. plasticine;
3. cardboard;
4. wooden skewers.
Stage-by-stage production:
1. On each apricot pit we sculpt a ball of plasticine, diameter 5 mm-7 mm. and attach to the cardboard, gradually forming the walls, leaving an opening for windows and doors.

2. For the roof, cut out a rectangle made of cardboard, the dimensions of which depend on the size of the house. We stick plasticine on cardboard, 2 mm thick. We sculpt skewers on plasticine, if necessary, we add them to the desired size. We make doors for the house in exactly the same way.


3. We strengthen the roof on top of the house, and for strength it can be varnished on top. And you can put the house in the clearing.
To make a clearing, I used: moss, cones, artificial branches. This is what a wonderful house comes out.
The bizarre outlines of the branches involuntarily attract attention, and I want to capture this sophisticated beauty not only in memory or in a photograph, but also in real life. If you wish, you can add an unusual decorative touch to the interior by performing interesting compositions or creative products with features of a utilitarian purpose. Crafts from tree branches are a great hobby that allows you to create beautiful decorative elements with your own hands, without investing any financial costs. The interior of the house, decorated with this natural material, acquires a special sophistication, where everything is aimed at emphasizing its individuality. Before starting work, the blank for future crafts should be carefully prepared, taking into account the individual characteristics of the wood.
Crafts from branches - material preparation
For creative activities to decorate the selected room (this may be, and even even), well-dried branches will be required. They are easy to pick up during forest walks, as well as pick them up in a public garden or park. You can independently dry the branches that remain in after performing sanitary pruning measures.
Before working, dry material carefully for future use:
Inspected for cracks;
Cleans from dust and dirt;
Exfoliating places on the bark are sanded.
To exclude the appearance of unwanted larvae in the house, it is necessary to disinfect with the help of a weak concentration of potassium permanganate solution known to many. Depending on the idea, the branches can be painted in the desired tone, stained or varnished.


Decorating a variety of items
Bringing home a bouquet, you can quickly make a creative vase using branches. For this, any suitable can is taken - tin, glass, and pieces of branches are cut with a length slightly exceeding the height of the container.
They are placed close to each other in a vertical direction on the outer surface of the can and secured by tying them with a beautiful braid or ribbon. You can plant the twigs with glue. Flower pots are decorated in the same way.


To make this wonderful vase, in addition to a glass base, you will need: a glue gun, dry sticks of willow or birch, wire cutters.
- The harvested branches need to be cleaned of bark. It is better to do this when the wood has not yet dried up, so it will be much easier to remove the bark;
- Next, using nippers, cut the bare branches into small pieces. Their size should be calculated based on the height of your workpiece;
- After the material dries, we glue each stick to the base in such a way that a kind of crate is obtained;
- It remains to give the glue time to dry for 10-15 minutes. Congratulations, the vase of branches is ready!
Crafts from branches will always find their worthy application in interior decoration of a house or apartment. Their shape and size can be completely different, because different materials can be used for their manufacture. Products made of bark, chips, snags, sawn timber or large boughs, etc., will look good. It all depends on your imagination and personal preference.

Branches installed inside a glass jar in a continuous layer along the entire lateral plane will look no less original. To prevent them from scattering in an impromptu vase, the bouquet should be large enough.
For the products described above, you will need fairly even pruning from the lower ends of the branches. The upper thin stems will help create a delightful evening with flickering candles. To do this, they are simply placed in a glass container so that they rise above it, no more than half of the volume is poured in water and floating candles are lowered.


Fascinating compositions of branches
To bring an unusual accent to a room, for example, a bedroom, trunks, crowned with a cobweb of thin twigs, placed at the head of the bed in a niche cut into one side of the coffee table top, will help. In the dining area or office, a tall floor vase will look elegant, in which, along with the branches, there will be dried cereals.
Intricately curved, branched thin tree trunks are placed in a vase and decorated with decorative elements matching the color of the interior. It can be sparkling stars or snowflakes on the eve of the New Year, bright valentines on the eve of the corresponding holiday of lovers, or just butterflies with fancy ornaments on the wings, birds, flowers, fruits, leaves from any available material.


Strengthening graceful twigs on a velvet fabric, in color that is in harmony with the overall environment, and placing, after gluing the resulting composition into a wooden frame on cardboard, you can get an elegant interior decoration.
A beautiful branch can be supplemented with golden bows, Christmas balls or forest cones. Such decoration will contribute to a good mood and evoke only positive emotions. In addition, New Year's decorations will create a festive atmosphere on the eve of the main winter celebration.


Branches in the interior: a step-by-step master class
Tall shrub trunks (willow is most often taken) will allow an unusual way. For example, separate the sofa area from the rest of the living room. Such a partition is made very simply:
- For this, a wooden bar of the required length is taken as a stand. You can use absolutely any type of wood.
- In a bar, two rows of non-through holes are drilled in a checkerboard pattern, in which prepared branches are fixed vertically to the glue. In length, they should be about a meter less than the height of the room. The step depends on how delicate the resulting screen should be.
- To make the product look stylish, it is varnished.


The current bedroom design ideas are endless - birch trunks in the interior are proof of this.

Cuts of trunks with a diameter of 8-10 cm with strong branches extending upwards from the side at an acute angle easily turn into lovely hangers. They can be fixed to the wall in the hallway, creating a natural corner with a specific purpose. Among the design finds, you can find birch trunks that play the role of cornices and even racks near the bed for attaching a canopy.
The picture will be complemented by a coffee table, the base of which is a bundle of branches fastened in a vertical direction into a stable cylinder, and the table top is durable glass of a round or oval shape.
You can make an unexpected version of the effect, fastening the branches in the shape of a cube, and laying it on the floor on the side edge. A plastic or glass square table top is placed on top.


Wall mirrors are often decorated with branches. They can be glued around the entire perimeter perpendicular to or along the frame. There can be many options. Craftsmen easily make frames for photographs, children's drawings, reproductions of favorite paintings from scraps of thin trunks.
A gracefully curved thick branch can form the basis of a table lamp. A branch with many twigs, mounted on the wall near the mirror on the dressing table, will allow you to easily place all the jewelry.


Such work requires gentle female hands and special attention.

Creative inspiration is the main incentive for a person who wants to create beautiful crafts from branches with your own hands.
In spacious hallways, one wall can be turned into a fairy forest by installing trunks that reach the ceiling, behind a high plinth with LED lighting installed near the floor. This is one of the best ways to give your décor a scenic look. Both thin and thick tree branches can be used as material.
Small products made from dried snags will look original. For a change, you can use tree bark and chips, combining everything later into a single composition.
We make decor from branches with our own hands
Crafts from branches are always distinguished by their originality and unique design. With the help of these simple sticks and twigs, you can create a beautiful author's decor for absolutely any topic. , paintings, wreaths, flower pots, bizarre animal figurines - this is just a small part of what can be created from this wonderful natural material.
- Making a wreath of branches is probably one of the simplest tasks that even a child can handle. Take thin rods of willow wood and twist them together in a tight ring, then carefully tie them with copper wire. As an additional decoration for the wreath, you can use tree leaves, flowers, forest cones.
- You can revive an inconspicuous tree branch using ordinary snowflakes. Cut them out of paper, foil, or colored felt and hang them on each branch. Such compositions will look great in the house against the background of a wall with beautiful wallpaper.
- If you still have broken light bulbs, they can also be used as decoration. Make a special fastener out of soft wire, with which you can hang them on a branch so that the base of the light bulb is at the top. Further, through a specially made hole in the base, the light bulb is half filled with water. It remains only to give our miniature an elegant look. To do this, the branch can be decorated with decorative braid, ribbons and bows.
Despite the fact that the process of creating some crafts is quite long and laborious, the result of the work done will be amazing.


Even the most ordinary painted twigs can be great materials for making fun crafts. For example, unique products made from branches in the shape of a star will look very beautiful and fun in interior design. You can make them yourself on a regular table.
- Material preparation. For each craft, we need 5 sticks. These can be branches of any tree, the main thing is that they are even and have the same length. The material should be dried and varnished in advance, so your products will last longer. We also need a thread, rope or thin ribbon. With their help, we will tie the ends of our sticks.
- We make a star. Place the sticks on the table so that they form the closed shape of a pentagonal star. Tie each corner formed with a thread or rope and decorate with satin ribbons. The resulting star can be hung on a Christmas tree or presented to friends.

To create something unique for your interior, do not copy someone's ideas, but try to do everything yourself. Feel the mood of your home, think about what exactly is missing in it, what things and objects could highlight its own style. Write down everything that comes to your mind in a notebook - these thoughts may come in handy when creating an interior design.
Pay attention to the little things. It is they who, in a creative union with non-standard design solutions, create an unsurpassed atmosphere and focus on a specific element of the interior.


Original floor lamp - creative interior decoration


Crafts from branches are not only beautiful, but also profitable. The main advantage is that no funds are required to make them, because the material itself literally lies under our feet. Moreover, all compositions can be created with your own hands, involving your children in this entertaining process.
Crafts from branches can be sold easily and quickly, because this is a unique decor, for which there is always an increased demand. You can also earn extra money by teaching paid master classes on creating designer jewelry for beginners.


We really hope that this article was useful to you. Create, create, experiment and perhaps this interesting hobby will grow into your professional field of activity.
Hand-made crafts from natural materials will create an atmosphere of comfort and a romantic atmosphere in your home. Such crafts and interior items made from natural materials are very popular today. It is especially pleasant to surprise your friends with such handmade decorative items. In order to decorate the interior of your country house or apartment, you can make crafts from the branches of various trees.
For use, you need branches that are not eaten by a bug. It is better to collect such branches in autumn or early spring. Also, all branches without exception require processing in at least 2 stages:
1) Drying the branches is a must. Otherwise, the product will warp in the first month. We dry at room temperature for 1-2 weeks. Or 7 days battery life. And if you want it very quickly, then in the oven for 2-3 hours on low heat and with the door ajar so that moisture comes out.
2) Also desirable painting or varnishing. If there is no special varnish for wood at all, then it can be treated with transparent nail varnish.
To do this, we offer you 10 do-it-yourself craft workshops from tree branches.
Candlestick from tree branches

Stylish candlestick in 5 minutes
To make a candlestick from twigs, we have to:
- Dry twigs.
- A small glass cup.
- Hot glue gun.
- Candle.
Step 1:
Collect a small amount of twigs, wash them in water and dry them. Once dry, cut the pruning shears to approximately equal lengths.
Step 2:
Take a small glass cup and a hot glue gun. Apply glue to each branch with a glue gun and glue it to the cup. Thus, glue each next branch side by side to each other.

Take a candle of the correct size and insert it into the inside of the glass. The candlestick is ready to use.
Another option to make a candlestick is to simply take a thick candle and glue the twigs around the candle with a glue gun. Also, if the branches are painted gold, the effect will be more glamorous.

Branches painted gold

Golden candlestick
House of branches
An unusual craft for a child can be made from ordinary twigs. In the photo below, our reader has shared his wonderful creation, which he made for a child.
ADVICE: If you decorate the house with a garland, you will get a great night light in the nursery!

House of branches
 How to make such
Photo frames made of tree branches
Unusual photo frames can be made from dry branches with your own hands.
For this we need:
- Dry twigs.
- Wooden base for the frame.
- Hot glue gun.
- Decor (moss).
Step 1:
Take dry twigs. With a hot glue gun. Apply glue to each branch with a glue gun and glue it to the wood base. Likewise, glue all subsequent branches side by side to each other in the form of a rectangle.

Step 2
Then take a decorating material, in our case moss, and stick it in the corner of the frame. This will make a wonderful composition.
Check out even more photo ideas on how to arrange frames and expositions from photographs in the interior.

Making a spring photo frame

Tree with photographs in a vase
Pencil holder
This little thing will look extraordinary on your desktop.

DIY pencil holder
You will need:
- A cut of a tree or a stump, with a diameter of 10 to 15 cm and a thickness of about 10 cm (the photo shows such a "stump", previously cleaned of bark, but for a greater effect of naturalness, you can leave the saw cut in its original form).
- Drill, the diameter of the tip drill of which should not exceed 8-10 mm. The nib drill is used to create shallow but clean, smooth-edged holes.
- Fine-grained sandpaper.
Step 1:
Take a drill, make 25-30 holes in the blockhouse (depending on the diameter of the "hemp"), each at a distance of 0.5 - 1 cm from each other.

Make 25-30 holes in the log house
Step 2:
After that, take a fine-grained sandpaper and sand the surface so that there are no irregularities.

Sand the base and top with sandpaper
After that, the stand is ready. It can serve not only for stationery, but also for art brushes.
Also check out other ideas on how to design a pen organizer.

Pencil holder

Stand for pens and phone
Clothes hanger
Such a craft will undoubtedly become a decoration of your hallway and will delight everyone who comes to visit you. You just need to choose such branches that have fairly strong and thick hook knots. Hangers can also be made from small tree branches.

Hanger in the hallway for clothes
You will need:
- Strong branches with thick knots with a diameter of 30-50 mm.
- Self-tapping screws.
- Saw on wood.
- Drill.
- Wall blank
Step 1:
Saw the trunk of the branch in half. We select a suitable workpiece with a length of 300-400 mm. We immediately form a hook with a miter saw. We cut off a branch from a branch with a saw at a distance of 50-120 mm. And then cut a half of a branch with a knot with a saw along the edges.

We select a suitable workpiece with a length of 300-400 mm.
Step 2:
We drill a hole in the hook with a self-tapping screw. And we attach it to the workpiece under the hanger. Can be individually hung or formed into a hanger if desired. If the hanger is designed for light items, then you can attach the branches with wood glue.

We paint with white acrylic paint
If desired, these hooks can be painted with special wood paints or sprayed with aerosols.

The original hanger is ready
Flowerpot
In order for all the pots to become the same and original, you can make a flowerpot with your own hands. You will need a minimum of effort and a maximum of desire and good mood.

Flowerpot made of branches
To do this, you need:
- Dry twigs.
- Saw on wood.
- A coil of twine yarn.
- A piece of burlap.
Step 1:
To begin with, we take dry twigs and with a saw on a tree make them approximately all of the same length.

cut branches and tie together
Step 2:
Then we wrap the flower pot or flowerpot with a piece of burlap. Fix it with any glue.
Step 3
Take the branches previously prepared, tie them together with a twine thread, so that the branches do not disintegrate (see photo)

We wrap our old flowerpot with a piece of burlap
Step 4:
Then tie a pot or flowerpot with these twigs and secure it with a bow.

Using a rope, we fix the branches around the flowerpot
Hanging table with your own hands
Hanging objects can give any interior a feeling of weightlessness and airiness. A hanging wooden table makes a wonderful bedside table. It is attached with three ropes to the ceiling by a hook. How to make it? Necessary:
- The little board.
- Grinder.
- Drill.
- Hot glue gun.
- Screw.
- S-shaped hook.
- Polyurethane spray.
- Felt strip.

Hanging table mounting
Step 1:
First, you need to choose a suitable board with an unusual texture. Sand any irregularities with a grinder.
Step 2:
Next, you need to drill three holes that correspond in diameter to the selected rope. The holes should be equidistant from each other, and one of them should be positioned as close to the wall as possible. You can also hang the table with four ropes, then you will need to drill four holes.
Step 3:
The wooden surface should be covered with several layers of polyurethane, allowing each to dry. Since the table will be in contact with the wall, protect its surface from damage. To do this, glue a strip of felt with hot glue to the part of the table that is adjacent to the wall.
Step 4:
Next, stretch the ropes through the holes and tie strong knots under the board. After that, you need to drill a small hole in the ceiling and insert a screw with a ring into it, into which an S-shaped hook should be threaded.
Step 5:
Then tie all the ropes at the top into a strong knot with a loop and hang the structure on the hook.
The result will be simply mesmerizing. Your hanging table will simply float around the room.

Decorative tree
To decorate the interior of your home, we suggest making a decorative tree with flowers.
You need:
- Twigs.
- Decorative flowers (can be made from paper).
- Sea pebbles.
- A piece of styrofoam.
- Hot glue gun.
- An unusual shape of a flowerpot (in our case, a square one).

Step-by-step making of decorative wood
- Take sea pebbles and put them on the bottom of the flowerpot.
- Then place the styrofoam on the pebbles in the flowerpot and insert the prepared twig into this styrofoam.
- Fill with sea stones again to make the branch more stable. Insert the moss up.
- Now let's start decorating the twigs. Take decorative flowers and glue them with a glue gun to a branch in a chaotic manner.
- When you glue all the flowers, then your decorative tree will be ready to decorate your apartment or house.

Decorative tree painted with gold

Decorative tree white
Wreath on the door of twigs
This is the easiest master class that could only be shown. Let's make a decorative wreath on the door from twigs. To start and finish our craft, we need:
- Twigs.
- Copper wire.

Base blank for a Christmas wreath
Step 1:
Take copper wire and make a circle with a hook out of it (see fig.).

making a circle out of wire
Step 2:
It is necessary to make small bunches of twigs, fastening them with a wire.

We tie twigs into small bunches
Step 3:
Then we fasten the bundles of twigs to the previously prepared circle of copper wire. And so on until the end. Your wreath is ready. You can also paint it with spray paint, giving it your favorite color.

We attach the "bundles" of branches to the base

The wreath can be decorated as you wish. And make it either New Year's or for another reason
from spruce and pine in this article!

Decorating the mirror with slices of branches
If you are tired of your old mirror and want to change it, take your time. With the help of branch cuts, you can decorate your mirror, and it will sparkle with its beauty in a new form.

Mirror decorated with saw cut branches
What is needed for this:
- Twigs of different diameters.
- Wood saw.
- Hot glue gun.
Work process:
- Let's get down to work. Take the twigs and make the cuts with a saw of the same thickness.
- Then take a glue gun and glue each saw cut around the mirror. Will come out very original.
- In the same way, you can paste over vases and flower pots, or whatever is enough for your imagination.
Also, from small boards you can make this one - LESSON here!

Wall decor
Branches can be used to make various decorations - - look, you will definitely find something for yourself!
And now we offer a simple master class on making a seahorse. He will decorate your room, making it unique. To make the decor more original, come up with your own figurine.

Decor from branches for the wall
To do this, you must have:
- Twigs of different sizes and diameters.
- Branch pruner.
- Hot glue gun.
- Cardboard, a pencil, scissors.
Step 1
Draw a figurine on cardboard, such as a sea conic. And cut with scissors.

Cutting the shape out of paper
Step 2
Take a hot glue gun, apply glue to twigs and glue them to a cardboard blank, lining them one by one.
Step 3
When finished gluing. Take the branch pruner and the branches that have gone over the edges of your base and cut them back. This will create a very beautiful wall decor.
In the same way, you can make crafts for the New Year in the form of a Christmas tree, decorating it with decor, or an asterisk on the door, crafts for Valentine's Day.

Heart made of twigs
We are learning how to make a toy fairy house together with children with our own hands from natural materials on the street or from waste materials indoors. A master class and 69 photos will help this.
Delight your children by creating a fabulous home with them. You can make it in an apartment or on a walk from natural materials.
Do-it-yourself fairy house made of self-hardening mass

Do the main material yourself. To make a self-hardening mass, take:
- napkins or toilet paper - 20 g;
- flour - 50 g;
- PVA glue - 75 g;
- starch - 50 g;
- olive oil, baby oil or Fairy - 20 g;
- dry gypsum putty - 125 g.

To make this glue, take napkins or paper and tear them into the tray. Then pour in hot water. All this will soften, then wring out the paper to remove excess water. Now you need to pour glue here, stir it with your hands to get a homogeneous mass.

Now you need to measure out 125 g of dry putty and pour it into adhesive paper.
Since plaster can dry out your skin, wear gloves when you create a fairy house this way.
Now add flour to the mixture and stir again. Next comes baby or olive oil. The last component is starch, add it.
Put this mass in a bag and store in it. You can also place it in a container with a lid.

Here's how to make a self-hardening mass. Now check out what you need to make a fairytale home:
- glass jar with a screw cap;
- foil;
- self-hardening mass;
- hot glue gun;
- wire;
- watercolor paints;
- white acrylic paint;
- brushes;
- sculpting tools;
- spray varnish.

Unwinding pieces of the desired size from the foil, roll them up, make several flagella and several blanks that look like cakes.

Glue the thicker flagella to the bottom of the can, from the thin ones make the outlines of the window and door. And two blanks in the form of cakes will turn into two steps to the house. Stick the foil on the lid in the form of a triangular piece.
See where the pipe will be. Attach a slightly twisted wire here, wrap it with foil.

Now you can add foil volume to some places in the house, if required.

It's time to get the self-hardening mass and wear it on foil. Use this spatula for this.

Wet your fingers in water and smooth the surface of the self-hardening compound. While it is still not frozen, use the sculpting tools to give the blank a texture. Then the walls will look like stone.

To make the surface even more embossed, go over it with a toothbrush. Its bristles will add grain.
To make the bottom of the house have a grass fill, add pieces of clay here and make the texture with a metal tool.

To further make a fabulous house, you need to glue the foil around the window with this mass. Now you need to leave the workpiece to dry overnight, and in the morning you can continue to create. Dip the brush in water, moisten the window, apply the mass here. Use a metal tool to dotted lines to cut out the window.

And with a silicone stack, you will make strips on it. Then paint thinner lines to make this part of the house look like wood.

Make a stump out of a piece of foil, coat it with a mass and a metal spatula, also apply patterns on it so that it is clear what it is.

Add strokes to the window by cutting out the excess. Make a window sill under a wooden one, drawing lines on it with a metal spatula.

Now let the house dry out, at this time you can arrange the roof. To do this, you need to stick the lid on the sides with clay and make the stripes with a clerical knife or a thick needle.

Now attach this roof in place and add a little self-hardening mass here, leveling it with wet hands. Apply a little clay to the pipe as well. Make a semblance of masonry with a metal tool.

At this stage, you can mold several bricks, attach them to the door and walls. If you want, cut out a few circles, for this, lean the opposite tip of the brush against the selected side and twist it.
Attach the clay fungus here as well.
You can rest while the house is completely dry. Then mix purple and blue paint with a little black. Paint over the masonry with these tones.

Paint the filling with green paint. For the door, use a brown one with a little green. Smear these tones with a wet brush for smooth color transitions.

And to cover the walls, use pink, yellow, beige, orange tones.

Color the fly agaric hat red.

Let the paint dry. After that, you need to take white acrylic, slightly moisten the tip of the brush with it and go over the protruding parts. It remains to apply white spots on the caps of fly agarics and window sills.

Here is such a wonderful fairy-tale house. You can do not one, but two or more. Then it will be even more interesting for the child to play.

Another curious structure can be made from junk materials. But some others will have to be purchased, however you will not spend more than $ 3 for this.
How to make a toy house "Forest Fairy Tale"?

You will be surprised what such a magical structure can be made by taking such simple materials as:
- pizza box;
- two plastic bottles;
- old newspapers or magazines;
- self-hardening mass;
- cardboard box.
Such "good" is usually thrown away, so you will not spend a dime to purchase it. And you will need to buy this: PVA glue, acrylic paints, and usually all needlewomen have a hot silicone gun.
Take the first large plastic bottle, tear off the label and cut off the bottom. Now take a rectangular sheet from a disassembled cardboard box or from a pizza and cut a hole in it equal in diameter to the bottle. Slide this sheet over it as shown in the photo.

Now you need to crumple up old newspapers or sheets from magazines and glue them to the bottom of the house. Now take the self-hardening mass and start gluing over the newspapers.

Cut out roof blanks from cardboard and start gluing them.

Measure the roof details to get the correct dimensions. Cut the main elements horizontally. Glue them together with a hot gun. Coat a horizontal sheet with a self-hardening mass, use a knife to make strips on it that will imitate the texture of a tree.

Now you need to add green paint to the self-hardening mass and start coating the roofs of houses. In some areas of the roof, make attic windows.

In the area of the balcony, cut out a horizontal cardboard so that it becomes semicircular. Glue small cardboard rectangles here to create a railing.

You are starting to get a fabulous house. As you can see, there should be several windows on the walls of the house. They are semicircular at the top, straight at the bottom. You will make the frames for them from cardboard rectangles, glue them crosswise. Now you can use brown, gray, green paint to color your creation.
Be sure to make a ladder. To do this, you need to cut out two vertical parts rounded at the top. Connect them with three horizontal steps.

Cut rectangles out of cardboard, start gluing them to the roof elements from below, moving upward.

Run white acrylic paint along the walls of the house, along the pipe and the bottom bulging parts.

To make it a magic house, you can install an LED lamp inside the bottle and turn it on. The light will be visible through the transparent window.

And if you want to get acquainted with another option, then the next master class and step-by-step photos to it will help. For such a structure, not very many materials are also needed, but the result will be excellent.
How to make a fairytale toy house from salt dough?

To make such a house, take:
- a can of tea;
- PVA glue;
- salty dough;
- stationery knife;
- knitting wire or tape;
- cardboard sleeve from foil;
- plaster cast;
- bamboo skewers;
- serpyanka mesh;
- paint;
- brush;
- paper;
- pencil.
First, draw the details of the future house on paper.

Cut them out and attach them to a tin can. Circle with a felt-tip pen, then cut with a clerical knife.

Using the markings provided, cut out the parts from the rolled dough. Dry these parts near the battery, and then grease them with PVA glue and attach to a tin can.

Add water to dry gypsum, fill with this mass the distance between the dough and the floor of the house.
To make the roof, stick on the sausage on the tops of the walls. Then place wooden skewers horizontally on them, pressing into the dough. Attach the serpyanka mesh on top.

Roll out the dough and place it on top of this crate.

Roll out strips of dough and cut each into a fringe.

Attach these headers to the roof starting at the bottom. The pipe must be pasted over with dough, to make a kind of stump.

Then stick the rolled dough strips onto the pipe and run your knife over them to indicate the structure of the wood.

Roll out the dough, place it on the wire mesh and cut to form a square. Give it a free shape and attach to the house.

Now let the house dry completely, then cover it with acrylic paints.

A small garden of branches with your own hands

The main object of such a landscape will also be a fairy-tale house, to make it, take:
- a cardboard bag from a dairy product;
- glue;
- ice cream sticks;
- felt-tip pen;
- secateurs;
- hot glue gun.
Draw on the outside of the milk bag where the windows will be located. They will need to be cut out. Measure the height of the future walls on the bag with a ruler, and you will need sticks of this length. Trim any excess with pruning shears.
Now use hot silicone from a glue gun to glue the walls with sticks. In this case, leave the windows free. Lift the top of the bag to form a triangular roof. Fix in this position using tape.

Measure each window. According to these dimensions, you will need to make frames from ice cream sticks. The same material will help create a beautiful door.
The fairytale house will look great against the background of green moss. Place it in a box. And to make furniture for this garden, also take twigs from twigs, cut them in such a way that you get chairs and stools. Glue these elements together with a hot gun.

You can make toy furniture not only with wood, but also with wire. Twist it using your pliers to make a round table top or seat.

Start twisting the wire from the middle, gradually working towards the edges. You can put blue glass stones to form a river. Also make a walkway through it from wooden sticks. Place a fairy figurine here so that the child can play in this fabulous place. Give him a small bed, pour light earth here and plant a few strawberry bushes.

Also, an interesting building can be placed in ordinary baskets. Together with your child, you will show your imagination and, along with the magical house, make a cozy courtyard. Make a bridge, a canopy and a swing from branches, connecting them, tying them with twine. Use fake moss to create green grass. You can also plant some succulents here.

Use a garden wheelbarrow for this. First you need to pour small stones on its bottom, which will become drainage. Now soil is poured on top, a path is laid and a house is installed. Make various decorative items such as a livestock pen. Place the chickens next to them, add fine gravel. Plant small plants in the soil that will not be tall. This is such a fabulous house with a magical garden.

For such purposes, you can use not only a basket and a wheelbarrow, but also an unnecessary trough. If the baby has grown up, such a container will help make a miniature garden, in the center of the composition of which there will be a blue house.

And if you have a wooden barrel as unnecessary, then you can also attach it to the case. Build a wonder house whatever you want. You can make it in the form of a fly agaric, as in the previous master class, make it from tree branches or from stones.
And if you have a flat slate stone and a hot pistol, then you can make the next magical structure.

Place the stones one above the other and secure them. Use a hot gun to glue the stones together. And make the roof out of the bark of a tree. Cut them into strips and attach them to create curls like this.
Beautiful houses and courtyards for them are obtained from small round light stones.

You will make a pipe to it from a plastic pipe, pasting it with pebbles on the outside. Flip the large shell to create a pond next to the house. Also line the coastal area with stones, but take a little larger ones.
So that your child does not get bored on a walk or on the beach, show him how you can make a house out of scrap materials.
DIY toy house made of natural materials

If you are relaxing with your child on the river bank or at the sea to entertain him, show how to make such a structure. Many materials can be found within walking distance.
Take:
- semicircular shells;
- dry algae;
- wooden planks;
- rope;
- seaweed.
Dry algae can usually be found right on the shore. If you do not have such, then you can use grass or handkerchiefs brought with you as curtains for such a structure.
Put boards or sticks next to each other, tie them with a rope to make the floor. Now you need to glue the shells together. To do this, you need to use superglue. And if you brought natural materials home, then take a hot glue gun. Also, at home, you can knock together planks with nails, and if you craft in nature, then tie them with a rope.
You will need to take it with you. You will also need this material to tie algae or handkerchiefs, which, if desired, turn into curtains, but first you need to decorate the roof with green algae and attach it to vertically installed branches. They will play the role of columns.
With the help of shells, you can create many houses, glue the base with this natural material.

You can also make a simpler fairy-tale beach house. It is for me who are found to burn, herbs can be created with a child like this kind of creation.

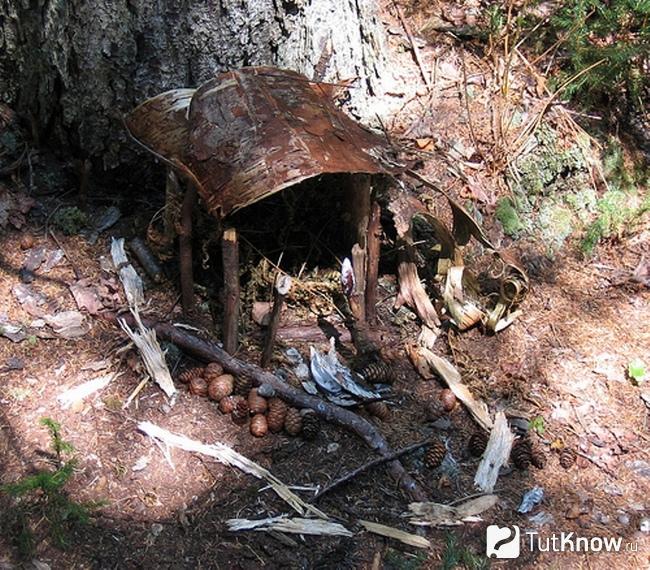
If you go with your child for a walk to the forest edge, you can find a stump here and make a house out of it. Kara will become a roof, and cones will become an ornament for it. From the sticks, you will lay out the entrance to the house.

Place the three sticks upright so that they form a triangle. Tie them up at the top. And at the bottom you can stick it into the ground for greater strength. Tie the found feathers with ropes to these sticks to decorate such a wigwam.

It is not difficult to find tree bark in the forest, it can be placed to create a shed or another fabulous house. And the path from it is lined with cones and stones. You can decorate such a structure with forest flowers.

It is also easy to find sticks in the forest and at the edge. Stick four into the ground to form the base of the walls. You will make them from bark, like the roof of the house.
Chaga or mushroom found in the forest will turn into a roof element. You can cover it with moss or grass. The sticks will become walls that let light in.

If you have enough time, make a two-story house with your child, attach boards horizontally here so that they become shelves. Children will be happy to sculpt kitchen utensils from clay and plasticine and put them on these shelves. They will develop their imagination to make other household items for this building. Make a ladder with the children from sticks and twigs.

Some houses can be made on the banks of the stream, near which you walk with your children. All you need is moss and sticks. After a while, it will be interesting to come here to see if the house is still there. You can tell your child that forest fairies will live here to play with him this way. If the children are already old enough and do not believe in such magic, then tell them that such structures will be useful for small rodents.

It is fascinating to make such fabulous houses for adults together with their children. If you want to see what other buildings might be, check out the plots. In the first, you will find a selection of papier-mâché houses.
And the second will teach you how to make such a structure from cardboard and scrap materials.
![]()
To begin with, you need to saw on a circular quite a lot of square sticks in cross-section. Approximately 16mm thick. If this house has six crowns, then 24 sticks are needed. Our house is square in plan, so sticks are needed of the same length. The length of the sticks must be chosen according to the length of the future walls of the house. Plus 2 centimeters.
Then you need to give the sticks a cylindrical shape. This is usually done on a special machine. We don't have it, so we use a regular wood lathe.

The front and rear centers of the machine leave quite noticeable indentations when machining on the stick. Therefore, the ends of the sticks, where the indentations remain, need to be sawed off. A centimeter on one side and a centimeter on the other. And so you need to process all 24 sticks.
In this picture, the grooves are clearly visible. 
Then two grooves are cut in each stick. 
Then we smear these grooves with "Joiner" glue (quick-drying PVA). If necessary, we also smear the entire length of the stick.

And glue it together. Crown after crown.


Until we assemble the whole frame. It will take about 15 minutes for the carpenter to dry out. Therefore, all this time, the whole frame must be pressed from above. You can just use your hands. When everything is glued together, it should look like this.

Now we mark the slots for the door and windows.

And we saw through with a jigsaw.

Before cutting out the windows, we drill a hole in the wall of the house. We will then insert the file into it. Sawing window and door openings will just show us whether we glued the sticks tightly or not.

Where necessary, we cut with a knife.

As a result, we should get this.

Then we grind and trim the ends of the logs on a rotating plywood wheel with a sandpaper.

We paint the house with a strong manganese solution. It is possible only outside.

When the manganese dries up, we wipe the house with a sandpaper. This is how we have a color stretch. Some places are highlighted, others remain dark.

As a result, it should be like this. Here we have blanks for two houses at once.

Then we cut out two triangular pediments from the fiberboard. The roof angle on most houses is 90 degrees. In the gable blank, you need to make two semicircular cutouts for sticks. They are made with a semicircular chisel.


Then birch bark is glued to these blanks. And already on it, embossing is done, depicting the boards and the structure of the tree. Embossing can be done with a very large needle. Then the embossed surface is painted with manganese, and the excess dye is wiped off with 646th solvent. You need to rub hard. Firmly pressing a cloth soaked in solvent against the birch bark. It should look like this.

Then windows are cut out of birch bark according to the size of the openings. Better two-layer. Then they need to be glued together and glued into the openings.

But the windows and gables are already glued into place.


