At the onset of spring, probably every gardener begins to think about cleaning accumulated garbage, litter and fallen leaves, remnants of old grass and other vegetation on the backyard. In its assortment, as always: a pitchfork, a rake and a broom. Today we'll talk about the broomstick. Not one rural courtyard and city courtyard can do without it. Therefore, if you do not have such a unit, then you should definitely get one. The easiest way to purchase in a store for a few hundred rubles. And there is a slightly more complicated way. For example, make it from soft and elastic branches of twigs, a flexible tree (elm elm, birch fir). Well, and the most incredible to make yourself out of plastic bottles that are in every home. A good positive aspect of the latter method is the respect for nature and our environment by recycling plastic waste. In this article, we'll show you how to make a broom from plastic bottles.
Step-by-step instructions for creating a bottle broom
So, let's get down to the question of how to make a broom from plastic bottles step by step. To get started, we need the following materials:
Eight plastic bottles with a volume of two liters. You can use more, in which case you get better bristles on the brushes and as a result, it will be better to capture debris,

A handle (suitable from an old shovel, hoe, rake or something else, if not, you have to purchase it at a hardware store),
Wire, hammer, nails, stationery knife, awl, stationery scissors and an ax.
Progress:
If you do not know what to make a broom for the yard - then use our information. When all the necessary tools are assembled at hand, then you can get to work.
We cut out the bottom of all plastic eggplants with a clerical knife and cut with clerical scissors into strips along the neck of the eggplant. The width of the strip is half a centimeter, and the length, without cutting to the neck of the bottle, is six to eight centimeters.


We cut out the neck of six eggplants with a clerical knife, and leave the seventh untouched with a neck, onto which we string six eggplants without a neck.

At the eighth eggplant, we cut off the neck of 13-16 centimeters with clerical scissors and string it into seven bottles and pierce two symmetrical holes with an awl. We put a wire into these holes and, on the other hand, gently pull the two ends of the wire together. 
We adjust the handle into the neck, if it does not fit, you need to hang it with a hatchet along the diameter of the neck of the plastic bottle and fit it tightly so that you then need to take a hammer and a nail and punch the neck of the bottle and thereby fix it on the cuttings.


That's all, our broom is ready to start working.

Another option for making a broom
Wondering how to make a broom at home? Then rather get acquainted with another version of the product. There is a more sophisticated version of a homemade broom, more like a broom brush. Nothing complicated is required to make it. First you need to get the raw materials from the PET tape bottle using a bottle cutter, and then make a broom from the tape.
And so let's get down to considering this option. We need:
- bottle cutter,
- fused tape from a PET bottle,
- construction adhesive 88,
- neck from a plastic eggplant (7 pieces),
- two-way twist,
- plastic eggplant lid (7 pieces),
- screws seven pieces,
- curly screwdriver,
- a larger block and a smaller block with a small hole,
- stalk.
The main device here is the bottle cutter. On the Internet, there are many variations of drawings that can be used in the manufacture of this product.
If not: a bar, a corner, a knife, an ax, then we will need 3 self-tapping screws, a knife blade, 4 nuts and 4 washers. You can use one nut or one washer. And he drank a board or a piece of chipboard (which will be at hand) for the base on which all this will be fastened. You need to take a screw (the length needs to be calculated so that it does not come out on the other side), put on a washer a knife from a clerical knife, a washer and a nut and screw it into the board, similarly the second only the knife will just rest against the screw between the washers.
Then the third screw is taken and fixed from above in the same way as the second, and now the knife blade is not movable, you can try to get the tape. To do this, cut off exactly the bottom of the eggplant, and make a small notch with scissors, after inserting it into this notch, the blade smoothly scrolls, the tip of the tape will come out, and begin to gently pull for it. And after the eggplant, almost all of it turns into a tape, which then needs to be thermally processed. This can be done: on fire, or in water, or with a construction hairdryer. So that it will sediment and decrease in size.
After heat treatment, the tape has become more durable, it is cut into the same length of 25 centimeters, stuffed tightly and tamped and level the edges into prepared and sanded necks from eggplants in the amount of 7 pieces. We put on a double-sided twist on top, and take out the neck.
While the edge is drying, move on to the second part of the broom-brush. It is necessary to take a block and place 7 lids from under the eggplant on it, then drill a hole in the middle and screw it with a self-tapping screw, and then screw double-sided necks with glued-in tapes from a PET bottle onto these lids. The main part of the broom of the brush is ready, now you need to take another smaller block with a hole and screw it to the larger one with a broom, and insert and fix the handle.
More details about the manufacture of a broom will tell the video:
You can try to clean up the trash.
Finally
Then take the ribbons and (70 centimeters or 140 centimeters from the size of the broom that you will make) fold in two. Then a piece of a branch is inserted into the tape, which is more evenly from the tree as thick as a finger for the stiffness of the handle, they begin to knit like a regular sorghum broom, only the willow twigs are replaced by a tape from a plastic bottle. The resulting screeds, knots and tapes are treated with fire or a construction hairdryer to shrink the plastic and tighten it. As a result, you get a broom that is not inferior to the store one. Plus it will be durable.
We think the considered examples of a broom and a broom will help you in cleaning and cleaning up garbage: at home, in the yard and on the street, and the proposed material will help cleanse the environment of plastic containers (eggplants).
More recently, an ordinary plastic bottle was just garbage that was thrown into a landfill. Today, a lot of various decorations and decorations are made from them. In addition to decoration, this material can serve to create quite practical and necessary things in everyday life.
One example of the beneficial use of plastic bottles is the broom. Such a product may well be used for cleaning a private yard. Making it with your own hands is quite simple. This will require some basic tools and materials.
Tools and materials for making a broom
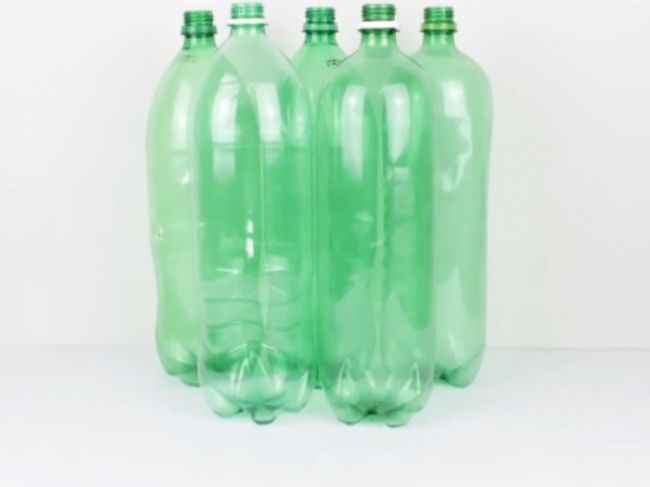
First of all, you will need several bottles of the desired color. It is best to take a larger container volume, for example, 2-2.5 liters. In addition to the color and volume, you should pay attention to the shape of the bottles - they should not have corrugations and sharp contractions. It is ideal to choose bottles that are completely straight.

In addition, you will need the following:
- Sharp stationery knife with replaceable blades;
- Household scissors;
- Waterproof glue for working with plastic products;
- Insulating tape;
- Shank made of wood.
Preparing bottles
First of all, you need to work properly on the bottles. To make a simple broom, you need a frame. It is made from a two-liter bottle as follows. The lower part of the container is cut with a clerical knife. In this case, it is desirable to remove as little plastic as possible. Usually it will be enough to remove only the bottom of the bottle, which is harder than the walls.
The width of the strips can be made about 0.5-1 cm. The wider the stripes, the more durable the broom will be. However, with narrower lanes, it will pick up small debris better.
After making the frame, you need to make the filling for the broom. To do this, you will need a couple more bottles of the same size.
Optionally, you can take containers with different colors. The bottom is cut off from them, in the same way as in the manufacture of the frame. In addition, the neck is cut off with a clerical knife. As a result, it should turn out so that the upper part has a smaller diameter than the lower one.
When the bottom and neck are cut with scissors, the same strips are cut as in the manufacture of the frame. The width of the stripes is made approximately the same as for the base.
The third bottle is processed in the same way. As a result, you should get two prepared bottles without a neck, and one with a neck for the frame.
Assembling the working part of the broom
After all the details of the future homemade broom are ready, you can start assembling it. To do this, you need high-quality glue, preferably waterproof. You can also use a glue gun, or at worst, fix it with a soldering iron. To assemble the working part, a prepared frame is taken, on which one of the bottles without a neck is put on. Previously, the upper, conical part of the container without a neck is abundantly coated with glue.
The second bottle without a neck is put on the frame in the same way. It is also pre-coated with glue at the top. After that, the future broom is left to dry so that the adhesive will set.
Attaching the handle to the broom
While the working part of the broom dries up, you can start making a handle. To do this, you can use the most common stick, which is made from scrap materials. The thickness of the handle should be about 3 cm. If possible, you can use a handle from another product that is no longer in use, or is out of order, such as a rake.
The selected handle should be sharpened at one end and adjusted in diameter so that it can easily be inserted into the neck of the bottle. Accordingly, the cork from the container is thrown away. You can use the remaining necks to adjust the handle while the broom dries.
The prepared stalk is inserted into the bottle and secured with insulating tape. The main thing is that the tape has sufficient adhesive properties. Instead of a tape, it is quite acceptable, and maybe even better, to use a self-tapping screw, screwed in the area of connection between the handle and the working part of the broom, perpendicular to the entire product.

Additionally, you can compress the working part of the broom and tie the bundles of strips with wire. This will create a broom that has a wider working area.
Dear readers, if you have any questions, ask them using the form below. We will be glad to communicate with you;)
What have not found a use for plastic bottles. As a secondary raw material, they are used in the arrangement of flower beds, when fencing the territory. All kinds of fakes and so on are made from them. Another invention that this article is about is the broom. Yes, it is quite possible to make a broom from a plastic bottle, we will tell you about two simple ways. So, let's take a look at together how to make a broom from plastic bottles with your own hands.
The first way - two-liter bottles
In the first case, you need to collect a little not small eighteen two-liter plastic containers. To do this, prepare the following set of building materials and tools:
- Sharp stationery knife.
- Awl.
- Hammer.
- Nail.
- Scissors.
- The wire is soft.
- Broom handle.
- 18 bottles of two liters.

So, if you already have everything at hand, then we will consider how to make a broom from plastic bottles step by step. According to some estimates, not everything is about everything, it will take you about two hours. Getting started:
- Seventeen bottles need to have the bottom cut off.
- Next, use scissors to cut the prepared container lengthwise into strips of 20 mm. but not cutting to the neck by approx. 60 mm.
- This procedure should be performed on all the remaining sixteen bottles. Let only one remain temporarily unchanged.
- Then take these sliced containers and cut off all the necks of them, leave only one on.
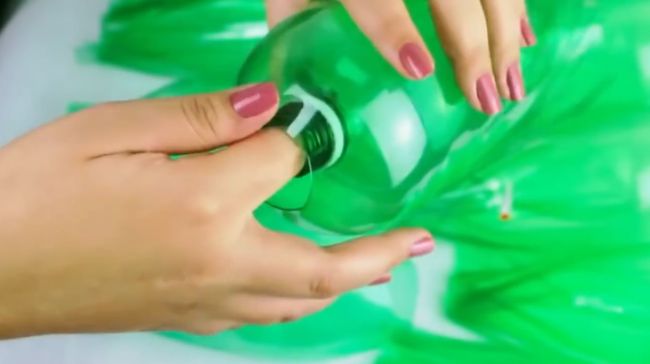
- Now you are holding a bottle in your hands, which has a neck. On top of it, put on sixteen bottles without a neck. During this process, it should be monitored so that the cut elements do not bend.
- The next step is to take a completely intact container.
- You should cut off the top from it. To do this, measure 150 mm from the edge of the neckline. The cut should be straight.
- From above, put on all the collected bottles together according to the principle of one inside the other.
- Take the awl in the next step. In one puncture, you need to pierce a hole. The hole must be made, stepping back from the edge by 150 mm. Make a hole in two places.
- Through these holes you push the wire, which should be tied together. The remaining wire protruding should be bitten off with wire cutters.
- Next, you need to prepare a wooden handle. Its diameter should be equal to the inner diameter of the neck on the container.
- Having cleaned the handle to the required diameter, thread it through the neck of the plastic container until it stops. The plastic container should sit tight on the handle and not wobble.
- After that, a hole should be made in the neck, in place of the existing thread. It will be necessary to screw one self-tapping screw into this hole so that the broom made from a plastic bottle is securely held on a wooden handle.

It is according to such a simple scheme that a broom is made from a plastic bottle. When working, it is important to comply with several important requirements or even safety rules. If you have ever had to cut a plastic bottle with a knife, then you know that the knife can sharply go in the wrong direction. For this reason, fingers or hands can easily be cut. Moreover, when cutting the strips with scissors, it is important to ensure that they are the same size.
Advice! There are many different shapes of 2 liter plastic containers. You should choose eighteen plastic bottles of the same shape. Otherwise, it will be difficult to piece the broom together.
So, now let's look at the second manufacturing method.
The second way is to cut the spirals

So, a broom from plastic bottles with your own hands can be made using a different technology. To do this, you should cut the plastic bottle into a spiral shape. Before starting the operation, the neck and bottom should be completely cut off.
Important! The cut elements from the bottom can be safely thrown away, and keep the necks for now, they will be needed to form a future broom from a bottle with your own hands.
So, you should have a kind of plastic cylinders. It is from them that the spiral should be cut. The strip should be about 5 mm wide. It is important that this dimension is maintained along the entire length of the spiral. It is best to use a sharp knife or scissors for slicing.
The resulting spirals must be heat treated. To do this, you can use different tools and materials, for example, a gas torch, blowtorch, candle or something similar. Thanks to this, the spiral will acquire the required hardness.
Important! Remember, you need to heat it, not melt the plastic.

So, straighten one spiral above the heat source. Gradually, the spiral should align. Alignment is made possible by folding the two longitudinal edges. So, all spirals should be absolutely even. The resulting plastic pieces should be cut into pieces of twenty centimeters each. Next, you should take the deferred necks.
The necks should be cut so that they can be glued together in pairs. As for the choice of glue, plastic can be glued by not every adhesive. For example, on a large number of adhesives there is an inscription - prohibited for PET. Otherwise, the glue can eat away at the plastic instead of sticking it together. The optimal glue is the usual moment.
When the necks glued together have dried, then these blanks will also be needed. The middle of this sleeve should be stuffed tightly with aligned plastic twenty centimeters each. It is important to ensure that these blanks do not fall out at the moment of sweeping. To do this, take one lid and pour a small amount of moment glue into it. Next, carefully close the neck with inserted plastic rods. Place the neck on a solid base, and press the twigs tightly so that they are completely dipped in the glue in the lid. Then, turn the lid upside down to allow the glue to penetrate slightly through the plastic strips. After a quarter of an hour, unscrew the lid. You need to wait until the adhesive is completely dry on a plastic container.

Now we take the base for the broom. It can be a rectangular bar. It is necessary to screw the plastic covers to it with self-tapping screws. First, pierce the holes in the covers with an awl, since without this the cover may crack at the moment the screw is tightened. So, on the base of the broom you screw several lids from plastic bottles in a row. They can not be screwed in a straight line, but mixed in a zigzag pattern. How many caps you will have screwed on, that is how much you should make the blanks described above.

When the glue on the first piece has dried, screw the neck to the lid. So, you should make several of these blanks. In each case, the process will be repeated. After several blanks made, everything will be done on the machine, so there are no special difficulties in making this type of broom from a plastic bottle.
Again, it is worth recalling the safety precautions, because you will have to work with a sharp knife, and, possibly, with an open fire.
Conclusion
So, as we have seen, it is really possible to make a broom from a plastic bottle. To do this, you need to make a little effort and ingenuity. Of course, you can find many more original solutions to how you can use a plastic bottle to make a broom from it. If you know about such methods, then write about it in the comments to this article. To consolidate all the theory provided, we offer you to watch the prepared video materials. In them, home craftsmen clearly show the technology for making a broom from a plastic container. We hope that this material was useful for you and that you can cope with all the work on your own, and if necessary, get additional information from the video.
How to make a broom from plastic bottles with your own hands? Tell me, have you ever seen a broom made of plastic bottles? If you read the article to the end, you will not only see, but you can also do it yourself.
Most summer residents who have garden paths from or know that keeping them clean is not so easy. This is especially true after the rain has passed, since the earth that has fallen off the shoes dries to the concrete. In this case, a broom with stiff bristles will help you. Such copies can be easily found on sale, but they cost decently.
Another option is to cut the willow stands, take twigs from them, and make a great rustic broom. But there is a much easier option - to make a broom from plastic bottles. Let's try!
DIY broom making
First you need to understand, what is a broom? This is the base to which the flexible rods are attached. Nowadays, it is almost impossible to find brooms with natural bristles, since synthetics are much cheaper. This is the simplest plastic in the form of a fishing line of various thicknesses, which is attached to the base. So, to make such a broom with our own hands, we only need the same line.
So let's start with the base of the broom. An old brush is suitable for this, and you can take both a wooden and a plastic base. If you don't have an old brush, that's not a problem either: cut it out of a suitable board, which is 25 to 30 cm long, 5 cm wide and about 2 cm thick.
 If you have chosen an old brush as the base, this area must first be "shaved", that is, get rid of the remnants of the old bristle. This operation is easy to perform with a clerical knife. The villi should be cut flush to the base. At the same time, you will still have the base of the villi inside the brush, but this is not a problem and will not interfere at all in the future. The main thing is that nothing sticks out outside.
Also, to make a broom from plastic bottles, you will need the main raw material for the broom - plastic bottles. For this, specimens of almost any capacity are perfect - from 1.5 to 3 liters, but the main condition is that the bottle is not crumpled and has a cylindrical shape in the central part, without depressions, grooves, etc. By the way, for this reason, five-liter eggplants are unsuitable, since they usually have concentric grooves along their entire height, i.e. stiffening rib.
Keep in mind that the thickness of the bottles is different. Beer bottles are recognized as thicker, but containers for mineral water and lemonade are much thinner. The thickness largely depends on the volume - with a larger liter, the walls are thicker.
So, take a plastic bottle, remove the label, rinse the inside out and let it dry. Next, using a clerical knife, you need to cut it - cut off the neck with the cork and the central cylinder. You need to cut off the neck below the wide ring against which the cork rests. The bottom and the case itself will not be useful to us in any way. For waste-free production, the maximum that can be made of them is a bowl and a funnel for your beloved cat.
Now, from the cut part, we need to get a fishing line for making bristles. To make a good broom from plastic bottles, we cut an even strip from the cylinder. This can be done with scissors, but it will take longer and more tedious process. For acceleration, you can make a convenient cutter.
Making a cutter for making bottle strips
To create a cutter, we need a block of wood with a cross section of about 4 * 4 cm and a length of about 20 cm. You can also use a piece of a shovel handle, which you no longer need. Using a hacksaw or a hacksaw in the upper part of the bar, make a vertical cut in the middle, the depth of which should be 5-6 cm. This cut is needed for cutting, and our cylindrical plastic workpiece will rotate in it. If you cut less, the bottle will simply slide out, and if you cut it deeper, you will have to apply more force when cutting.
- Now, you need to step back from the bottom edge of the slot 0.5 cm, and make a horizontal cut perpendicular to the first cut, the depth of which will be 1.8 cm. This will be the place for the knife. Use a piece of blade as a cutter knife, for example, from the same clerical knife with which you cleverly dealt with the bottle. A piece should be cut off from the blade slightly less in length than the width of the bar, inserted into the slot and secured with two screws. Ready!
- Next, we begin the process of making long tapes from a plastic bottle. The end of the cylinder should be cut with scissors to make the beginning of the tape. A cut length of 10 cm and a width of 0.5 cm will be enough. Now the beginning of the strip should be inserted into the cutter, but UNDER the knife. Take the device in your left hand, and with your right you just have to pull the tip of the strip. The bottle will begin to rotate, and a flat ribbon will appear from under the knife. It is important that you pull smoothly without jerking. Hooray! We now have a long polyethylene tape.
Interesting! From one bottle, the capacity of which was 2.5 liters, it turned out 17 meters of fishing line, and from 1.5 liter only 11 meters.
And it would seem that a broom made of plastic bottles with your own hands is not so difficult to perform, but there are some nuances. The ribbon blank is soft enough for a broomstick and still retains its ring shape. Heat the tape to give it a specific characteristic. It's easy to do with a candle, gas torch, or blowtorch.
- We will consider alignment using an example using a gas stove. Take the tape in your hands as far as your arm span allows, and smoothly and evenly pass it over the fire source. When heated, it will straighten, the edges will curl inward, and now in section it will not be flat, but semicircular. The main thing when heating is to choose the ideal pulling speed, because if you pull quickly, the tape will not have time to warm up and straighten, and if you delay, you will burn it, and it will melt and break.
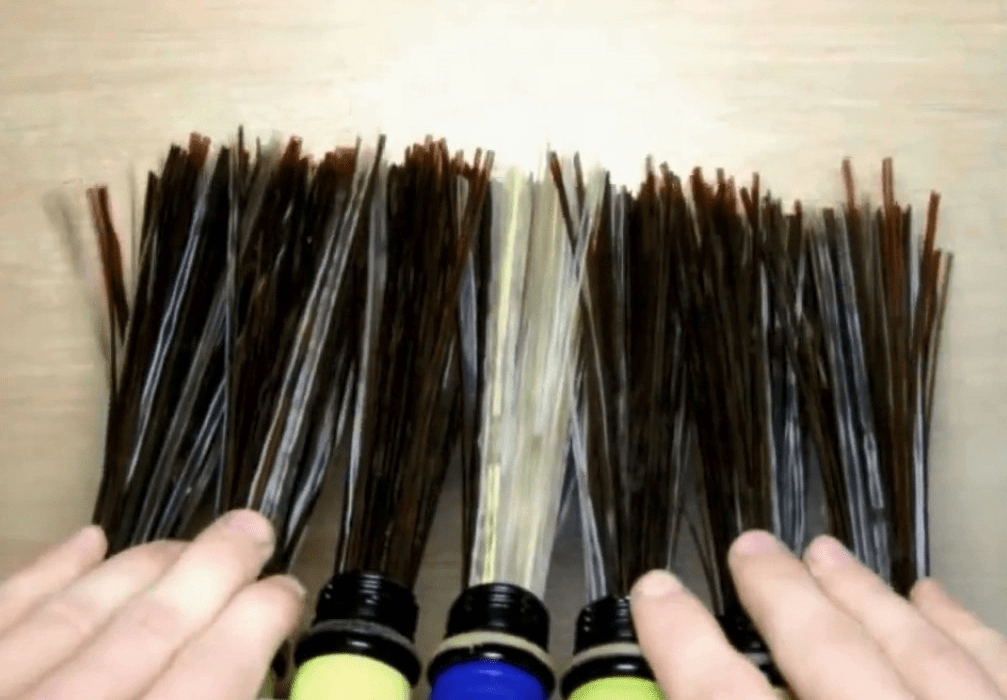
- In the comparison photo, you can see that at first the tape was soft and twisted, and then became straight and stiff. We now have a great plastic bottle tape! It remains only to collect the broom.
- The broom itself is made up of many individual panicles. The number depends on the size of the base of your broom. For the above sizes, only 9 panicles were needed. The finished fishing line should be cut with scissors into equal segments 20 cm long.Now you need to take 2 cut necks from PET bottles and glue them together. So, you need to glue the necks, and for this we will use glue like "BF" or "Moment-classic".
note , that it is not recommended to use glue like "Super-moment" if it is made on the basis of cyanoacrylate. You should pay attention to the label, where the content of this item will say “not recommended for PET bottles”.
After drying, the resulting sleeve should be stuffed with bristles, that is, with already prepared lengths of fishing line. The number of rods that fit into one sleeve is unknown, but it needs to be tightly packed. Next, we fix it in the sleeve. To do this, you need to move it to the middle of the beam, and grease the ends with the same glue that was used earlier to the full depth or a little more.
 By the way, instead of glue, you can use a conventional sealant from a tube - when it hardens, it will reliably fix all the twigs. Next, return the sleeve to the edge of the bundle and leave it alone until it dries completely.
While all the elements for the broom from plastic bottles are drying, prepare the base: screw the screws to it with corks, and for each cork there are 2 screws, and place them along the line of the broom. This will ensure that they will not be ripped out when sweeping. Please note that because of the rings that protrude on the bushings of the panicles, the plugs should not be fixed close to each other, but with a small distance of 0.4-0.5 cm.
They can be positioned in one line - then the broom will be thin, or it can be zigzag, and then the working thickness will be 2 times thicker. When everything is dry, you can collect the broom. To do this, screw them into the plugs that are on the base. Now you just need to attach the handle and the first test can be done!
Important! We do not recommend using ordinary plastic tubes from household mops as a handle, since the base turns out to be very brutal, and the load will be appropriate. For this reason, it is highly recommended to use only sturdy wood cuttings.
After the first use, we can safely say that the broom perfectly cleans concrete and asphalt, and if necessary, it can perfectly clean even snow compacted by the wheels of a car, which even a snow shovel does not always cope with.
But this is not the end of making a broom from plastic bottles with your own hands. The necks need to be cut from the bottle along the lower edge of the ring, but since the material is too dense in that place, use scissors or a knife. For ease of combing and acceleration, you can use a simple device that only needs to be spent on a cork.
In the center, make a hole with a diameter of 0.5 cm. Insert a bolt of the same diameter into it, and insert a hat inside the lid, fasten the lid to the bolt with a nut and enhance the effect with a washer. Now it remains to insert such a template into the drill chuck, tighten the neck and you can easily cut off the excess.
Conclusion
Although it may seem to someone that you should not bother so much for the sake of some kind of broom, the efforts are not in vain. Firstly, this is a creative process and the creation of something new, and secondly, this is just one option for using plastic tape, and such things are much more practical than those offered to us by the mass market.
Plastic bottles are a wonderful and versatile material that serves many purposes. Not only do we store liquid in them, but the container can also be useful for all kinds of handicrafts. Some can be purely decorative, while others are useful in practice. One of the possibilities for using plastic bottles is to turn them into a broom. This is a useful device that you need for a home or summer cottage. Instead of buying a broom from the store, you can spend an hour or two manufacturing it.
Everyone has the material, and a trivial set of tools is required. Let's find out how to make yourself a broom from plastic bottles step by step.
Tools and materials for work
It does not take a lot of money to create a broom from a bottle with your own hands. All components are in the house, so you don't have to run to the store. The toolbox is simple and even kids can use them. What will it take to work? Here's a small list:
From such a set of simple things, you get such a practical broom from a plastic bottle.

Now that you have everything you need, you can start creating a product with your own hands.
Creation technology
It will take you about an hour to manufacture, plus or minus. There is nothing difficult in the work. The main thing is to follow the instructions and do the job carefully. For your convenience, we have made step-by-step instructions to help you. So, let's look at the creation in stages:
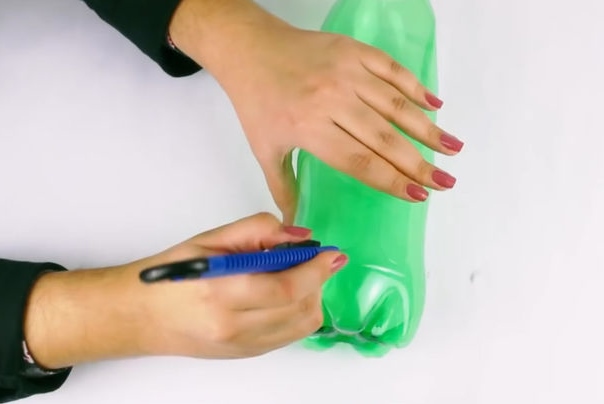
- Take the first bottle and utility knife. It must be sharp. Cut off the neck from it, stepping back a few centimeters from the top.

- Cut the bottom of the plastic container in the same way.
Advice! Work carefully so as not to injure your hands. Plastic is a soft material, so it lends itself well to processing.
- Now you need scissors. Each broom has twigs or stems. Your task is to create these stems. Using scissors, begin to cut the workpiece lengthwise, from bottom to top. The width of each strip is approximately 0.5-1 cm. Do not cut it to the very end. Move just above the middle, leaving about 6 cm from the top.
- Treat the rest of the bottles in the same way. Leave only two of them untouched. Please note that the more products there are, the thicker the broom will become. She will more effectively cope with cleansing.

- So, at this stage, you have 3 or 5 blanks ready (depending on how much you initially stored), in which the neck is cut off, and the rest is cut into strips. You also have two untouched plastic bottles. Take one of them and, without cutting off the neck, do the same as with the rest.

- Your bottle broom is almost complete. Take a piece with a neck and begin to insert it into the inside of each piece made without a neck one by one. A product with a neck will freely enter the prepared hole. Place all workpieces completely.
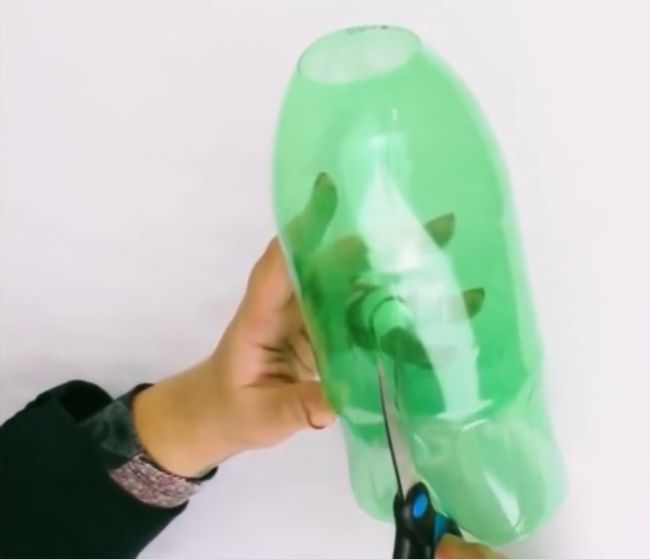
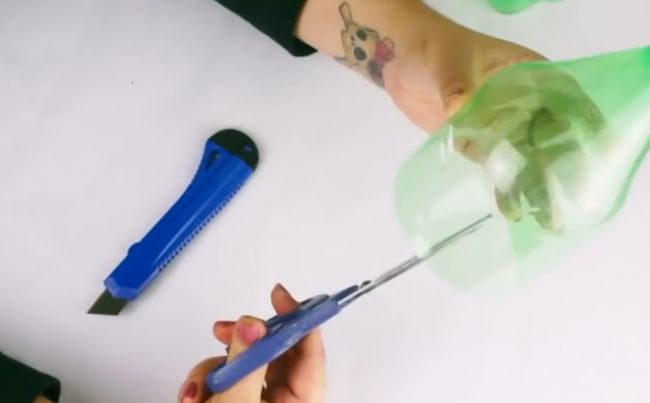
- Basically, the bottom is ready. It remains to bend (flatten) to shape. But, we will not stop at this, but improve it to make it beautiful and practical. Take the remaining bottle, preferably with a high neck, and use a utility knife to cut it in half. We only need the top.

Advice! Do not throw away the lower part, you can make a tabletop or hanging pot, a container for pens, an owl or a ladybug from it.
- In the desired part with scissors, make two cuts on each side, opposite each other. Make the cut approximately to the middle of the plastic part.
- The finished part must be attached to the blank made from the rest of the bottles.
- Using a large nail (50 or 100 mm), sew the product in two places in the horizontal plane. You can use an awl. You need to make an effort. Insert the wire into the holes formed and tie all the layers firmly. It should turn out as shown in the photo.

- That's all, the product is almost ready. It remains only to attach a handle to it. The stick should not fit freely into the neck of the bottle, but end-to-end. To control the thickness, trim it with a regular knife.
- When the stick enters the neck, it remains to fix it with nails or screws so that it does not fall out and turn around. The nails will securely fasten the handle and the broom will be one piece.
- For reliability, it is better to use not one, but two or three nails. They need to be driven into the neck with the inserted handle. For better fixation, you can use small self-tapping screws.

You have successfully created a fixture. A broom made of plastic bottles with your own hands will perfectly cope with the tasks. You can use it to sweep the yard, room, paths, etc. Create several brooms and surprise your friends with your skills. To make it clearer how to properly make a broom from plastic bottles, check out this video.


