Lighting is one of the most challenging aspects of photography and one of the most important. An external flash is one of the most effective ways to ensure correct exposure, but using it correctly is also quite difficult. In this article, we'll go over some of the flash techniques, accessories, and more. We will also offer you a cheat sheet that contains the most common lighting methods.
The main feature of built-in flashes is that the quality of their light is poor. Because the flash is a high intensity light source and the light comes from a small area close to the lens, it produces flat, harsh lighting that creates deep, ugly shadows.
It also kills fine texture, whitens skin tones and causes red eyes. A complete set to make any shots horrible.
External flashes mounted on the camera are not much better. The light emitting area is slightly larger, the flash is farther from the lens, but it also produces hard light.
This type of lighting, where the flash is aimed directly at the subject, is known as "head-on" flash. Although the image usually looks fake and ugly with direct flash, the proper use of this kind of light can be absolutely stunning.
However, most of the time you will need to avoid this kind of lighting.
Off-camera flash photography
The key to dramatically improving the quality of lighting is to increase the size of the light source and change its direction for a more natural effect.
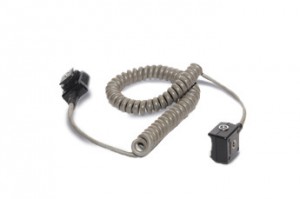
To do this, you need to completely decouple the flash from the camera, for example, using a sync cable. This will give you much more freedom in staging the light and eliminate red-eye completely.
Nikon and Canon release TTL sync cables that completely transfer all information from the camera to the flash.
For some cameras, you will need to purchase additional adapters for the hot shoe and for the flash, and a cable to connect them.
If you want to keep your hands free, you can buy a flash bracket that attaches via a tripod socket to the camera and allows you to aim the flash at different angles.
Powerful hammer flashes are used to illuminate large objects such as buildings, usually in conjunction with a bracket.
Simulated studio lighting with two flash units.

Using the built-in flash to illuminate objects closer than 60cm from the camera is a bad idea as the built-in flash is too powerful.
Positioning the flash above the lens causes most of the light to be directed over the subject. At close range, it is better to use an external flash with a diffuser and wide-angle adapter.
Take care not to block the light from the flash with the telephoto lens and tilt the flash head slightly downward.
This solution is far from ideal. You will get much better results if you use off-camera flash photography with a reflector on the opposite side of your subject to fill in the shadows. You can also use a ring flash for close-up photography or, as in this case, a pair of TTL flash units located on either side of the subject.

First shot.
Here we illuminated the subject with a single Canon Speedlite 550EX mounted on the camera, without a diffuser. It can be seen that the lighting is flat, and an unpleasant shadow also appears behind the figurine.

Second shot.
This time we used two Canon flashes. One on the camera as a manager. The other is located slightly to the side of the subject and is controlled by the master flash from the camera. Its light reflects off a large white sheet. This gives a softer lighting and emphasizes the volume.

Third shot.
Here we additionally set a reflector to the left to fill in the shadows. The difference is small, but the improvements are still noticeable.
Bounce Light Shooting

The direct light from the flash is very harsh and looks artificial. He needs softening.
There are several ways to do this, and one of the most effective is the bounced method. This is very easy to do if your flash has a flash head that can be pointed upward and rotated horizontally.
The idea is to direct light onto a reflective surface, such as a ceiling, wall, or even a mirror, which will spread the light over a large surface and increase the effective size of the light source.
This brightens shadows and produces soft, natural light, as opposed to direct flash. For best results, select the optimal tilt angle of the flash head. The disadvantage is somewhat flat lighting and lack of glare in the eyes.
Also, close-up photography can accentuate bags under the eyes and create shadows under the nose and chin. Also, this method significantly attenuates the flash light, usually by two to three stops.
Flash in TTL mode automatically compensates for the loss of light by increasing the power, but if the power is no longer enough, you need to open the aperture more, increase the ISO or get closer to the subject.
If you use a manual flash, you will have to adjust its power manually.
Another important point is that the reflective surface where you aim the flash must be neutral, otherwise you will get an extraneous cast in the image.
Using the white card

Good flash units have a pop-up white card built into the flash head. This allows a small portion of the light to be bounced towards the subject when the flash head is pointed upward.
Using a white card, you can add highlights to the subject's eyes and fill in the shadows.
Some flash units have a low power second flash that can illuminate shadows when the main flash head is pointed up.

If your flash does not have a white card or second flash, try using a piece of paper instead of a white card, securing it with a rubber band.
Bounce flash cannot be used outdoors or indoors with colored ceilings and walls.
One solution is also to purchase a mini reflector that attaches around the flash head, softens the light and directs it forward. These can be, for example, LumiQuest reflectors.
If your flash does not have a swivel head, then removing it from the camera, you can direct the light in any direction. You can also use it on an umbrella stand for almost studio lighting.
We use a diffuser
The diffuser is a good alternative to bounce flash. It spreads the light over a larger area and directs it towards the subject, softening it.

This minimizes red-eye, reduces harsh shadows and creates softer lighting. Using an off-camera flash diffuser gives an even better result.
Various types of diffusers can be purchased, such as Sto-Fen Omni-Bounce, LumiQuest and others.
You can also diffuse light through cloth or paper, or make a homemade diffuser for your flash.
For better softening of the light, it is advisable to use mini softboxes, for example, LumiQuest, Lastolite, etc. Lastolite makes Micro Apollo mini softboxes in three different sizes, and they attach to the flash with Velcro.
For the softest, shadow-free lighting possible, you can combine diffuser and bounced light by sliding the wide-angle adapter out of the flash head for even more even illumination.
This method is great for close-ups and portraits. Diffusers also reduce the light output by up to two stops, and when using bounced light, the total light loss can be up to five stops.
Products such as LumiQuest UltraSoft overcome this problem by combining a mini reflector and diffuser in one closed design, resulting in only about two light loss steps.
Using wireless control

Using two or more flashes will greatly expand your options. To avoid cable problems, it is best to use wireless flash control.
Nikon and Canon support wireless TTL control of nine slave flash units via the master flash unit. However, they can be divided into three groups.
Flash mode, output, and exposure compensation value can be set separately for each group and for the control flash. If you want to use all your flashes, you can fire them with an infrared trigger on the camera's hot shoe.
This gives you the freedom to create any type of lighting, emphasizing the shape, texture, tone and color of objects. The disadvantage is that the distance is limited to 10 meters.
As a rule, only top-end flash models can be used as controllers. If your flash does not allow this, you can use simpler methods, for example, connect a light trap to its PC connector.
Crib
The portraits below were shot using an 80mm lens and one Nikon SB-800 flash unit. We used different lighting techniques. Thus, you can choose the right one for yourself.
© 2012 site
The flash is one of those photographic accessories that are usually used by amateurs categorically incorrectly, but at the same time very willingly. Meanwhile, when used correctly, the flash can be of invaluable help to the photographer.
First of all, you should abandon the idea that an on-camera flash can be used as the only source of light. Unlike studio flashes, on-camera flash is needed when the scene being shot is already lit, but the light is either insufficient or too contrasting. With the traditional amateur use of the flash, a brightly lit object with glowing red eyes and a background immersed in pitch darkness are captured in the picture. Even more naive is an attempt to illuminate a football field or palace and park ensemble with a tiny flash built into a compact camera or mobile phone. High ISOs or a stable tripod are much more beneficial for night shots than a late-fire flash.
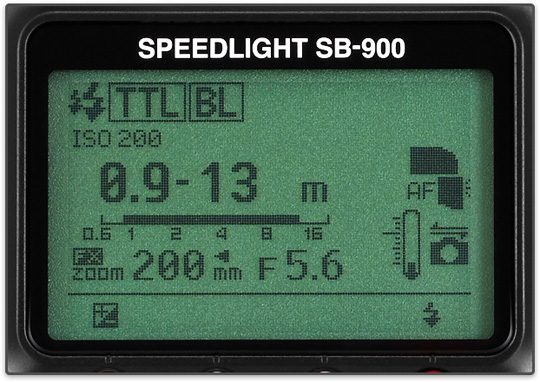
To compare the output power of different flash models, use flash guide number, i.e. the maximum distance in meters or feet to the subject that the flash is able to illuminate at f / 1 and ISO 100 flashes powered from the mains - up to a hundred. The guide number is not a very accurate parameter, since it strongly depends on the design of the diffuser and on the zoom parameters, and the manufacturers do not hesitate to give slightly overestimated characteristics in the documentation for the flashes.
Of course, the flash is not often used at full power, but it's nice when the flash brightness is sufficient with a margin.
Usually, the pulse power is automatically adjusted according to the lighting conditions, but manual mode can also be turned on. If the flash is controlled automatically, then immediately before the shutter is released, it gives a preliminary low-power pulse or a pre-flash, which is necessary to calculate the power of the main flash. The assessment is made directly through the lens using the camera's exposure meter, and therefore this method is called TTL (Through The Lens).
If you are lacking in the capabilities of the built-in flash, then on-camera flash units that are part of the system you are using should be preferred, be it Canon, Nikon or any other. Third-party flash units, even with the declared compatibility with your system, may not work completely correctly in automatic modes, which does not exclude, however, the possibility of manual control.
Two expositions
In flash photography, you are dealing with two independent exposures - one determined by the ambient light and the other by the flash pulsed light. Together they make up the overall exposure of the frame.
What kind of shooting parameters affect each of the exposures?
External exposure dictated by the brightness of the ambient light, controlled by shutter speed, aperture and ISO sensitivity. In automatic modes, exposure is controlled by exposure compensation (exposure compensation).
Flash exposure depends on the power of the pulse, the distance to the subject, the aperture value, and the ISO sensitivity. She does not depend from endurance is very important. The flash duration is approximately 1/1000 s, and therefore, no matter how long the shutter is open, the contribution of the flash to the overall exposure will not increase. Automatic flash output can be controlled with flash compensation (compensation), similar to exposure compensation.
The most important role in flash operation is played by ratio between flash exposure and external exposure. It is the ability to correctly dose the contribution of external and pulsed light that distinguishes the professional use of the flash from the amateur.
You can change the ratio of the two exposures by varying the shutter speed, flash output and distance to the subject. Everything. The ratio is independent of aperture or ISO as both aperture and ISO change both exposures at the same time. Meanwhile, shutter speed allows you to independently control external exposure, and flash output and distance also independently change flash exposure.
Flash compensation control logic differs slightly from system to system. On Canon cameras, Flash Compensation and Exposure Compensation work completely independently, controlling flash exposure or external exposure separately. With Nikon, things are a little more complicated: flash compensation also applies only to the flash, but exposure compensation controls general exposure, i.e. changes both the external exposure and the flash exposure at once. For example, if you set the flash compensation to -1 EV and the exposure compensation value to -0.3 EV, then the flash compensation will no longer be -1 EV, but -1.3 EV. However, you quickly get used to it.
Indoor flash photography
A forward facing camera flash is the worst light source imaginable. Firstly, a light source located so close to the optical axis of the lens deprives the photograph of volume, and secondly, the small size of the flash makes it practically a point source, giving extremely hard light without transitions and halftones. The face of a person shot in the forehead by the flash looks flat and lifeless, their eyes are either red or closed, and the background appears unnaturally dark, falling under the inverse square law.
You can remove the flash from the camera using either an extension cable or a remote sync system. However, the easiest and fastest way to modify the light from a camera flash is to bounce it off some bright surface. Of course, you need a tilt-head flash for this. By aiming the flash, for example, at a white ceiling, you radically change the nature of the lighting. Now it is no longer a flash, but the ceiling is a source of light, moreover, the light is soft, diffused and, moreover, falling in the most natural way from above.
The flash is aimed directly at the face.
Note the shadow on the wall.

The flash is aimed at the ceiling.
Photos taken with bounce flash look as if no flash was used. The scene acquires volume and depth, and the effect of the inverse square law is reduced due to a more uniform distribution of light.
The flash can be bounced off not only from the ceiling, but also from the wall, if the flash design allows it. You can use the wall to your side to get the side light, or you can aim the flash up and back by bouncing it off the ceiling and wall behind your back - this technique gives a particularly soft light.
Using walls to bounce flash light becomes especially important when the ceiling is too high and the flash power is simply not enough. When shooting outdoors, the ceiling is also rare. Basically, you can use any object light enough as a reflective surface. Even your friend in a white jersey is able to reflect the light of the flash, if, of course, he agrees to it.
If the light from the flash is aimed directly at the ceiling, the subject's eyes may be in shadow. In this case, you should use a white card (the so-called "business card") attached to the flash, which reflects some of the light towards the model, highlighting the shadows and adding glare to the eyes. Many flash models are supplied with such a card from the beginning, however, it is not difficult to make one yourself.
The only drawback of the reflected flash is the increased power consumption. Some of the light is absorbed by the ceiling or wall, and some is scattered to illuminate the interior. As a consequence, the pulse should be at least four times brighter than straight-line flash use. However, the benefits of bounce flash are no doubt worth changing batteries more often.
To make life easier for the flash and to speed up its recharge time, when shooting indoors, I try to use a fully open aperture, unless otherwise dictated by the need for a greater depth of field. I usually set ISO around 400 or 800, which on modern cameras gives a more or less bearable noise level. Using fast lenses with a maximum aperture of f / 1.8, or even f / 1.4, is of great help when there is a lack of ambient light.
A fill flash is a flash used to illuminate shadows while the subject is already illuminated by an external light source.

In this photo, the exposure is skyward and the face is illuminated by the flash. Without the flash, you would either have to overexpose the landscape or underexpose the portrait.
The most important use of fill flash is in bright sunlight. In the afternoon with fire? Why use a flash when it's light without it? The answer is simple: to soften the contrast.
Sunlight, especially in the middle of the day, is very harsh, and the flash allows you to expose the shot in the highlights, while lightening the shadows, which would have come out completely black without the flash. When the contrast is excessive, highlighting the shadows with a flash or reflector is vital. Otherwise, the faces of people in the photo will resemble masks. If you are shooting against the light, the backlight prevents your face from falling into darkness. The reflector is not always at hand, but the flash is built into almost every camera.
In addition, the flash adds flare to the subject's eyes for a more lively look.
Fill flash can also be useful indoors, for example, when a person is standing in front of a window. With a flash, you can capture a person, an interior, and a landscape outside the window.
Fill-flash is useful when shooting landscapes, as it makes it possible to show details in the shadows of the foreground, while keeping the light intact.


In many cases, the built-in flash of the camera is sufficient, but an additional on-camera flash is more powerful, recharges more quickly and does not consume the camera's battery.
The fill flash shouldn't be obvious. The image should look natural, which requires moderation and even delicacy in the handling of the flash from the photographer. As a general rule, you shouldn't use a flash at full power, or even at the power suggested by the camera's automation. I almost always use negative flash compensation values. This is usually -1 EV for humans and -1.7 EV for nature, although the offset can vary significantly depending on shooting conditions.
The main difficulty with using fill-flash on a sunny day is that the flash power may not be sufficient. it has to compete with extremely bright sunlight. The contribution of the flash to the overall exposure is often too small compared to external exposure.
If the flash is operating at its limit, the only way to change the ratio of the two exposures is to decrease the external exposure. How? Obviously, decreasing the aperture will not help us, because this way we simultaneously reduce the flash exposure along with the external exposure. The only way out is to shorten the shutter speed, but at the same time we will run into a significant limitation due to the synchronization delay.
Sync speed
Flash sync speed is the fastest shutter speed that can be used with flash photography.
Shutter speeds faster than your camera's sync speed cannot be used with flash. Why? The reason is especially the design of the mechanical focal plane shutter of SLR cameras.
The shutter consists of two shutters that can slide parallel to the plane of the sensor or film. Initially, the sensor is completely covered by the first curtain. When the shutter is released, the first (front) curtain is spring-loaded to open the sensor. Upon completion of the exposure, the matrix is closed by the second (rear) curtain. Then the closed curtains are synchronously returned to their original position.
The curtains slide very quickly, but still not instantaneously. If a fast shutter speed is required, the rear curtain starts moving before the front curtain finishes it. As a result, at high shutter speeds, the sensor is illuminated through the gap between the shutters, which runs along the frame. Those. different areas of the frame are exposed sequentially, not all at once.
If the flash fires during such a short shutter speed, then only part of the frame will be exposed, namely the area above which the slit formed by the shutter curtains was at the moment of the pulse.
Thus, sync speed is the fastest shutter speed at which the entire sensor area is open at the same time. The limiting factor here is the speed at which the shutter curtains move.
Obviously, the shorter the sync speed, the better. For professional SLR cameras, the flash sync speed is 1/250 s. For junior SLR cameras - 1 / 180-1 / 200 s. Digital compact cameras with electronic shutter can have sync speeds in the order of 1 / 500th of a second.
The importance of fast sync speeds becomes apparent when using fill-flash on sunny days. As strange as it may sound, it is precisely the short shutter speed that allows us to get a pulse of sufficient brightness from the flash.
To balance the sunlight, the flash power must be very high. How can you increase the contribution of the flash to the overall exposure if it is already operating at full power? It is pointless to increase ISO because in this way, you will increase the sensor's sensitivity not only to flash light, but also to external light, which will lead to overexposure. This will require decreasing the aperture, which will throw us back to the starting position, because the small aperture will again reduce general brightness.
You can open the aperture wider - this will increase the brightness of the flash, however, and the external exposure will be increased. To now subtract only external exposure should be reduced the shutter speed, but you cannot reduce it further than the sync speed, and your camera will not let you do this.
A camera with a faster sync speed allows the use of large apertures, which increases the brightness of the flash while maintaining correct external exposure. Those. a fast sync speed gives you the ability to bias the flash / external exposure ratio in favor of the flash.
Fast sync speeds increase the usable flash distance, while keeping the flash distance constant allows the flash to operate at lower power, which speeds recharges and extends battery life.
Sometimes the limitations imposed by the sync speed can be circumvented. For this there is a so-called. high speed sync(FP or HSS).
In high-speed sync mode, the flash emits a series of low-power pulses, thus becoming a kind of constant, rather than pulsed, light source. With constant light, you are free to use whatever shutter speed you want. This feature may seem very tempting, but in fact, the disadvantages of high-speed sync outweigh, in my opinion, its merits. First, the flash output of a high-speed sync flash decreases noticeably, thereby reducing the working distance. Secondly, power consumption increases dramatically, requiring frequent battery replacement. Thirdly, the recharge time is increased. The reason for this is that since only a narrow strip of the sensor is illuminated by the flash at a time during exposure, most of the flash light is wasted. In short, high-speed sync is not a bad thing, but it is just a surrogate for a full-fledged sync exposure.
Flash modes
Most cameras allow you to use flash in the following standard modes:
Fill flash
Flash effortlessly. In exposure metering modes P and A (Av) the minimum shutter speed is limited, i.e. the maximum shutter speed that the camera can choose when shooting with flash. This is usually 1/60 s, but some cameras allow you to independently adjust this parameter.
Red eye reduction
Most useless mode. After pressing the shutter, the flash makes several preliminary impulses designed to narrow the pupils of the subject, and only then the actual shooting takes place. Not only is this method of little help in the fight against red eyes (and more often it just makes the person blink and squint), but it also gives you a second delay before releasing the shutter, allowing you to miss the frame in a wonderful way.
Slow sync
Unlike conventional fill-flash, which is limited to a maximum shutter speed of 1 / 60s, slow sync leaves the shutter open for as long as the correct external exposure requires. As a result, not only the object is exposed, but also the background. Thus, slow sync allows you more flexibility in controlling the balance between flash exposure and external exposure.
Often it can take a very slow shutter speed to work out the background - up to a few seconds - in which case use a tripod.
In modes S (Tv) and M slow flash sync is the same as normal flash sync, as you can choose the shutter speed you want. During the day, when there is enough light, slow sync does not offer any advantage either.
Rear curtain sync
In fact, this is the same slow sync, providing a shutter speed sufficient to work out the background, but if, in the case of slow sync, the flash fires at the beginning of the exposure, i.e. immediately after the shutter opens, in rear-curtain sync, the flash waits for the exposure to end and fires just before the rear curtain closes the sensor. This is necessary for a beautiful display of moving objects. If the flash fires at the start of the exposure, you will get a frozen image of the subject and a blurred trail of movement in front of it, which looks silly. When synchronizing with the rear curtain, the motion trail is located behind the object, which looks more natural.
I almost always use this particular mode - slow sync on the rear curtain. If the shutter speed in exposure metering modes P or A is too long, I raise the ISO, or switch to S or M and set the shutter speed manually.
Flash camera modes
Various exposure metering modes ( P, S, A and M) suggest a slightly different approach to flash handling.
When I use fill flash on a sunny day, my camera is usually in P(Program auto). This allows me not to think about the timing exposure. If the camera's exposure meter rests on the sync speed, i.e. 1/250 s or 1/200 s, it automatically covers the aperture to a suitable value, protecting the frame from overexposure. In the mode A or Av(aperture priority) I would have to constantly monitor the shutter speed, and, once the sync speed is reached, I would have to reduce the aperture myself.
At dusk or indoors, when sync speed is not an issue and my primary concern is lack of light, I switch to A (Av) and open the aperture to the limit. When using slow sync, shutter speed is dictated by ISO settings. The usual synchronization does not allow the shutter speed to be slower than 1/60 s, which leads to underexposure of the background.
If the camera does not offer sufficient flexibility in Auto ISO setting, you can switch to shutter priority mode ( S or Tv) to manually select the minimum shutter speed, depending on the shooting conditions, so that you can hold the camera steadily. The diaphragm will then be fully open.
Mode P not very good for indoor flash photography, because its algorithm does not allow you to open the aperture to the limit, keeping it in the region of 4-5.6, which deprives you of the advantage of having fast lenses. It's better to use the mode A and the maximum aperture, and if a greater depth of field is required, reduce the aperture manually.
Fully manual mode M requires, in my opinion, excessive attention to the camera - you have to personally control the shutter speed, and aperture, and ISO. In addition, many cameras do not have direct ISO controls on the body, and navigating the menu every time the lighting changes slightly is tedious.
Using the mode M only justified when the lighting conditions remain unchanged, for example in a studio. In ordinary life, however, automatic modes provide greater flexibility and responsiveness.
How to avoid blinking?
An unpleasant feature of TTL metering of flash exposure is the evaluative pre-flash that fires before the shutter is released. The time interval between the preliminary and main flash pulses is small, but it is enough for a person with a good reaction to blink exactly by the time of the actual shooting. Pets are even more susceptible to this effect.
There are two ways to deal with closed eyes in pictures.
The first way is obvious, but a little laborious - switch the flash to manual mode, excluding preliminary impulses, and select the flash power empirically.
The second method is not available on all cameras. Some models allow you to assign a function to the Fn or AE-L / AF-L button. flash lock(Flash Lock). Flash lock works as follows: after pressing the button, the flash gives an estimated pulse, and the camera calculates the flash exposure and remembers its value; Now, when the shutter is released, the flash fires instantly, with a pre-calculated operating power and without any pre-flashes. As long as the shooting angle and distance to the subject do not change, the flash exposure may remain locked.
Color balance
The flash light has a color temperature of 5000-6000 K, i.e. close to daylight. As a consequence, during the day, the color balance of objects illuminated by the flash is in harmony with the color balance of the background illuminated by external light.
When shooting at sunset or indoors under incandescent lamps, the ambient light has a warm, yellow-orange tint. Under these conditions, the flash light appears to be significantly colder than the surrounding light. Depending on the white balance settings, you run the risk of getting either bluish-pale faces, or a bright orange background, or both at the same time.
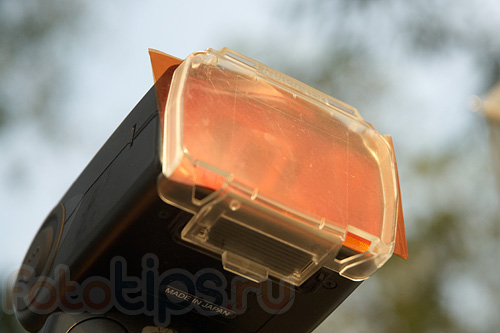
To match the color of the flash to the ambient light, use color filters over the diffuser. For some flash models, proprietary filters are available, but in the absence of them, it is not difficult to make the necessary color filter with your own hands from transparent plastic in a shade that matches your needs.
Thank you for the attention!
Vasily A.
Post scriptum
If the article turned out to be useful and informative for you, you can kindly support the project by contributing to its development. If you don't like the article, but you have thoughts on how to make it better, your criticism will be accepted with no less gratitude.
Please be aware that this article is subject to copyright. Reprinting and quoting are permissible provided there is a valid link to the source, and the text used should not be distorted or modified in any way.
How to work with flash in a reportage? Everything you need to know to shoot a beautiful report.
With the construction of the frame, everything is more or less clear - the laws of composition are the same for all genres, and the correct exposure can be set simply experimentally.
But with the flash, everything is a little more complicated - novice photographers do not understand what settings to set on the flash and in what mode to shoot.
This is exactly what we will talk about today - about working with a flash in reportage shooting.
Many aspiring photographers do not use flash at all in their reportage. Simply because they don't understand how to work with it. It's much easier to use only natural light.
I will say right away: a flash on a reportage is a necessary thing. Just like without a camera and optics, without a flash, a reportage photographer simply will not be able to shoot well.
In the post "How to choose a flash" we already wrote about the basics of choosing a flash, and in my last article "Equipment for a reportage photographer" I talked about accessories for a flash. If you are interested in learning about soft boxes, reflectors, boosters and strobe frames, you should go there.
Today we will talk specifically about the practical use of flash in a reportage.
On the set

So, you have arrived at the event, there is still half an hour before the event, there is time to "shoot".
First, let's take a look at the flash modes.
As a rule, two modes are used in a reportage:
TTL
Nikon's TTL system is called i-TTL, Canon's e-TTL.
The bottom line is the same - the camera itself sets the flash power, based on the analysis of the illumination of the frame. A virtually versatile mode suitable for most shooting situations.
Its main disadvantage is that if there is a lot of white or black in the frame, the flash may give out too weak or excessively strong puff. But this is not due to the operation of the flash, but to the complexity of the frame analysis.
This problem is solved by manually adjusting the TTL flash.
With experience, you will be able to anticipate situations in advance when it is necessary to manually change the flash output.
In the frame are 4 men in black tailcoats?
Feel free to set the flash power to one and a half steps less.

After all, the camera perceives the abundance of black in the frame as the "darkness" of the picture and gives a more powerful puff, completely highlighting the black tailcoats and terribly burning people's faces.
Likewise with a group of girls in white dresses or a man against a white wall in light clothes - a flash in TTL mode will give a weaker puff than usual, so you can safely "lift up" a half-step-power level

Manual mode
Working in manual mode requires a certain amount of experience in sequential shooting and a good sense of the frame.
Among my friends-reporters there are photographers who constantly shoot with flash in manual mode, but, in my opinion, it is worth working with a "handbrake" only in some situations.
First of all, the manual mode is convenient for shooting in "static" conditions. A typical example is conference photography: all subjects sit in the same places, practically motionless, lighting conditions do not change, and you can safely set the flash power in manual mode.

Very often, in manual mode, photographers work who hold the flash in their hand "on the hand" (more on that below). When the photographer holds the puff in his hand, the conditions are essentially the same, and you can safely work on the manual settings.
But for novice photographers, I would not recommend switching to manual on responsible shooting. The most important thing in a reportage is not to miss a good shot, and working in manual mode, without shooting experience, it is very easy to "screw up" a photo.
We figured out the shooting modes, but that's only half the battle. The most important thing with flash is to get beautiful lighting in the frame.
Why do you get such terribly boring, flat shots when you shoot with a point-and-shoot camera?
It's very simple - the flash works "head-on". That is, the light from the flash shines directly on the people in the frame, and as a result, there is no "light pattern" and a three-dimensional picture, but only poor flat light.
Therefore, the main rule of flash photography is work with reflected light.
Aim the flash at the ceiling or wall - let the light bounce off it and “fall” on the people in the frame.

Volumetric light is the key to a good reportage frame
You will immediately notice how much more interesting the frame becomes with the bounced light.
What to do when there is nothing to reflect?
There are two options:
1) Puff head-on, and then add life to the frame by processing (tools such as Shadow / Highlights help especially well). But this is a terrible way out of the situation, since the light will be flat anyway.
2) Shoot "on the go"... Many photographers use this technique: they put on a large soft-box or "burdock" on the flash, connect it to the camera with a sync cable and hold it on the outstretched hand from the top-left side. Thus, they themselves put the light on the subjects of the shooting.
This method has one main drawback - it really works well only for close-ups, there is not much point in lighting a group portrait in this way.
As I already wrote in the article about flash accessories, all "phong banks", burdocks and other reflectors with diffusers can help indoors, but you should definitely not expect a miracle from them.
We figured out the shooting in the room: if possible - we work with a flash on reflection, bad conditions - we hit it "point-blank" or take the flash in hand.
Now let's talk about what to do with puff on the street.
Outside
Many aspiring photographers believe that outdoor flash is not needed at all. This is not entirely true. Or rather, not at all. You need a flash, you just need to use it wisely.
For the most part, outdoor flash is used in two ways:
1)
To highlight shadows on the faces of people in the frame
On the street, "burdocks", diffusers and other attachments for the flash are practically useless. To highlight the shadows, you can safely peel them "on the forehead".
2) When shooting against the sun
Shooting against the sun is a classic outdoor flash technique.
Since today we are talking about working with flash in a reportage, it is imperative to talk about two things: radio synchronizers and color filters for flashes.
Radio synchronizers

We have already written in detail about what is and how they work in our previous articles.
Working with radio synchros is a different, higher professional level for a reportage photographer, which requires more shooting experience.
Therefore, at first, just get used to working with a flash on sequential shooting, “aim” at the manual control mode. And only then you should think about radio synchronizers.
As a rule, radio synchronization of flashes is used in a reportage in two cases:
1) When the photographer is holding the flash in his hand "on the hand".

For this kind of shooting, radio sync is essentially just an alternative to the flash-to-camera cable. Synchronization over the radio allows you to do without unnecessary wires, which is very convenient.
2) The second use case is setting the flash units on the set for better illumination of the frame.
A typical example is the filming of conferences or seminars.
The room is full of spectators and a speaker behind the podium. It's good when everything is in order with the lighting on the site - you can make a beautiful overall shot of both the speaker and the auditorium.

Great hall with good video light
If you work with a modern platform (for example, Digital October in Moscow), where all the amenities for a photographer's work are created, everything is fine, there is nothing to worry about.
But shooting in an ordinary hotel room, where most of the corporate conferences take place, the photographer is faced with one problem. The flash cannot illuminate the entire room evenly, and shooting without the flash is not possible in low light.
And if you want to take a beautiful photo of the speaker and the audience, you simply will not be able to achieve uniform illumination of the frame - the light from the flash is not enough to illuminate the speaker.
What do professional photographers do in such cases? Use radio synchronizers!

There was no additional stage lighting in the hall, so a flash with a radio synchronizer had to be installed between the speaker and the audience.
The photographer puts one shot with a radio synchronizer next to the speaker and can easily move around the auditorium - the speaker's illumination in the frame will remain unchanged.
An important point. Try to position the flash higher than the audience in the audience. You can put it on a table, closet, or ideally bring a flash stand with you.
If the flash is on the floor, the speaker and the audience will be illuminated from below, and this gives "demonic" shadows on the face and looks bad in the frame. Although if you are filming a conference of Satanists - everything is ok.
But it is not always necessary to put the light on the speaker. Very often, additional flashes are needed to simply highlight the very room where the event is taking place.
On a recent shoot, I specially made three very revealing shots for this article. We were filming a conference for a large company, and one of the sessions was held in a large, elongated room.
This is what the frame looks like if you shoot with one on-camera flash.

Terribly depressing. The corners of the room fall into darkness - a camera flash cannot illuminate the entire room.

Better, but now the right corner is noticeably shadowed.
By adding a third flash, we got the desired image.

Of course, in the shots for the client, stands and flashes are not visible - only a well-lit room.
Small digression... Many organizers often do not understand why a professional photographer is worth his money and what he gets it for. It is for such working moments.
The reporting professional is ready for any difficult situation and knows how to get good footage even in poor shooting conditions. He has all the necessary equipment to work in difficult shooting conditions and, most importantly, he knows how to use it.
The client does not know about this (he does not need to know about it), he just always gets high-quality and beautiful photos. This is the professionalism of the photographer.
But back to our topic.
Another option for using radio synchronization in a reportage is to organize a mobile studio.
Let's say you're filming a small party in a restaurant. Find a corner with a nice interior, put your flash on a stand, and set up a nice key light.

Let the flash with a synchronizer stand on the stand - after all, most of the time you will be shooting classic reportage shots.
But if the guests want to take beautiful staged photos, you will have all the conditions for this.
Of course, you can put the flash on the stand in the light trap mode, but then it will fire every time a guest takes a picture with his camera. Working with radio synchronizers, you have complete control over the filming process.
Color filters
Color filters for flash, or as they are also called color gels, are an indispensable thing for reportage photography.
In fact, these are simple colored films. You can buy specialized sets of ready-made flash gels, or you can simply buy several different sheets of color film and cut them into rectangles. The effect will be the same, but 5 times cheaper.
Typically, gels are used in two cases:
1) To approximate the color temperature of the flash light to that of the shooting room.
How does it work in practice?
Very simple. Let's say you are shooting in a hall where all the walls are yellow-orange, and the room is illuminated with yellowish lamps.

If you shoot without color filters on the flash, the entire foreground in the frame will be illuminated by a cooler light (from the flash), and the entire background will be yellow-orange.
The fact is that since the light from the flash is colder than the color temperature in the room, you will have to choose according to which light to set the white balance: either according to the cold light from the flash (then the backdrop will be excessively "warm") or according to the main lighting in the room (then people in the foreground will be bluish-cold).
Putting a color filter on the flash, we roughly equalize the light from the puff with the lighting in the hall. The only thing that remains for us to do is manually select the appropriate white balance, as a rule, this is a figure in the region of 3000 Kelvin.
2) The second case when gels are used is to create a color contrast between the foreground and background.
Let's say you are shooting in a boring (in terms of lighting) room, and you want to somehow "revive" the picture. A very effective technique is to make the foreground warm and the background cool.
Do not confuse this technique with the first point - there we are fighting with the problems of lighting a room that looks bad in the frame. By creating a contrast of "cold / warm", we do it consciously and only in those conditions that allow us to do it.
Typical example:
We filmed for Mercedes in one of their car dealerships. Nice, spacious room, but dull in terms of lighting.
Here's what we got by simply putting an orange color filter on the flash:

This is a test shot with me in the foreground and a car dealership in the background. How did this picture come about?
To begin with, we set the color temperature on the camera in the region of 2500-3000 K. Thus, the daylight became bluish-cold.
But then the foreground should have “turned blue”. That is why we used gel on the flash - on people in the frame, the flash shone with orange light, but thanks to the cold WB we get natural colors in the frame.
How does this apply to the story?
For example, let's say you are shooting during the day in a room with large windows. Excellent - we put the gel on the flash, set the "cold" BB and go ahead - the client will definitely be pleased with the "unusual" frames.
Gels are also often used to illuminate a model with colored light, but this is a separate conversation and not about reporting.
Another trick for using flash gels is to add bright, colorful colors to dull room lighting.
Six months ago, Anton Marakhovsky and I filmed one corporate event in a completely dull (in terms of lighting) room.

To somehow liven up the picture, we put one flash with a purple filter in the interior of the restaurant, and the second (with orange helium) on the music speaker by the stage.


These are just a few of the flash reporting techniques, the basics you need to know to work in events.
Another big and very interesting topic is artistic flash photography. But this is a story for a completely separate article.
A camera flash greatly increases the chance of getting a good picture. Therefore, almost all modern cameras assume its use. The difference is that some devices have a built-in flash, while others have an external one. The special feature of the built-in flash is that it is included in the price of the camera, does not take up separate space, and does not need to be installed and adjusted by yourself. But the good thing about an external flash is that it provides a more powerful glow, and also helps to avoid unnecessary glare, shadows and red-eye. If you are buying an amateur camera that you do not intend to use for professional purposes, then you may find it easier and more convenient to use the built-in flash. If you are seriously passionate about photography and even plan to make this craft your profession, don't hesitate to choose an external flash.
Finding the perfect shot is not an easy task. However, even if a good location and angle are chosen, the picture may not be perfect. Often the photographer is faced with the problem of insufficient lighting. This can make your photo look dark, blurry, and lackluster. The camera flash helps to solve the problem with light. Moreover, it can be both built-in and external (removable). Each type of flash has its own advantages and disadvantages. What are the differences between them, and what should you choose? Let's try to figure it out.
Built-in flash
 The simplest and most common device that helps to solve the problem of low light is the built-in flash. Most cameras produced to date are equipped with it. In this case, the built-in flash can be either built-in directly into the body of the camera, or sliding out of it.
Built-in flashes have a number of advantages. Firstly, you actually buy such a flash together with the camera, and you don't have to spend money on it separately. Plus, the flash will be with you in any situation. This is handy when you need to take a quick photo without wasting time setting up the flash.
In order to use the built-in flash, you do not need to know how to handle it, how to adjust and install it. You just take a picture without thinking, and the camera itself highlights the darkened areas. Plus, you won't lose the built-in flash, and you won't need a separate case to carry it.
Another advantage is that the built-in flash will always fire when the camera has sufficient battery power. It does not require separate batteries, and you will never find yourself without a flash at all due to the fact that it "runs out of battery". However, built-in flashes, along with the above advantages, also have some disadvantages. For example, they are low-power, so the benefits of having such a flash are sometimes very controversial.
With a built-in flash, the change in pulse occurs solely due to an increase in the duration of the glow, and not due to an increase in brightness. Also, the disadvantage of the built-in flash is that you cannot change the direction of illumination due to the fact that the flash does not separate from the body of the device. So, for example, you cannot highlight an object from the side.
External Flash
 External flash units are flash units that can be detached from the camera body. They are mounted on the machine using a special mount called a hot shoe. You can install an external flash only on those camera models that have this mount.
When choosing a flash unit, make sure that its manufacturer is the same as that of your camera. The fact is that companies that produce photographic equipment adapt flashes to work only on cameras of their own production. So you can hardly make a Nikon flash work correctly and fully on, say, a Canon camera, no matter how hard you try. An external flash provides the photographer with more convenience than a built-in flash.
First, you can change the direction and angle of the lighting. Secondly, you will be able to use the flash autonomously. This is useful if you need to, for example, illuminate an object from different angles.
Shooting in a dark room with built-in flash and external flash
 Shooting with the built-in flash is good when it comes to purely amateur photography, on the quality of which, in principle, nothing depends. If we are talking about pictures that must be flawless, then it is better to use an external flash. When shooting with the built-in flash, the light emitted may still be insufficient to create the desired effect.
However, when shooting in a dark room, unwanted highlights and shadows may appear. And you won't be able to adjust this, because the built-in flash can only "hit the forehead". Also, due to the non-adjustable position of the flash relative to the camera body, you will not be able to correct the red-eye effect.
An external flash, firstly, will not give such a sharp flare, even if the flash hits the forehead. Secondly, you can adjust the angle of the swivel head, which will reflect the light from the floor, ceiling and wall. Thus, with an external flash, you can avoid the appearance of highlights and shadows altogether.
You can get rid of the red-eye effect by moving the flash away from the camera.
Built-in and external flash for daytime shooting
 It would seem, why do you need a flash at all if you have to shoot on a sunny fine day? It turns out that it is still needed. For example, if you are shooting a portrait photo, then part of the face may be lit up and another part darkened. As a result, even if the model is stunningly beautiful, the photo can be quite unsightly.
The flash allows you to gently highlight details that remain in the shadows, resulting in an image that is even, without harsh shadows. In order to get rid of changes in lighting when shooting on a sunny day, both an external flash and a built-in flash are suitable, because the task is only to highlight some details, and not to reflect the light. Therefore, the ability to adjust the flash position does not play a decisive role.
6309 I am a young photographer! 0
Greetings, our young friends! Have you already figured out a little about the structure of your camera and the "scary" three whales of photography in our previous tutorials? Sure? Then let's move on! And today you will learn about such a simple and at the same time complex device like a photo flash.
Simple - because you do not know how to use the built-in flash in your camera - in automatic mode it was fired without your participation, and most likely you did not pay detailed attention to the results of such shooting. Truth? Not scary! Let's find out!
And the fact that there are external flashes that are mounted on the same "hot shoe" (remember this from our first lesson?) - have you seen them from professional photographers? - have you ever wondered. Yes? It's also not scary, it is for this knowledge that we will go with you now!
Built-in and external flash. About good and bad
It's time for us to deal with this device of your camera. - flash And we'll start with a simple one - with a built-in flash.
Everyone imagines what a built-in flash looks like, and even most use it for shooting.
Does it look like this:


or even like this:

Let's try to say what advantages it has:
- the built-in flash is primarily a source of illumination. If you really need to take a picture in a dark room, and you do not have a fast lens or the increased ISO gives terrible noise, then the built-in flash will help! (did not forget what ISO and aperture ratio are? If necessary, review lessons 2 and 3 again);
- when shooting with the built-in flash, the camera adjusts itself automatically, although it does it, frankly, badly;
- compactness is the biggest advantage of the built-in flash.
So why don't cool photographers use the built-in flash? (We'll tell you a secret that some professional cameras don't have a built-in flash at all!)
Yes, because it has more disadvantages than benefits:
- Due to the small area of the light source, the photograph produces strong highlights and deep shadows. Look at your photos with the built-in flash: these are faces with oily sheen on the face, with harsh shadows near the nose and under the chin, and some areas of the skin are overexposed. Like? not really!

- the flash cannot be rotated, its position cannot be changed. This is sometimes called a forehead flash. Together with the first drawback, a flat picture is obtained at close range. This is terrible!
- and those red eyes? Have you seen these vampires in your photos? And she is to blame for them, the built-in flash!
- the low power of the built-in flash leads to the fact that the light does not reach far-away objects and allows you to shoot only at close distances. And this, in turn, leads to a dark background and overexposed faces;

- oh, the battery was quickly discharged in the camera, and at the right time .... And again the fault of the built-in flash.
What to do? The answer is simple: you need to learn how to shoot using an external flash and be sure to buy it. Of course, there may be problems with the purchase: parents will have to spend money on this not cheap accessory.

Let's try to persuade them:
Dear Parents! If your child is interested in photography and you support him in this endeavor: your help is needed! You already have a camera, that's great. If you can install an external flash on it, please consider purchasing it. This is a very useful and interesting tool that will open up a new world of unexplored possibilities in photography for your child! It will be a wonderful gift, for example, for a birthday or New Year.
What kind of flash you need for your camera - consult the nearest photo store or ask us this question on the site's forum. :) Deal?
Important warning! Although you can put any flash on a camera with a standard hot shoe, even the old one from the parent Zenit, do not use them with modern devices! Older flash units supply too high a voltage to the hot shoe, which can damage the camera electronics. It is safe to use only modern flash units.
And now let's figure out why it is so necessary, this built-in flash.
A modern external flash is not just a battery-powered lamp, but a complex device that needs to be learned to work with. As with the built-in one, let's take a look at all the pros and cons (and they also exist) of an external flash. Let's start with the good:
- an external flash is much more powerful than a built-in one. With its help, you can shoot distant objects or fill large areas with light. The power of different models of external flashes differs - you will learn about this a little later in this lesson;
- External flashes recharge much faster, which means you can take the next shot faster and even use the continuous shooting mode (shutter click-click-click!);
- an external flash, if your camera allows it, it is not necessary to put it on a "hot" shoe - it can stand on a stand or be in your hand at a distance from the camera and illuminate the subject at the desired angle. This is a very exciting property!

- external flashes allow you to control almost all your parameters (power, viewing angle), select various modes of automatic operation (or turn it off altogether). For now, we will leave these possibilities for adults;
- most external flashes allow you to direct your head in the desired direction. This is one of its main advantages. A little later we will figure out why this is done;

- external flash - runs on its own batteries, so it will not drain the device's battery;
- and forget about red eyes! Down with the vampires without the aspen stake!
Wow, how many good things! And what of the shortcomings? Well, first of all, it's an expensive purchase. Secondly, this purchase requires space in your bag and is heavy. Third, you need to monitor the charge of not only the camera battery, but also the flash. This means that you will have to take one more charger on your trip. But all these disadvantages are forgotten when you see how great it is to shoot with an external flash!
Learning to use an external flash
The main difference between an external flash and a built-in flash is, as we have already learned, in a rotating head. Thanks to it, you can implement a technique that will significantly improve your photos: we are talking about the “flash-to-ceiling” technique.
The essence of the technique is simple: the flash is directed not "to the forehead", but to the ceiling. When it fires, light will first hit the ceiling, which acts as a giant diffuser. And only after that the soft, diffused light from the ceiling will fall on the person you are photographing.

Thus, we kill two birds with one stone. First, the light becomes diffused, without contrasting shadows. Secondly, it falls on the object not from the front, but from top to bottom: such lighting is more familiar to the eye, and better emphasizes the volume of objects.
The automation of modern flash units does not require any additional adjustments from you: just lift the flash head up and it will adjust all parameters accordingly. The only limitation of this technique is that it is applicable only where ... there is a ceiling!
Please note that if your ceiling is not white (they are black, brown) or it is very high, the technique may not work. When the ceiling is higher than usual, then the pulse calculated by the automatic flash unit may not be enough, and the frames will turn out to be dark. To avoid this, you can slightly raise the ISO on your camera.
Instead of using a ceiling, you can try using other surfaces to bounce the flash. For example, walls. It is important here that the reflective surface is white: this is the only way in the photo you will get color without distortion.
Many models have a built-in white reflective card. It can be used when you are shooting with a flash aimed at the ceiling, but you will also get the illumination in front, not just from the top. Why is this needed? When shooting a portrait, for example, this will even out shadows and give a sparkle in gases. Try it!

The set also includes diffusers: either built-in or removable. They can be used head-on when shooting a wide panorama.
Flash characteristics
Often when reading about flashes, you will see a name like "Guide Number". What is it? This is its main characteristic, this is the distance (in meters) at which a flash can give an impulse, and at the same time you will get a normal frame. The leading number of built-in flashes usually ranges from 10 ... 12, while external ones - from 20 to 60. And so you can compare the power of different flashes when buying. Once you buy a flash and start shooting, you will most likely forget about all the leading numbers.
The zoom range is also important. Advanced flash models can automatically change the angle of the light beam, depending on the focal length of your lens. The wider the focal length range that the flash can handle, the better. Of course, no one bothers you to shoot with lenses of other focal lengths, which are longer than the flash can provide. It's just that the angle of light given by the flash will be slightly different than the angle of view of the lens.
That's all you need to know and not scare you with numbers and calculations. You will find out later when you grow up.
Buying a flash
So, you and I managed to persuade your parents to buy you an external flash. It's so cool! To get it right, we've already learned a lot. But it is very easy for a beginner photographer to get confused in this information, and even more so for such "dummies" as your parents. Therefore, we will devote the final part of our lesson to tips for choosing a flash unit. What to look for first of all?
First. Compatible with your camera. Of course, to work effectively with a flash, it must be 100% compatible with the camera, i.e. if you have a Canon camera, it should say "for Canon". In this regard, buying a "native" flash will be a win-win option. Dear Parents! Yes, a branded flash is more expensive than its Chinese counterpart, but do not be afraid to overpay for it - you will receive excellent quality, reliability and warranty service.
Second. Swivel head. It will allow you to use the "flash to the ceiling" technique, creating high-quality, soft lighting in the pictures. We do not recommend buying flashes without a swivel head.
Third. Availability of automatic and manual settings. If the first point is clear - this will solve all the difficulties of a beginner photographer in working with flash, then manual settings are a reserve for studying in the future when you grow up.
The fourth is zoom and guide number. As you have already learned, the wider and larger these values are, the better.
And the last one is the possibilities of remote control. If your camera supports this function (you can find out about this from the instructions), then this characteristic will not be superfluous.
That's all you, our young photographers, need to know about flash. And now, yes - yes, homework! It promises to be interesting!
Homework:
1. Take a few pictures at home with the built-in flash. Let it be a portrait of your mother or grandmother: ask them to pose for you a little.
If you do not know how the flash turns on, read the instructions for your camera. Use your parents' help if necessary.
Now take a close look at your photos and find on them all the negative points that we talked about in this lesson. Found it? Show them to your parents. You have to buy an external one!
2. For those who already have an external flash.
First of all, pay attention to how to correctly insert the batteries into the flash, learn how to carefully close the fragile cover of the compartment where the batteries are and correctly put the flash on the camera. Learn to turn the flash head in different directions. To do this, carefully yourself, or with your parents, study the instructions and practice.
3. Now that the flash is on the camera, take the same shots as with the built-in flash, but with the flash head turned towards the ceiling. Happened? Wonderful! Find all the advantages of external flashes that we studied with you in the pictures and compare with the pictures taken with the built-in flash. See how different they are? And again show these pictures to your parents so that they understand that it was not in vain that they made this gift to you. :) Uraaaa! Happened!
4. Now remove the white bounce card of the external flash from the slot and take a couple more shots. Look closely at the photos and try to spot the difference with and without a map.
5. Try using a diffuser. Take photos with and without him: a panorama of a room, a portrait. Compare pictures. Understand what it is for.
Until the next lesson in our photography school, friends, where you will learn about the secrets of composition! All you need is photographic!
And your questions, do not forget, we are waiting on the site.


