4 8 653 0
Cakes with mastic look like real masterpieces of confectionery art. Such a dessert will delight guests at any holiday - a child's birthday, a wedding or a solid anniversary.
Many housewives prefer to order a mastic cake from a master than to make it on their own. And it’s completely in vain - even novice confectioners can make it at home, and children will be happy to help create jewelry.
The main thing is desire, and we will tell you about all the intricacies of the process.
You will need:
An absolutely smooth surface is covered with mastic, since all irregularities under a thin layer will be visible and can damage the aesthetic composition.
You can decorate almost any cake with thick cakes. However, desserts that are too light, for example, soufflés, are not suitable - they will simply bend under the weight of the mastic.

Take a knife and shape it into the desired shape. If it will be a figurine, shape it and smooth it with a knife. If the cake is round, process the sides.
Spread with cream, carefully smoothing over the surface, making it perfectly flat, without protrusions. Then put the cake in the refrigerator for 1 hour.
The surface with the cured cream must be treated again for perfect smoothness. It is recommended to use a hot knife for this. You can heat it by dipping it in boiling water. While running the blade parallel to the surface over the cold cream, smooth out any unevenness again.
Cream for mastic
The mastic can only be placed on a dry cake or cream that hardens well. In this case, you can grease the cakes with any cream.
Oil
An oil cream is most often prepared. You just need to beat a pack of butter (200 g) and the same amount of boiled condensed milk.
First, the butter is whipped separately to a white and creamy state. Then condensed milk at room temperature is added to it in portions.
To make the butter taste less pronounced, you can add half a bar of melted and slightly cooled dark chocolate to it.
Ganache
Made with cream and chocolate. Depending on the variety of the latter, 200 g of cream should be given:
- 200 g black;
- 300 g milk;
- 400 g white.
Bring the cream to a boil, remove from heat and add finely chopped chocolate. Stir with a spoon, and then beat with a mixer until smooth.
Cover the mass with foil so that no crust forms on it, and refrigerate for 12 hours. Before decorating the cake, the cream should stand at room temperature for about 3 hours.
It is applied to the cakes in two layers, each time leveled with a hot knife. You can cover with mastic after 2-3 hours, when the ganache is completely solidified.
Protein
Mix 4 egg whites, a pinch of salt and 200 g of sugar and place in a water bath. We warm up, not forgetting to stir, until the sugar is completely dissolved. Remove from heat and beat with a mixer until fluffy.
Separately, you need to beat 300 g of butter.
The butter is gradually added to the whites and beaten until smooth.
The mastic lays down on such a cream very evenly, and from the remnants you can make meringues or cover other baked goods.
How to cover the cake
First measure it in order to understand what the diameter of the layer you need, and make it a little larger.
Sprinkle the table with powder or starch and roll out mastic 2-4 mm thick on it. If you make it thinner, it will tear. Try to get an even, uniform canvas. Wrap the mastic on a rolling pin and transfer it to the cake (it is better to place it on a stand).
You can decorate the cake with mastic in another way: grease two sheets of polyethylene with vegetable oil. Place the mass between them and roll it out to the desired thickness. Remove one sheet, and with the help of the second, transfer the mastic to the cake and peel it off lightly.
Be careful to smooth out all wrinkles from the center to the sides. For convenience, you can use a pastry spatula. If not, press down on the mastic with your palms, avoiding fingerprints as they will leave fingerprints.
Make sure that the linen fits snugly against the cakes to the very base. The remainder can be cut off at the bottom edge with a knife or tucked under the cake.
Textured cover
The coating does not have to be smooth. You can decorate the cake in a very original way with embossed mastic.
For this purpose, special silicone mats with a three-dimensional pattern or embossed rolling pins are used. Some housewives advise taking tulle with a uniform texture.
When rolling, you must always move the rolling pin in one direction, for example, only away from you, so that the pattern turns out to be even, without distortion.
Ideas for decorating cakes with mastic for beginners
Prepare the multi-colored tortillas separately, and if you have some dough left, add food coloring to it and knead well.
ribbon
You can decorate a cake simply and beautifully with a ribbon of a contrasting color.
Roll out the mass and cut the tape out of it. Moisten one side with water or egg white and glue around the circumference of the cake. You can also make a special glue from a small amount of white mastic diluted with water, which is applied with a brush.
Transferring the strip to the cake is easier with the film - this will help smooth it out while gluing.
The ribbon can consist of several colors or have wavy edges, which are made with wheels. This decoration can be complemented with a small bow.
Openwork ribbon
You need a lace making rug, a sponge, a spatula and olive oil. In this case, the mastic should be less dense.
Lightly grease the rug with oil, spread a layer of mastic on top and stretch with a spatula. Now it should dry out a little.
Carefully remove the lace and transfer it to the sides of the cake, cutting off the excess.
Bow
Cut out two identical rectangular pieces. Connect the ends of each rectangle with each other and make folds at these edges with a knife. One rectangle is half a bow.
You can make a more effective option.
We roll out the dense mastic to 1 mm and cut eight ribbons 7 cm long. We put them side by side, in the middle we place some round object, for example, a marker, wrap the edges of the strips around it and glue them.
In the same way we prepare the core of the bow, only smaller.
Cut out 2-3 ribbons 0.5 cm thick and about 15 cm long, screw them onto a marker in the form of a spiral. We leave all these blanks to dry overnight.
We make the edges of the resulting loops sharp and place them in a circle, gluing them together. Place smaller loops on top. Glue the spirals on the sides of the bow.
It is better to fold this structure immediately on the finished cake.
Flowers
Cut out the mugs using glasses and glasses of different diameters. Place them on top of each other in descending order, placing them initially on a sheet of foil. Pull the foil together a little, shaping the shape of a blossoming bud. Bend some of the petals outward.
To make a rose, we need to make 7 identical circles. Roll out one edge with a ball (placing the mastic on the mat or sponge), making it slightly wavy.
On one side of a toothpick we sculpt a little mastic and wrap the first petal around it. The second and all subsequent ones should overlap the previous one from the middle. Leave to dry hanging or on a wire rack to maintain its beautiful shape.
For chamomile, we use the same technology as for the second version of the bow. Only the stripes should be larger, and their width - smaller. We bend the tapes around the tube, glue the edges and cut them.
Cut out a core from the yellow mastic and make a relief on it with gauze or a toothpick. Place the circle face down on the bottle cap. We glue the petals to the base, and place another core on top.
You can decorate the cake with small and easy-to-make flowers. First, we make a drop from a piece of mastic. We dust the pencil with a powder and make a hole with the pointed side on the blunt side of our droplet.
Cut into 6 identical petals with scissors. We flatten them with our fingers, give them an oval shape and bend them outward. Thin the edges with a small ball. If desired, the petals can be overlapped, and the middle can be tinted with a different color. Place a bead in the middle.
Or bend three petals slightly towards the middle, and bend the edges outward in the rest. For the middle, in this case, you need to make small stamens.
Leaves
With a mold or knife, you need to cut out leaves of any shape. Finish the edges with a ball.
With the blunt side of a knife or a toothpick, make a small depression in the middle and bend the leaf slightly inward. Then draw veins on them for a more natural look.
In rose leaves, the edges can be cut slightly with thin scissors, creating their characteristic notches.
Such leaves can be glued to the cake individually or placed on a wire during cooking, creating a whole twig.
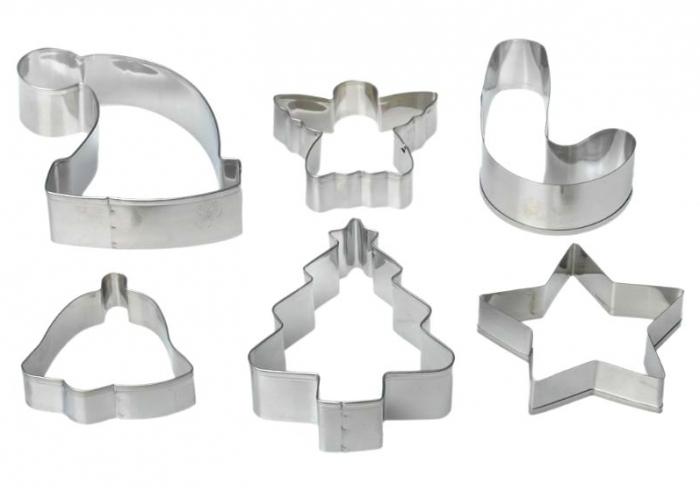
DIY figurines
One of the advantages of mastic is that magnificent figures are obtained from it - little men, angels, houses, animals, fish, clouds, trees. You can list it endlessly. But to do it will take a certain skill.
We advise you to stock up on instructions for making figures from plasticine - the mass is almost the same, the principle of operation is identical. The only difference is that the individual parts need to be glued, periodically use powder and place the products in the refrigerator if they become too soft.
Having mastered this process, you can create whole compositions when decorating children's and wedding cakes. Knowing the hobby of a man or a woman, you don't have to think long about how to decorate a cake with mastic. And by inviting children to create figurines, you will turn decorating pastries into a real holiday.
In this article I will try to outline in detail some of the features of making do-it-yourself mastic jewelry for beginners.
The basics
I am often asked about which mastic is better to sculpt figures. For a while I worked with both mastic bought in the store, made according to different recipes, and with sugar paste, but I always returned to my recipe, because I know how to tailor it to my needs.
Here I will not describe the process of making complex figures, but just try to tell in detail about how to make figures from mastic with your own hands. We will be making a person with relatively realistic body proportions and simple clothing. I am sure that everyone who follows these instructions will eventually learn how to create excellent figurines from mastic for children's cake, and that this knowledge will help in the future when moving to more complex working methods and making figurines with outstretched arms, as well as sculpting animals. from mastic.
If you have any questions about how to sculpt figurines from mastic, do not hesitate and ask them in the comments. I will try to answer them as quickly as possible, but still remember that I am a busy person, so do not expect immediate answers from me.
Remember that all this is not the ultimate truth, but just my own work, and you may have a different perspective on how to make figurines from cake mastic. Therefore, there are no clear rules here other than, maybe, the location of the parts, so adapt these tips to your needs and preferences.
Required materials and tools
In my work, I try to avoid unnecessary expensive tools and often use what I already have at home. I'll stick with that idea in this guide and try to keep the amount of sugar mastic figurines you need to a minimum.
To mold a simple mastic figure, you will need:
- Mastic of different colors for the manufacture of the following parts: pants, boots, sweaters, leather, hair;
- Several toothpicks. Note: Do not give small children mastic products containing toothpicks and be sure to warn everyone else that they are inside. You can replace them with hard pasta if you wish, in any case, let everyone know;
- A salt shaker with powder or corn syrup, whichever you prefer. If you don't have a salt shaker, you can use a spoon instead;
- Cutting board (as smooth as possible);
- Sharp, non-grooved knife;
- Small to medium ball-shaped mastic tool;
- Small pastry brush;
- Water in a small container;
- Food color gel black;
- The surface on which you will place the figurines, such as a cake or, if you make them in advance, a piece of styrofoam;
- Printed sketch of a person (see below).

Through trial and error, I realized that as I made figures from mastic, each next detail turned out to be larger than the previous one, and as a result, I ended up with disproportionate crafts from mastic. It was also difficult for me to make several figures of the same size if I did it by eye. For this reason, I began to use sketches similar to the one shown above and the figures for the mastic cake began to turn out for me in the right size. Just load this sketch into any graphic editor (I use Irfanview), set the desired height of the future figurine and print the sketch. This approach can also be used when decorating a cake to figure out how to position the figures and what sizes they should be.
The height of the figure described in this article is 6.3 cm.
Mastic is usually sticky, so to roll it out properly and avoid sticking to the board and fingers, sprinkle powdered sugar on your work surface and hands. Don't worry about the whole figurine being covered in powdered sugar; you can easily clean it up afterwards.
To glue the pieces of mastic, apply a thin layer of water on one of them with a brush and press them together. You may need to wiggle them a little to make them stick together, but usually just water is enough for this. Some people like to use a variety of store-bought or homemade food glue, but I usually don't bother with that. Water adheres well in almost all cases.
If you are working in a dry environment, you may need to soften your mastic to prevent cracking on the surface. To do this, it is enough to mix a small amount of water into the dough and warm it in your hands. Try to do everything quickly so that the mastic does not have time to dry out and begin to crack. In humid conditions, you may need to add additional powdered sugar to the mastic and lengthen the time between steps to keep the pieces from mixing.
Sculpt a man
Roll a long snake out of blue mastic. Make sure to match the thickness of the foot in the printed sketch. Don't worry about it getting too long - you can always cut off the excess.
Using the blunt side of the knife, make a notch in the middle of the snake and bend the mastic over it.

Place the folded snake over the sketch so that the folded edge is near the hips. Trim the bottom of the pants if necessary.

Flip the pants over and place them next to the sketch. Using the blunt part of the knife, make indentations at the knees. They will help prevent wrinkling when bending.

Gently rotate the knife several times to make the indentation wider. The back of your legs should look like this:

If you are going to decorate the cake right now, you can wet the back of your legs with water and place them on the edge of the cake. I made a figurine on polystyrene, so I'll tell you about the features of this case later.
Place a handful of powdered sugar on a surface and, gently bending your knees, place them on the edge of the styrofoam.

For greater stability of the figure, you can wet the gap between the pants and, carefully, so as not to damage the shape, press one leg against the other.
Make two even balls of black mastic a little larger than in the sketch (boots require more mastic than feet without them, unless of course you are making thin slippers). To get the same balls, you can use this tricky trick: make a thick sausage with flattened ends out of mastic and cut it in half.

Shape the balls into water droplets, but without the pointed end on top, and then press down lightly.

Break a toothpick in half and insert each one into your legs from the bottom. Leave the overhang just long enough to hold the boot.

Moisten the top and side of your boots with water (and the back if you're decorating the cake now) and slide them over the protruding parts of the toothpicks.

Stick a toothpick into the top of your legs so that it goes a little deep into the foam, but make sure that there is enough length on top to put your body on it.

Make a block of mastic that will be wider on one side. Its thickness may vary depending on the size of your figurine. I find that 1.3 cm is suitable for most situations.
Now put it on the sketch. The upper edge of the bar should reach the shoulders, respectively, the lower edge - to the legs. The block should be even near the shoulders, but you can make a depression in the opposite part of it if you want the sweater to overlap the pants a little.

With a little water added, slide your body onto a toothpick and press down on top so that it sticks to your feet.

Press down on the sides so that the edges are in line with your hips.

Roll out a long snake of the same color as the body from the mastic, put it on the sketch along the line of the hand and cut off the excess, without taking into account the length of the hand and fingers, which we will do next. From above, cut the snake along the vertical line of the body (at an acute angle).
If you need to make the arms that would be in a horizontal position, then the angle must be made more obtuse. An acute angle is needed so that the hands are close to the body, and the palms of the figure are on the knees, because in this case you will not need to make any internal supports or wait for the mastic to harden.

Do the same for the other hand, making sure they are the same length.

Mark the elbow bend with the blunt side of the knife.

Bend your arm along the line, and from the back with your fingertips, make the elbows. Unlike the knees, the elbows should be slightly pointed. If your arm starts to dangle after that, add a little water to the elbow and press lightly to glue the edges of the groove.

Use a ball-shaped tool to make small indentations in the base of the hands. They are needed so that the hands look like extensions of the arms, and not as if they were torn off the body and then glued back on.

Moisten the surface of the hand that will be adjacent to the body with water and press it against the torso and leg. While you are doing this, shape your shoulders as needed.

Do not place the bases of your hands close together, unless you intend to do folded hands. And this will most likely be difficult to do without bending them at an unnatural angle.
Then insert another toothpick into your torso from above, this will be the inner head support. Stick it deep enough so it doesn't pop out of your head on the other side.

Leave your hands to harden for a while before you start making the palms.
Roll out a drop-shaped ball of flesh-colored mastic and put it on the sketch. The ball should slightly cover the contours of the head in the sketch, but nothing more. In general, it is better to make the head a little smaller, since it can be enlarged later due to the hair.

Beginners tend to have a hard time getting a bare neck to work well, so it's best to replace it with a sweater collar. To do this, make a small, thick cylinder of mastic and slide it over a toothpick.

Make a small indentation in the front.

Take the head made in the previous steps and slide it over the toothpick at an angle. At the same time, the chin should look forward, otherwise the head will look like a ball.

Using a ball-shaped tool, make small holes for the eyes.


Roll out a very small piece of mastic into a drop-shaped ball and press it down with your fingers.

Then attach it to your head so that its sharp tip is flush with the brow ridges.


Use a toothpick to poke through the nostrils, while pulling it slightly to the side to indicate the shape of the nose.

The mouth can be made in two ways: draw or cut. You can cut out the mouth with the tip of a sharp knife.

When you're done, lightly press down on the lower half of the mouth with a knife to highlight the lower lip.

Shape the bottom of the lip with a toothpick and, using light pressure, cover the mouth of the figurine.

Use the sharp end of a toothpick to shape your upper lip down the middle, making a small notch.

The easiest way to mold your hands is to make them in the form of mittens. For those who want to make more realistic hand outlines, detailed instructions are given below.
Roll a hand-sized piece of mastic on a stencil and shape it into a drop as you did in the previous steps for the head and nose.

Then decide which hand you are making: right or left. Place your hand next to the piece of mastic to see which way you want your thumb to turn.

Make a wedge cut as shown in the photo below.

Swipe your knife to indicate your thumb.

Cut another small piece to shape your finger.

Make cuts to form the rest of the fingers.


Use your fingers to gently smooth sharp corners.

Use a ball-point tool to form light indentations in the palms.


Turning your hand and gently pressing it with your fingers, make a round wrist.

After adding some water to the leg and sleeve, insert your wrist there. Nails can be marked with the tip of a toothpick.


Make the other hand in the same way as above.
One of the easiest ways to make your hair is to mold it into a hat or pot. Take a piece of mastic and shape it like in the picture below. It should have a flat bottom and a slightly convex top.

While pressing down on the mastic with your thumb and forefinger, rotate it.

When shaping your hair, always check how it will look on your head to find the correct size. When you get the size you want, press your hair around the edges so it is thin and doesn't look like a helmet.

Dampen the inner surface of your hair with water and gently attach to your head.

To create curls, run a sharp knife along the edge of your hair a couple of times.

Long hair can be easily made by simply pressing the mastic on one side more than the other.

If you decide to sculpt the figurine's ears, make small cuts in the hair, as shown below.


Tear off a small piece of mastic and shape it as shown in the photo.

Use the sharp end of a toothpick to make two holes on the piece.

Connect these pits with a groove while pressing sideways to form an ear ridge. Make a hole at the bottom of the ear.

Continue to refine your form until you are happy with the result.
Place a wet brush on the outside of the center of the ear, which will be close to the head, and stick it in place.

Look at the figurine from multiple angles to make sure the ears are not sticking out.

Use black gel dye to paint the eyebrows and eyes.


The figurine is ready!


I hope now you do not have a question about how to make a figurine from cake mastic and surprise your family and friends with your masterpiece.
Not a single holiday goes by without a beautiful and tasty cake. And if you have to celebrate a child's birthday, then you want to make the cake very beautiful and colorful. Not so long ago, sugar pictures appeared that you can eat. Therefore, now it has become even easier to make a beautiful cake! I suggest you try to make such delicious beauty for your family and loved ones! The main "feature" of this cake is mastic with a sugar pattern, so this cake will delight children very much. At the same time, making mastic at home is not difficult at all, try it yourself!
Products:
For the test:
- Chicken egg - 6 pcs.;
- Sugar - 1.5 tbsp.;
- Flour - 1.5 tbsp.
For sour cream:
- Sour cream - 600 g;
- Powdered sugar to taste.
For butter cream:
- Butter - 100 g.;
- Boiled condensed milk - 100 g.
For impregnation:
- Canned cherry juice - 200 ml.
For filling:
- Canned cherries - 1 can (liter)
For mastic:
- Marshmallow - 200 g;
- Powdered sugar - 200-300 g;
- Food colors - 3 pcs.
For decoration:
- Sugar or waffle picture - 1 pc.
Cooking method:
| First of all, we will prepare an airy biscuit. For a biscuit, you need to beat the eggs with sugar very well so that the sugar is completely dissolved. And also so that all the yolk particles are also completely whipped and do not settle to the bottom. | |
| To do this, beat for about 12-15 minutes. |  |
| Then we begin to add flour, sifting it. |  |
| After that, you need to mix the flour well into the dough so that it is homogeneous. Mix gently with a spatula or whisk. You do not need to mix for a long time. |  |
| Pour the biscuit dough into a prepared form. The bottom and sides of the form must first be covered with parchment. The parchment on the sides should be a couple of centimeters higher than the form. This will allow the biscuit to rise above the mold. |  |
| Bake the sponge cake in the oven at 180 degrees for 40 minutes. Before time, we do not open the oven so that the biscuit is not an ass! The oven must be preheated. |  |
| Carefully remove the biscuit from the mold onto the wire rack. Remove the parchment paper. |  |
| We leave the biscuit for several hours so that it completely cools down and rests. You cannot put a biscuit on a board or plate, as it must breathe so that the bottom does not turn out wet. |  |
| Cut the biscuit horizontally into 3-4 parts (layers). |  |
| Cooking sour cream. We take sour cream from 20% fat. Add sugar or powdered sugar to sour cream. The cream will mix faster with powdered sugar and will be thicker. Add sugar or powder to taste, depending on how sweet the cream should be. |  |
| Mix the cream well until smooth. |  |
| We soak all the cakes with juice from cherries. Do not pour too much impregnation so that it does not flow out from under the mastic. |  |
| Put almost half of the cream and pitted cherries on the soaked cakes. |  |
| Pour on top again with a very small amount of cream. |  |
| Now we form the cake further. Cover with the second cake, again cream, cherries, cream and top cake. We send the cake to the refrigerator. |  |
| Now we make a cream to cover the cake. We take soft butter and condensed milk. |  |
| Beat butter with condensed milk until light, about 5 minutes. |  |
| Cover the cake evenly with the resulting cream. We smooth out the cream with a kitchen iron. |  |
| Now let's prepare some mastic to cover the cake with it. The marshmallows need to be melted a little to soften. Pour them into a mold and put them in the oven at 110 degrees for 10 minutes. Then we put them on a silicone mat, sprinkled with a large amount of powdered sugar, and knead the mastic. Knead it like dough so that it does not stick to your hands and is very elastic. |  |
| The mastic should be rolled out on a large surface, also sprinkled with a little powder. Roll out with a rolling pin. The diameter of the circle should be about half the diameter of the cake, this is to make it easier to put the mastic on the cake. We carefully transfer the mastic onto the cake. |  |
| We smooth it with our hands or with a kitchen iron to the cake, leveling and smoothing the sides. Cut off the excess mastic. |  |
| Separate the back film from the sugar picture. With a slightly wet palm, you need to wet the top of the cake and put the picture on it. |  |
| On the sides, I also hook parts cut from a sugar picture. I also fix the details with water. |  |
| I divide the remaining cut mastic into several pieces and paint each piece with different dyes. |  |
| I knead each piece of mastic and get a multi-colored and evenly colored mastic. With the help of a plunger, I squeeze out the necessary figures - these will be stars for me. |  |
| And finally, we hook them onto the cake and also glue them with water. |  |
So our birthday cake is ready!
Today almost everyone is familiar with the interesting word "mastic". Custom-made cakes, decorated specifically for her, have become very popular and in demand. With the help of this substance, wonderful desserts are made, but not simple, but real Masters who create this beauty, even the language does not dare to call simple confectioners. They are artists, they are real geniuses of their craft!
What is mastic?
Mastic gained wide popularity about ten years ago, but still remains at the peak of its popularity. It has no equal for one simple reason: it can be used to create almost any figures and flowers, it has a plastic-like consistency and tastes quite good. And our article will tell you how to make your own jewelry from mastic with your own hands. Step by step we will reveal to you all the secrets of this beautiful and delicious art.
Types of mastic
Mastic is different. A person who is just starting to work with it and who has looked, for example, in a specialized store, will find it very difficult to understand in all its diversity. And you will probably need detailed advice from the seller about the purpose for which this or that type of this sweet plasticine is needed. So what is it like?
- Marzipan.
- Chocolate.
- Floral. It is she who is most often used to create very complex works, for example, the finest rose petals. The thing is that it is flexible, rolls out easily and dries pretty quickly. These qualities are ideal for this purpose. Therefore, if in the near future you will be decorating a cake with mastic with your own hands, plus your skill already allows you to make complex elements, choose this particular type of cake.
- Honey.
- Sugar. This type of mastic is usually used for wrapping cakes.
- For modeling. It is good to make figures and simple decorations from such mastic.
- Homemade from marshmallows.
What mastic should a novice master choose?
Do-it-yourself molding of mastic jewelry for novice craftsmen can be quite a difficult task. Therefore, at first, for an easier and faster improvement of skills, you should opt for purchased, not homemade mastic. The first is more expensive. But to create flowers and figures, you need to gain a certain skill, which is much easier to do with purchased mastic.
You can find a wide variety of manufacturing firms in stores, and the price of the product will vary from this. Russian brands can be found for 250 rubles / kg, imported (Italy, Sweden) - 500 rubles / kg. A novice master would like to advise a mastic for modeling. It is versatile, suitable for wrapping a cake, and for creating figures and not very complex colors.
on one's own?
If there are no specialized pastry shops nearby, and you really want to master the art of decorating cakes with mastic, do not despair! You can make it yourself, and the base for this will be a chewy marshmallow soufflé. The most common brand of this dessert, which can be purchased in almost any grocery store, is Bon Pari.
Yes, yes, it is these viscous sweet sweets that we need. A couple of sachets with a total weight of 180 grams can be purchased for 110-120 rubles, and as a result, 900-1000 grams of finished mastic will turn out from this amount! As you can see, the savings are obvious. But this is not the only plus of homemade mastic. Many consider it tastier than a purchased competitor.
So, do you need to decorate the cake with mastic with your own hands? We will show you how to make this product yourself using marshmallows. Everything is very simple. It is necessary to put the soufflé in a bowl, melt it to a stringy state in the microwave, add 2 tablespoons of butter at room temperature, a couple of teaspoons of natural lemon juice to it and mix it all well. After that, you need to add one tablespoon of powdered sugar to the mass (stock up on it, you will need a total of 500-700 grams of this product) until it acquires the consistency of a batter. After that, the future mastic must be kneaded (like an ordinary dough). Homemade wonderful product is ready! You need to store such mastic in the same way as purchased - always in cellophane film and in the refrigerator.
What does a novice master need to have?
In order to create figures and decorations from mastic with your own hands, of course, you need to have the appropriate confectionery inventory. These are special kits, which are sometimes accompanied by a brochure describing what this or that tool is needed for.

Cutting is required to create petals, leaves. They can be metal or plastic.
To create a certain texture, for example, the natural lines of petals and leaves, so-called weiners are used. They are not cheap, but they will make your creations perfect and simply irresistible.
For convenient work, it would be nice to have a silicone mat and a rolling pin. And, of course, a novice cake decorator always needs to keep an appropriate educational book at hand, where it would be shown in great detail what this or that tool or cutting is needed for, how to use them to create a rose or violet, orchid or lily.
Secrets of working with mastic
Each pastry chef has their own unique and original ways of working. We will tell you about the basic and well-known ones. Knowing these secrets, you can even more easily create mastic jewelry with your own hands.
- To prevent the pre-cut mastic parts from drying out prematurely, cover them with plastic.
- If you want to add color to the mastic, use rather than dry ones. They already have a liquid texture, which makes it easier to color the product evenly.
- After your jewelry is ready and dry, to give it a richer color and shine, hold it for 10 seconds over a saucepan with steam.
- If you want to give your jewelry a glossy shine, arm yourself with a brush and a 1: 1 mixture of vodka and honey. Go over your masterpiece with a brush. Don't worry, the vodka smell will evaporate and the mastic will look smooth and shiny.
- If the mastic is dry, just send it to the microwave for 5-10 seconds, and then knead it thoroughly.
- In order not to overdo it with the color intensity when coloring the product, use a toothpick. With its help, it is very easy to mix in the dye in the smallest doses and control the process.
- The mastic can be cut with ordinary scissors. With their help, you can, for example, cut the cloves on a rose leaf.
DIY mastic jewelry. Master class using silicone molds
The easiest way to make a figurine out of mastic is using a silicone mold. With him, everything becomes easier and faster. Molds can be large or small. With their help, you can make 2d-decorations (in which only the "front" part is created) and 3d-figures. In the latter case, a complete product is obtained, beautiful from all sides.
Let's take a step-by-step look at how to make do-it-yourself mastic decorations using Let's create, for example, a multi-colored 2-d flower.
We will need:

The manufacturing process is very simple.

It's as simple as that, within 10 minutes and with the help of a silicone mold, you can make a wonderful one yourself.
Examples of decorating wedding cakes with mastic
Wedding cakes are one of the most popular ordered desserts in pastry shops. But they are usually not the most difficult ones. You just need to have the right inventory. And then any hostess can handle decorating a cake for a wedding. Don't believe me? See for yourself!
For example, very popular DIY mastic jewelry is pearls or beads.
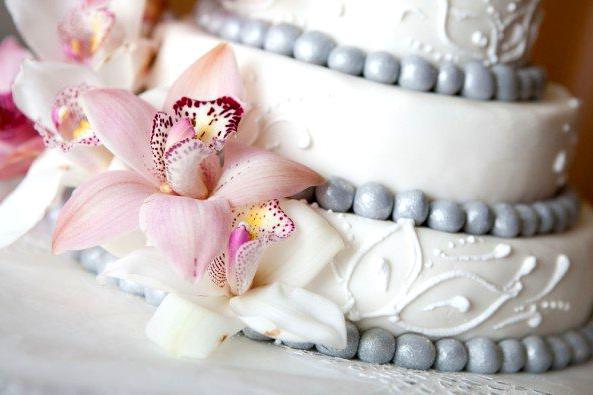
They can be made quickly and accurately using this silicone mold.
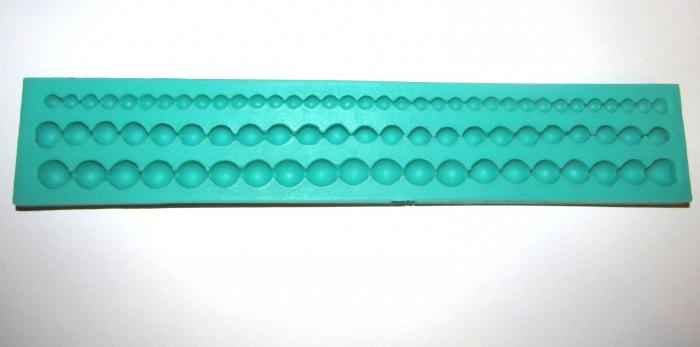
Then there will be no need to sit all evening for sculpting each ball. Smooth, the same size, one to one beads will surely delight guests! Such a performance of a wedding dessert will be simple, but very exquisite!
Decorations from mastic on a cake for a man
Is your soul mate having a holiday soon? Birthday or promotion? How to decorate a cake for a loved one? After all, he is a man! And they do not like butterflies and flowers, "shushi-pusi" is not for them. Strong sex! And that's it! In this case, you can buy the corresponding "male" silicone mold in the form of a car or a phone (a wad of money will also come in handy). And do-it-yourself mastic decorations for your husband, more precisely, for a gift cake, can be made very quickly! You will be able to please and surprise your soul mate not only with the most delicious biscuit, but also with your resourcefulness. Your beloved will surely tell you: "Thank you, dear!"
DIY mastic jewelry. There are gifts for boys too!
Boys are the same little men! And they are not far from the dads in desires. They are also perfect for cake decorations in the form of cars, pistols and other joys. You can decorate your dessert with cookie, candy, candy or chocolate shapes. If your little son is a fan of some cartoon character, then you can try to find and purchase a mold with a figurine of his idol.

Happiness and delight in the eyes of your child are guaranteed to you 100%!
Decorations from mastic on a cake for a girl
It will be easier for a daughter or niece to decorate than for a boy. Molds will help here with a variety of colors, and with bows, and the figurines in the form of sweets already mentioned in the article, and butterflies, and dolls, and much more.
A special chic and long-awaited gift is a cake for a girl made in the shape of a doll. We will give an example of making such a decoration from mastic with our own hands (with a photo) for a girl.

For this, the most ordinary Barbie can be used. In this case, the biscuit is baked in the shape of a dome-skirt, the doll's legs are inserted into it, and then with the help of mastic they decorate both its upper part and the resulting skirt. In this case, mastic is perfect, since it can be easily cut with the most ordinary knife or scissors into ribbons, circles, linens and (it would be a fantasy!) To build the most beautiful dress from these pieces!
As you can see, it is not at all necessary to order a mastic cake in special pastry shops. It is quite possible to try to master the simplest techniques of this art yourself. And the main assistants for a novice master will be silicone molds. There are a huge number of them on sale with a wide variety of ideas - from floral to New Year's, from men to women.
Try and create! Making mastic decorations with your own hands for a birthday or any other holiday is a sheer pleasure. Your family will definitely appreciate your efforts and will thank you with admiration from the bottom of their hearts!
No celebration of an important event can be considered complete without an exquisite cake on the table at the end. Great attention has always been paid to the creation of this enchanting festive accent. Recently, a new trend in the confectionery business has become widespread - decorating cakes with mastic... It looks like this, without exaggeration, a work of art is simply amazing (photo).
A variety of mastics are now sold ready-made - buy and decorate. But you can always create a beautiful cake coating at home, which is in no way inferior to factory counterparts. You just need to know what and how this "outfit" is prepared.
There are several recipes for mastics: milk, with gelatin, with marshmallows. Now we will tell you in detail how to cook each of them at home, and how to decorate the cake with mastic, created with our own hands.

In principle, there are no particular difficulties in decorating a cake with a mastic mass. It will not be possible to cover it only with soufflé or jelly cake (they have too delicate consistency). The rest need only be properly pre-processed:
- Carefully level the surface of the cake - remove all bumps and bumps. Spread with cream to remove crumbs. Smear again - to align. And finally, walk over the cream with a hot knife - to create the perfect smoothness.
- A few words about the cream. To prevent the mastic from flowing, the cream must be oily (custard, ganache, with condensed milk and others are suitable). You need to avoid sour cream, yoghurt and creamy.
- Roll the prepared mass into a layer, like a regular dough, to a thickness of 0.5 cm. With its size, the layer should cover the entire cake along with the sides. Use starch instead of flour for dusting.
- Then quickly cover the cake with this layer, smooth the surface and carefully trim off the excess. Everything is ready for the final decoration - by the way, it will hide possible flaws.
Dairy decoration

Very few ingredients are needed to prepare this type of cake coating:
- 150 g each of milk powder and powdered sugar;
- 100 g of condensed milk (not boiled);
- 2 tsp lemon juice.
The specified amount of products is enough to completely cover one cake (photo). The milky white coating looks very delicate and sophisticated. And this mastic is prepared like this:
- Powdered sugar is sifted twice into the bowl where the milk "blanket" will be created. Then milk powder is added to it.
- After that, lemon juice is introduced. The creation of milk mastic comes to the end with condensed milk. The mass is well mixed - that's all there is to it.
Mastic can be prepared in advance - carefully wrapped in cling film, it can be easily stored in the refrigerator for up to 10 days. If you want to change the color, you just need to add food coloring to the mass. This mastic is also suitable for covering a cake and making decorations.
On gelatin

This variety has not worked very well as a coating for the entire cake, as it is not elastic enough. But it is perfect for making figurines and ornaments: pliable, like plasticine, and quickly hardens. To prepare it you need:
- gelatin - 1 tsp;
- vegetable oil - ½ tsp;
- icing sugar - 20 tbsp. l .;
- water - 3 tbsp. l .;
- lemon juice - 1 tsp
Manufacturing:
- Pour gelatin, as usual, with water and leave to swell. Then dissolve it over low heat and set aside to cool.
- Pour ½ of the icing sugar on the table (heap), make a depression in it and pour lemon juice, vegetable oil and gelatin into it. Start kneading the "dough", gradually adding the remaining icing sugar.
- Knead until the mass stops sticking to your hands. Then wrap it in plastic wrap.
- To form jewelry, you need to pinch off small pieces from the total mass - the mastic hardens quickly. Patterns, figures, flowers and so on are especially good from it (photo).
From marshmallows

Confectioners consider such mastic to be simply ideal: it does not stick to hands, easily rolls out, takes any shape and is evenly colored. Only you need to take monochromatic marshmallows, otherwise they will have to be divided by color.
For the chocolate mastic that we propose to prepare, the color of the marshmallows does not matter. Chocolate gives it a pleasant and rich brown color, and the cake decorated with it looks extremely appetizing (photo). To make a chocolate cake decoration at home, just stock up on:
- marshmallows (marshmallows) - 90 g;
- dark chocolate - 100 g;
- icing sugar - from 90 to 120 g;
- 30% cream - 40 g;
- butter - 1 tbsp. l .;
- cognac - 2 tbsp. l.
Manufacturing process:
- Set the saucepan over low heat, place the broken chocolate in it and melt it. After that, add marshmallows and, stirring, continue heating.
- When half of the marshmallows are melted, add butter, cream and brandy. Constantly stirring the mass, wait for its complete homogeneity.
- Remove the saucepan and heat and start a little, stirring all the time, add the powdered sugar. When the spoon ceases to cope, continue kneading the mass with your hands. The moment when the mastic begins to resemble a warm elastic and tight dough is a signal that there is already enough powdered sugar.
- You need to store the finished mass in a sealed form in the refrigerator, and slightly warm it up in the microwave before use. The mastic is rolled out very simply: between two sheets of baking paper.
Rosettes

Of course, it is simply impossible to talk about all the possible types of cake decorations. Let's dwell on the most versatile and beautiful - roses. They are done very simply:
- You need to roll out a layer of mastic and cut 4 circles out of it with a glass. Lay them on the table one on top of the other (overlap).
- Sculpt a small sausage separately - this will be the core of the flower. Place the "pistil" on the first "petal" and start rolling a bud roll from it. At the same time, slightly press down the bottom of the flower.
- When the bud is ready, you need to take it in your hands and slightly bend the petals, giving the shape of a living flower.
This way you can form a whole bouquet. Put the finished flowers in the refrigerator. They should be stored in a hermetically sealed container and placed on the cake only before serving (photo).
Video of making and decorating a cake with mastic


