Users who have at least once reinstalled the Windows operating system on their own have a question about which drivers need to be installed after that for the normal operation of all devices connected to the computer. This article will show you how to check the drivers on Windows 10. The instructions below will work for other versions of the system as well.
How to check the driver version
If you try to figure it out, it becomes clear that the computer must have drivers for all devices, both external (mouse, keyboard, joystick) and built-in (video card, network adapter, processor). Developers from Microsoft are doing their best to make life easier for users, with each update significantly expanding the internal database of drivers, but sometimes you still have to look for software and manually install it. Now four ways will be presented on how to check drivers on Windows 7, 8 and 10.
Method 1: official websites of manufacturers
The most reliable way to get the latest software for your devices is to download them directly from the manufacturer's website. But it should be understood that these manipulations are of paramount importance and will not provide all devices with drivers. But this is the essence, first you need to update the main components: motherboard, processor and video card. But first you need to find out the name and model.
Find out the model of the motherboard
To find out the manufacturer and model of the motherboard, you need to follow these steps:
- Open the Run window. To do this, press the Win + R buttons on the keyboard.
- In the window that appears, enter and execute it by clicking "OK".
- The "Command Prompt" window will appear. In it, write two commands in turn: wmic baseboard get Manufacturer and wmic baseboard get product.
- In the output for the first command, the manufacturer of the board will be indicated, for the second, its model.
Remember the name, you will need it to find the appropriate driver.
Find out the model of the video card and processor
You can find out the manufacturer and model of the video chip and processor in almost the same way:
- Open the Run window.
- Enter the dxdiag command in it.
- Click OK.
- In the window that appears, go to the "Display" tab.
- In the "Device" category, next to the lines "Name", "Manufacturer" and "Type of microcircuits", the corresponding information regarding the computer processor will be indicated.
- Go to the "Converter" tab.
- By analogy with the processor, all the necessary information about the video card will not be indicated.

Record all the information you get to search for the appropriate drivers for your computer components.
We are looking for drivers
Knowing the names of all devices for which drivers need to be installed, you can easily find the software for them directly.
- Go to any search engine.
- Write down the name and model of the component that needs updating.
- Go to the manufacturer's official website.
- In the site interface, find the search bar and run a query with the name of the device.
- Find the appropriate driver in the output.
- Download it to your computer.
- Install.
Just like that, you can update the main components of your computer. Now you know the first way to check your computer drivers, but it is far from the last.
Method 2: programs to update drivers

The previous method, how to check drivers, may seem quite complicated to you, and this is partly true. For an ordinary user, it will be much easier to use special programs that automatically scan the computer for outdated versions of software and offer appropriate updates for them. One of these programs is Driver Booster.
- Run the program.
- Click the Scan button.
- Wait for this process to complete.
- As a result, the devices that need updating will be displayed.
- If you want to install new versions of individual software, then click Install next to the corresponding component.
- If you decide to update all components at once, click the corresponding button on the top panel of the program.
Immediately after that, the download process will start, and then the installation of drivers for computer devices. During this step, the computer may restart several times.
Method 3: online services
Someone fundamentally does not want to install additional software on a computer, in this case there is a great way how to check drivers on Windows 10 and in general all other OS versions, which implies the use of online services.
- Open the "Device Manager" and look in it for the identifier of the device for which you want to download the driver.
- Go to an online service to find drivers by their ID.
- On the main page, enter the identifier in the search box and click the "Find" button.
- The output will display a list of all drivers suitable for your hardware.
- Select the one you like and click the "Download" button.
- Install.
As you can see, this is perhaps the fastest way to check the drivers on your computer, but it can not help everyone.
Method 4: updating by standard means of the operating system
Is an update required, how can I check the drivers? You can also update them without using additional software through the Device Manager utility.
- In the search for the system, enter "Device Manager" and run the corresponding program from the results.
- In the list of all devices, select the one you want to update.
- Click on it with the right mouse button.
- Select Update Drivers from the menu.
- In the new window, click the "Update automatically" button.

After that, the computer will independently try to find and install new versions of drivers for the component. This method is not always effective, since the search for software goes through the internal Microsoft database.
So you have a recurring blue screen of death, and like many BSoDs, it's because a bad driver is to blame. However, the screen does not give you the correct information, either because it does not contain any drivers at all, or because it lists a system driver that is acting as false.
Driver Verifier is a free utility included with all versions of Windows from Windows XP. It literally checks each of the drivers on your PC until it encounters the problem that caused the problem, intentionally creating the same blue screen, but then writing the information to a log file, helping you pinpoint the problem.
Run driver driver
If you use the same blue screen frequently and would like to get active and fix it, here's how to use Driver Verifier.
- Click the button Start
- Click " Execute "...
- Enter CMD and press Enter.
- In the new window enter verifier and press Enter.

On Windows Vista and 7:
- Click the button Start
- Enter CMD in the box and click Enter.
- In the new window enter verifier and press Enter.

On Windows 8 and 8.1:
- Press the key Windows + X
- Click " Command line "(" Administrator ") (Windows PowerShell (Admin) in Windows 8.1)
- In the new window enter verifier and press Enter.
All Windows versions:
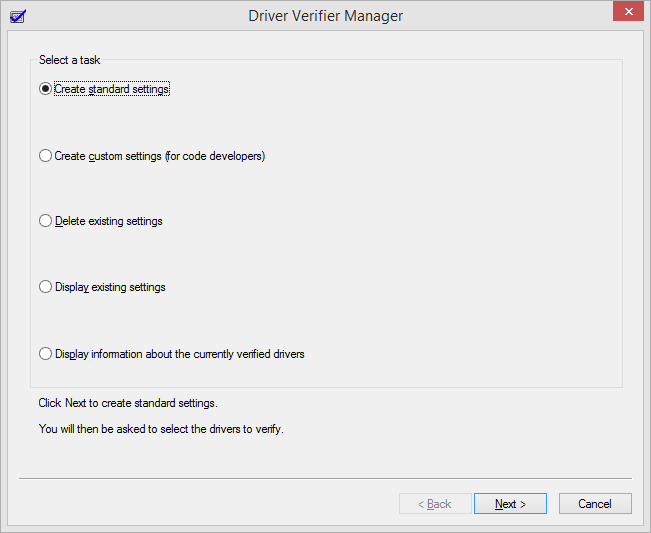
- Make sure to select customizing custom settings (for code developers) .
- Click " Further" .
- Select " Select custom settings "from the full list .
- Click " Further" .
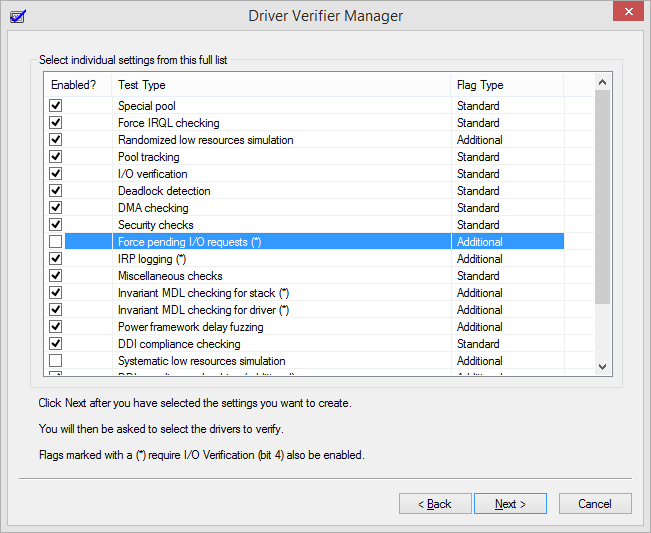
- Deselect low resource system modeling and standby I / O requests... (These two are causing unnecessary workload on your PC.) Make sure everything else is selected.
- Double click " Further" .
- Select " Select driver names "in the list .
- Click " Further" .
- Select all drivers on this screen except those that say Microsoft Corporation under the Supplier. It is very unlikely that a Microsoft driver is causing this issue.
- Click " Ready" .
Note. If you are unable to complete the above steps because the blue screen continues to occur, please try downloading to first.
At this point, you must restart your computer. Then try calling BSoD again by doing what you did before. Windows puts an extra burden on your drivers to help you. If you are unable to reproduce the BSoD, try starting your computer overnight. As soon as BSoD reappears, restart your computer and read the Minidump file.

Reading a dump file
Driver Verifier will start up, run blue screen and write a log file. This log file is located at C: \ Windows \ Minidump \. Read it and you will see which driver is causing this problem. Try searching for the driver name to see which piece of hardware your PC is using.
So how do you read it? You need a debugging tool that you can download from Microsoft.
A . Download the SDK, install it, select Debug Tools, and deselect everything else.
Note that the debugging tools for previous versions of Windows are no longer available; you will have to send the dump file to a Microsoft technician for analysis.

After installing it, find it on the startup screen. It's called windbg (x64). Run it.
- Click " File", then " Open crash " .
- Switch to C: \ Windows \ Minidump \ and open the .dmp file contained inside.
- Look at the bottom of the resulting file where the line says “ Probably caused by "... This is a good indication of which driver is causing the problem.
Fix driver
Update the driver associated with this hardware:
- Click the button Start
- Click on Control Panel
- Click " Switch to classic view "
- Double click The system
- Go to the "Equipment" tab
- Click on Device Manager
- Click " Update Driver ".
On Windows Vista and 7:
- Click the button Start
- Click on Control Panel
- Double click Device Manager
- Find the device causing the problem
- Right click on it
- Click " Update Driver ".

On Windows 8 and 8.1:
- Press the key Windows + X
- Click on Control Panel
- View by small icons
- Click on Device Manager
- Find the device causing the problem
- Right click on it
- Click " Update Driver ".
Or use our app not to be confused with Driver Verifier. Driver Reviver automatically updates all existing drivers on your PC and is especially good for updating ineffective drivers like this one to the latest and greatest version.
After fixing the driver problem, you will want to disable Driver Verifier.
Disable driver verifier
After you are done using Driver Verifier, you will want to disable it, as it is quite tough on your PC while it is running.
On all Windows versions:
- Launch Driver Verifier again using the steps above.
- Select " Delete existing settings " .
- Click " Ready" .
- Restart your computer again.

Please keep this article bookmarked for future reference so that whenever you have a blue screen, you can fix the problem. Also, check out our interactive and enter your bug name for more tips on how to tackle your specific blue screen of death. Good luck!
We warn you that any experiments with drivers are dangerous and can damage the system. It is better to make a backup of the system in advance and then not cross your fingers, removing another suspicious driver from Windows.
And as soon as they do not scold Windows from Microsoft, calling the poor thing at the same time nerdy, and buggy and even unstable. Only now no one is in a hurry to give it up, and in general it is unlikely that they will ever give it up. Therefore, instead of scolding poor developers and throwing a meaningless flame, it would be good to figure out: why, in fact, is the system buggy? Let me tell you a little secret. In the notorious screens of death and precarious work Windows in the vast majority of cases, third-party drivers are to blame, and the operating system itself has absolutely nothing to do with it. Now we will tell you how to find such drivers and remove them from the system.
Defects in driver design can be of a very different nature: from falling out into the blue screen of death ( BSOD- Blue Screen of Death) and to the slowdown of the computer and the strange behavior of some applications that are completely unrelated to the driver.
The Blue Screen of Death is remarkable (without any irony!) In that it clearly signals the presence of a serious problem and gives a tip from where to dig. Often (but not always) the name of the "guilty" driver is displayed directly in the upper right corner of the blue screen of death. However, it may not be there, or, even worse, the name of a completely extraneous driver may be there.
So, for example, one fairly common driver from a video card Matrox G450 tends to destroy the underlying structures of the graphics subsystem Windows 2000 , as a result of which the BSOD displays the name of the system driver win32k.sys, which implements a significant part of the USER and GDI functions and which, of course, has nothing to do with it. So the interpretation of the testimony of the blue screen of death is magic, and intuition, and science, and art - a little bit of everything.
In addition to driver defects, blue screens of death can also be caused by hardware failures, for example, an overclocked processor, faulty RAM, a crooked hard disk controller, a PCI card not fully inserted into the slot, non-contact in one of the connectors, a bad power supply, swollen electrolytic capacitor on motherboard. And the latter are sulking for various reasons: due to overheating from a nearby processor, a lack of ceramic capacitors "unsuitable" by the manufacturer (as a result of which the RF component goes through the electrolyte and heats it up strongly), finally, due to the leakage of key transistors in the node stabilizer. Therefore, before chopping wood, you need to make sure that the iron on which we are sitting is completely intact. How can this be done?
Showdown with iron
Blue screens of death caused by hardware failures are spontaneous in nature, appearing unpredictably and independently of any specific user actions. Applications are also starting to generate critical errors in many different places, and the error codes, addresses, and other information generated by the system will be different in all cases! By the way, drivers that handle asynchronous requests from I / O devices such as wireless networks behave in much the same way. Blue screens of death caused by defective drivers, as a rule, occur when performing a certain set of actions and contain more or less permanent information.
To remove all suspicions from the hardware, it is enough to connect another hard drive to the system, install a virgin Windows and work on it for a while. If the blue screens of death do not disappear, then, indeed, the iron is to blame and it's time to change it. The search for defective components is a topic for a separate conversation, which we will leave for the next time, but for now, rolling up our sleeves, we will come to grips with these insidious drivers.
Firewood without a certificate directly into the firebox
The entire set of tools required for driver development ( DDK- Driver Development Kit), Microsoft distributes free of charge along with accompanying documentation. Drivers, sometimes very buggy and unstable.
To prevent such chaos from happening, Microsoft back in ancient times, it introduced a procedure for certifying drivers for compliance with the requirements imposed on them, after which a digital signature is issued to the driver. Or ... not issued, and he was sent for revision. And although certification is just a formal procedure that does not guarantee the absence of fatal errors and development defects, it still filters out some of the frankly "pioneer" drivers.
Ideally, only digitally signed drivers should be kept on the system. And while a digital signature is not an insurance policy, its presence already indicates a certain level of development culture. Drivers without a digital signature are worse than a cat with a cat in a bag, and should be disposed of whenever possible (especially since many of them are malicious programs installed by rootkits or aggressive defense mechanisms that penetrate deeply into the system and cause its instability ). In short, it will not breed demagoguery, but we will try to answer one simple question: how to make a list of drivers without a digital signature?
The utility will help us with this. sigverif.exe, included in the standard delivery set of the operating system and located in the WINNT \ System32 directory. We launch it and see a dialog box. Press the "Advanced" button and in the "Search" tab set up the selection criteria by moving the radio button from the "Notify about unsigned system files" position (where it stagnated by default) to the "Search for other files not signed with a digital signature" position. After that, in the "Search parameters" open the box "Search for files of the following type" and select "* .sys", and below we indicate the folder for the search "C: \ WINNT", be sure to check the box "Including subfolders".
Actually, strictly speaking, drivers are not required to have the sys extension and are not always limited to the WINNT directory, being in the directories of "their" applications, and some applications even store drivers ... inside themselves! Immediately after starting (or at any other time) they save the file to disk in the current or temporary directory, load the driver into memory and ... immediately delete it from the disk! This is done not only by malicious viruses, but also by quite respectable programs, like some utilities of the famous Windows explorer Mark Russinovich.
Therefore, for the purity of the experiment, it will not hurt us at all to get a list of drivers currently in memory and compare them with the drivers located on the disk. The words "at the moment" are key, since the loading / unloading of drivers can be done for free without rebooting the operating system. It is advisable to perform this operation several times by running the drivers.exe command line utility included in the DDK, which can be downloaded from the Microsoft server. Launched without any command line switches, the utility drives.exe dumps all the information on the screen, which is not good, since there are usually a lot of drivers in the system and they do not fit on the screen. However, religion allows us to redirect the output stream to a text file (drivers.exe> file-name.txt), which can be opened by any text editor, be it Word or notepad. Then all that remains is to select a vertical block (which notepad does not allow) and get a list of drivers. Straight from the kernel of the operating system!
If at least one of these drivers is missing in the C: \ WINNT \ directory, then its digital signature will not be verified! Naturally, such a driver immediately attracts attention, and we have a reasonable question: where does it come from? First, we scan all the directories on the disk; if it's not there, set a breakpoint on Soft-Ice's CreateFileW function and look at the arguments passed to it. Sooner or later we will come across our buggy driver, after which it remains only to look at the lower right corner of the Soft-Ice screen, where the name of the process that spawned it is displayed. For more details, see the book "Technique for Debugging Programs without Source Codes", an electronic copy of which can be found on the ftp- or http-server nezumi.org.ru, as well as on our disk. And we continue to torment the utility sigverif.exe.
After clicking on "OK", "Start", a "thermometer" will appear on the screen, displaying the progress of the progress, and the hard disk will begin to rustle with all its heads, which it only has. Upon completion of the work, a list of drivers without a digital signature will be compiled and displayed on the screen.
Some hotheads suggest, in order to cleanse the system of heresy, to remove all unsigned drivers - then, they say, it will remove all problems like a tail. How can this be done? The crudest solution is to simply take and delete them from the disk via FAR or Explorer (of course, having administrator rights!). But the consequences of such an operation can turn out to be very dire, and it is better, by right-clicking on the driver icon in the explorer, to find the manufacturer's name in the Properties, by which you can determine what application / hardware installed this driver, and uninstall it in a civilized way. True, there is one "but" here.
The driver is highlighted in the figure. g400m.sys, which comes with the Matrox G450 card, and although Matrox is not a frail company at all, it did not receive a digital signature (either Microsoft didn’t give it, or Matrox itself didn’t want to bother). Naturally, after removing it from the system, you will have to forget about the SVGA mode. You can, however, go to the Matrox website by downloading the latest driver version (it is already digitally signed). Only now ... both signed and unsigned versions contain many fatal errors, in particular, as a result of certain circumstances, when trying to switch to overlay mode, the system crashes into a BSOD, as the driver tries to free the already freed memory.
Thus, the presence / absence of a digital signature does not in itself mean anything, and even if we use only signed drivers, this does not give us any guarantees of stability.
This is where we pass on to the second part of the article, namely, testing drivers in conditions close to combat.
We arrange a real test for firewood
The DDK includes a great utility Driver Verifier, which creates the most severe conditions for drivers, bordering on extreme and suicide, in which the probability of failure is maximum, and the name of the defective driver is determined with the highest accuracy (even if due to development defects it does not suffer itself, but destroys the data structure of other people's drivers).
It is important to note that Driver Verifier is not a medicine, but only a diagnostic tool. It will still not save you from failures (on the contrary, it will increase their intensity by a couple of orders of magnitude), but it will help to identify the "sneaky" driver with a sufficient degree of reliability.
So, run verifier.exe, we see a window Driver Verifier Manager, go to the Setting tab and move the radio button to the Verify all drivers position, then press the "Preferred Setting" button, which sets the following verification types:
- Special pool- the checked drivers will be allocated a special memory area for allocation, which does not work very quickly, but is capable of detecting most types of damage to their own and other people's data.
- Force IRQL checking. IRQL is the Interrupt Request Level. The most common mistake driver developers make is trying to access memory at an IRQL where the swap manager does not work. And if the required page is suddenly pushed to disk, the system will turn into a blue screen with the inscription "IRQL_LESS_OR_EQULAR". Forcing this mode forcibly pushes driver pages to disk so that the development defect manifests itself in 100% of cases.
- Low resource simulation It is useful to install it in order to see how the driver will behave in case of a catastrophic lack of system resources, however, this may not be done, but the Pool tracking checkbox (tracking the correctness of handling the memory pool) is better left. I / O verification errors make up an insignificant part of all errors, so the position of this checkbox is generally completely uncritical.
Having finished with the choice of settings, we press the "Apply" button and, as we are offered, we reboot.
Immediately after the boot starts, the system slows down noticeably, which it should be, since the kernel performs a lot more checks than usual. When errors are found, a blue screen of death flashes with the name of the driver and some other information useful for developers, but useless for us. All we can do is update the driver to the latest version or stop using the program (hardware) that uses it. Actually, we have a little more options for starting raw firewood, but more on that later.
You can find out the status of the check at any time by running verifier.exe. The Driver Status tab lists the statuses of all detected drivers with an explanation of the current situation. The Loaded status means that this driver has been loaded and tested at least once (but, perhaps, not completely, that is, not all parts of the driver have time to run). The Unloaded status prepares that the driver has been loaded, verified (possibly partially) and unloaded by the system / program using it or of its own accord. The latter is especially true for drivers left over from equipment that was removed by barbarously pulling the expansion cards out of the slot, that is, without performing uninstallation. The surviving driver scans the bus, trying to find "its" hardware, breaks off with a search, and then unloads itself from memory, by the way, slowing down the system load (sometimes very significantly) and conflicts with other drivers. Moral: the equipment must be removed from the system according to all the rules! However, not every Unloaded status is a sign of an abnormal situation, and before removing a driver with such a status, you need to figure out what kind of reindeer it is and where it came from.
The Never Loaded status indicates that this driver has not yet been loaded, and therefore has not been tested, therefore, you need to wait, launching various programs that may be associated with it. However, some drivers (especially incorrectly uninstalled ones) are not loaded and, accordingly, never checked.
After working with the system in the tough check mode for some time (from several hours to several days), we will identify almost all defective drivers from which we suffered earlier, and write their names on a piece of paper.
You can return the system to normal mode (that is, without additional checks that eat up performance) using the same verifier. Return to the Setting tab, move the radio button to the Verify selected drivers position (no driver should be selected), click on "Reset All", then on "Apply" and reboot. Everything! The system is now operating at normal speed, but without checks.
What to do with raw wood?
But really, what can be done with a defective driver? Hackers who know how to hold the debugger in their hands, if they have enough free time, can disassemble it (since the drivers are usually small in size), find a bug, and come up with a way to fix it, but ... this is too time consuming path.
Throwing away the driver (along with the hardware / program that uses it) is also not an option. Although if it is known that a $ 20 sound card from an unknown Chinese manufacturer is to blame for the blue screens of death, then we have quite a strong motivation to replace it with something more worthy. But this, in fact, is clear to everyone and does not need additional comments.
But not everyone knows that a huge number of crashes and blue screens of death are due to the fact that a driver developed (and tested) in a single-processor environment is installed on a dual-processor machine. By "dual-processor" here we mean both a real platform with two stones and Hyper-Threading / multi-core processors. It is known (and confirmed by a large number of tests) that two processors are absolutely useless for a home computer, since there is practically no increase in performance on the vast majority of applications.
Therefore, if the system is unstable, and you cannot get rid of the defective driver for one reason or another, you can try to get into BIOS Setup, turning your “virtual two-processor” machine into a one-processor one. A similar effect can be achieved by opening the boot.ini file (on computers with Windows NT / 2000 / XP it is located in the root directory of the logical disk on which the system is installed) and adding the / ONECPU switch to it, and then reboot in the hope that the errors will disappear.
Listing 1
An example of a typical boot.ini file
timeout = 30
multi (0) disk (0) rdisk (0) partition (1) \ WINNT = "Windows 2000 Pro" / fastdetect / SOS
Listing 2
We configure the system to use only one processor out of all available
timeout = 30
default = multi (0) disk (0) rdisk (0) partition (1) \ WINNT
multi (0) disk (0) rdisk (0) partition (1) \ WINNT = "Windows 2000 Pro" / fastdetect / SOS / ONECPU
But on Windows Vista there is no boot.ini file, and while there is a (temporary) opportunity to configure its boot settings using a special utility, Microsoft plans to completely remove this loophole, so that only BIOS Setup remains. However, as for Vista, then by the time of switching to it, driver developers will probably acquire multiprocessor machines (since there simply will not be others on sale) and will test their creations in a multiprocessor environment.
Another subtle point. Do you remember that we said above that the most common mistake of driver developers is accessing preemptive memory at the IRQL level at which the swap manager does not work, and if the requested page is not in memory, it crashes? The obvious solution here would be to increase the RAM to the extent that practically no paging to disk occurs. At current prices for memory, almost everyone can afford to buy a couple of new "dies". But there is also a more accessible (and more elegant) solution to the problem. If the parameter DisablePagingExecutive located in the next registry branch HKLM \ SYSTEM \ CurrentControlSet \ Control \ Session Manager \ MemoryManagement, equals one (zero by default), nuclear components will not be displaced. Therefore, we simply launch the "Registry Editor", change this cherished parameter and reboot (the changes take effect only after a reboot), hoping that this will help solve the problem of crashes.
Sometimes hardware-related DRIVER_VERIFIER_DETECTED_VIOLATION blue screen errors can be due to memory (RAM) corruption. If you experience random computer restarts, startup beeps, or other computer malfunctions (in addition to BSOD 0xC4 errors), then it is very likely that there is memory corruption. In fact, nearly 10% of Windows application crashes are caused by memory corruption.
If you've recently added new memory to your computer, we recommend temporarily removing it to make sure it isn't causing the DRIVER_VERIFIER_DETECTED_VIOLATION error. If this action resolved the BSOD, it means that this is the source of the problem, and, therefore, the new memory is either incompatible with some of your hardware, or is corrupted. In this case, you will need to replace new memory modules.
If you did not add new memory, the next step is to carry out a diagnostic test of the available computer memory. The memory test allows you to scan for severe memory failures and intermittent errors that could be causing your 0xC4 blue screen of death.
Although recent versions of Windows contain a utility for checking RAM, I highly recommend using Memtest86 instead. Memtest86 is a BIOS based test software unlike other test programs that run in the Windows environment. The benefit is that it allows you to test ALL of your memory for DRIVER_VERIFIER_DETECTED_VIOLATION errors, while other programs cannot test the section of memory occupied by the software itself, the operating system, and any other running programs.


