Do you want to take a break from the Internet or television programs and spend quality time for yourself and your child? Then take more paper, scissors, glue and try to make voluminous paper toys.
Paper craft templates.
The most interesting paper crafts are moving toys. For example, here is a Nyan Cat toy, based on a very popular YouTube video.
(function(w, d, n, s, t) ( w[n] = w[n] || ; w[n].push(function() ( Ya.Context.AdvManager.render(( blockId: "R-A -468763-13", renderTo: "yandex_rtb_R-A-468763-13", async: true )); )); t = d.getElementsByTagName("script"); s = d.createElement("script"); s .type = "text/javascript"; s.src = "//an.yandex.ru/system/context.js"; s.async = true; t.parentNode.insertBefore(s, t); ))(this , this.document, "yandexContextAsyncCallbacks");
The plot is from the popular game Tiny Wings.
And this is a paper made of the famous singer PSY and his famous dance move from the Gangnam Style video.
Paper dancing man.
All the parts of this paper figurine are movable and when shaken, the little man seems to be dancing. Watch him dance the Harlem Shake in this video.
Paper 3D projection of a highway and a moving car. In the instructions you will find a QR code link to the animation for the smartphone.
Video - How to make a paper projection of a highway.
Volumetric SpongeBob SquarePants made of paper.
SpongeBob's paper friends: Gary the snail, Bird the starfish, Skidward and Sandy Cheeks.
Model of a real Macintosh computer with a paper keyboard.
And here is that same Nyan Cat video (the very first toy template) with almost 153 million views.
(function(w, d, n, s, t) ( w[n] = w[n] || ; w[n].push(function() ( Ya.Context.AdvManager.render(( blockId: "R-A -468763-11", renderTo: "yandex_rtb_R-A-468763-11", async: true )); )); t = d.getElementsByTagName("script"); s = d.createElement("script"); s .type = "text/javascript"; s.src = "//an.yandex.ru/system/context.js"; s.async = true; t.parentNode.insertBefore(s, t); ))(this , this.document, "yandexContextAsyncCallbacks");
Paper modeling is quite a fascinating process, in which all family members can be involved - it will be interesting for everyone. After all, once you start, it’s already difficult to tear yourself away from this activity. Now there are a lot of different templates for paper crafts; all you need is a printer to print them. It should be noted that cutting and gluing three-dimensional parts from paper develops spatial thinking and fine motor skills of the hands, like any other handicraft.
All children love to decorate a Christmas tree, but they will also definitely enjoy making voluminous Christmas tree decorations from paper with their own hands. After all, how interesting it is to decorate a Christmas tree with your creation, admire it every day, and show it to everyone around you.
For crafts you will need:
- Colored cardboard of various colors (not very thick);
- Threads, braid, twine (optional);
- Double-sided or regular tape;
- Glue stick, scissors, simple pencil.

Volumetric Christmas tree decorations made of paper step by step
1. Bell

Using this template or any other from the Internet, trace and cut out 6 bells in a flat version.


Fold each one in half, being careful to fit the edges together.

Glue together one half side of one piece to the half side of the second.

Glue all 6 pieces together, then place a string in the center and secure it with tape. In principle, glue will also cope with this task, but with tape it is faster and more reliable.

Glue the last two sides together to create a complete three-dimensional bell for the Christmas tree.

2. Complex DIY Christmas tree toy

Redraw or print the template.

Cut out 6 shapes.

Fold them in half.

Take one part and apply glue to its half, also glue the second part to it with one side, adjusting the ornament.

Repeat until you have glued all 6 pieces together.

Before gluing the remaining edges, do not forget to place a rope or thread in the middle of the toy, making a loop out of it.
3. Christmas tree toy in the form of a multi-colored top

Now we complicate the work a little, although it still remains as easy as the previous ones.
Using the template, cut out 6 parts, but in different colors. Alternatively, some may be repeated in color.


Glue the sides together after placing a loop of thread inside.

4. Paper bear

Children will especially enjoy making this Christmas tree decoration and then viewing it on the tree. Using the template, cut out 6 bears.


Fold them in half.

Glue one side of the bear-shaped blank to the other side of the second blank.

Before gluing the last sides, tape a thread in the middle, making a loop out of it.

Finally, on all parts you can draw the bear’s eyes and muzzle. You can also color it completely. Draw a smile, claws, outline the ears.

5. Volumetric Christmas tree toy made of paper in the shape of a star

The craft is made in the same way as the previous ones, but you can also add an insert of a different color in the middle.
Cut out 6 stars from paper of the same color according to the template. And 6 slightly smaller stars made of paper of a different color.


Glue the small stars in the middle of the larger ones.

Fold in half.

Glue the half sides together, place a string inside and glue the remaining two halves of the sides together. The star is ready.

This is how the paper Christmas decorations turned out for the Christmas tree. They can be very different, because it all depends on the template used, of which there are thousands on the Internet. The Christmas tree can even be completely decorated with hand-made paper animals, birds, and decorations of various shapes, which are made in the same way as the step-by-step photo instructions for creating three-dimensional objects presented above.
Such three-dimensional figures can be made of any shape, they can be multi-colored, they can be decorated with beads or lace and a beautiful inscription can be made. In such an unusual box you can store jewelry or all sorts of women's little things.
Many fathers and mothers are occupied with the question of how to explain this or that question to a child in the most accessible way. When a child grows up, the time comes to explain to him complex geometric shapes - cube, sphere, etc. It is much easier to show these figures to a child. To give a child three-dimensional models of geometric shapes, they need to be made from something.
The most convenient and easiest to make is paper crafts in the origami style.

There are many different shapes that people have learned to make from paper and not necessarily geometric ones. These can be voluminous hearts that you can use as decorations for Valentine's Day or stars that will complement the decor in the nursery.
Volumetric paper figures: diagrams of geometric shapes
Creating three-dimensional geometric shapes is not only exciting, but also useful. The child learns to think spatially, which is very necessary.
The simplest way to make a three-dimensional geometric figure is to print the templates and cut along the dotted line, then glue them according to the instructions.
But you can also make such figures yourself. For this you will need: cardboard, colored or white paper, pencil, ruler, scissors and glue.

How to make a paper cube:
- On a piece of paper, draw 4 identical squares with sides 4 cm in a row in a row.
- From the second square, up and down, draw an identical square. You should get a pattern of 6 squares in the form of a cross.
- On the protruding squares, draw valves in the form of trapezoids (width no more than 0.7 cm).
- Cut out a template - a future sample for working with cardboard or other thick paper.
- Bend the figure along the drawn lines, coat the small trapezoid flaps with glue and connect all sides together.
If desired, each side of the cube can be covered with colored paper. And if one side with the flap is not fixed with glue, you will end up with a small box that can be used as gift wrapping.
Amusing volumetric paper animals: toys for kids
Children love to cut out, glue, and draw - such activities broaden the child’s horizons, develop attentiveness and perseverance. Using ready-made diagrams on the Internet or in creative magazines, schoolchildren can create different animal figures.

Gluing three-dimensional shapes is quite simple:
- Having chosen the desired animal, you need to print the diagram.
- Cut out the parts according to the template, leaving a small margin for gluing.
- Make folds along the line and glue the figure.
You can make easy crafts yourself. A bear, a fox, a dog, a cat, a bee - all these animals will be made using identical technology.
Whatever craft you make, you need to let it dry completely. If you handle wet glue with your hand, you can leave dirty fingerprints on the paper.
To create a simple craft, you will need white and green paper, scissors, and glue.
DIY little bunny toy:
- Two strips 3 cm wide and 10 and 7 cm long;
- Two semicircles in the shape of ears;
- Two eyes (blanks);
- A free-form green piece of paper for the “grass.”
Fold the strips and glue the ends together. You should get two wide rings. Glue a larger ring onto a green piece of grass - the body of a bunny, and glue the head onto it. Attach the ears evenly to the back of the head. Draw or glue ready-made eyes, make a mouth - the bunny is ready.
Do-it-yourself three-dimensional paintings from toilet paper: master class
Any creative work is inextricably linked with extraordinary thinking. Crafts made from improvised materials help both children and adults look at these things from a different angle.
Three-dimensional pictures made from toilet paper are not very well known in ordinary circles. But where there is room for creative thinking, there is always something new and interesting.

To create a picture you will need:
- Toilet paper;
- PVA glue;
- Thick cardboard;
- Gouache;
- Brushes 2-3 pcs. different sizes;
- Acrylic varnish;
- Glue container;
- Pencil.
The way you work with paper also determines its appearance. Before gluing the paper onto the cardboard, you need to soak it well.
How to make a three-dimensional picture from toilet paper:
- It is better to cover the cardboard with one or several layers of soaked paper. To do this, apply a thin and even layer of PVA glue to the cardboard and then apply a strip of paper. After drying, we have a ready-made base for the painting.
- Let's draw a tree.
- Take glue into a bowl and dilute it a little with water.
- To create a tree trunk, the most convenient way is to twist soaked paper into a spiral. Lay it out according to the pattern of the tree trunk and its branches.
- To create tree leaves, a suitable method is to layer many small pieces of paper. Twist small pieces into paper balls, soak in glue and lay out according to the template. This will give the tree volume and, of course, make the picture clearer due to the difference in textures.
The finished picture can be inserted into a regular wooden frame without glass.
The painting should be painted on dry paper.
For coloring it is better to use gouache. Ordinary watercolor paint will not lay down in a dense layer on the paper and will show through. For paint, use a high-quality brush that will not disintegrate.
Original do-it-yourself voluminous paper birds: origami patterns
With a little practice, you can create complex and interesting three-dimensional paper shapes with your own hands. You need to start with the simplest shapes that can be printed, cut and glued.

The origami technique is not as easy as folding according to a ready-made template, but it is very interesting. It happens without cutting.
This work with origami involves the use of a square sheet of paper, which must first be cut out.
Do-it-yourself volumetric owl: working with paper
- We bend a sheet of paper 40x40 cm diagonally, unbend it and bend it along the second diagonal.
- We turn the sheet over with the curves facing up and fold it in half towards itself.
- Unbend and bend in half again from left to right. We fold the sheet along these folds into a square and place it in front of us in the form of a diamond.
- We bend the lower edges towards the center, forming two triangles. We bend the upper triangle and unbend it back.
- Unfold the side triangles and open the bottom corner. Turn the craft over and also open the bottom corner.
- We bend the upper half of the top layer in half “towards ourselves”.
- In the same way, bend the upper half of the second layer back.
- We bend the side edges of the top layer, forming 2 triangles. We bend the bottom layer back in the same way.
- Fold the right half of the top layer in half to the left. Turn over and repeat the action.
- At the same time, we turn the left half to the right and pull the lower part up - we get a wing.
- We bend the left half to the right - onto the wing, and bring the back half forward. We make the second wing identical to the first.
- We bend the top corner down and form the head. Turn the product over.
- We cut the corners on the sides and lift up the resulting triangles. Turn it over.
- We make a cut in the lower corner, and from the top layer we bend triangles to the side—the owl’s feet. Your bird is ready!
The owl will be white and can be decorated. For drawing, use watercolors, gouache or a regular felt-tip pen.
Volumetric paper applique: templates and pictures from lumps of paper
It is also interesting to be creative with small children. A very popular type of needlework for kids is creating pictures from lumps of colored paper. This work is quite easy, but at the same time painstaking, because you have to work with small pieces of paper.

Working with paper balls develops the motor skills of the fingers, which determines the development of the baby’s speech and his further mental development.
For work we will need - colored cardboard, thin colored paper (ideally napkins), glue, pencil.
When working, it is important not to forget about alternating colors, because the picture should be bright and colorful.
Before you start creating a picture, you need to draw simple toy figures on a sheet of cardboard. It could be a doll, a car, a butterfly or a whole house.
To make a picture from lumps, you need to cut a napkin into many small squares. Crush each piece with your hands, dip it in glue and apply it to the drawing, forming a three-dimensional picture.
Simple three-dimensional paper crafts for children: how to surprise a child
Creative work with your children will help you pass the cold winter evenings. Every kid wants to have toy furniture that can be made from ordinary paper and cardboard.

Armed with a good mood, you need to use your imagination. Take a couple of sheets of cardboard, scissors, glue, a plastic bottle, paint and openwork ribbon - with these simple things you can create a beautiful table for a doll.
DIY doll table:
- Prepare materials. Cut off part of the bottle from the neck to 12-15 centimeters. Cut 2 ovals from cardboard - the future shape of the table.
- Glue 1 oval onto the neck of the bottle. Paint the bottle any color and wait until it dries.
- Glue the openwork to the rim of the oval and glue the 2nd oval on top.
The finished table can be decorated with beads and flowers and used as decoration.
In addition to the table, you can make a whole set of furniture - chairs, a bed, an armchair. If you can’t draw the details manually, you can find ready-made diagrams on the Internet. It is very easy to use them to cut out various three-dimensional crafts.
Master class: three-dimensional paper crafts (video)
Looking at these crafts, it’s hard to believe that everything can be done with your own hands from the simplest material of paper. Kids can make light appliques, and older children will be interested in voluminous crafts that will be a good gift for any occasion. The main thing in this creativity is accuracy and perseverance, only then will all the crafts turn out beautiful and interesting.
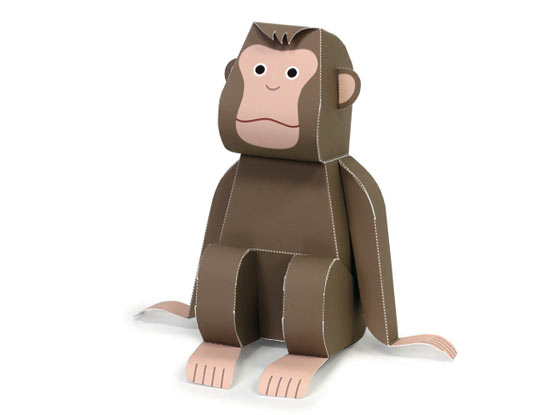
And again, voluminous paper crafts - forest animals: hare, fox, owl, monkey and squirrel. The author illustrated very cute forest animals, the design is quite simple, but the model diagrams themselves will still require some perseverance in assembly.
Gluing three-dimensional paper figures is very interesting and completely uncomplicated. Together with your children, you can collect and glue a lot of funny little animals, and then populate an entire paper forest with them. In addition, assembling such models is useful for children to develop fine motor skills.
Paper animal diagrams
All children love making, cutting and gluing fun crafts. But working on three-dimensional toys contributes to the development of a child’s spatial thinking. I suggest you join the children and get creative with them.
Using ready-made diagrams that can be downloaded on the Internet, it’s easy to make a lot of original three-dimensional figurines of forest inhabitants together with the children. This entertainment will keep your child busy and provide many hours of useful and educational activities.
To complete this work, we will need to download the diagrams and assembly instructions and print them on a color printer. Then, using scissors, cut out all the parts and, according to the instructions included, assemble and glue three-dimensional figures of animals or even a whole tree.
Let's start by making a cunning fox out of paper.
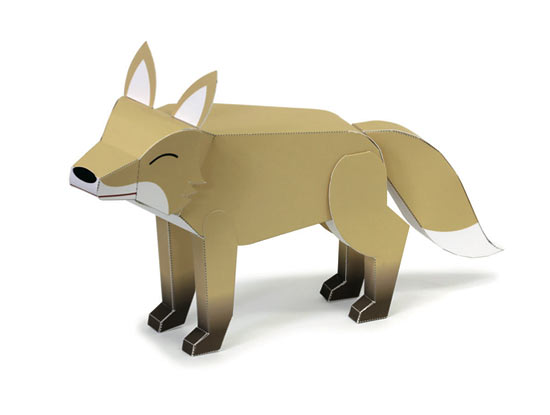
After we print out the sheets with the parts, we take scissors and cut them out taking into account the gluing allowances. Then we bend the parts along the dotted lines and glue them together according to the instructions and diagram. We glue on the ears and tail and as a result we get a real red-haired rogue.
As we remember from fairy tales, the fox always hunted a bunny and a paper bunny will keep our fox company.

The algorithm for creating a three-dimensional paper bunny craft is the same as for creating a chanterelle. ,
We print it on a printer, cut it out, bend it along the marked lines, glue it together and assemble the animal toy.
The forest is home to not only the hare and fox, but also various birds. A voluminous paper bird is made in the same way as

And of course, what is a forest without trees? and collect it as described above.

Colored paper is an excellent material for crafts. You can make appliqués, various figures and many other creative things from it. In this article we will look at how to make crafts from colored paper for elementary school children with your own hands.
You will need: thick colored paper, glue gun, ruler, scissors, tape, rubber band, pencil, pen spring.
Master Class
- Take a sheet of paper and a pencil, twist the tube diagonally from the corner, then secure it with tape and pull out the pencil.

- Twist the second piece of paper around the first tube, then separate them. The second paper tube should be slightly larger in diameter than the first so that it can be used to shoot in the future.
- Secure the second tube with tape, then cut off the edges.
- Twist 2 more paper tubes in the same way.
- Cut the tubes into pieces of this length: trunk - 2 tubes 15 cm long; handle – 7 tubes 5 cm long; trigger – 1 tube 8 cm long.
- Glue 5 cm tubes diagonally to form a handle.

- Glue the 8 cm tube on top of the handle so that the remaining 3 cm protrudes to the right. This is the trigger.
- Glue two 15cm tubes together and glue them to the top of the gun as the barrel.
- Roll two thin tubes from yellow paper.
- Bend a thin tube into a “U” shape and insert one end into the trigger and the other into the upper tube of the handle. Trim off the excess. This will be the trigger.
- Make a trigger guard from the second thin tube. To do this, place one end of the tube into the handle (into the second tube from the top) and glue the rest of the tube to the bottom of the barrel.

- Roll up the pink paper tube, flatten it and tape it around the handle as shown in the image. It is worth noting that the rear hole in the trigger must be open.
- Pull the trigger out of the top tube of the handle and insert the spring. It is worth noting that the spring should rest against the tube covering the back of the handle. Reinsert the trigger.
- Roll up a thin, thick tube of yellow paper, secure with tape and trim the edges so they are even.

- Fold the edge, put on an elastic band and secure with glue.
- Insert the tube with the rubber band into the lower tube of the gun barrel and pull the rubber band forward, hooking it between the two tubes.
- Roll paper bullets, load the gun and fire.
You will need: colored cardboard, scissors, glue stick, cotton wool, stapler.
Master Class

Rainbow in the clouds is ready!
Binoculars
You will need: yellow cellophane, scissors, tape, black paint, brush, green and black paper, glue, rubber band, wine cork, string or elastic band.
Master Class
- Cut out 2 circles of yellow cellophane and tape them to the circumference of the sleeves as binocular lenses.

- Paint the circumference of the wine cork with black paint and cover it with green paper.
- Cover the bushings with green paper and glue the black stripes as shown in the image.

- Glue the bushings together and secure with a rubber band. After a while, remove the rubber band.

- Glue the taped cork between the bushings.

- Prepare an elastic band or rope of the required length, make a hole in the side of the bushings and secure the elastic band.
The binoculars are ready!
Origami rose
You will need: double-sided colored paper, scissors, a simple pencil.
Master Class
- Fold a sheet of colored paper diagonally as shown in the photo and cut off the excess strip to make a square.
- Bend the square to create a second diagonal.

- Fold the square in half to create lines like a snowflake.
- Move the sides of the workpiece in this way: the top - from the right side to the left, and the bottom - from the left to the right, to form a triangle.
- Fold all 4 tops over to the middle and run your fingers along the folds.
- Expand the workpiece to a double triangle and bend the upper corner back.

- Straighten the bud and bend the curved corner inward.
- Gather the double corner back together and run your fingers along the folds.
- Bring the 4 side corners up to the top.

- Flip over, then fold each side in toward the middle. You should end up with a blank with a hole at the bottom.
- Blow strongly into the hole from below to straighten the bud.
- Curl the petals using a simple pencil.

- Take the strip of paper you cut at the beginning.
- Fold the stem and insert it into the bud.
The origami rose is ready!
Moving 3D fish
You will need: colored paper, scissors, glue, pencil, black felt-tip pen.
Master Class
- Take a piece of blue paper and make a square.
- Fold the sides toward the fold line, then open the paper.

- Fold the paper in half to create a triangle as shown in the image
- Make cuts along the fold line, then open the paper and overlap the uncut parts.
- Make the fish's face flatter by cutting off a corner.

- Cut out the fins and tail from the pink one, then draw stripes with a felt-tip pen.
- Cut out the eyes from white paper and draw the pupils with a black felt-tip pen.

- Glue the fins, tail and eyes, and don’t forget to draw eyelashes.

- Cut out an elongated semi-oval and glue it as the lower jaw.
You will need: a sheet of colored paper, a felt-tip pen and scissors.
Master Class
- Fold a sheet of colored paper in half.
- Place your palm on the leaf so that your thumb and index finger touch the edge of the leaf, thereby forming half a heart.
- Circle your palm.
- Cut out the palm and unfold the craft.
A heart in hands made of colored paper is ready!
You will need: white and yellow colored paper, a simple pencil, ruler, glue, coin or compass.
Master Class
- Cut 9 strips of paper the same size.
- Make 2 circles on yellow paper.
- Cut them out.
- Glue the ends of the strips together to form petals.
- Glue the petals to the yellow circle, then glue the second circle on top.
You will need: red colored paper, a pencil, scissors, a round object.
Master Class
- Trace a round object on colored paper.
- Draw a spiral in a circle.
- Cut out the circle.
- Cut the spiral in such a way that you get a “spring”
- Twist the rosette and make the required number of rosettes in the same way.
The original colored paper roses are ready! I recommend watching the video master class!
You will need: double-sided colored paper, glue gun, stick or skewer as a stem, button.
Master Class

A creative flower made from colored paper is ready!
You will need: 4 sheets of colored paper, double-sided tape.
Master Class
- Fold each sheet into an accordion shape.
- Fold each accordion in half to form a fan.
- Glue 4 sheets together to form a circle.
The fan flower made from colored paper is ready!
You will need: colored paper, stapler, cut out butterfly (from a magazine, notebook, picture), felt-tip pen.
Master Class

The case for surprises made of colored paper is ready!
You will need: colored paper of black and yellow, a simple pencil, scissors, ruler, glue, compass, glitter.
Master Class

The colored paper owl is ready!
You can also make a cute bunny out of colored paper, and see how in this video!
Sisters made of colored paper
You will need: paper of two colors, 2 wooden sticks, buttons for eyes, elastic bands or strings for hands, pencil, glue.


