So the greatest miracle happened - a new man was born on earth. In a few months, he will, at first hesitantly, and then more and more confidently, set off to explore the world. And there is nothing better for a little person’s comfortable travel than carefully hand-knitted booties made from the softest and most delicate yarn.
There are a great many variations on the theme of baby booties, however, the most popular models remain knitted. Classic and newfangled, simple and with elaborate patterns - every needlewoman will find a model to please her baby.
These cute, cozy booties are not as difficult to knit as they might seem at first glance. To work, you will need wool or wool blend yarn of two contrasting colors, preferably with the addition of acrylic thread - thanks to this, the finished product will stretch less. The tools you will need are stocking needles No. 2.5 in the set and a crochet hook.
Bunny booties are designed for babies 6-9 months old and consist of 3 parts - a sole, a toe and bunny ears.
At the first stage, the sole is made. Since the sole is the basis of the entire future product, it is better to knit it with thread in 2 folds. This will give the insole additional strength, and it will be much more comfortable for the baby to stomp on the compacted sole. In this model, the insole is made in garter stitch.
To start working, you should cast on 7 loops on the knitting needles and knit one row, and then make yarn overs along the 3 odd rows next to the edge loops. In even rows, yarn overs are knitted with a knit stitch to avoid the formation of holes. After there are 13 loops on the knitting needles, you should knit 26 rows without changes. Then you need to make another addition by yarn over and then knit the resulting 15 loops for another 20 rows. After this, a gradual decrease begins - one loop at the beginning and end of each front row. When the number of loops on the knitting needles reaches 7, they need to be closed. The second sole is knitted in the same way.
Next, using a contrasting thread, loops from those that form the edges on the sole are cast on needles. The distribution of loops occurs in the following order: 12 loops are left for the toe, and the remaining loops are distributed so that there is an even number of them on each of the 3 knitting needles. Further knitting is carried out in the round as follows: in the 1st, 3rd and 4th rows all loops are knitted, and in the 2nd row 2 loops are knitted together, after which a yarn over is made.
At this stage, the finishing thread is fixed and cut. Next comes an important point - the formation of “teeth”. To obtain such an interesting decor, you need to return to the thread of the base color and knit, connecting the loops from the contrasting thread that are in progress with the loops of the last row from the base thread. After joining the parts, 9 circular rows are knitted using stockinette stitch.
On the 12 loops of the front part of the bootie, the toe is made according to the principle of knitting the classic heel of a sock. As a result of the decreases, two “pigtails” are formed on the front of the booties on the sides, which will allow the product to keep the desired shape. Decreases are made gradually until 30 stitches remain in the work, not counting the 12 toe loops.
Knitting the upper part of the sock is done in circular rows from the inside:
- 1st and 2nd rows - purl loops;
- 3rd-9th rows – elastic band 1x1;
- 10th-16th rows - facial loops;
- 17th row - purl loops;
- Rows 18-24 – knit stitches.
After this, a thread of a contrasting color is re-attached to the work and the next 4 rows (from the 25th to the 28th) are knitted alternately with knit and purl loops.
Having knitted the final row (34th), all loops are closed. At this stage, the bootie itself is ready, all that remains is to tie the ears.
To make the ears, you need to cast on 22 loops with finishing thread and knit 1 row with purl loops. This is followed by 6 rows of stockinette stitch in the base color. The thread of the main color needs to be cut, but at the same time leave a “tail” for sewing the ears to the booties. After this, 2 more rows are knitted with a thread of a contrasting color and all loops are closed. The long edges of the product are crocheted, folded in half and sewn to the bootie. At the final stage, the bunny's nose is embroidered or glued on.
Video - bunny booties for your baby
Such bright and colorful booties will appeal to those who are not afraid to stand out.
To work on booties, you will need 100 g of wool yarn in two colors (preferably children's yarn, as it is hypoallergenic) and a set of needles No. 3.
The work will use two main patterns - garter stitch and 1x1 rib.
To begin with, you should cast on 12 stitches on the knitting needles in the base color of the thread and knit 12 cm in garter stitch - the result will be a sole. Next, 60 loops are knitted from the edge loops of the sole, distributed according to the following principle: 20 side stitches and 10 stitches on the front and heel. The work continues in a circle with a 1x1 elastic band, and in each new row the color of the thread changes.
Having knitted 3 cm, you should switch to garter stitch, gradually decreasing by 3 loops. In each new row, the color of the thread continues to change. Having knitted 3 rows, the loops in the toe area are closed, and in the heel area there are still 10 loops left on each side. An additional 20 loops are cast on the knitting needles, from which the fastener is knitted - 2 cm with garter stitch thread in a contrasting color. In the middle of the fastener you should make a hole for the button, for which 2 loops are closed. After all the remaining loops are closed, the button is sewn on and the booties can be tried on. Ready-made booties can be decorated with some decorative element, for example, a beautiful applique or bow.
These beautiful and cozy booties are knitted quite quickly due to the fact that the model does not have any seams. Knitting a rectangular sole will also reduce the time it takes to calculate increases and decreases. Seamless booties are a great choice for a newborn.
To work, you will need 50 g of cotton or wool yarn (depending on the time of year) and stocking needles No. 3. It is better to knit in two layers of thread.
The knitting process begins with the cuff. Having cast 32 loops, they must be distributed equally onto 4 knitting needles (8 loops each). Knitting closes in a circle.
- 1st-12th row – purl loops;
- 13th row - two knit stitches are knitted together, after which a yarn over is made;
- 14th row - facial loops
At this stage, the loops are redistributed as follows: 7 loops are left on the 1st and 3rd knitting needles, and 9 loops are left on the 2nd and 4th knitting needles. Now you can proceed to knitting the toe of the bootie.
From now on, work will take place only on the 1st and 2nd knitting needles.
From the 15th to 30th rows, knitting occurs in stockinette stitch (make the last loop an edge stitch); After each row the work must be rotated.
To knit the edge of the product, you should “raise” the outer walls of the edge loops of the sides of the toe on the knitting needles and continue working with the loops of the 3rd and 4th knitting needles, knitting them with knit stitches.
31st – 38th rows – purl loops.
The most important part of the whole work is knitting the sole.
Starting from the 39th row, knitting occurs only with facial loops. When forming the sole, 3 knitting needles are involved in the work - with loops of the sides and toe. When knitting the loops of the toe, it is necessary to combine each outer loop with the adjacent loop of the side. Decreases are made until the edge loops run out. Next, all the remaining loops (there should be 18 of them - 9 on each knitting needle) are closed in any convenient way - by knitting two loops together with knitting needles (crochet) or by stitching with a knitted stitch “loop to loop”, which imitates the front stitch.
This concludes the knitting of booties. To decorate the finished product and additionally secure the booties on the child’s leg, you can knit a hollow cord or a caterpillar cord with a hook about 40-50 cm long and thread it between the loops under the cuff. And in order to diversify your work and make the booties brighter, you can experiment with multi-colored threads.
Video - booties on two knitting needles for beginners
Even beginner knitters can make these easy-to-make booties. And their beauty and convenience will delight both baby and mother for a long time.
To make these cute booties you will need 100g of wool yarn and size 3 straight or circular knitting needles.
At the beginning of knitting, you should cast on 35 loops (two of which are edge stitches).
The work process begins with the sole of the product, straight and reverse rows, edge loops are performed in the usual way. Further description of the work is carried out without taking into account the edge loops. In the 1st row, 33 facial loops are knitted. In the 2nd row, a yarn over is made, then 15 knit stitches, another yarn over, 3 knit stitches, a yarn over again, 15 knit stitches are knitted and finally another yarn over is made. In the 3rd row, 37 facial loops are performed.
Further knitting is done according to the same principle, only taking into account the additions made, i.e. in each even row, a yarn over is made, the number of loops is knitted one more than in the previous even row, yarn over again, the number of loops is knitted two more than in the previous row, another yarn over, the number of loops is knitted one more than in the previous even row row and the last yarn over is made. Thus, the work continues until the 8th row.
9th row – 25 knit stitches, yarn over, 26 knit stitches.
At this stage, you can move on to forming the rise: from the 10th to the 20th rows, all loops are knitted, no additions are made.
The upper part of the booties is knitted as follows (the edge loop is removed only at the beginning, after each row the work is turned):
- 21st row - 29 facial loops, knit 2 loops together behind the outer wall;
- Row 22 – purl 8 stitches, purl 2 stitches together;
- 23rd row – 8 knit stitches, knit 2 knit stitches together;
- 24th row - similar to 22nd row;
- 25th-36th rows - alternately knit rows 23 and 24;
- 37th row – 21 knit stitches (the edge loop is knitted purl).
The main part of the bootie is finished. Now you can move on to knitting the elastic (the edge loops are knitted as usual).
- 38th row - 34 facial loops;
- Rows 39-58 – 1x1 rib (alternating knit and purl stitches).
You can knit a simple elastic band (as in the example), or you can show your imagination, spend a little more time and make a beautiful voluminous or openwork elastic band - it all depends on the desire and skill of the craftswoman.
Having reached the desired height of the elastic, all loops are closed, and the seams of the product are connected to each other. The finished booties themselves already look elegant, but you can further decorate them.
The main decoration of these booties are the luxurious harnesses. It won’t take much time to complete them, and thanks to perseverance and perseverance, even novice craftswomen can master them.
To work, you will need to purchase warm yarn (preferably made from natural wool) and stocking needles No. 3 or No. 4.
Having cast 22 loops on the knitting needles, you can proceed to making a simple harness by knitting 9 loops in garter stitch, 8 knit stitches and again 5 loops in garter stitch. On the wrong side of the fabric, loops are knitted according to the pattern. In the 11th row, the knit stitches are crossed to form a tourniquet. Next, the fabric is knitted with the main pattern with crossing every 10 rows. In total, you need to knit 7 strands, and then close the knitting. The upper part of the bootie is finished.
To knit the main part from the edges of the finished product, cast on 36 loops. Of these, 10 central ones (toes) stand out, which are knitted in garter stitch over 14 rows. In the 11th and 13th rows it is necessary to gradually reduce the number of working loops, one on both sides. Thus, by the end of the 14th row there should be 6 loops on the knitting needles.
From the edge loops of the toe, 7 loops are taken to the working knitting needles. As a result, 46 loops should remain, which are distributed as follows: 13 + 7 + 6 + 7 + 13. The resulting loops are knitted alternately with front and back for 20 rows.
To form the sole, you should select 6 central loops and gradually increase their number to 10. At the same time, you should connect the edges with the side parts of the product. When there are 6 loops left on the side knitting needles, the number of central loops must be gradually reduced to 6. By the end of the work, you need to have 6 loops in the work, which must be closed and then sewn to the sole.
You can finish the work here, or you can decorate the booties with a welt. Along the edge of the sole on 4 knitting needles, loops are cast on with a pigtail and 6 rows are knitted with facial loops. The loops are closed and the welt is twisted. The welt can be further secured by securing it with stitches in several places.
Video - knitting. Booties with braids
This model deserves special attention - it is simple in execution, but at the same time not devoid of grace.
To work, you will need yarn of two colors and knitting needles No. 4. The color of the yarn changes every two rows.
37 loops are cast on the knitting needles, which are knitted with facial loops over 10 rows. From the 11th row, decreases are made, for which the loops are divided as follows: 3 loops are highlighted in the center, which will be knitted with knit stitches. Two nearby loops on the right and left must be combined by knitting together. The remaining stitches are knitted.
Decrements are made in 7 rows until 23 stitches remain. This completes the formation of the toe.
For the cuff, 14 rows are knitted with knit stitches using a thread of the same color, after which all loops are closed in a convenient way. Next, the booties are sewn together along the edges, and the cuffs are turned away.
By playing with the color scheme, you can achieve different results and make booties in soothing colors, as well as in bright or contrasting colors. In any case, you should remember the “golden” rule: the simpler the model, the more opportunities the knitter has when choosing a color palette.
The cutest socks for our babies are booties. They are the first and necessary shoes that warm the feet and protect them from various mechanical damage. Beginning handicraft mothers will definitely want to give their baby a pair of warm socks. So let's talk about something for newborns. The schemes and sequence of work here are so simple that no complications will arise.
Preparing for work: choosing yarn and tools
You need to approach the choice of threads in order to make baby booties with knitting needles very seriously, since any product for a baby must be made from high-quality and non-prickly (important!) yarn of optimal thickness.
When selecting yarn for children's socks, preference is usually given to acrylic or mixed fibers. A good material for knitting children's things is domestic acrylic from different manufacturers, for example from the “Baby” or “Krokha” series; “Children’s whim” (“Pekhorka”) with a wool to acrylic ratio of 60/40% is well suited.

We will not delve into the question of choosing the color of socks, since it is very individual. The traditional colors of clothes for girls all over the world are considered to be all shades of pink, purple and red, for boys - blue, indigo and turquoise. Neutral tones - white, orange, yellow, beige or green - are successfully combined in the clothes of children of both sexes.
To knit simple booties with knitting needles, take a thread of medium thickness, focusing on the length in a hundred-gram skein. The optimal thread thickness is 300-350 m/100 g. Knitting needles are matched to the yarn: knitting needles No. 2.5-3 are excellent for the specified threads.
Knitted products are of normal density, moderately stretchable and soft. In addition, the requirements for children's clothing are very strict. Booties are no exception. They should not be too tight, too thick or restrict the baby’s movements. The products should be sewn carefully, grabbing the broaches of the outer loops of each row and not tightening the seam. Rough and poorly executed seams will cause inconvenience to the child and worry to the mother. After all, it is not difficult to knit booties with knitting needles for newborns, patterns for which are attached in many sources; it is important that the results of the work please everyone.

For beginning needlewomen, after choosing the material and tools, the question arises about the need to calculate the required number of loops for the job.
Knitting booties: description of settlement operations
Since we are knitting for a newborn, we can use the average leg sizes. The approximate length of the baby's foot is 6-7 cm. Add 1-2 cm to the freedom of fit, and the child's height should also be taken into account. By the 3rd month of the baby’s life, the length of the foot increases to 9 cm. Therefore, we will proceed from the size of 8 cm and try to knit booties for newborns. The diagrams that will guide us in the process of work are given below.
The second measurement needed to get started is the girth of the leg. It's easy to measure. Usually it does not exceed 10-12 cm. Before starting work, many craftsmen make a loop test sample in order to calculate the required number of loops, but in the case of knitting socks or booties, you can not waste time, but take conditional averages. For example, in 1 cm of knitted fabric made from yarn of medium thickness (300 m/100g) there are approximately 2.4-2.5 loops. Let’s make simple calculations, taking the largest number as a basis, since we must not forget that it is impossible to pull the child’s lower leg with socks:
12 cm * 2.4 = 28 loops.
Let's start knitting with 28 loops.
Knitted booties for beginners step by step
The easiest classic way to knit booties is on 2 sock needles. We start knitting from the top. For the convenience of assembling a ready-made sock, when casting on loops, leave a thread of such length that it is enough to complete the seam.
Let's get started: knit the top part
Step 1. We cast on 30 loops (28+2 edge stitches) and knit 20 rows with a 2x2 elastic band. We knit as usual, following the rule: the edge stitches are not knitted from the beginning of the row, but are knitted with purl loops at the end. This is necessary to obtain beautiful, even edges, the subsequent stitching of which will result in an invisible seam. When distributing the loops, it is better to make sure that there are 2 front loops in the center of the work - this way the product will turn out more beautiful and harmonious.

In our example, the elastic band will be wrapped like a cuff. But if you are planning a small elastic band, then you need to knit it to the desired length, reducing the number of rows. By the way, the upper part can be tied not with an elastic band, but with some other pattern you like, for example, like this:

Making holes for ties
Step 2. Booties with knitting needles, the description of which is presented, after knitting the elastic, continue like this: in the 21st row we make holes for a fixing lace or ribbon. According to the elastic pattern, we knit *2 knits, and knit 2 purls together with one loop, 1 yarn over*, etc.
Forming the upper part of the sock
Step 3. From the 23rd row, select 10 central loops and begin to form the upper part of the bootie, knitting only them. You can take 2 additional knitting needles or knit on the main needles, remembering to turn the work. We knit 12 rows.
We knit the side parts and toe
Step 4. Having finished forming the top of the sock, we proceed to the final part of the knitting - we knit the side parts and the toe, which has already been formed by the upper part of our sock.
To do this, we cast on one needle all the open loops and edge loops formed on the edges of the knitted upper part of the bootie. You will get 42 loops (40 + 2 edge loops). We knit them with garter stitch for 12-14 rows and close them on 2 needles.

All that remains is to sew the sock neatly along the back. The pair is knitted in exactly the same way.
Assembly and decoration
Our simple example shows that it is not at all difficult to knit booties for newborns. The schemes are simple and clear. Having knitted and sewn a pair, we begin to decorate the booties. The main thing here is not to overdo it with decorations. Newborns absolutely do not need beads and other small decorative elements, since they are potentially dangerous, because babies often pull their feet into their mouths. Therefore, in our example, a lace of a contrasting color will play a decorative and functional role. You can crochet it, fasten the end loops and insert it into booties, tying knots at the ends. If desired, you can use tips, but they must be fastened to the lace properly so that they cannot slip off it.

We offered to learn how to knit simple booties. Any novice craftswoman will do this work quickly and easily. Knitting items of clothing for children is an exciting activity, and after a successful start you want to improve the skills you have acquired. Knitted step by step and completed in stages, this is just the beginning in the wonderful world of creating clothes for your beloved children.
Knitting booties with knitting needles is a very exciting activity for expectant mothers, because it’s so nice to knit cute booties yourself that will warm your baby’s feet.
But if you previously encountered knitting only at school during labor lessons, you only know the basics of knitting and are afraid that you won’t be able to handle even a small thing on your own, then our master class will come to your aid. These knitted booties for beginner craftswomen will come in very handy. They come with step-by-step descriptions, photos and a diagram of the sole.
We will tell you in detail how to knit a beautiful model of booties for a newborn, which can become the basis for your subsequent creativity. For example, for knitting or knitting.
These booties are designed to be worn by a child up to 3 months old. A little bit of growth. The length of the sole is 9 cm.
If you need booties only for discharge, you can switch to a smaller size. Or when knitting according to this pattern, use a thinner thread and hook.
To create booties you will need:
- yarn for knitting children's clothes - 25-30 grams (this is less than half of one skein);
- stocking needles No. 2.5-3;
- hook No. 2.5;
- large needle for sewing knitwear;
Knitted booties for newborns (from 0 to 3 months) - Master class for beginners with diagram and description:
1. We will start knitting booties from the sole. We cast on 8 loops + 2 edge loops on two knitting needles. 
2. We begin to knit with stockinette stitch, i.e. The front rows are knitted with knit stitches, and the purl rows with purl stitches. We knit the first row without increasing stitches, and in the second we begin to make increases according to the diagram.

Picture Diagram of bootie soles

3. We perform increases as follows - remove the first (edge) loop and insert a knitting needle into the jumper between the loops - you get an extra yarn over, which we knit like a knit stitch. We also increase before the last (edge) loop. 

4. In the third row we also make increases according to the pattern, and then we knit 7 rows with straight fabric and again knit a row with increases on each side. 
5. We knit another 10-12 rows with straight fabric, depending on how long you need the sole. For an older child, we knit more rows accordingly; for a newborn, 10 rows will be enough. 
6. Next, we perform rows with decreasing loops - to do this, before the edge loops, we knit two loops together, knit or purl, depending on the side on which the row is located. We do not close the last row. 
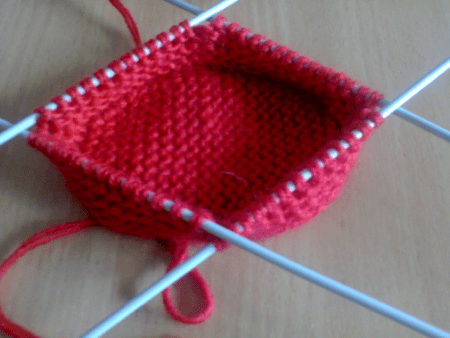
7. Leave the last row on the knitting needle (you need to knit the front row last) and cast on loops for the side walls of the booties - 14 loops on the sides and 8 loops on the heel, the same 10 loops remain on the toe. 
8. Next we knit in the circle with front rows, knit 3 rows. In order for a ruffle to form on the booties, you need to perform the following row - knit two stitches together, yarn over, then knit two stitches together and yarn over again. This is how we knit the entire row. 
9. Next we knit 3 front rows, which will belong to the ruffle. We knit the yarn over like one knit one. 
If you bend the knitted fabric at this stage, you will see “teeth”, which will form a ruffle. 
10. Now we knit 10 rows in stockinette stitch - the fabric has formed the side walls of the booties. 
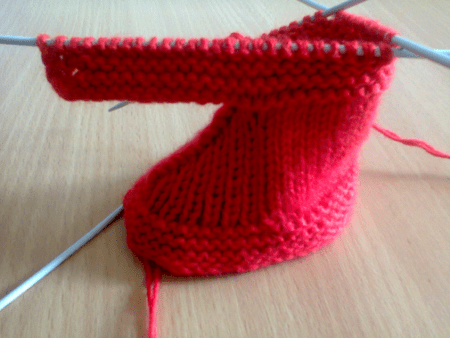
11. It's time to close the sock. To do this, we will perform decreases on both sides of the toe. We knit the front row of the sock (10 loops), transfer one loop from the next knitting needle and knit it together with the last tenth loop of the row that will form the toe of the bootie. 
12. Unfold the knitting and knit a purl row, also transfer a loop from an adjacent knitting needle and knit two loops together purl. 
13. Thus, we knit the bootie toe with knitting needles until there are 8 loops left on the adjacent knitting needles. 
14. We knit another front row of the sock, while decreasing on each side. This way we will have 8 loops on each knitting needle. 
15. Next, we continue knitting in the round with right rows. We knit 5 rows and perform 1 row in the same way as we formed the ruffle on the sole, i.e. knit two together, yarn over and two together again. A ribbon will then be inserted into this row, which will secure the bootie on the newborn baby’s leg. 
16. We knit another 5-7 rows and again knit a row to form “teeth”. 

17. We knit 3 more rows with knit stitches and close the loops as follows - cut off the working thread (tail about 40 cm) and insert it into a needle for sewing knitwear. Using a needle and the same working thread that we knitted, but cut, we begin to close the loops - we lower one loop from the knitting needle and sew it at the level of the third row from the place where we made the row to form the “teeth”. This is how we sew all the loops on the knitting needles. We fasten the thread from the wrong side and cut off the tail. 
This is how you get a ruffle from “teeth”; by the way, in this way you can process the edges of not only booties, but also blouses, as well as the necks and sleeves of various products. 
18. Now we sew the ruffle on the sole of the bootie. We fasten the thread from the wrong side and on the front side we sew a seam “back with a needle”. 
It turns out that this is an almost finished bootie. 
19. Crochet a cord of 100 air loops. 
20. Insert it into the holes on the bootie and tie a bow. 
21. We knit the second bootie in the same way.

Now your baby’s first knitted shoes are ready. You can decorate booties for a newborn according to your taste and imagination - beautiful baby buttons, beads, ribbons, ruffles and everything that you have in your handmade bins can also be used.
The booties knitted with knitting needles turned out to be 9 cm. For a child from 0 to 3 months.


A master class on knitting booties for beginners was prepared by Irina Nikonova.
You will need 50g medium weight yarn in two colors . Cast on 28 stitches using the first color on straight needles. Knit garter stitches 52 rows (by the way, you can adjust the shoe size by the number of rows knitted). Then close on the right side 8 pieces at a time . The number of remaining loops became 20. Next, we will continue knitting in a different color: first perform 4 rows in knitting, then 4 in purl. Repeat this 7 times and finish with knit stitches. . Close everything at once.
After this, connect, more precisely, sew the part with the edges facing each other to create a vicious circle. Then sew the main part of the workpiece, and along the rest of the part (knitted with strips) lay a basting stitch and pull it towards the center.
Decorate the top of your baby's shoes knitted applique , beads or any other decorations according to your taste and imagination. Turn away the protruding edges.
- Another simplest version of one-color booties with knitting needles. Thread thickness is medium or higher
The size of the product can be increased or decreased due to the length of the knitted toe.
Cast on 37 stitches and spread them across 4 knitting needles - 9 pieces each . Join the knitting into a circle by knitting the last two stitches together. Then knit 12 rows in a circle with a 1 by 1 elastic pattern. Don’t forget to make a row of holes where you will insert the braid or lacing. It works like this : Knit 2 with one, 1 yarn over, 1 knit (alternate until the end of the row). Then knit two rows with knit stitches, after which they need to be distributed as follows: 11 loops on the first knitting needle (try to ensure that the place where the knitting is connected into a circle is in the middle), 7 loops on the other, 11 loops on the third and seven on the fourth .
Now let's move on to knitting a toe . We knit it on 11 loops of the third knitting needle in a garter pattern, in reverse rows. We do not touch the remaining loops for now. We knit 18 rows of toe . Next we knit the sides. To do this, we cast on one loop from each edge loop on the sides and add all the postponed loops to the work. The sides are also knitted with garter stitches - 10 rows.
Well, then we will continue the sole from the top of the toe with facial loops, evenly grabbing and knitting together sole loops with side loops. Continue knitting until the side knitting needles run out of stitches. When all the eyelets are locked, the seam created on the heel is sewn together.
- Crochet "shoes"
We cast on 13 loops, knit a single crochet into the second loop from the hook and knit according to the pattern.
After knitting seven rows, we will get the finished sole of the shoe. We knit further from 8 to 11 row just single crochet - no additions or decreases.
Having knitted everything to the end according to the pattern, we get an almost finished slipper. Then we knit along the top edge three rows in single crochets and, fasten and break the thread.
To make the fastener, cast on a chain of 21 loops and knit a single crochet into the second loop from the hook, then knit according to the pattern.
Sew on the buckle and secure it with a pretty button.
Master class on knitting booties with your own hands
I suggest you try your hand at knitting a charming pair of shoes, your choice by knitting or crocheting, and an accessible description and detailed photographs will help you with this.
- Crochet booties
For these booties, I took the remains of the Turkish yarn “Lanoso” Egyptian cotton for children with a thickness of 50g/105m.
 Materials
 Let's start knitting from the sole - cast on 11 chain stitches. Add two for lifting.
 Step 1. Cast on 11 chain stitches
 For this model, I took Baby Wool Alize yarn 50g/175m in two threads. According to my description, the size of the sole turned out to be 8-9 cm, that is, also for a baby aged 0-6 months.
 Materials
 We start knitting from the sole. We put 8 loops on the knitting needles.
 Step 1. Cast on 8 stitches
 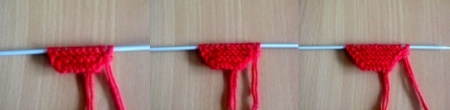 Step 2. Garter stitch
 In total we get 14 loops. We continue knitting 34 rows in garter stitch.
 Step 3. Knit 34 rows in garter stitch
 In the 35th row we decrease one loop from each edge.
We repeat decreases in the 37th and 39th rows. There are 8 stitches left on the needles.
 Step 4. From rows 35, 37 and 39, decrease one stitch from each edge
 Close all the loops until only one remains. And along the edge of the sole we begin a set of stitches on four knitting needles.
 Step 5. Close all the loops until one remains and cast on the loops on four knitting needles
 We should have 60 loops.
We knit 6 rows with a scarf pattern.
 Step 6. We knit 6 rows with a scarf pattern
 We divide the work into two parts - heel and toe. We perform the toe with a 1 by 1 elastic band, and the heel with the stockinette stitch. In the first row on the sock exactly in the middle (between 15 and 16 loops) add one loop. We knit four more rows according to the pattern.
 Step 7. We perform the toe with a 1 by 1 elastic band, and the heel with the stockinette stitch
 Then on half of the sock in each row in the middle we knit three loops together.
We continue this way until there are seven loops left on the sock, while knitting the heel with a knit pattern.
 Step 8. Continue this way until there are seven loops left on the sock
 We close these seven loops, and add 16 more loops to the number of loops on the remaining knitting needles.
 Step 9. Cast off seven loops and cast on 16 more loops for the remaining ones.
 We knit 6 rows with a scarf pattern. Don’t forget to make a hole for a button in the third row (knit two together, yarn over one).
 Step 10. Knit 6 rows with a scarf pattern and make a hole
 We close all the loops, cut the thread, and fasten. We remove the protruding ends.
We knit the second one in the same way.
 Step 11. Knit the second bootie
 Sew on the buttons. The shoes are ready.
 Step 12. Booties for the little princess are ready
 - When choosing yarn for knitting children's products, it is better to give preference threads marked “baby” . This yarn is soft and hypoallergenic , so the baby will wear products made from it with pleasure, and it will not cause him any inconvenience or harm. For one pair of booties, one skein weighing 100g is enough. All other necessary information can be read on the label.
- When choosing a model, it is better to focus on options that have no seams or they come out . The seams can rub the baby's leg or cause discomfort when worn.
- Try to choose safe decorative elements . Don't forget that kids are very inquisitive and will definitely try to tear off and taste your jewelry. If your shoes have buttons, appliqués, or clasps, check them thoroughly for durability.
- Excellent and crocheted decorative elements will be a safe decoration for the product – berries, leaves, flowers and much more.
I hope my detailed instructions will help you cope with this difficult task and your crocheted or knitted booties will delight your little one! Good luck!
Booties are the first shoes for a baby, which, as a rule, mothers want to make with their own hands. The desire to give the baby a piece of your soul in the form of a knitted amulet smoothly flows into the question of how to knit booties. They can be made using a hook or knitting needles. There are a great variety of models of knitted booties - from small sneakers to tiny sandals. And, with patience, you can knit any of them.
Booties owe their name to the inventor of elegant children's shoes with membranes in the distant 19th century, the French shoemaker Pina. Since then, booties have undergone many transformations and transformations, and have firmly established themselves as the first light and comfortable shoes for newborns and small children up to one year old. Handmade is incredibly popular these days, because the end result is something completely unique. While knitting booties, the needlewoman puts her care and love into them; a message of tenderness and warmth is sent through her hands. And you can be sure that you won’t see exactly the same shoes on any other baby.
First of all, you need to take care of choosing quality yarn. It should be hypoallergenic, soft to the touch, not fluffy. Acrylic, merino wool, linen, cotton are suitable; Mohair, Angora wool, and synthetic yarn are not suitable. Its composition must consist of at least 80% natural fibers. The thickness of the threads is medium; a product made from yarn that is too thick will be bulky and rough, and a yarn that is too thin will be difficult for a beginner knitter to work with. For the cold season, you need to choose wool threads, and for the warm season, cotton threads. The ideal choice would be yarn marked “For Children” from a well-known manufacturer.
It is necessary to remember that the baby will definitely pull her foot into her mouth, so it is not recommended to use finishing decorative elements; leave beads, rhinestones and sequins for older fashionistas. It is also important to be careful with laces; they should be short and tightly tied.
Ready-made booties must be comfortable, fit as comfortably and firmly as possible on the child’s leg. It is better to choose a seamless model. But if you really like sewn shoes, then the seams should be external and strong.
The color scheme for boys is traditional blue and blue shades, for girls - all varieties of pink. Red booties can be suitable for babies of both sexes. But orange, green and yellow, as a rule, are preferred by the children themselves. They improve their emotional mood. In any case, children's shoes should bring aesthetic pleasure and be made from yarn in joyful colors.
size table
A newborn baby's foot is very small, so choosing the size of booties must be done very carefully. This issue must be approached as scrupulously as possible, especially if the product is made for an unborn baby. It is possible to change the size by using thicker or thinner needles. Below are the approximate dimensions of a little person's foot.
0-3 months - 9 cm
3-6 months - 10 cm
6-9 months - 11.5 cm
How to knit booties “Shoes”
You will need:
Children's yarn, 2 colors (80% acrylic, 20% wool), density 135 m/50 g, approximately 30 g each.
Stocking needles 4 pieces, thickness 4 mm.

Step-by-step instruction:
We begin the work with white yarn according to the following pattern, evenly increasing and decreasing loops.

The knitted sole looks like this

We cast on 60 loops along the edge of the sole and distribute them as follows: 18 loops on the toe and 21 loops on the side knitting needles.


Next, we continue working with pink thread, distributing 60 loops in the same way. We knit the 1st row.

We knit the 2nd row with a white thread as follows: we knit one loop purlwise, slip the second one with a double crochet, leaving the thread before work. Knit in this way until the end of the row.
The 3rd row is knitted with a pink thread like this: knit the first loop purl, the next - knit, knitting it together with the yarn over loop. Knit to the end of the row.
In total, you need to knit 15 rows in this way.


Row 16 is knitted with white thread. There should be 15 stitches left on the side knitting needles, knit them, reduce the middle part by knitting 2 knit stitches in 1.

We knit the 17th row with white thread. Purl all 45 stitches.
Row 18 and row 19 – pink yarn. 45 knit and purl rows respectively.

Rows 20 and 21 - white yarn. 45 knit and purl stitches respectively

Close all the loops, tightening them a little.

We begin to form the strap. To do this, on both sides of the cast-on loop, we cast on 10 loops with white thread, for a total of 20, respectively.

We knit 2 rows in garter stitch: 1st and 2nd row with knit stitches.
For one bootie to the left of the edge, and for the other to the right, we cast on an additional 20 loops on the same loop.

We knit 6 more rows in garter stitch. Don't forget to make a hole for a button at the edge of the strap. To do this, in the 3rd row, 3 loops before the end, knit 2 loops together with the front one, and in the 4th row, make a yarn over in this place. In the 5th row, knit this yarn over with a knit stitch. 
Decorate the booties as you wish.


How to knit booties “Sneakers”

You will need:
Children's yarn, 2 colors (80% acrylic, 20% wool), density 160 m/50 g, approximately 30 g each.
Stocking needles 4 pieces, thickness 3.5 mm.
Step-by-step instruction:
- We knit the sole with light-colored threads using the pattern of booties-shoes.
- Next, along the edge of the sole, we cast on 52 loops and continue circular knitting with garter stitch for 6 rows.
- We knit the subsequent rows in stocking stitch, i.e. with facial loops, as follows: we knit the toe of the sneaker with white yarn, for this we continue to knit the front 22 loops with white yarn. We knit the remaining 30 loops with dark yarn. We distribute the loops into 3 loops, and cross them on the wrong side to avoid the appearance of holes.
- This way we knit 2 rows. Next, we begin to gradually close the white loops: we knit the adjacent dark and light loops on both sides with facial loops. We make such decreases in each subsequent row until the white loops run out.
- After finishing the white loops, the dark ones do not need to be closed in a circle, but we knit them on 2 loops in stocking stitch.
- After 6 rows of this knitting, we knit one row with purl loops, then with knit stitches again and bind off all the loops.
- We thread laces through both sides of the dark fabric. You can take ready-made ones or knit them in the form of a chain using a hook.
- The baby's sneakers are ready.
How to knit baby booties

You will need:
Yarn of the same color, about 50 g, density 180/50.
Knitting needles 2.5 cm.
Step-by-step instruction:
- Cast on 34 loops.
- 1st row: knit stitches.
- Knit the 2nd and all subsequent even rows according to the pattern, knit yarn overs with crossed loops.
- 3rd row: knit stitches. Knit as follows - edge stitch, 1 knit stitch, 1 yarn over, 14 knit stitches, 1 yarn over, 2 knit stitches, 1 yarn over, 14 knit stitches, 1 yarn over, 1 knit stitch, edge stitch.
- Rows 5 – 11 row: knit stitches. We continue to add yarn overs as in row 3 until the total number of stitches reaches 54.
- For subsequent knitting, you can choose any pattern: 1 to 1 rib or English rib, honeycomb pattern or garter stitch, stockinette stitch, or change the color to a contrasting one. We knit 2 cm with the selected pattern.
- Let's start knitting the toe. To do this, we knit the middle 10 loops as a heel. We begin to gradually decrease the loops located on both sides of the toe. To do this, we knit them 2 loops together. When the initially cast-on 34 stitches remain on the knitting needles, stop decreasing. Next, we knit a lapel of the desired height and close the loops.
- Decorate baby booties as desired.
How to knit summer booties-sandals

You will need:
Leftover yarn in different colors, 180/50
Knitting needles 2.5 cm
Step-by-step instruction:
- To knit the sole we use the pattern of booties-shoes.
- We knit the sides of the sandals. To do this, in the next 2 rows we evenly decrease 4 and 4 more loops. There should be 52 loops left on the knitting needles that need to be cast off.
- To fasten the heel side, cast on 15 stitches over the sole and another 25 stitches with chain stitches. We knit 4 rows, then close the loops.
- For the front “straps” we knit multi-colored strips of the required length and close them. We sew the “straps” to the sole.
- We decorate the sandals as desired. We sew a button onto the clasp.
How to knit seamless booties and socks

You will need:
Yarn of one color, approximately 50 g
Stocking needles 2.5 – 3.3, depending on the thickness of the yarn
Step-by-step instruction:
- Cast on 32 stitches on the needles, distribute them evenly into 4 and enclose them in a circle.
- From the 1st to the 12th row, all stitches are knitted.
- Row 13: knit 2 loops together and yarn over.
- Row 14: knit stitches.
- Knitting needles on loops must be placed on the knitting needles as follows: 2 times 7 loops and 2 times 9.
- Next, we begin to form the toe and knit it 30 rows.
- For the sides, we continue to knit the loops from the side knitting needles. We continue knitting 38 rows.
- The sole is knitted with facial stitches. In this case, each last loop must be connected to a bead loop.
- Close all loops.
These booties can easily be turned into a funny dog by knitting the nose and sewing it onto the toe, sewing on the eyes, and sewing knitted ears on both sides of the booties.

Mothers take care of babies from the first days of their life. Everyone needs the warmth of their mother’s hands, especially the little ones. Showing care in the form of knitted booties is very cute, and the touching shoes themselves look stylish and original. They can be worn by children who are standing on their feet and taking their first steps or who are starting to crawl. Or you can prepare them for the maternity hospital, so that the feet of a newborn baby can warm themselves with mother’s love.


