Today we will learn how to make an origami ball out of paper with our own hands. Despite the apparent complexity, even a beginner can create such a craft, and an accessible diagram and step-by-step instructions with photos will tell you how to do it correctly.
Tools and materials Time: 1 hour Difficulty: 4/10
- scrapbooking paper with a beautiful pattern;
- scissors;
- pencil and ruler.
- an interesting Japanese art that allows you to create a variety of three-dimensional figures and decorations from simple module elements, for example, like this origami ball. Making crafts using this technique is a great way to give your brain a rest and get rid of unnecessary thoughts in your head.

This volumetric ball is made using the modular origami technique. In fact, it is a polyhedron of 12 identical pentagonal spheres - a dodecahedron. This original ball is perfect for decorating a living room or children's room; it can also be hung in a doorway or on a window.

Step-by-step instructions with photos
So, let's get to work. To make the origami ball neat, first prepare your work area by thoroughly wiping it from dust and moisture.
Step 1: Cut the Paper
To build this model you will need 30 identical pieces of paper. Each piece should have dimensions in a 3:4 ratio (for example, 3 cm x 4 cm, 6 cm x 8 cm, etc.)
To make this voluminous origami paper ball, we used colorful scrap paper in light green tones, plain and with a geometric pattern.
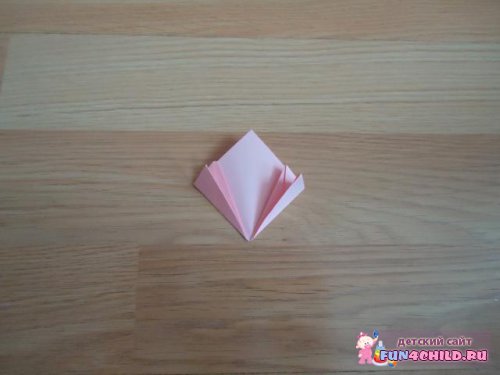
Step 2: fold the module
- Fold the paper into three sections in a Z shape. You now have a strip of paper in a 1:4 ratio.
- Fold the bottom right corner upward towards the opposite side.
- Next, fold the top left corner down towards the opposite side.
- Now take a ruler. Use it to make a diagonal fold from the top left corner to the bottom right corner. Using the same ruler, iron the folds thoroughly.
One of the modules is ready. Using the same technique, make 30 of these parts.

Step 3: Assemble the ball
Take two modules. Fold one piece with the folded corner into the inner flap of the other piece.

Take another module. Place the folded corner of the third module into the inner flap of the second module. After this, place the nearest corner of the first module into the inner pocket of the third module.

We used three different patterns for each of the corners, but you can assemble this ball any way you want! When you insert the last 30th piece, you will get a dodecahedron shaped ball.

The origami technique is multifaceted; it includes not only the folding of various models from a sheet of paper, but also modular figures, which involve the production of identical elements and their subsequent combination into one whole. It is by this principle that kusudama is made, which is the name given to flower balls created from individual elements.
The Japanese word "kusudama" translates to "medicine ball". Previously, the Japanese placed various medicinal herbs inside kusudama and stirred it over the patient’s bed. And these days these magic balls are used simply for decoration and decoration of rooms.
Kusudama - photos and diagrams of how to make
In this master class I will show 5 options - how to make kusudama from paper with step-by-step photographs with your own hands.
Openwork paper ball

These paper balls with a brush can be used for indoor decoration or hung on a Christmas tree. It all depends on your imagination. The openwork ball turns out to be very original and beautiful.
To create it you will need the following materials:
- white stripes - 30 pieces (size 4.5x9 cm);
- blue stripes - 30 pieces (size 4.5x9 cm);
- PVA glue;
- strong knitting thread.

Stages of work:
Take a blue strip of paper and fold it in half from left to right.


Then return to the starting position. Thus, the middle of the strip is visible.

Bend the upper left corner of the strip up to the middle.

Do the same with the second corner, that is, the right one. You just need to bend it from top to bottom.

Now bend the upper left corner down and the right corner up to the center line.


Repeat steps 3 and 4 again.


Now carefully unfold everything to the initial position of the leaf.

Take a white piece of paper and fold it in half.


Then step back about 0.5 - 0.7 mm down and bend again.

Carefully fold the leaf to the middle like an accordion.
At the end, there is no need to bend the corrugation one last time; there should be a protrusion.


Do the same with the second side of the workpiece. In the end it should look like this.

Now you need to bend the lower left and upper right corner.

From the reverse side the workpiece looks like this.


Then bend on both sides along the marked lines.


We bend the entire part along the lines of the blue blank. In the end it comes out like this.


The white center must be glued using PVA glue.

There should be 30 such blanks.

Now assembling the ball. Take one module and coat the pocket near the corrugation with glue.

Glue the second module in the same way as in the photo.

So glue 5 blanks together.


Continue gluing the side modules in a circle until a ball is formed.


At the end, make a brush and attach it to the ball.

This is such a beautiful and original openwork paper ball. It can be used simply for interior decoration.
In addition, this craft can be done with children and involve them in creativity.


Sonobe ball
This kusudama is perfect for a beginner. It consists of only 30 modules, which are very easy to fold.

To work, you will need 30 paper squares with a side of 8 to 10 cm. It is very convenient to use leaves from writing blocks, but you can cut squares from colored paper. In this version, 8.5 cm squares are taken in five different colors.

Let's start folding the module. Take a square of paper and fold it in half.

Unfold and fold the edges again towards the midline.

From opposite sides we bend the corners to the first horizontal line.

Bend the corners again.

Fold the sides towards the center of the square.

Make two diagonal folds.

We repeat the action in the other direction to get this pattern of lines.

We turn over one side of the workpiece and put a corner there.

We return the bend to its place.

On the other side, we tuck the edge of the paper into the resulting pocket to create a diamond shape.

Fold the rhombus in half.

We fold the triangle towards the center of the module.

We do the same with the other edge. The module is ready.

When all 30 pieces have been collected, we begin assembling the kusudama. We push the corner of one part into the pocket of another.

We form a pyramid of three modules.

In the future, when assembling, we focus on the “star” of five pyramids. This is what the correctly assembled side of the kusudama should look like.

We continue to collect. If the modules were made carefully, then everything will turn out smoothly and without glue. The last 2-3 modules are difficult to insert. Make sure your creation doesn't fall apart.

Our kusudama is ready.

You can decorate it with a ribbon or tassel and attach a loop for hanging. Or you can leave it like that.

Kusudama flower ball "Bells"
Bells are very beautiful flowers. They can be easily made from paper and shaped into a ball. A little-known technique called kusudama will help with this. At first glance, it may seem that the craft is very complicated, but it is not so. If you strictly follow the instructions, you can make such a ball quickly and easily.

Necessary materials:
- paper squares measuring 8x8 cm - 60 pcs.;
- PVA glue;
- paper clips;
- knitting thread;
- big bead.

Step-by-step diagram for making a kusudama ball
01. Take one piece, that is, a square and place it with an acute angle up to form a rhombus.

2. Now bend the workpiece from bottom to top horizontally.


4. Then bend the left half in half from top to bottom.

5. Bend the right half of the workpiece down. Then bend it in half.


6. Now fold the left corner of the module towards the right so that they do not overlap each other, but simply touch.

7. Hide the right corner of the module as shown in the photo.


8. Bend the upper triangle, which extends beyond the workpiece lines, down.


10. It is necessary to make 60 such blanks.

11. Each flower consists of five modules. They need to be glued in a circle. In order for them to be fixed, they must be fastened with paper clips.


12. There should be 12 flowers in total.

13. All bell blanks also need to be glued together with glue and secured with paper clips.


14. Glue the remaining flowers in a circle and form a ball.


15. Make a brush from knitting thread.

16. After the ball has dried and the parts are holding tightly, remove the paper clips and pull a brush through any hole in the ball and secure with a large bead. Kusudama ball “Bells” is ready.


This is the kind of beauty you can make with your own hands. This ball can be hung on a window or on a wall in a room. You can also decorate even a New Year tree with it. It all depends on your imagination and preferences.

Master class on making such a bright kusudama flower from paper.

To work, you will need a colored sheet of paper, some object for drawing circles, a pencil, scissors, and PVA glue.

Draw six identical circles on paper and cut them out.

Fold one of the circles in half.

Let's unfold it, after which you need to make a fold in the middle on one of the halves.

Turn the workpiece over to the other side and form small indentations in the upper part.

Apply a little PVA glue to one fourth of the circle from the edge.

Let's connect this part of the circle, and then apply glue to the other quarter of the circle.

Let's glue it together, our workpiece takes on the following form.

This is what one of the petals looks like from the front side.

Using the same principle, we make 5 more petals.

We begin to glue these elements together. Apply a strip of glue to one of them.

Let's connect this petal to another.

Let's continue gluing them together, and in the end we get a flower.

The flower using the kusudama technique is ready!

Video lesson “Kusudama superball”
The origami technique is becoming more and more popular every day. And this is not surprising. After all, with its help you can create masterpieces from paper. This process is so exciting that it cannot even be put into words. Of course, creating crafts requires a lot of time and materials. But such work brings pleasure, including aesthetic pleasure.
A beautiful and fairly simple ball can be made in 15 minutes from a rectangle of paper using the origami technique. Download the template for 2 balls from the link below.
Such a ball will decorate the New Year's holiday or simply serve as room decor.
To work you will need:
- printer for printing the template;
- office colored paper - 1 sheet for 2 balls;
- scissors (you can cut it to fit an iron ruler on a cutting board with a stationery knife - faster and smoother);
- glue stick;
- thread to match the paper with a needle.
How to make a three-dimensional origami ball from a rectangle of paper:

- and cut out a rectangle with marks for the folds.
- We make transverse “valley” folds across the entire width of the rectangle. When folded correctly, the template tends to curl into a tube facing inward.
- We make oblique folds of the “mountain”, located from right to left.
- We make oblique folds of the “mountain”, located from left to right. When you make the third type of folds, be sure to try to ensure that all three types of folds intersect at one point. This is more important than strictly following the drawn lines.

- Lubricate one vertical strip from the edge of the rectangle with pencil glue.
- Combine it with the strip on the other side - you should get a cylinder. Attention! When combining, the main thing is that the folds match!
- We thread the thread into the needle and make a huge knot at the end of the doubled thread (a small one can break through the paper and jump out).
- We make the first puncture from the inside out. We insert the needle in the middle from the inverted base of the triangles, departing 1.5-2 mm from the edge.

- The next puncture is in the adjacent triangle from the outside to the inside - and so on in a circle.
- At the end, we pick up the knot and the needle, tie a single slip knot and begin to carefully pull it together. If necessary, use your fingers to tuck the “valleys” down and the “mountains” up. Pull until the hole is closed.
- We fix the hole with a second knot.
- Repeat steps 7-11 for the second side of the cylinder. The thread can be cut, or you can make a hanger out of it.

Shared master class
Anastasia Kononenko
Paper is an excellent material for crafts with children and more. Using the origami technique, you can create an endless number of options for figures and decorations. Our task for today is a ball of paper flowers using the origami technique.
In order to make an origami flower ball, we will need:
- Paper (plain or colored), cut into squares. I use 7cm note blocks. You can use larger or smaller paper. From squares with a side of 7 cm, a ball with a diameter of approximately 13 cm is obtained;
- PVA glue;
- Paper clips;
- Ribbon. You can use cord, chain, etc.;

1. Fold the flower petals. To do this, take a square and fold it diagonally. It turns out to be a triangle.

2. We bend both corners to the top of our triangle so that we get a regular rhombus.

3. Now turn the corners out one by one.

4. Bend the protruding parts (ears) towards you.

5. Fold our corners inward along the fold line.
6. Apply glue to the halves of the corners and glue them together. Jam. When the glue dries. The result is one petal.

7. One flower needs five of these petals.

8. Glue all five petals together to create a flower.

9. For kusudama we need to make 12 flowers. They can be the same color, they can be multi-colored, as you like. As you can see, mine are colored.

10. When all the flowers are ready, we begin to assemble the ball. First, we collect two halves of 6 colors each. We fix the contact points with paper clips.

11. Then we connect the two halves of the ball with paper clips. This is roughly what should happen. Until we have fixed everything with glue, the flowers can be swapped.

12. When the composition is ready, glue the places where the petals touch each other with glue. Let the glue dry. It turns out like this origami ball of flowers.
First, let's figure out what kusudama is, where this term came from and what it means. Kusudama is a paper spherical figure, as well as a type of origami, it is made from several identical origami figures that are glued together. Kusudama is also the predecessor of modular origami. This term came to us from Japan. And initially it meant a medicinal ball; the Japanese placed medicinal herbs in it and hung it over the patient’s bed. This ball also served as a storage for incense and aromatic mixtures of dried herbs and petals. But now these balls are called balls of happiness, and they are used as home decor or are an excellent decoration for weddings, birthdays and any other occasion. Kusudama can also serve as a gift for family and friends for any occasion. Therefore, we propose to make origami kusudama together.
First, we suggest you look at the image of this figure, since it comes in different sizes, shapes and colors.


There is also an opinion that kusudama is not a type of origami, since it is made using many parts with the participation of glue and scissors, while others, on the contrary, believe that this is precisely a type of origami, since earlier this art also involved the participation of scissors and glue.
Introduction to technology
To begin with, we suggest you make one of the easiest types of this craft to get acquainted with this figure. This will be a kusudama flower, and we offer you a diagram for assembling this figure. This is what all the elements of this figure will look like, which will then need to be glued together and shaped into a ball.

To work, we will need 60 square sheets of paper measuring 7/7 cm and PVA glue. From this amount of paper we should get 12 flowers, which will consist of five such shapes.
We bend our square sheet of paper so that we end up with a triangle.

Now we bend the corners of the triangle to the top point and get a rhombus.

Then fold the previously folded sides in half.


Now we need to bend the upper corners of those sides that we folded so that they are equal to the main figure.

We bend both sides in half and glue the resulting triangles together.

And now we need to make 5 of the same petals and glue them together to make a flower.

You can watch the video for more detailed information and find out the answers to all your questions:
Now, in order to get a ball from these twelve colors, we need a few more minutes.

For this work we need glue, lace or a beautiful ribbon and beads for decoration.
Let's take 6 flowers, place one of them in the middle, and glue the other five around the central flower.

Now we will glue the flowers together, we will apply glue little by little, starting to the right of the center fold line.

When the glue sets well, we move on to gluing the next flower.

Glue it very carefully, first the first six colors, and then we get one hemisphere, and then the remaining six and we get the second hemisphere. By themselves, they look very beautiful and can already serve as a decorative item. But still, let's finish our figure.

Now let's design a lace or ribbon, depending on what you choose, on which the kusudama will be held. To do this, take beads and string them onto a cord. We tie the first and last beads with a knot to hold them in place.

All we have to do is connect the elements of our future ball; to do this we need to apply a small amount of glue inside the fold.

Then we glue the lace to the upper and lower petals, but the glue should be applied exactly in the center of the petal. We will glue the second part of the ball when the glue on the first one dries.

Well, that's all, our kusudama ball is ready. You can hang it above your bed, in your living room, or use it as holiday decor. It will also make a great gift.

You can also watch a video on how to assemble this ball correctly.
Star model
There are many models of kusudama in the world. And this kusudama resembles a three-dimensional star.

In order to make such a ball, we will need 30 square sheets of paper measuring 7/7 cm, they can be of different colors, then the figure will come out more beautiful, scissors and glue.
We present you a video that describes in detail how to make such a ball.

Ball with magic
The magic ball is a little different from kusudama, since it is made from one sheet of paper, but you will have to invest a lot of effort and patience. Because for this we will need to make several hundred folds and folds. But in the end you won’t regret how much you worked, as you will end up with an original toy, gift and decor.

For this craft, take a sheet of paper measuring 15/30 cm. Let's watch the video to learn how to make such a beautiful figure.
Video on the topic of the article
And now we present to you another selection of videos, thanks to which you will learn how to make other kusudama balls.


