Click Class
Tell VK
Who is the main symbol of the New Year? I believe this is Santa Claus. This old man pleases us with gifts and magic. What else do we expect from this holiday? Well, since we have already made Christmas trees, glued them, sewed them, then we definitely need to make Morozko.
Moreover, there are also many ideas for this. We will select options for every taste and for any material. After all, what is the most important thing in this craft? That's right, red hat and white beard. And that’s it, a guest from Veliky Ustyug is coming to us for a holiday. Well, for those who are closer to Santa Claus, there will also be ideas.
In general, it’s time for us to create and be inspired!
First, let's look at what creative individuals tried to make Grandfather out of. What happened to them at the first moment of creative thought? And for some reason I wanted to start the article with large interior and volumetric crafts.
Santa Claus from cups
These Frosts inspired me. All are made using the same technique, but how different they are, it’s simply amazing!
The combination of red and white cups immediately brings to mind who it is. Look at what beards are made of: cotton wool, cotton pads, paper, yarn.


And this Grandfather even has a beard made from cups.


So how do you make them? Let's look at the diagram. Draw the blank on paper with the diameter you choose. We will immediately lay out the equator of our ball. The larger the diameter, the larger the ball!

Then we lay out the cups along the line. We fasten them with a stapler and make a second, third row, removing 1-2 pieces from each layer to make a circle.
Or here’s an option where you only need one glass.

For the body we used a toilet paper or paper towel roll.
From candy
Next we have simple crafts and gifts with candies and lollipops. Remember, we looked at, and so there are also ideas with Frost and candies. I won't repeat myself. True, I only found one diagram. I am attaching it.


I was amused by the idea of wood. It turns out that to create, you just need to take the right paint colors.

From the cones
Since we started talking about natural materials, here are some ideas from pine cones.


If there are a lot of cones, then you can do the same for Big Frost. But, of course, this craft is not for one day.

Another interesting option is made from napkins. From a distance, they also resemble cones.

Maybe someone likes to felt wool? Then here is a craft for you as an example with step-by-step actions.

This drawing was used as a basis.

Let's start with the body.

Using it we make a pattern from red fabric, leaving room for the head.


Turn it inside out and sew it together. We put it on a body made of wool.

Tighten the bottom edges with thread.


We make a hat, fur and beard.
Made from plaster or salt dough
Nowadays it is fashionable to make crafts from plaster. But for those who have children under five years old, it is better to make salt dough.
And you need to make an imprint of an outstretched palm, look.


Making a palm print. Dry the material.

Mark the drawing.

And we will implement it in colors.
We thread the string through the hole and hang it on the tree.
I’m sharing with you my discovery of popsicle sticks.


From threads
Have you ever seen the technique of pulling thread through nails? So, for those who are interested, these are the frosties you can create.


And with the help of a cone base and yarn, a very simple but interesting craft is made.

- felt,
- heat gun,
- yarn,
- paper cone,
- decor.
First, let's start with this felt face.


We cut out the necessary parts and glue them with hot glue.


Now we need to make a cone out of paper and wrap it with threads to make it look like this. Make sure there are no gaps.

The edges need to be well fixed with glue. 
Let's put the craft together and don't forget about the handles. 
From disposable plates
Yes, many people definitely have this improvised material lying around in their kitchens. Great craft idea for kids.


For this master class you will only need part of the plate. It will act as a sleigh.


Let's now take a step-by-step look at how frosting is made.
Take a plate and cut off 1/4 of it. Paint the inside, where the flat and smooth part is beige.
Take a red paper triangle and glue a plate onto it. All that remains is to form the eyes, mustache and pompoms.

Look what a cool beard Grandfather can make from disposable spoons.

And even eyebrows can be made from them.

Of course, there is an idea made from plasticine. Everything is shown in detail in the photo instructions.

If you happen to have a sheet of foam plastic at home, here’s what can come out of it.

There's a plastic water bottle lying around, dress that up too.

Well, there’s also a cool option with one plastic spoon, a cotton pad and yarn.


Take a spoon and cut off a stalk from it. We wrap the edge with thread. And coat the convex side with glue. Roll up the cotton pad. And glue it onto the spoon. All that remains is to add the missing elements.
How to make a craft from nylon tights, master class in video
There is a cool idea for creating dolls using the stocking technique. Unfortunately, I am not a master at this, so I am providing a master class in video format.
And here I’ll give you an idea from a sock

You can make a body without handles. The main thing is that it is sustainable.

Well, do you often find balloons in your house? They also make wonderful Santa Clauses.


That's not all. We can say that we are only at the very beginning of the journey!
Patterns for Santa Claus made of fabric (tilde)
Now I'll give you a lot of patterns. There are ideas using the Tilda technique, and there are just patterns for soft toys.


Scheme 3. 


For inspiration!


Scheme 10.
Scheme 11. 


Scheme 14. 


If you can’t save or download the diagram, then take a screenshot of the screen and edit the picture in Painte. This graphic editor is installed on all operating systems.
Knitted Morozko and patterns
Now options for crafts for those craftswomen who knit. I liked these non-standard Morozushki. And it doesn’t matter that none of them is wearing a red hat; you still can’t confuse them with anyone else.

This selection shows how to knit such beauties.

Of course, there is a scheme.

The idea is the same, but here the crochet pattern is different.

You can also make a three-dimensional Santa.

Or just cross-stitch it.
We'll talk more about embroidery below. There will be enough diagrams there.
Video on how to make Grandfather from cotton wool
In our childhood, Father Frost and the Snow Maiden were made from cotton wool. If you miss those times, then here is a master class for you. It is presented in video format to eliminate all possible questions, because the craft is complex.
Of course, here you need to practice a little, but it’s still not that easy.
Simple paper crafts
Of course, we will now make crafts from paper and cardboard. There is simply nowhere without this. This is the most accessible material for us. Especially if the children make the crafts.


In addition to this Frost, you can decorate the windows. For example, using this stencil.


Cones make a lot of different ideas. In the photo below you will see a detailed master class on how to create such funny Frosts. This cone pattern can be used for any other crafts.


Well, here’s another great idea made from cardboard and paper. The main thing is what kind of beard turns out gorgeous with 0 rings!


And these little grandfathers can even be hung on the Christmas tree. I really loved the bow mustache idea.


Here are more cone blanks.

Based on them, such crafts are made.

Or you can simplify the task. And make the base yourself. The main thing is to secure the edges of the cone well so that they do not unravel.

Another fun craft and a master class for it.

Now for a more complex idea. This Frost is made from two paper balls.

Such balls are made according to this scheme. By the way, you can do it at the same time.
For those who are familiar with the quilling technique, here are some ideas.

You can make an individual gift for each party participant from corrugated paper and sweets.

I laughed at this craft. How funny Santa turned out.

The hat folded like an accordion is simply incomparable. Both volume and relief are created at once.

Another craft with a curly beard. 
You can create such an interesting Frost from cardboard.

Idea for little kids! Use your own stencils for crafts.

This craft can be made from pieces of paper or plasticine balls.

Hello Santa from Peppa Pig!

Our parents keep making crafts and crafts. And we thank them and take them into service!

Now I’ll give you a few stencils for gift boxes with elements of Santa Claus.


And I almost forgot to show you these pendants.

You can also make them as postcards.
Making crafts from cotton pads for kindergarten children
Of course, it’s very easy to make crafts from cotton pads. For example, like this Frost. You just need to prepare the materials in advance. So that there is enough for each child. and there are usually about 30 of them in kindergarten groups.

Idea for home creativity.

It is very easy to glue paper and cotton pads with PVA glue. Moreover, this is the safest type of glue. It can be used for creativity even by the smallest children.

This option was in the first section, but I decided to remind you.

Santa Claus's beard can be very useful at various matinees.

Put on a red cap and a red T-shirt and young Santa Claus is ready. Or Santa Claus.
DIY Santa Claus made from felt
Certainly, ! They don’t make anything out of it! And definitely a lot of patterns and templates. Let's get started, please!
This is your first master class. This is a Christmas tree toy. You can, of course, play with it like that, but it’s too unstable. 

Pattern for Santa Claus.

These crafts simply amaze with their thoroughness and presentability.

There may be several patterns for them. For example, this one. 
It also turns out to be such a Morozushko.

For the cap, take this diagram.

The next pattern for the pendants. 
Now for detailed instructions on how to sew such a boot for gifts.


A very unusual idea. You can use not only felt, but also fabric.


Another template for inspiration.

You can make a lot of wreaths. They are suitable as decor for any room.

This Frost will not leave anyone indifferent. It can also be used as a pendant, because the hat has a convenient hole for this.


For decoration, you can make several New Year's symbols: a Christmas tree, a star, a Christmas ball, deer, etc.


Fantasy is limitless. Therefore, based on one pattern, you can create many new ones.

What attracted me to this craft were the bells. How festive they ring!

You can also make three-dimensional and flat figures. I provide patterns for both.


This Frost is very similar to the New Year's gnome, but does not lose its relevance and charm at all!

In general, only your imagination is important. And we will provide you with the diagrams!

How do you like this craft using bushings?

There is nothing complicated here and you don’t even need to sew anything.
How to quickly and easily make Santa Claus from a bottle
So, the bottles are different. Someone decorates the beauty with champagne. And someone creates something out of a plastic water container.

Of course, if we are talking about children, then we will take a closer look at the ideas. Here, for example, is a stand for office supplies or small toys.

Or just an interesting craft for decoration.


Santa can be the packaging for a child's sweet gift.

For inspiration, here are more options for oldies.


Cotton swabs come in handy too!

I think that a child can choose for himself what idea he wants to bring to life.
Santa Claus for New Year from origami
Origami is popular among schoolchildren. This is a bit difficult for small children. We once tried to make a dog with a child of about 18 years old, he understands everything, but it’s not possible to repeat it a bit. Therefore, this section is for those who are older.

There will be several master classes. All with a step-by-step description of the work.

Diagram with arms and legs.

Are you familiar with the modular origami technique? There, first many blanks of the same shape are made. and from them a craft is formed.

The following is a step-by-step diagram.

Another option.

Detailed step-by-step photographs will not let you get confused. 
How do you like this option? 
And the Santa Clauses have already gone.


Well, one more variation.
In general, attentiveness is important here.
New Year Card Ideas
Finally, let's look at ideas for postcards with our character. It can be flat, three-dimensional, monochrome or colorful. Small or big. It depends on you! The main thing is the mood in which you created it!
Use different techniques and unusual shapes.

Combine different materials: pompoms, buttons, paper and cardboard, wood and wire.
And also several drawings to create a postcard. you can simply print them out and give them as a gift, signing your wishes on the back. They can also be used as window decorations.
Here is the simplest card idea that you can create together with your child.
For inspiration, you can look at crafts and just take their outline.
The postcard itself can be of different shapes; it can unfold, shrink, or simply open.
Or it may be in the form of an envelope.

As you can see, there are no restrictions anywhere, it’s just important to think through the composition, prepare the materials and start creating! I wish you health and every success.
Tweet
Tell VK
On the eve of the New Year holidays, everyone is expecting miracles, preparing and trying to follow traditions. Kids are in a hurry to decorate the New Year tree so that Santa Claus will come quickly and give gifts. Recently, DIY crafts have become popular.
Let's look at master classes on how to make Santa Claus with your own hands from scrap materials. The step-by-step implementation is clear to children, so they will create with pleasure and joy.
From leftover felt and fabric
The fabulous Santa Claus, made of felt and fabric, seems so cute! I just want to quickly start creating such a beautiful character.

Materials:
- a piece of felt;
- textile;
- thread;
- pine sprig for hat decoration.


Manufacturing process:
- First you need to take the Santa Claus template, attach it to felt, circle it with soap and cut it out.
- You also need to cut out a hat and beard using the stencil. The cap at the top will have to be tied with braid, so it will be voluminous.
- At the very end, connect all the parts together, securing them to each other with glue.
To prevent the glue from bleeding through the material, it is recommended to sew the parts together. However, such a process will take a lot of time.
From the bottle
A beautiful big Santa Claus is made from plastic bottles. The grandfather figurine can be placed under the Christmas tree.
First you need to take the bottle in your hands and visually determine where the parts of the body will be located: the head, the torso, where the beard and belt should be drawn, the cloak. The figure should be proportional.

Paint the fur coat red, make the belt black, the face beige, and the beard white. After drying, put a sewn cap on your head, attach a mustache and mittens.
From a light bulb
The used light bulbs are suitable for creating various Christmas tree decorations. To do this, you need to be patient, take a brush and acrylic paints, and start creating.
You need to draw Santa Claus, a fawn, a pine cone or other characters and objects according to your imagination or look for similar drawings in coloring books.


It can be done differently. To work you will need glue and semolina. First you need to coat the light bulb with glue, and then roll it in cereal. After complete drying, paint with paints. You can decorate toys with sparkles, pom-poms, rhinestones, and beads.
Santa made from toilet paper tubes
A roll or tube of toilet paper or paper napkins will be needed to make a pipe through which Santa Claus descends into the house. The craft turns out so bright that children are happy to take on it. Moreover, they have hope that Santa will come down to them to pamper them with gifts, because the New Year is a holiday of hopes and miracles.

Materials and tools:
- toilet paper roll;
- cardboard;
- scissors;
- glue;
- paints.
Manufacturing instructions:
- This New Year's craft for Santa Claus pleases with its ease of execution. You need to take cardboard, wrap it around a roll and measure out a suitable rectangle. Then cut out the stencil, paint it with red paint and draw black lines - these will be the bricks. The result was a blank for the pipe.
- After drying, you will need to glue the workpiece to the roll, wrapping it tightly. You can do without unnecessary steps and immediately color the roll itself. This will be much faster, but with additional cardboard the craft will be more stable.
- Next you need to make blanks for a hat with a pom-pom, make the socks and mittens from black cardboard, and the legs will be ordinary strips of paper made from red cardboard.
- First, let's create a composition when the fairytale grandfather goes down the chimney. To do this, you need to make sure that only your legs and the stuck bag of candy are visible from the pipe.
- And the second composition shows how Santa Claus gets out of the chimney. To do this, you need to slightly raise the grandfather cap above the level of the pipe and bend the mittens and fasten them so that you can see that it is rising outward.


A black gift bag can be designed in another color, usually it is red. To prevent the gift bag from blending into the pipe, you can draw a black stripe along the edge of the red bag.
Santa Claus made from ice cream sticks
Previously, ice cream was sold only with wooden sticks, but now excellent material for creativity is available for free sale. By adding a little imagination, you can get a beautiful New Year's wall decoration.
You can make a simple or complex character figurine from sticks. To make a simple figurine, you will need to take a stick, color it accordingly, draw eyes and glue on a beard made of fur or cotton wool.
To make a complex figurine of Santa Claus at home, you need to take several sticks and draw Santa Claus on cardboard. Then glue one stick horizontally - there will be grandfather's eyebrows, and use 5 sticks to make a beard. Attach a loop to a horizontal stick and glue the mustache.
From a paper plate
Christmas is a delightful holiday for which you want to thoroughly prepare. Santa Claus can be made from an ordinary paper plate. By the way, if anyone cannot buy a ready-made one, you can make it yourself from papier-mâché.

Materials:
- paper plate;
- brush;
- acrylic multi-colored paints;
- red velvet paper - 1 sheet;
- White paper;
- eyes;
- scissors;
- glue.

Manufacturing process:
- First you need to prepare the necessary templates: a red paper triangle, white balls, eyes, pompom, glue.
- Next you will need to switch to working with the plate. You need to visually divide the plate into 3 transverse parts and cut off the top one. The middle needs to be painted over with beige paint to match the tone of the face.
- Then the finished part for the face needs to be glued onto the triangle in such a way as to create an image. The proportions must be chosen independently.
- All that remains is to glue a strip of white paper for the eyebrows (it also covers the cut line of the plate), nose, mouth, and eyes.
Wonderful Santa Claus is ready. You can safely celebrate the New Year!
Santa Claus beard decor made from old tulle and organza
To make a beautiful door pendant you will need:
- circle;
- tulle or organza;
- Little Red Riding Hood (ready).

Manufacturing process:
- You will need to cut the tulle or organza into long strips, and then, using the macrame technique, make a beard. The strips need to be secured with a knot.
- First, fold the organza strip together. Place the side on which the loop was formed under the circle inside, and then wrap the circle itself, pull it through the loop and tie it tightly.
- The process will need to be repeated until you get a beard.
Put the cap on top - the pendant is ready. Let it protect your home and bring happiness!
Paper Santa Claus
The art of origami is a complex but fascinating creative process. It originated a very long time ago. From childhood we remember how our parents made boats for us, and we sailed them along the streams. They themselves also tried to learn this craft.
Over time, more and more complex compositions began to appear, which require logical thinking and are designed to develop fine motor skills and memory. Therefore, a child must first perform origami toys under the guidance of adults, and then independently.
Materials:
- colored red paper;
- scissors.
Manufacturing process:
- To make a cap, you will need to cut out a rectangle of the required size from paper.
- Then on both sides (which are longer), make longitudinal folds 1.5 cm wide.
- Then turn the sheet of paper over so that the acute corner of either side faces up and fold it into a triangle - first one side inward, then the other.
It turned out to be an interesting cap for decorating a New Year tree or for Santa Claus. You can glue a cotton wool pompom.
Santa in the chimney
Young children are often told the story that Santa comes into the house late at night through a chimney and leaves gifts under the tree. The kids love this fairy tale and look forward to the evening when Santa brings them gifts.

To make it you will need thick cardboard for the pipe and soft felt for Santa.
Using the presented templates you need to cut out a pipe and parts for Santa. Which color to choose is up to you. Then you need to glue the pipe, and sew the Santa Claus parts and fill them with padding polyester to make the toy seem huge. Put Santa in the chimney, as if he was going to come down to the house and give souvenirs.
From old keys
There is nothing complicated. You just need to be able to draw or really want to learn how to do it. On old keys you should paint the face of Santa Claus and a hat with acrylic paints. And make a beard from small rhinestones, you will get a brilliant Santa Claus with a beard sparkling like frost.

From paint brushes
A cute Santa can be made from paint brushes. It can be hung on the Christmas tree or somewhere in the house in a visible place.
You need to take a brush with good bristles, paint the handle with red polka dots - this will be a hat. The beard is the bristles of the brush, and the metal strip connecting the brush will serve as the face, so you need to stick the eyes on it, just below the nose. Make a cool head of hair from cotton wool above the eyes, tie it with a ribbon and decorate it with a bow or flower arrangement.


Made of wood - for garden decoration
Many people celebrate the New Year in a house on a country plot. We offer an idea to create a festive mood: Santa Claus made of logs, who will stand and keep order.
Materials:
- flat log;
- paints;
- scarf material.
Manufacturing process:
You need to make a cut on the log obliquely - this will be the face of Santa Claus. Then take paints and draw a beard, eyes, nose, mustache and little red riding hood. Tie a scarf from a piece of material.
From socks
The socks make a creative Father Frost and Snow Maiden. Interesting ideas for a school creativity fair.

Materials:
- red, white and blue socks;
- threads with a needle;
- cotton pads;
- buttons for eyes.
Manufacturing process:
- For Santa Claus and Snow Maiden, you need to cut off the bottom of the red and blue sock and fill them with rice. You can, of course, use sand, but it will spill out. Tie with thread.
- To mark the head and body, you need to tie it with thread again, but so that the parts are not equal.
- Then all that remains is to put on a hat, glue or sew on eyes, a nose, a mustache from cotton pads, and give Santa Claus a staff in his hands. It can be made from wire and wrapped with tinsel.
And so that the long-awaited guests do not catch a cold, you can tie them scarves from strips of socks.
From cotton pads
A cotton pad is not a material for creativity? It is very light and can be used to make Santa Claus for the Christmas tree or give a beautiful toy to friends.

Materials:
- cotton pads;
- glue;
- velvet red paper.
Manufacturing process:
Everything is extremely simple. First you need to take one disk for the base. From another disk, cut out curls for the mustache and a round pompom for the hat. Cut out a cap and a circle for the nose from red paper. All prepared parts are applied to the main disk and glued together.


It turns out to be an elegant, beautiful toy that you can make with children in kindergarten.
From leftover plywood
After the repair, pieces of plywood remain. There is no need to throw them away; they will be needed for the New Year's Santa Claus toy.
Materials:
- plywood;
- white felt;
- a piece of burlap;
- red fabric.
Step-by-step manufacturing process:
To make the toy, you need to make blanks from plywood in the shape of a square, a triangle and an asterisk. There are 2 options for making Santa Claus.
- You need to glue white felt for the beard onto the prepared triangle and make your face milky. Draw eyes and glue a red nose. The cap is made in the shape of an asterisk.
- Glue a mustache, a hat made of round wood onto a rectangular base, and decorate with a bow made from a strip of burlap.
The result was some cute toys made from waste material. The first option can be hung on the Christmas tree, but the second one will be a little heavy, so it can be hung on the wall or above the door.

Unusual, extremely simple and original crafts, such as DIY Santa Claus from scrap materials, are intended not only for decorating a Christmas tree or room for the New Year and Christmas.
By performing them, children acquire skills and abilities to work with various materials, they develop thinking, creative imagination, fine motor skills, which is of no small importance in preparing a child for school, and kids also get great pleasure from work - this is perhaps the most important aspect to enable the child to realize his ideas into reality.
For several years now, before the New Year holidays, my child and I have been making Christmas tree decorations from cotton wool. This material for children's crafts is convenient, affordable and safe. This time we made a wizard Santa Claus so that ours would not be bored.
We needed:
- cotton wool- 250 grams
- Potato starch- 0.5 tbsp
- Yogurt bottle- 1 piece
- Packaging from chocolate Santa Claus- 1 piece
- Plastic straw- 1 piece
- Satin ribbon- 30 cm.
- Decorations(sequins, sparkles)
How to make Santa Claus from cotton wool and a plastic bottle
1 . Pour one tablespoon of cold water into a plate. Add 0.5 tablespoon of potato starch.
 2
. Stir until dissolved.
2
. Stir until dissolved.
 3
. Gradually pour 1 cup of boiling water into the resulting mixture, constantly stirring the potato paste. Leave for 15 minutes for the glue to cool to room temperature.
3
. Gradually pour 1 cup of boiling water into the resulting mixture, constantly stirring the potato paste. Leave for 15 minutes for the glue to cool to room temperature.
 4
. Pierce a plastic yogurt bottle (this is easily done with ordinary scissors), making holes at the same level on both sides for a plastic tube, which you can then pull through. Leave pieces of the same length on both sides - this is a blank for Santa Claus's hands.
4
. Pierce a plastic yogurt bottle (this is easily done with ordinary scissors), making holes at the same level on both sides for a plastic tube, which you can then pull through. Leave pieces of the same length on both sides - this is a blank for Santa Claus's hands.
 5
. You need to make two holes in the lid and thread a piece of beautiful ribbon through them. Tie a knot on the inside of the lid.
5
. You need to make two holes in the lid and thread a piece of beautiful ribbon through them. Tie a knot on the inside of the lid.
 6
. Remove the wrapper from the chocolate Santa Claus. Cut out a piece with a face. Attach the image to the bottle. Secure the top edge by screwing the foil lid on.
6
. Remove the wrapper from the chocolate Santa Claus. Cut out a piece with a face. Attach the image to the bottle. Secure the top edge by screwing the foil lid on.
 7
. Now we begin to cover our Santa Claus with cotton wool. We tear off thin, long cotton flaps, moisten them generously in starch jelly and place them on the bottle, without touching the area with the image of the face. The ends of the flaps should lie crosswise. When you wrap cotton wool around Santa Claus's hands, try to ensure that the ends of the flaps end not on the palms, but on the torso.
7
. Now we begin to cover our Santa Claus with cotton wool. We tear off thin, long cotton flaps, moisten them generously in starch jelly and place them on the bottle, without touching the area with the image of the face. The ends of the flaps should lie crosswise. When you wrap cotton wool around Santa Claus's hands, try to ensure that the ends of the flaps end not on the palms, but on the torso.
 8
. In this way we gradually make a fur coat, a beard, a hat, and hands. To make your beard voluminous, simply place several flaps (not one thick one, but several thin ones on top of each other, from different trajectories). Wet the cotton generously!
8
. In this way we gradually make a fur coat, a beard, a hat, and hands. To make your beard voluminous, simply place several flaps (not one thick one, but several thin ones on top of each other, from different trajectories). Wet the cotton generously!
 9
. While the starch jelly is wet, you can attach various accessories to it, for example, sequins, light braid, sparkles. If, after drying, some of the jewelry falls off, it can be secured with a glue gun or thread.
9
. While the starch jelly is wet, you can attach various accessories to it, for example, sequins, light braid, sparkles. If, after drying, some of the jewelry falls off, it can be secured with a glue gun or thread.
 10
. The finished craft should be left to dry at room temperature. Do not place Santa Claus on a window or radiator, the cotton wool will turn yellow and the festive appearance will deteriorate. It will take at least a day for it to dry completely. Santa Claus will lose significant weight and the Christmas tree toy will become light, suitable for decorating the holiday tree.
10
. The finished craft should be left to dry at room temperature. Do not place Santa Claus on a window or radiator, the cotton wool will turn yellow and the festive appearance will deteriorate. It will take at least a day for it to dry completely. Santa Claus will lose significant weight and the Christmas tree toy will become light, suitable for decorating the holiday tree.
Magic grandfather is ready to decorate the New Year tree

Santa Clauses made from cotton pads
Are you preparing a craft for kindergarten for the New Year? An excellent solution would be to make a magic grandfather from cotton pads. By the way, during the work, you can discreetly and unobtrusively find out what kind of gift your child is expecting for the New Year.
For the craft you will need:
disposable plate;
cotton pads;
red colored paper;
half of a Kinder egg case;
shifty eyes;
PVA glue, scissors, simple pencil.
Start with the Santa Claus hat. Cut out a semicircle from red paper. You can use a disposable plate as a stencil. Let the child try to cut out the part along the contour on his own. Glue the hat to the plate. Decorate the edge of the hat with halves of cotton pads. Make a pompom from the whole disc.
For the nose, take half a Kinder egg case and carefully wrap it in red paper. Try to make as few folds as possible. Secure the paper with glue and attach the red nose in the desired place. Glue on the eyes.
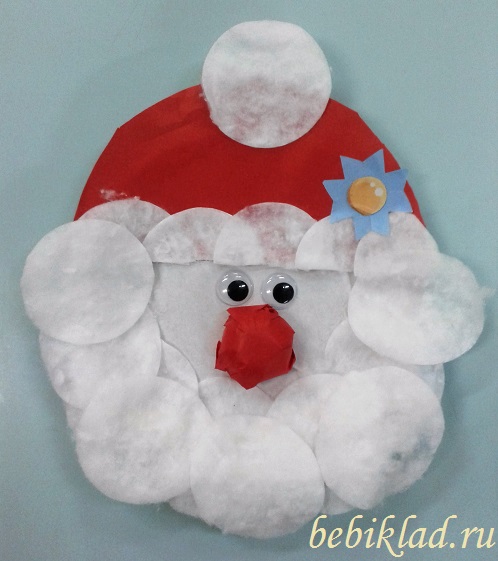
Divide the cotton pads into two parts. By the way, this is an excellent exercise for developing a child’s fine motor skills. Glue the discs so that the fleecy (inner) side is on top. After all, Santa Claus has a fluffy beard. Make sure that the circles are positioned evenly along the circumference of the plate. For volume, you can make several layers.
Glue a paper snowflake, Christmas star, brooch, or other decoration onto the hat. Let your imagination run wild. This will add personality to the craft.
If you glue a loop on the back side, you will get a Christmas tree toy or just a New Year's decoration. The craft will become an interesting gift if you write New Year's greetings on the free side. You can make the Snow Maiden and other fairy-tale characters from disposable plates and cotton pads. Perhaps you will have actors for a real New Year's performance. It’s so great to create with children!
Santa Claus: all about your favorite New Year's character
It may seem that the New Year holiday has existed at all times. Moreover, exactly in the same form as it is now - cheerful winter holidays with decorated Christmas trees, children's round dances, the beautiful Snow Maiden and, of course, Father Frost. However, this was not always the case.
A little history
In Rus', the arrival of the New Year was celebrated either in spring or autumn, and no one ever decorated the Christmas tree. Peter the Great tried to force people to celebrate the coming of another year on the first day of January just a little over three hundred years ago. True, the glorious tradition did not take hold immediately. And if in Germany Christmas trees appeared a long time ago, then in Russian cities - only by the middle of the nineteenth century. In village houses, the new custom took root for decades.
The character, without whom the modern New Year is unthinkable, did not exist at all. The image of Santa Claus emerged somewhere at the beginning of the twentieth century. By this time, Zimnik with its cold and snowfalls, and the harsh Moroz the Voivode, and the perky Morozko, and the foreign Santa Claus were known, but our beloved hero was not.
Some researchers are inclined to believe that the Russian Father Frost was borrowed from European culture, and his prototype is St. Nicholas. Others are sure that this New Year's hero was invented by the Russian people. In any case, by the beginning of the last century, the purpose and image of this character were completely formed. His character was also determined: a handsome and kind grandfather, at the same time strict and fair, inspiring trust and able to fulfill his innermost desires.
In pre-revolutionary Russia, both Father Frost and the decorated Christmas tree symbolized well-known biblical events. The tree was decorated for Christmas, the main decoration was the golden star of Bethlehem, and the kind Father Frost gave gifts to the children for the holiday. In those days, our character was not particularly popular.
The revolution and wars pushed all kinds of celebrations “for later,” and the anti-religious campaign launched in 1927 completely canceled everything related to Christmas. In 1935, the government, with the personal permission of Comrade Stalin, returned everything to Soviet citizens at once: the holiday, the Christmas tree, and Santa Claus. True, the new winter holiday symbolized only the arrival of the calendar year, and its original meaning was lost.
Santa Claus has become one of the main symbols of New Year's celebrations. Now he has faithful assistants: his cheerful and beautiful granddaughter Snegurochka, as well as a snowman, always ready to help out in difficult situations. Over time, our character acquired personal transport: a traditional Russian troika, harnessed to a painted cart or wide sleigh.
Ordering Father Frost and Snow Maiden to your home was already possible in those years. Thousands of Soviet children carefully prepared for the exciting meeting, learning songs and poems.
Our days
The national recognition and respect won by our hero in the Soviet country remained even after the collapse of the state. In Russia, New Year (including the old one) and Christmas are loved and awaited; the large country begins to prepare for the celebrations almost from mid-November. Not a single New Year's event is complete without a kind, fair and generous wizard, be it the Kremlin Christmas trees or office corporate parties.
The New Year's character is also used for pedagogical purposes: every child knows that a gift from an attentive and fair Santa Claus can only be received if he studies well and behaves well throughout the year. However, on wonderful holidays, all children receive gifts from their kind grandfather - both obedient and not so obedient.
The most important residence of our hero is located in Veliky Ustyug, in the Vologda region. There, Santa Claus rests, receives guests, answers letters, and on November 18 celebrates his birthday.
For many Russians, the annual meeting with their favorite New Year's characters is another opportunity to return to a serene childhood and believe in all the good things.
Video “How to make Santa Claus from cotton wool master class”
Start making New Year's crafts with your children in advance so that you can celebrate the holiday in a special way later. You can cut out snowflakes and shiny stars from foil, prepare greeting cards, and glue multi-colored garlands. But you can’t do without the figure of Santa Claus.
There are many different ways to make the main symbol of the New Year. One of the simplest and most accessible is Santa Claus made from cotton wool.
Decades ago, three-dimensional toys, including Santa Claus, made from cotton papier-mâché were very popular. Try to make a bright, original craft from cotton pads.


Master class: Santa Claus on the Christmas tree
In order for the toy to be hung on the Christmas tree, it must be light. Therefore, in addition to cotton pads, take:
- an empty plastic bottle, such as a vitamin bottle;
- felt-tip pens, paints;
- scissors;
- glue.
If you plan to display the craft rather than hang it, then you need to weigh the bottle down or use a glass one.

The bubble will be the body of the craft; it needs to be carefully covered with cotton pads. To make hands, divide the cotton pad into two parts. Twist each thin part into a ball and glue the wide part of the resulting bag onto the sides of the body.
The head can be made in two ways:
- Mold it from plasticine, preferably from light plasticine, and then cover it with cotton pads. Such a head will easily attach to the lid - the “neck” of the figure. Also make a Santa Claus hat from plasticine.
- Make the head from cotton wool using the felting method. Roll a ball out of pieces of cotton wool, gradually forming a piece of the desired size with soapy hands. After the figurine’s head is dry, coat it with a 1:1 solution of glue and water. Apply the solution with a brush. Glue the dried ball to the cap of the bottle. The hat can be made from a piece of material or knitted. To make it stick better, place it on glue.

The craft is ready, but the beard and fur coat are still missing for the figurine to take on the appearance of Santa Claus.
Prepare paints or gouache. Paint the fur coat red, leaving a white edge on the clothing. If you want to add expressiveness to the craft, use dry paint to glue a white edging of cotton pads onto the sleeves and along the bottom of the fur coat. You can cut a large collar. Don't forget to paint the part of your hands where Santa Claus has his mittens.
Start painting your face. Add blush, carefully highlight your eyes and nose. Cut out and glue a mustache and beard from cotton pads. It is enough to use 2-3 layers of cotton pads for your beard to make it “fluffier”. Start gluing the beard from the bottom layer. Draw a mouth between the mustache and beard.

The real Santa Claus does not come without gifts, so make a bag for the toy - take any colored paper napkin, put a thick wad of cotton wool in it and tie it with a bright thin ribbon. The gift bag is ready.
A craft that is sure to become a holiday decoration can be made not only using plastic bottles or glass vials. There are many options: paper, thread, clay, textiles. Be sure to involve children in the process of creating a Santa Claus figurine. Make a craft using cotton wool, colored paper or cardboard - this is one of the easiest ways, even kids will be happy to take part in it.
Before making the applique, draw the outlines of Santa Claus on paper. Here you can show all your imagination. Select material for the hat and decorate the background of the applique. Emphasize the outline of the figure with paints, a felt-tip pen or tape. Yes, and Santa Claus himself can be depicted standing and walking.

Master class: original figure of Santa Claus
The uniqueness of the craft lies in the fact that the face is not painted, but sculpted. If an artist takes on the work, the New Year’s character will be similar to a real grandfather.
For this craft you will need various materials:
- foil;
- salty dough;
- wire;
- beads, buttons;
- brush, paints;
- plastic bottle;
- padding polyester
The frame of the head can be made of foil. “Pack” a piece of wire into a ball of this shiny material. Prepare salted dough for crafts and stick it around the ball. Insert beads or small buttons in place of the eyes. And start sculpting grandfather’s face. Form cheeks and lips from pliable dough.
Using water, attach pieces of dough - nose, ears. Make small wrinkles on your face. Make sure that your facial expression is good-natured: Santa Claus is a kind character.
Then you put the head in the oven to dry.
Now it's time to paint and varnish it.
The head needs to be attached to the body. To do this, select a plastic bottle of appropriate size. Remove the lid from it and make several holes in it. Insert the wire into the holes and twist.
Screw the lid together with the head to the bottle; you can use pebbles and pebbles to weigh it down.
A beautiful figurine of Santa Claus, made according to our master classes with photos and videos, is suitable for submitting to a competition and decorating your home for the New Year. We have collected a lot of instructions for adults and small crafters on sewing a toy from fabric and felt, sculpting it from salt dough, and assembling it from a plastic bottle, paper or cardboard. Step-by-step master classes will be clear to children from school and kindergarten and they can easily make Santa Claus with their own hands from various purchased and improvised materials.
Do-it-yourself Santa Claus using scrap materials for kindergarten - step-by-step master class with photos

Using various materials and fabric at hand, you can easily make a cute Santa Claus figurine for the New Year. For the youngest crafters, we have selected interesting instructions that tell you about the rules for making such a craft. Our next master class with photos will tell you more about how to make a cute Santa Claus from scrap materials for kindergarten with your own hands, step by step.
DIY materials for Santa Claus kindergarten
- multi-colored felt;
- silicone glue;
- juice can or cardboard toilet paper roll (for the base);
- lace;
- red and white pom-poms;
- scissors.
Master class on making your own Santa Claus from scrap materials
- Prepare materials for work.

- Cut out a rectangle from red felt according to the size of the cylinder to be glued.

- Glue the red felt to the base.

- From light pink felt, cut out a large face for the future figurine and glue it with glue, as shown in the photo.

- Decorate the edges of the face with lace: glue the lace along the contour of the light pink felt.

- Cut out a couple of eye circles from black felt. Glue on the eye circles and the red pompom nose. Cut out a couple of cheek circles from pink felt, and a smile from red felt.

- Glue cheeks and a smile to the figure.

- Cut a triangle out of red felt as shown in the photo. Glue the edges of the triangle together to form a cone-cap. Glue a white pompom on top. Then glue the cap to the previously prepared figure.

Do-it-yourself voluminous Santa Claus from nylon tights - master class with video

A funny craft in the form of Santa Claus can be made using ordinary nylon tights. They make interesting three-dimensional figures that can be submitted to competitions or used to decorate your home on the eve of the New Year. Our step-by-step master class will tell you more about how to make a beautiful Santa Claus out of nylon tights with your own hands.
Master class with video of making your own from nylon tights of Santa Claus
The following video discusses in detail the stages of making a voluminous toy from tights. It is important to follow all the author’s instructions, then the resulting craft will be beautiful and neat. You can use the finished figurine to decorate rooms for the New Year or simply plant it under the Christmas tree.
Cool DIY Santa Claus from a plastic bottle and spoons - master classes for kindergarten

Pasting and painting plastic bottles is a fairly simple task that can be easily completed by a student in the middle and senior kindergarten group. Therefore, for the New Year, we have selected interesting master classes on making crafts from such simple scrap materials for kids and their parents. In the following photo instructions you will learn how to easily and quickly make a large figurine of one of the main symbols of the New Year. According to our master class, Santa Claus is made from a plastic bottle and spoons with your own hands without much difficulty.
Materials for making a cool Santa Claus from a plastic bottle and spoons
- large plastic bottle 5 liters;
- plastic spoons;
- scissors;
- white and red tape;
- glue gun;
- rain;
- circle of pink fabric;
- cotton wool;
- white cardboard and black paper.
Master class with photos of making Santa Claus with your own hands from a bottle and spoons
- Start gluing the five-liter bottle with red and white tape.

- Cover the front center part with white tape, as shown in the photo.

- Use red tape to create a neat frame around the previously glued white tape. Also cover the entire back of the figurine with red tape.

- Cut off the handles of plastic spoons. Proceed to gluing the resulting blanks onto a five-liter bottle using a glue gun. In this way, glue the lid and make a strip of spoons on the neck.

- Glue the spoon blanks to the bottom of the bottle (under the white tape).

- At the bottom of the bottle, glue spoon blanks in several tiers, as shown in the photo (so that the bottle itself is not visible).

- Make eyes for the figurine from white cardboard and black paper.

- Make a spout filled with cotton wool from pink fabric.

- Use pieces of plastic spoon handles to make eyebrows for the figurine. Glue the eyes and eyes onto the prepared plastic bottle.

- Decorate the bottle with rain.

Video on how to make a cool Santa Claus from a plastic bottle with your own hands
You and your children can make a simpler, but no less cool figurine in the next master class. A detailed video will tell you how to make a cool Santa Claus from an ordinary plastic bottle for the New Year. A voluminous craft can be used to decorate a room, and it can also be placed under a Christmas tree. The original figurine is also suitable for participation in a competition at school or kindergarten.
Original DIY Santa Claus made from cotton wool - master class with video for school

A large number of toys were made from ordinary cotton wool in the USSR. At the same time, they turned out not only beautiful, but also very original. Now, using this technology, you can also make unusual decorations for the New Year. And with the help of our next master class with video, you will learn how to make a cool Santa Claus out of cotton wool with your own hands.
Video on making your own Santa Claus from cotton wool - for school
By following the author’s instructions in the next video, you can easily make a real toy out of ordinary cotton wool for the New Year. The finished figurine can be painted or varnished. This craft will look original and bright against the backdrop of modern store-bought toys. In addition, it can be used not only to decorate rooms, but also to decorate a Christmas tree: plant Grandfather Frost and Snow Maiden made of cotton wool under the tree and create a real festive atmosphere for the New Year.
Simple DIY Santa Claus made of paper and cardboard - templates for kindergarten and school

You can easily and simply make many different Santa Claus figures from ordinary cardboard and paper. The templates we have selected will help you and your children with this. All you need to do is print them out, and then start cutting and gluing the figure. And in just 10 minutes a beautiful craft for the New Year will be ready. You can choose a template for cutting out a bright Santa Claus from paper or cardboard with your own hands in our collection of pictures.
A selection of templates for paper and cardboard with Santa Claus for elementary school and kindergarten
The cutting templates we offer can be used both at home and for kindergarten or elementary school. From simple blanks, children will be able to make cool and cute Santa Clauses on their own. You can also submit such an original craft together with a child from the junior group of kindergarten to an exhibition held in honor of the New Year.


Do-it-yourself original Santa Claus made from fabric and cotton wool - very simple - patterns for beginners

Sewing three-dimensional figures and toys requires certain skills in working with fabrics and a sewing machine. But in our next master class you will find the simplest possible master class on making a toy from fabric. In it, the main task of the needlewoman will be to carefully redraw the workpiece onto the base and brightly color it. You can learn more about how you can very easily sew Santa Claus from fabric and cotton wool with your own hands in our next master class with patterns for beginners.
Materials for making your own original Santa Claus from fabric and cotton wool
- linen or cotton fabric;
- paints for painting on fabric;
- paper (for printing patterns);
- cotton wool or holofiber;
- scissors.
Master class on making your own original Santa Claus from fabric and cotton wool
- Print out the proposed patterns, transfer the contours of the figure (or both figures onto the fabric). Transfer the drawing itself to make an original pendant toy.

- Paint the front of the figurine with fabric paints.

- Make the back of the figures: redraw the outline again (turning the pattern over) and paint with fabric paints.

- Make the bottom part of the toys and paint them as shown in the photo.

- Cut the blanks with an indentation of 1-1.5 cm.

- Fold the blanks with the front parts and sew them using a sewing machine or by hand. Additionally, sew on a ribbon or decorative cord to hang the figurine.

- Turn out the workpiece.

- Sew the bottom part of the toy (not completely - half).

- Fill the toy with cotton wool or holofiber.

- Hem the second half of the bottom of the toy.

Video on sewing the original Santa Claus from felt - with patterns for beginners
The following video will help you sew a different Grandfather to decorate your home for the New Year. It tells you step by step how novice craftswomen can make a simple toy. The patterns offered in it are quite easy to redraw, so even middle and high school students can make the craft.
DIY funny Santa Claus made from salt dough - master classes with photos and videos

You can make many different cool crafts from salt dough for the New Year. This kind of work will definitely appeal to both kindergarten kids and primary school students. And with our next instructions, you and your children can make original pendants with painted handprints. A simple master class with photos will help you easily and simply create your own original Santa Claus from salt dough.
Materials for making a funny Santa Claus from salt dough yourself
- flour - 2 cups;
- fine salt - 1 cup;
- water - about 1 glass;
- rast. oil - 1 tbsp;
- foil;
- acrylic paints.
Master class with photos of making Santa Claus from salt dough with your own hands
- Prepare everything for making salt dough. Mix the ingredients and knead thoroughly until smooth.

- Roll out the prepared salt dough into a thin layer (no thicker than 2 cm). Cut out small ovals or circles from it (to fit a child’s hand and leave a neat side).

- Make imprints on the surface of the salt dough.

- Carefully trim off the excess dough, leave a border about 1 cm wide near the print. Make holes in the upper part of the workpiece with a tube for later threading the cord or ribbon.

- Place the pieces on foil and place it in the oven. Bake the crafts at 120 degrees for 2 hours.

- Paint the workpiece with white paint and let it dry. Then draw the face of Grandfather Frost and his beard. Thread a ribbon or lace through the previously prepared hole.

Video on how to make Santa Claus from salt dough yourself
Your children can make a three-dimensional figure in the shape of Grandfather Frost in the next master class. A step-by-step video will help them create a very cool New Year's craft. It can be used to decorate your home for the New Year or to decorate a classroom at school or kindergarten. Simple and exciting work with salt dough is sure to please all children.
DIY bright Santa Claus for kindergarten - crafts for an exhibition with master classes

When making crafts with your child, it is not at all necessary to use only available materials. For example, in the following master class, a wooden blank in the shape of a man is used as a basis. You can easily purchase it in modern craft stores. The figurine itself with such a blank is obtained quite easily and simply, so every child will like working according to the instructions. The following master class will tell you how to make a bright and cool craft in the form of Santa Claus for the New Year with your own hands for an exhibition in a kindergarten.
Materials for making bright Santa Clauses for an exhibition in kindergarten
- wooden blanks "men";
- acrylic paints;
- yarn for felting (can be replaced with padding polyester);
- white and red felt;
- silicone glue;
- scissors.
Master class with photos of making a bright craft in the form of Santa Claus for an exhibition in kindergarten
- Paint the body of the wooden piece red.

- Wait for the workpiece to dry.

- Use felting yarn or padding polyester to make hair and beard for the figurine.

- Add a belt and buckle to the dried blank. Glue hair and beard with silicone glue.

- Draw eyes for the figure.

- Cut a triangle from red felt.

- Sew (or glue) a hat out of it.

- Cut a thin strip from white felt. Glue it to the hat as a frame.

- Place the cap on the finished figurine.

Video on how to make a bright Santa Claus craft for an exhibition in a kindergarten
You can make bright crafts in the form of Santa Claus yourself from other materials. For example, children and their parents can make a very interesting craft for the New Year from ordinary light bulbs. Moreover, such blanks can be painted in different colors, and you can also make various clothes and decor for them. But such work should only be carried out together with adults.
Do-it-yourself Big Santa Claus made of fabric to school for a competition - step-by-step master class

Our next master class will help you make a big and handsome Santa Claus for your school competition with your own hands. High school students can easily make a toy calendar using it. But for children in high school, such work will be quite difficult and their parents must help them in making the toy. A craft for the New Year sewn according to our instructions will very easily and simply help your children take prizes.
Materials for making a fabric Santa Claus for a competition at school
- a piece of red and black fabric;
- sewing supplies;
- white felt and ready-made white felt numbers;
- linen or cotton fabric of flesh-colored or light gray, light pink color.
Master class with photos of sewing Santa Claus with your own hands for a competition for school
- Cut a strip of fabric with a width of 11 cm and a length of about 100 cm. Carefully hem it on one side to prevent the fabric from fraying: fold it 1 cm and repeat the fold, leaving the edge inside. Sew the workpiece. Make folds as shown in the bottom photo: step back 4-5 cm from the edge, tuck the fabric under the bottom, making a 2 cm fold. Repeat until the end of the cut. All fabric bends should be ironed.

- Secure the folds at the top with clothespins and at the bottom with pins.

- Sew the parts together and turn the workpiece inside out.

- Cut out another large triangle and sew finished arms and legs to it.

- Pin the front and back of the workpiece together.

- Sew the connected parts. And then sew the head to them. Glue felt numbers onto the pockets themselves (to make a calendar).

Using our master classes with photos and videos, you and your children can easily make Santa Claus with your own hands from various available materials: paper, cardboard, plastic bottle. We have also selected simple instructions for sewing toys from fabric and felt with patterns. They will tell you how to make a Santa Claus figurine for a competition for school and kindergarten, as well as what decor you can make to decorate your home for the New Year.


