Designer jewelry is always highly valued in the fashion world. Polymer clay allows you to make any decoration with your own hands, putting your warmth, energy and imagination into it. Jewelry from polymer clay enjoys great popularity among the fair sex.
Polymer clay

Polymer clay is a plastic material that resembles plasticine loved since childhood. When heated to certain temperatures, it hardens and becomes like plastic. You can make any jewelry from it: earrings, rings, necklaces, pendants, hairpins and much more.
A huge color palette allows you to choose any shade. Colors can be mixed to get new ones.

The material is considered non-toxic, therefore safe for health.
Fantasy, precision and creativity provide an excellent result and please the author with new products.

Polymer clay is produced by many manufacturers, different quality and different price ranges.
To get started, you can choose soft types clay, from which it will be easier to sculpt for a beginner.
You should not buy a whole package, first it is better to buy a separate color and try to make simple elements out of it and bake it. If the product has not cracked, has not changed color, then you can also purchase a set from this manufacturer.
Before sculpting, you need to hold the clay in your hands - it will heat up from the heat, and it will be easier to sculpt.
It is better to roll out clay in thin layers so that the resulting product is neat and elegant.

Carefully read the instructions on the package, which indicate the baking time and temperature regime. It must be observed exactly and in no case be increased, otherwise the product will deteriorate.
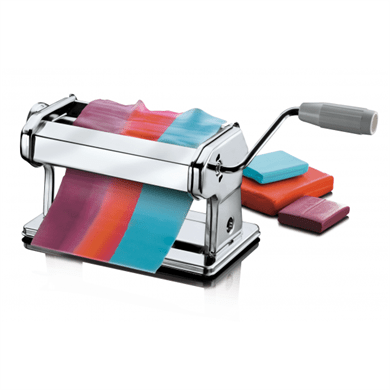
In addition to clay and an oven, you will need various accessories and tools.
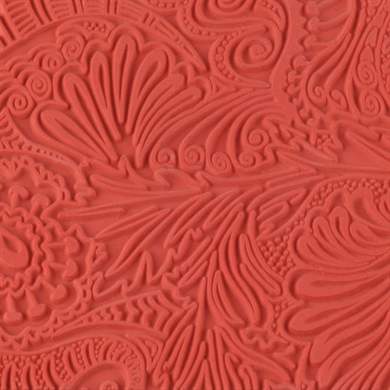
Tools

- machine for rolling out clay;
- extruder;

- texture sheets;
- glue;
- stationery knife;
- brushes of different sizes;
- stacks of wood;
- modeling surface;
- toothpicks.
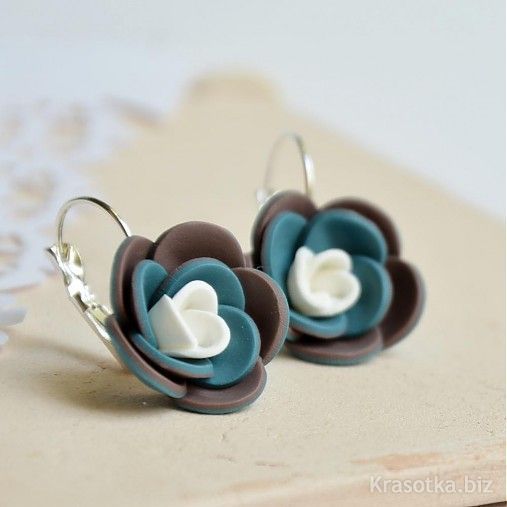
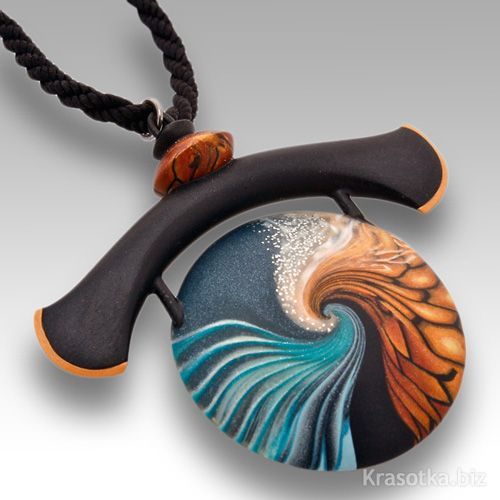
graceful roses

This master class will tell you how to sculpt flowers from polymer clay.
Roses look very beautiful and natural. They can be used to decorate earrings, bracelets, hairpins.
Materials:
- polymer clay of any shade - red, pink, white, yellow for a flower;
- stack with a ball;
- clay rolling device.
- First you need to create blanks for the flower petals.
To do this, you need to make as many small balls as the flower will have petals. The sizes of the balls can be different, because a real flower has smaller petals inside than outside.
- Roll into balls and cut into halves.
- Create the center of the flower: for this, make a drop from one ball with your fingers.
- Then gradually form a bud, alternately attaching the petals to the center.
The splendor and size of the rose will depend on their number.
- Bake according to the time and temperature indicated on the package.
In the video below, all the stages of this master class are discussed in detail:
Earrings

Taking the technique of making a rose as a basis, it is not difficult to make earrings.
Materials:
- roses made of polymer clay;
- rings for fastening;
- earplugs.
Before you send the flowers to bake, you need to pierce a hole in the petal, into which you later insert a ring and attach it to the earring, and enjoy beautiful new earrings, such as in the photo:

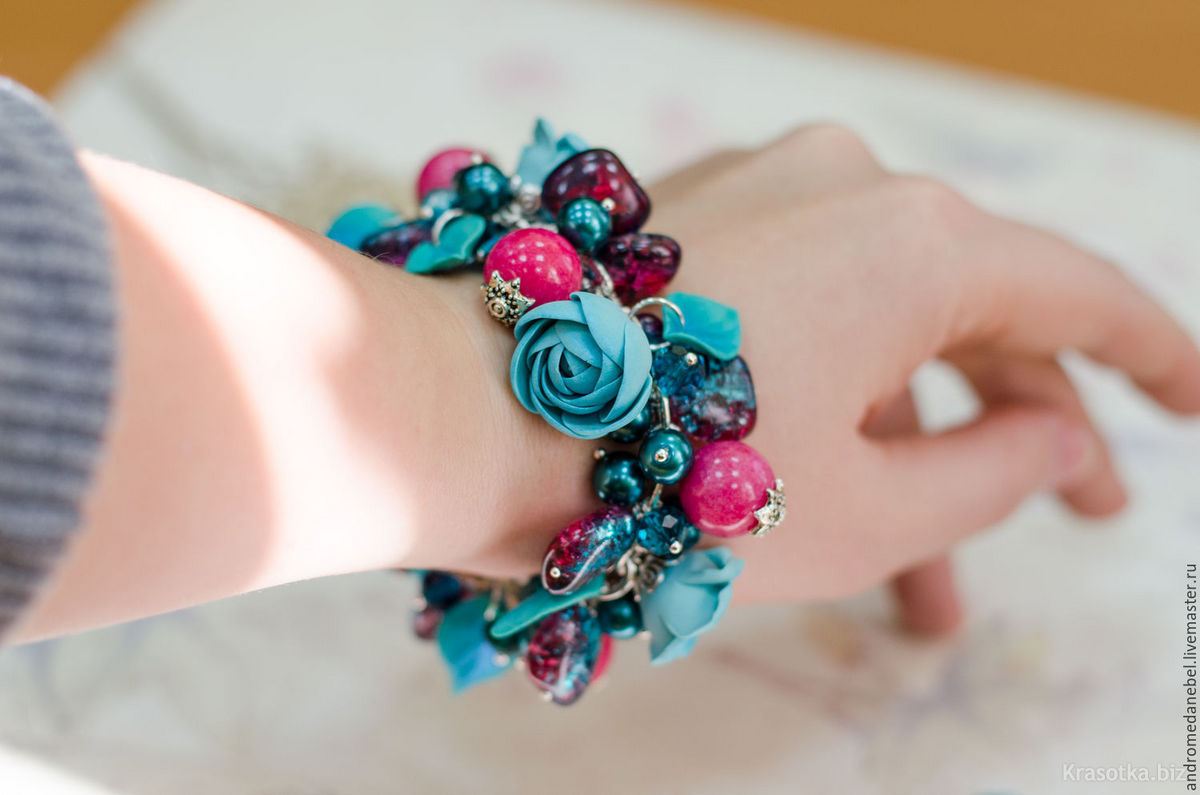
beads
Beads made with your own hands look incomparable. They look very feminine and give originality to any image.

Materials:
- polymer clay in various pastel shades: beige, pearl, caramel, pink-brown, white.
- sequins;
- toothpicks;
- varnish for plastics (matte and glossy);
- cord or chain.

- crush the clay;
- divide into pieces, based on the size of the beads;
- form beads of different sizes;
- using a toothpick, make holes in them;
- add glitter to a few beads, to do this, dip your finger in sparkles and press it to the surface of the bead;
- bake;
- let the beads cool completely;
- cover part of the beads with glossy varnish, and the other part with matte;
- collect beads.

You can make any decoration that will complement your favorite dress, suit or blouse. It will be in harmony with the outfit or vice versa, it will become a bright accent in the image. Handmade polymer clay jewelry is a pleasure to present as a gift. For the author's work, you need quite a bit of free time, creativity and imagination.

Video selection:
Every year there are more and more various materials for creativity and implementation of the most incredible ideas. From polymer clay, you can create small masterpieces: buttons, earrings, rings, animal figurines and various items, thematic plots and other products.
Now everyone can use such material, because it is sold in any art store or stationery department and has an affordable price.
What it is
Polymer clay is a lamellar mass, similar to plasticine, but when solidified, it forms plastic. It is intended for modeling and modeling various products for children's and adult creativity.
Presented now a large number of varieties: one hardens when heated, others on their own for several hours.
 The basis of the clay mass is polyvinyl chloride (PVC), auxiliary components (pigments for coloring, white porcelain, kaolin, talc, various stabilizers, plasticizers, cellulose, mica, chalk). The most common brands:
- Fimo is one of the first brands;
- Darwi;
- Polyform Sculpey;
- Decoclay;
- Cernit;
- Keraplast;
- bake shop;
- Kato;
- Flower.
Some need time to cool down. outdoors, for others oven for baking finished products.
Finished products can be painted with acrylic paints, mechanical actions (drilling, piercing) can be performed, the product does not break from them.
How to choose
Before you buy the material, you need to decide:
- what product will be made, what colors of clay to choose for them;
- whether the oven will be used for solidification;
- need a very soft or harder material for modeling.
Clay producers create new types of clay every year. various properties. It is necessary to pay attention to the fact that some manufacturers produce:
- based material natural ingredients, others made of synthetic materials;
- soft or hard;
- fast - slowly hardening or by applying temperature;
- children are allowed to work with some, only adults with others;
- some become brittle after solidification, others are ductile and amenable to further processing;
- some deform upon contact with water, others do not;
- some manufacturers have 2-4 colors, others have more than 10;
- some sell small packages, others - large ones.
Therefore, before buying, you should read the instructions and the characteristics of the material.
Suitable for working with children: Ezki, BakeShop, Fimo - they are soft and eco-friendly. For the manufacture of figurines - Premo, Kato, Skulpey. For beginners, you can make clay at home, and as you gain experience, you can switch to a professional one.
How to make composition at home
There are many recipes for creating polymer clay at home, but each has its own characteristics.
Recipe number 1: for working with children
Required components:
- corn or potato starch- 100 g;
- glycerin - 30 g;
- PVA glue - 150 g;
- food coloring- the quantity depends on the desired color.
 Glycerin, glue and starch are thoroughly kneaded and put on water bath 10-15 minutes, then cool to a temperature that is acceptable for the skin of the hands to knead the dough. So that it does not freeze, it is laid out in plastic bag and store in the refrigerator.
Recipe #2
Required components:
- salt - 50 g;
- soda - 50 g;
- starch (corn, potato) - 150 g;
- warm water -100 g;
- food coloring.
Divide the water in half: dissolve starch in one, pour salt, soda and food coloring into the other, put on fire. Water with salt and dye should come to a boil, then dissolved starch is added to it and thoroughly mixed until a homogeneous mass.
Recipe number 3
Required components:
- starch - 150 g;
- vaseline - 50 g;
- baby cream - 50 g;
- PVA glue - 150 g;
- food coloring;
- vegetable (vaseline, olive) oil - 30 g.
This recipe has its own peculiarity, clay does not require heat treatment for cooking. Mix all the ingredients and stir until smooth, then slowly add the starch and knead the dough.
Tools needed for sculpting
 To create masterpieces from polymer clay, you need to prepare a place and tools. It is important that all tools after sculpting are not used for cooking, but it is better to leave them only for making crafts:
- board on which products will be made;
- knives, wooden sticks, wire;
- rolling pin, empty bottle, pasta machine;
- molds;
- decor materials (beads, beads, sequins, lace, foil, fasteners, chains, etc.)
- gloves;
- napkins;
- sandpaper or nail file for grinding;
- acrylic paints, varnish;
- utensils for baking.
When creating products, you must adhere to several rules:
- Work with gloves.
- Use wooden, glass, metal utensils, tools.
- After finishing work, remove the rest of the dough in a bag and in the refrigerator.
- Wash and dry the tools, put away until the next time.
- Avoid contact with clay on the surface: floor, carpet.
It is important to remember that during drying the product decreases in size, so in order to get the required size at the exit, the figure needs to be made a little larger.
How to sculpt
 Prepare the tool and workplace, choose 1 or more colors to create beads. For the first product, it is better to take simple craft(e.g. beads).
- Cut a piece of clay into equal parts and knead in your hands.
- When it softens well, make a ball out of each piece, according to the principle of plasticine.
- With a toothpick or wire, make small holes in order to then thread a rope or fishing line.
- Put the balls on a plate and put in the oven. Each of the packages always indicates the time and temperature at which the product will be ready.
- Remove from oven and cool.
- If the product has defects, then use sandpaper or a nail file to grind it.
- Degrease the product with a soapy sponge or dish detergent and dry.
- Prepare acrylic paints and paint the product, if necessary.
The final stage in the manufacture of beads is varnishing and stringing them on a prepared ribbon or rope.
What can be done
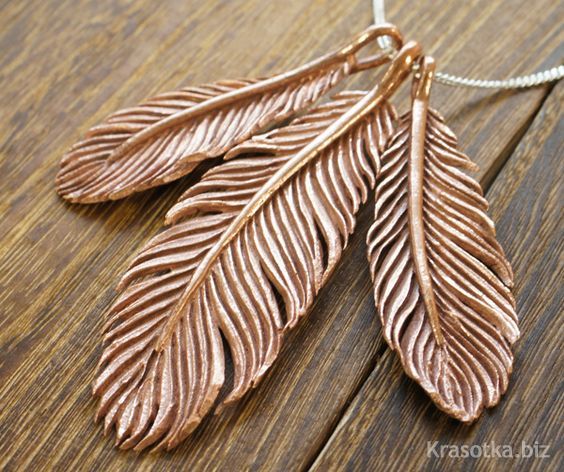
Thousands of various products will be obtained from polymer clay: accessories, jewelry, figurines, figurines and other items. Most often, beads, earrings, rings, fairytale heroes, animal figurines, key chains, flowers, mugs, Christmas tree decorations.
You need to know that if the required color is not on sale, then it is allowed to mix it and get a variety of colors and shades.
Toys
 To create a toy, you need to decide on the color and shape (volumetric or flat). For a flat figure (for example, a fish), you need:
- prepare a sketch drawn on thick paper or cardboard and cut it out;
- cut off a piece and roll out with a rolling pin;
- attach clay to the cut out sketch, cut with a knife;
- add beaded eyes to the figure or rolled up small circles of clay, make scales with a knife, cutting semicircles along the entire length of the fish.
 After that, the figurine should be wiped with a damp alcohol wipe by clearing it. Put in the oven for baking, then pull out, dry and cover with acrylic varnish.
Thus, you can make cartoon characters, gingerbread, a cat, a dog, Smeshariki, even buttons. To give flat figures a semi-bulge or wavy shape: for this, it is necessary to lay out the blanks on the prepared foil figures.
dolls
Doll to choose from: voluminous or flat. For a three-dimensional figure, balls are rolled out like sausages from plasticine.
To make a ball is a head.

The torso must be made in the form of a cone, arms and legs should be rolled into sausages.
You can make the feet and hands flat, using a sketch and stick to the sausages.
To the finished doll, add a dress, costume and headpiece, beaded or beaded eyes, a handbag, etc.
New Year crafts

 To decorate the Christmas tree, you can make toys in the form of large and small balls, geometric shapes, Santa Claus, snowman, snow maiden, snowflake and others.
One of the options for crafts is a combination of several colors, using the example of a snowflake of 2 colors (blue and white):
- From white color roll up a thick sausage (cylinder).
- From of blue color roll out a flat cake and wrap the cylinder, cut off the excess.
- Make another flat blue cake and cut into thin slices.
- Cut the cylinder in half and cut along the edges of each stick along the blue strip, connect the halves.
- Again, cut the cylinder in half perpendicular to the first cut and stick it, so do it several times, when the cylinder sticks together, you can see that a kind of snowflake has turned out.
- Cut the cylinder into circles and put in the oven, then degrease and open with varnish.
Before baking, make holes in the snowflake with a toothpick, so that later there is where to thread the rope.
figurines
 Figurines are made in the likeness of a doll, you can combine colors or make one color and paint after baking. For figurines, it will be necessary to make a pedestal on which the figurine is attached, so that later it can be placed and hung.
Mugs
 Creating a mug or flower pot is a rather complicated process; for it, it is necessary to choose clay that is harder and dries quickly. To make the figure even and beautiful, especially for beginners, you need to take a form - a plastic glass or a finished mug.
Choose a material and roll out large cakes from it, but not thin ones 1-1.5 cm thick.
Grease the form vegetable oil or rinse with water.
Stick around the mug from the inside, carefully connecting the layers of clay so that there are no cracks, ideally it should be made from one whole piece.
Pull out the figure and put in the oven for baking, then degrease with soapy water and open with varnish.
Flowers
 The creation of flowers is a kind of symphony in the form of a bouquet, key chain, earrings or just a picture or a watch.
To create a rose, you need to roll out the plates, roll the first one into a tube, and gradually wrap the rest, spreading the petals. Chamomile is made from plates: paper blanks with sharp or round edges and cut out the required amount on them.
Then combine and bake. You can create dahlias from balls that are cut in a circle with scissors, forming sharp petals, a little prickly, like a hedgehog.
Ideas for modeling
A few things to keep in mind while working:
- Polymer clay has a specific smell when sculpting and baking, so you need to work with an open window.
- The figures must be made immediately and baked, because some types of clay can become brittle after drying in the air or, on the contrary, lose their shape.
- Colors should be mixed carefully using the tables.
- The figures must be well connected, without leaving air streaks, since during baking, such a figure will crack or swell.
Modern masters develop a lot various techniques sculpting and making figures. For a novice crafter, it is better to make simple, light figures from home-made clay.
Beautiful polymer clay jewelry will certainly find a place in the jewelry box of a modern fashionista, especially if such products are made by hand.
Before you wonder how to make polymer clay jewelry, familiarize yourself with useful tips specialists:
- The first thing to do when deciding with my own hands create beautiful jewelry, choose the material. It can be expensive or cheap, on which the quality of finished products actually depends. Material presented different colors, it can be sold individually or in sets. Among the expensive polymer clay are the products of such imported companies as Fimo, Kato, Pardo. There is also a cheaper material of domestic production.
- Do not rush to immediately buy a lot of polymer clay, first buy 1 bar and check it in work - how it mixes with other plastics and colors, how finished products look. Be sure to bake the finished item, high-quality clay should not crack.
- For sculpting, you need primary colors that can be mixed during work to get others. color options. You will also need special tools and a small electric oven for baking.
- Polymer clay should be handled with care. In order not to lose color, work in rubber gloves and on clean surfaces.

If you have already purchased the necessary materials and tools, familiarized yourself with the basics of modeling, you can start creating polymer clay jewelry with your own hands.
How to make polymer clay jewelry: beautiful earrings


With the help of this master class, you will be able to make beautiful polymer clay jewelry in the shape of jars with bells.


You will need the following materials and tools:
- polymer clay in blue, white and yellow;
- liquid plastic;
- work surface - tiles, a sheet of paper;
- stack for drawing veins;
- stack with a ball;
- plastic blade;
- platypuses, pliers, side cutters (assembly tools);


The process of creating jewelry with your own hands looks like this:
- We begin work with the creation of blanks, they will serve as the basis for the bells. Cut the long bronze-colored pins into 15 mm lengths. Using platypus pliers, make loops on each segment by bending one of the sides. For these earrings, you will need 38 of these blanks.
- Now start creating the "pestles" for the bells. To do this, polymer clay yellow color roll up a tourniquet about 2 mm thick and cut it into small identical pieces.
- Form the petals from the segments and fasten them on the pin loops. Press the petals firmly so that they hold securely on the base, make their edges sharp.
- In the same way, make petals from blue clay. Make each petal flat by lightly pressing it with your finger against the work surface.
- Using a stack or other suitable object with a thin, sharp edge, vein the petals.
- Take the stack with the ball and lightly roll it on inside petal so that it turns out to be slightly concave, while bending its tip back a little.
- Now take the pestle on the pins and grease each with liquid plastic, glue the petals to it. For 1 pistil you will need 3-4 petals. Make 38 flowers in this way. Make a few bells in the form of closed buds.
- Place the bells in the oven, wait until they are baked, and then bend the pins, forming a small loop.
- When the bells are ready, jugs should be made for them. To do this, take white clay and roll out of it 2 identical balls of medium size. Roll it over your palm to make an oval, while on one side it should be a little wider. Flatten the narrower side with your hands to the work surface to make it flat.
- From the side flat surface roll up the neck and, using a stack with a ball, make a recess to “put” bells into the jug. Pierce the jug with a pin. Roll from white clay pinstripe, make a pen. Bake in the oven, if necessary, sand and polish, varnish.
- For one jug, divide the bells into 3 parts, assemble them into branches in chains, the central part should turn out to be slightly larger than the side ones.
- Collect the flowers on the pins, there should be 2 identical bouquets of bluebells. Insert them into jugs, fasten them, attach the earrings, and delicate spring earrings are ready.
Such an idea of polymer clay jewelry in the form of earrings is presented in these photos:


Wedding jewelry made of polymer clay: a set decorated with flowers


Wedding jewelry made of polymer clay will complete the gentle and romantic image of the bride.


To create a wedding set, represented by a bracelet and a ring decorated with flowers, you will need:
- polymer clay - white, white translucent, pink, light brown or beige, green;
- white acrylic paint;
- blade or clerical knife;
- plast machine or acrylic rolling pin;
- a stack with a ball and a stack with a needle (toothpick);
- wire with a diameter of 0.5 mm;
- round-nose pliers, side cutters;
- cutter round shape;
- veiner double-sided with leaf veins;
- foam sponge;
- thin white satin ribbon.
The process of making wedding jewelry looks like this:
- Soften the plastic in your hands and roll it in the pasta machine on setting No. 5. You should get a layer about 3 mm thick.
- Then, using a round cutter with a diameter of no more than 5 mm, cut out many small circles from clay. Lay them on a foam sponge and, using a stack with a ball, thin each element by slightly concave it inward.
- From the resulting convex small petals, collect flowers of different sizes. To make a bud, use 3 elements, and to create a beautiful blossoming rose, add to this bud another lower row, consisting of 5 petals.
- Make through holes in each flower and only then send it to the oven for baking.
- For flowers of larger sizes, clay of delicate pastel shades should also be used. To do this, roll up a layer 3-4 mm thick in the same way, then take a cutter or plastic cutting in the shape of a leaf and cut out a lot of teardrop-shaped parts.
- Place the resulting petal on the palm of your hand and press one of the sides with a stack with a ball so that the elements have uneven edges. With the same stack, make a small indentation in the center of the petal. It is not necessary to make the petals of the same color, you can use several delicate shades that will look harmonious with the bride's outfit.
- Now proceed to the formation of large flowers: take three petals with jagged edges and overlap each other to make a bud. The next row consists of 5 petals, which are attached in the same way with liquid plastic. You can make a third row, it should consist of 9 petals superimposed on each other. Beautiful flower arrangements obtained by making the middle of the flower a little darker.
- When the polymer clay flowers for wedding jewelry are already made, you can begin to form the stalks and leaves. To do this, use light green clay. If you don't have that color, mix green plastic with white. Roll the light green material on a plastic machine to make a sheet about 3 mm thick.
- Then take a plastic cutting in the form of a five-leaf flower and make a lot of elements from a light green clay layer. They will serve as stalks for flowers.
- Measure small pieces from the wire, about 5 cm, and cut as much as the stalks. Using round nose pliers, make small loops by bending one side of the wire.
- Pass the wire through the through holes in the buds and flowers so that the loop is inside.
- Put the flowers in the oven again for re-baking.
- Next, proceed to assemble the elements into decoration. To do this, string small flowers mixed with large flowers on the wire by twisting the wire. Attach a wire with a clasp for a necklace to the wire frame, and wrap the structure with a thin white satin ribbon. It is desirable to do this in two or three approaches in order to be able to completely close the wire.
- Follow the same steps to create a wedding bracelet.
Ready-made wedding jewelry made of polymer clay with your own hands is shown in the photo below:


The most beautiful polymer clay jewelry: instructions for beginners


Such beautiful jewelry made of polymer clay in the form of a bracelet made of "cakes" and "gingerbread" will appeal to both children and adult fashionistas.


To make this polymer clay jewelry you will need:
- polymer clay;
- acrylic paints;
- pastel colors;
- base chain;
- toothpicks.


Choose the colors of polymer clay, acrylic and pastel paints at your discretion.


Follow these instructions for making polymer clay jewelry for beginners:
- Make blanks for "cookies". For this out of clay Brown color form two pancakes about 2 cm in diameter.
- Make notches along the edge of these blanks by pressing on them with toothpicks. From brown clay, make two such rings.
- From white clay, make a third, exactly the same element. Connect them all together, placing the white ring in the center. Use liquid plastic to connect the elements.
- Make a hole in the center for fastening, insert the wire and bend it with pliers, send it to the oven for baking. Decorate the “sweetness” on top with acrylic paints and pastels, creating an imitation of gingerbread or cookies.
- Make these 5 elements. When painting "gingerbread", try to apply contrast, alternating them through one.
- String decorative elements on the bracelet chain. Stylish decoration ready!
Other ideas for a master class on creating jewelry from polymer clay are presented in this video:
Material such as polymer clay began to be used recently, but many craftsmen fell in love with it. Jewelry made from this material looks great and is easy to create. Working with polymer clay is quite easy, it is plastic, it is easy to give it the desired shape. After drying, it becomes hard like plastic and looks great.
Each person can master several modeling techniques and create masterpieces. From it you can make a huge variety of things - from luxurious jewelry to toys for children. The main thing is to show imagination and try to make various products from polymer clay, after watching the master class.

Working with polymer clay
Many firms put polymeric material on sale, so the price and appearance its different. If you are a beginner and not confident in your abilities, you should not immediately purchase expensive polymer clay. Get basic colors and try to create with them simple decorations from polymer clay, a master class will help you with this. In the process of work, you will understand how colors are mixed, what combinations can be obtained.

You can make amazing DIY polymer clay jewelry. In order to make them, you need to use the following five techniques.

- Treatment
Polymer clay must first be processed, it needs to be softened. Therefore, it needs to be warmed up, kneaded by hand, and then smoothed until it is thin enough to pass through a special machine. Folding and running the polymer clay through the machine helps prepare the material for later use.

If you don't have a car, you can work the polymer clay by hand by folding it and flattening it several times. You can heat the clay with a hair dryer or heat lamp to loosen it up and make it pliable.

- Shaping the color
One of the most attractive features of polymer clay is the color. It comes in huge number colors and can be mixed with an unlimited variety of colors. So mix colors to get the one you want. You can even imitate expensive materials if you learn how to mix colors properly.

- Shaping
You can carve clay, ruffle it, weave it, flatten it, fold it, texture it, stamp it, and so on. Ceramic tiles and wax paper are ideal surfaces to work with polymer clay. One of the most creative clay polymerization techniques is canning, which creates structures by rolling logs of different colors of clay and arranging them in a particular way.

- baking
In order for the clay product to harden and your creation to be preserved, you must bake it in a special clay toaster. This will be one of your most important polymer clay tools.

Bake the clay on parchment paper, cardboard, or ceramic tiles. Note that curing the clay directly on the metal will create shiny spots on it. First you need to preheat the oven to 12o degrees, and then bake the polymer clay pieces for 30-60 minutes between 121 and 129 degrees.

Note: Polymer clay may melt or release toxic smoke if the temperature exceeds 130 degrees. Make sure you have a good thermometer (don't rely on the oven setting and keep a close eye on it). Also, always work in a well-ventilated area.

- Finishing
After your ceramic clay jewelry will be released and cooled, they can be finished to make them look even more attractive. You can sand it down with sandpaper or a sanding sponge and cover it with a thin coat of varnish or clear sealer to protect its surface or add shine. You can highlight certain areas as you wish.

In addition to polymer clay, you will need other tools. However, for starters, you can make things from polymer clay alone and use any improvised means available in your home. Ordinary cutting knives, paper clips, toothpicks, rubber molds for cooking and anything with an interesting texture can be used.

Try baking a piece of polymer clay and see how it behaves. If it has changed color or cracks have formed on it, then its quality is not very good. When heating in the oven, follow the instructions that should be written on the box.

Wear medical gloves to avoid getting dirty. The surface you are sculpting on must also be clean.

We present to your attention polymer clay crafts, this master class will help you, especially if you are new to this. All of them can only be made by hand, with the help of your oven, as well as using any everyday items that you use in your normal life.

Polymer clay necklace
Material such as polymer clay is great for making jewelry, this master class will help you make a necklace.
What you will need: Polymer clay in any color, waxed cotton string, toothpick.
Start by heating the clay between your hands until it is soft and pliable. Take a small piece of clay, roll out the beads, and then make small balls with the palm of your hand. You can make them as big or small as you like.

Use a toothpick to poke a hole in the center of each ball. If the clay you are using is soft, it is best to wear latex gloves. Place your beads on a baking sheet and bake according to the directions on the box.
Thread the beads onto the cotton cord. This is where you can get creative. You can put all the beads on one strand, or you can make a bunch of necklaces and stack them. All this is up to you! Attach a magnetic closure so they can be opened and closed.
Polymer clay bracelet
What you need: polymer clay, razor blade. Mix the clay with your hands to soften it. Roll up three long tubes with your palms. Put 3 sticks together and start braiding.
Weave a bracelet of the length you need, while focusing on your wrist. You can cut off the rest with a razor. Bring the two ends together carefully so that you have a solid circle.
Bake for 25 minutes at 245 degrees. You can make not one bracelet, but several, it will look quite beautiful.

DIY earrings
Make these lovely polymer clay earrings for yourself and your friends. They can be a wonderful gift for anyone.

Consumables: polymer clay, earrings, glue, acrylic paints.
Progress:
- Work with the clay first so that it feels nice and soft.
- Form a heart shape using the end of a needle or toothpick.
- Bake the hearts according to package directions.
- Once your figurines are cool, you can paint them. acrylic paint. After the earrings are dry, take the glue and stick them to the earrings. It will look pretty cute and will become one of your favorite decorations.


bow decoration
What is necessary:
- polymer clay;
- cutter;
- spring rings;
- pliers;
- clasp;
- chain;
- oven;
- pencil;
- pin.
It's very simple. Do the following:
- It is best to work with clay on waxed paper so that the surface does not get dirty. Knead the material until it becomes soft and pliable. Form a long stick into a log shape and divide by four. Take each and smooth it out until it is flat.

- Pinch the sides as shown in the picture and then join them together. Clamp all the parts in this way and connect them together. Be careful not to ruin the folds!

- Then take some clay, roll it up and wrap around the middle of the bow. Cut out the excess and flatten a bit. That's all - a beautiful bow is ready.
- Place a pencil inside the bow to give it a nice shape.

- Bake the clay according to package directions. Attach jumping rings and necklace chains done!

This is a summer or spring decoration, but it can brighten up any outfit, regardless of the season.
The options are endless, you can make a ring if you attach it to the base or a pair of earrings. Attach them to your phone case to decorate it.

Headband with horns
It looks funny, besides it is fashionable now to wear a headband with horns.
To make this headband, you first need to choose a polymer clay color. You will need by at least, one block of polymer clay or more if you want to make large antlers.

Divide the block in half, remember it a little, and then fashion two cylinder shapes. Pinch the top pieces and shape them into a cone shape.

Take a wooden dowel (or pencil) and punch holes through it. Bake polymer clay according to package directions.

Cut out a piece of ribbon that can be tied around the head. Pass the ribbon through the holes and make knots on both sides of the horn.

Tie the ribbon around your head so that the horns sit well on your head. Now you can go to any party to conquer those around you with your appearance.

Earrings "Friendly monsters"
What You'll Need: Various colors of polymer clay, toothpick, sharp blade, ring, paintbrush (optional), pink chalk pastel (optional).
Instructions:
- Close the earring shape with clay as shown.
- To form the eye, place small circle in the middle of the monster's forehead. Add a smaller portion of green and then a smaller portion of black on top of the green.
- Add horns if necessary.
- With a sharp blade, cut the slit, forming a mouth.
- Smooth out your mouth with a toothpick.
- Take a piece of pink clay and form a small tongue.
- Make an indentation in the middle of the tongue with a toothpick.
- Use the brush to apply some of the chalk pastel to the cheeks of the monsters (optional).
- Bake according to package instructions.

All is ready! Make as many little friends as you want and have fun! Cute monsters are fun and easy to make.
Polymer clay ring
You can also make a polymer clay ring. To do this, you can take a ready-made mold or form it with your hands.
If you are going to make a solid ring, then it is better to use a special silicone mold - mold. You will need to bake it in shape and then sand and varnish it.

If there is no mold, then you will need to purchase a base, which is usually available in stores that sell accessories for making jewelry. They already have fixtures for attaching plastic, so you will have to form it yourself from polymer clay. Design you choose any of your preference.
Don't be afraid to mix colors and get interesting combinations. Create and get beautiful decorations worthy of admiration.


Every day more and more fashionistas give their preference to handmade jewelry. Indeed, very often there is a situation when there is nothing suitable for the outfit in the store, but an image has already been drawn in the head desired product. What to do? Stock up on modeling materials and start bringing your ideas to life. Who knows, maybe this hobby will become a source extra income. In addition, handmade jewelry - great gift for friends and loved ones.

First, let's talk about the basic rules and secrets of working with polymer clay. After all, the quality depends on their observance. finished work, and the process will become much more pleasant.
1. Cleanliness of the work surface. The table at which you work must be absolutely clean. Otherwise, any mote and speck of dust will spoil all your work. Or you just have to cut off a whole layer when grinding. Therefore, it is very important to clean up before starting work.
2. If you are working with different colors of clay, then work on white first. If you take on bright shades, then be prepared for the fact that the material remaining on your hands can in the future spoil the whiteness of light details when kneading. More good advice- Wipe your hands with damp, lint-free wipes every time you change the color of the clay you are using.

3. If the clay is very sticky to your hands, hold it between regular landscape sheets. The paper will absorb the excess plasticizer and make your work easier.

4. In order for the hole in the beads to be even and neat, it should be done from two sides, and not through and through.

5. For baking beads, you can make a special "dryer". Take a piece of foil and make a ball out of it. Stick toothpicks into the resulting ball and carefully string beads on them.

6. And the most important thing! Don't be afraid to experiment and try new things!
These simple rules easy to follow. The only thing left to do is to find suitable ideas and start implementing them. We have put together some interesting workshops on making cute hairpins and other polymer clay jewelry.
Remember that it is not necessary to follow from and to. You can always bring something of your own. What else is very interesting: both a hairpin and a blank for a brooch can serve as the basis for your masterpiece. That is, a product molded according to the master class can be made in the form of absolutely any decoration.
Simple but very bright bracelet

The bracelet made in this technique is very fashionable, as the gradient has not left the covers of magazines and Instagram photos for many seasons. Achieving a smooth color transition in polymer clay is very easy. Then you can always use this technique when creating new masterpieces.
The bracelet is based on bright beads and small medallions. Such a bracelet will appeal to both a young girl and a little princess. If desired, the bracelet can be supplemented with bright matching beads.
So, you will need:
- Polymer clay in two different colors (more if you wish);
- Stationery knife;
- Talc (baby powder is fine)
- Coarse table salt;
- Toothpicks;
- Brushes and glue;
- Lace and metal rings.
Step 1 Choose two colors of polymer clay that go well with each other. For example, an excellent combination of white with any other, and the gradient will turn out interesting, and the risk of error is minimal. By the way, as an experiment, try to take three colors, when you mix them, you will get an unusual transition from the first color, through the second to the third.
Cut two identical pieces ( rectangular shape) clays of different colors. As a rule, clay bars sold in the store have special notches, which can be safely cut off. right amount. Cut the resulting rectangles diagonally, and then align the two triangles of each of the colors with each other. You have two two-color rectangles.
Step 2 Cut the rectangles into small equal pieces. There should be exactly as many beads as you planned to make. Depending on the ratio of the colors, the color of the beads will change. Each cut piece should be thoroughly kneaded so that all colors mix well.
Step 3 We dip each bead in salt and carefully roll it between the palms so that the grains of salt are imprinted into the clay. So you need to do with each bead three times.
Step 4 We make holes with a toothpick in each bead. Remember that it is better to do this from each side, and not through and through.
Step 5 Now we are making small pendants, which, for your convenience, should not be many on the bracelet. Roll out thinly a piece of the desired plastic. For greater beauty you can give some texture to your future pendant by pressing the rolled piece on corrugated paper, for example, or a special plastic blank, which can be bought at a specialized store. Then take the shape you like and print it on the rolled out piece. This will be your pendant. The basis can be your favorite metal pendant, an unusual textured button, etc.
Step 6 When all the details are ready, send them safely to the oven and keep there exactly as long as indicated on the clay package. Then take out and let cool. Beads also need to be rinsed with water so that all the salt is washed off the surface. As a result - unusual rough beads.
Step 7 String beads on a rubber thread (the main thing is that it is strong). And attach the pendants with metal rings at the very end to the bracelet.
Such unusual beads can be assembled into various compositions and attached both to the base for earrings and hairpins.
real owl

Such a decoration in the form of a flying owl can be made in the form of a cute hairpin, an outstanding brooch or a beautiful pendant.
To create it you will need:
- Clay white and ivory;
- Acrylic paints are predominantly brown and gray shades;
- Stationery knife;
- Small beads (shiny, no more than 3 mm in diameter - these are the future eyes of an owl).
Step 1 From a small piece of beige clay, make a ball, and then turn it into a drop with a blunt end. This is the body of a bird. Depending on what size you want the product, choose the size of the ball. The sharp side of the droplet should be flatter. Where the head will be, you need to make a small indentation with the help of an improvised tool, for example, a pen cap or a marker. In this resulting cup, put a pre-prepared "flat cake" made of white plastic.
Step 2 On the white cake of the bird's face, make two indentations for the eyes with the round edge of the pen. Insert the beads into them slightly at an angle. In place of the beak, draw two strips with a needle or a thin awl so that you get a triangle imitating a beak and two points (nostrils). Two small tiny pieces of white clay should be rolled into sausages and made into eyelids, placed around the beads. Outline the eyes with a needle. Also, with a needle, you need to draw lines from the center of the face to the edges, imitating feathers. Just don't touch the beak.
Step 3 Wings. For manufacturing, you will need a standard rectangular piece (cut along the grooves) of beige plastic. We cut the rectangle diagonally and from the resulting triangles we sculpt two bases for the wings. Later we will attach feathers to them, so you should not bother with the ideal shape. It is important that the wings are reliable.


