Gemstone jewelry made by jewelers in a single copy is a great choice. But not every girl can afford to buy such an exclusive product because of its high cost. Gold items from the "mass market" series have more than affordable price, but they lack the main highlight - uniqueness.
Therefore, many of our contemporaries prefer to wear jewelry made of simple and cheap materials, but having no analogues. An example would be jewelry polymer clay. Such jewelry can be made to order according to the sketches of the customer. And you can master the work with this material on your own and make unique jewelry for yourself and as a gift to your friends and relatives.
Photos of jewelry made by craftswomen cannot leave indifferent any connoisseur of beauty. It can be simple, but interesting beads, ideal for everyday look, and charming headsets that you can wear for special occasion including the wedding.
Some craftswomen use a combination various materials. Jewelry made of polymer clay and beads is popular. Sometimes beads, artificial pearls or crystals are used for decoration.
What's the material?
The basis of the material is polyvinyl chloride, a polymer material that is widely used in everyday life. Furniture, dishes, toys and other things are made from it. Outwardly, polymer clay differs little from plasticine familiar to everyone since childhood. And the technique of working with the material is in many ways reminiscent of modeling from plasticine.

Polymer clay began to be produced for general sale more than fifty years ago. Initially, the material was intended for the manufacture of dolls, but then other ways of using it were invented.

The main difference between polymer clay and plasticine is that when exposed to high (100-130 degrees) temperatures, the material hardens and retains its shape forever.
With this quality, the material resembles natural clay. But the polymer analogue hardens at much lower temperatures than ordinary clay. Therefore, the use of special ovens is not required; it is possible to “fire” in a conventional household oven.
Is there a health hazard?
The composition of polymer clay includes the following substances:
- Polyvinyl chloride - the substance forms the basis of the material.
- Plasticizers - special additives thanks to which the material is easy to knead in the hands and give it any desired shape;
- Kaolin - powdery substance gives the material qualities that make it look like ordinary clay.
- Dye - polymer clay is available in a wide variety of colors.
- Mica - the additive is present in varieties of material that has pearlescent shades.

As can be seen from the description of the composition of the material Polymer clay does not contain any substances hazardous to health. However, some caution should still be exercised. When molded parts are heated, vinyl chloride is released in a small amount. Inhalation of the vapors of this substance can cause poisoning. Therefore, it is recommended to fire only when the hood is turned on or the window is open. After the firing is completed, the release of vinyl chloride will become impossible, so the finished products do not pose any danger, even children can wear jewelry made from this material.

There are varieties of polymer clay that do not require firing. The plasticity of this material is ensured by the introduction of additional additives into the composition, which evaporate during the drying process at room temperature. These additives are not poisonous, however, you should not risk and inhale their vapors. Finished products are recommended to dry in a well-ventilated area.
Material Capabilities
The possibilities of polymer clay are very diverse. Any decorations are made from this material - rings, hairpins, earrings, bracelets, medallions, etc. In addition, the material is well suited for making Christmas tree decorations, decor elements, dolls.

If desired, polymer clay products can be made to look like marble, wood or porcelain. For this, they are used special techniques work with material.
watercolor
Using this technique, you can make products with a "marble" pattern. To do this, you need to take clay of at least two shades and start kneading it with your fingers, making sure that the colors mix, but not completely. If you overdo it, then the marble shade will disappear, and you will get a piece of clay of a uniform color.
The workpiece is rolled out on a glass or ceramic base and cut to form the required parts.
Millifiori

it a more complex technique, which is also called "sausage". To obtain a blank, pieces of clay of the desired shades are rolled into flagella of different sizes (in accordance with the idea) and folded in the required order. Then the workpiece is compressed and cut across. On the cut, a certain pattern is obtained.
Mokume Gane

The technique is distinguished not only by a complex name, its execution requires a certain skill. Clay of different colors is rolled into plates, and put on top of each other. Then, holes of the required shape are cut out in the prepared workpiece, inserting clay workpieces of a contrasting shade into them. After compressing the workpiece, it is cut into transverse layers, which allows you to get a very unusual pattern.
Filigree
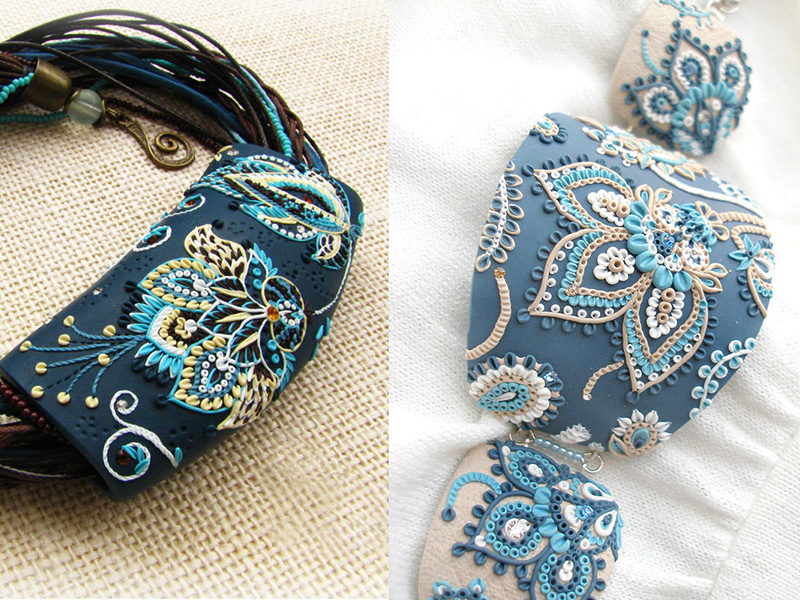
Products made using the filigree technique are distinguished by a special grace. The difference between the technique is the use of thin flagella and stripes, which decorate the surface of the product, laying them out with intricate patterns.
Salty (sugar)

This technique allows you to get products with a relief. Fashioned beads (or other blanks) are rolled into coarse salt or sugar. After firing, the blanks are placed in water so that the salt (sugar) dissolves.
Where to begin?
Having decided to make a polymer clay jewelry, you should start from the very beginning. simple option- making beads or a bracelet from beads. It is necessary to roll identical beads of the desired shape from clay and make holes in them so that later they can be strung on a thread.

It is necessary to burn the finished beads by stringing them on a wire and placing them over the form in weight. If you lay the beads on a flat surface, then one side of the product is deformed. Finished beads are coated with water-based varnish, and then collected on a strong thread or fishing line.
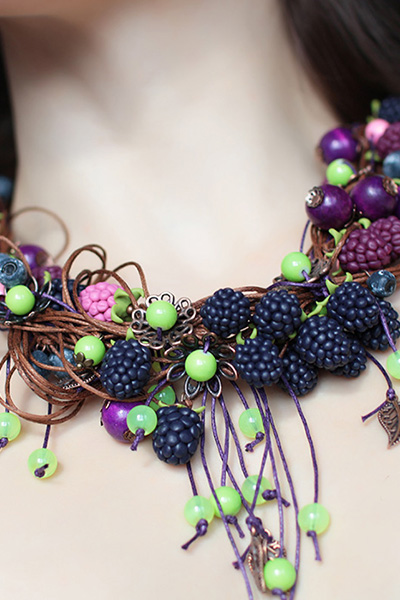
Having mastered simple technique work with the material, you can begin to make more complex jewelry. So, if this is jewelry for children, then the elements of jewelry can resemble berries or fruits. Decorations in the form of animal figurines look interesting. Adult girls can also wear such jewelry; they can complement everyday, and especially summer, looks.

Polymer clay flowers are very beautiful. Flowers made by talented craftswomen are difficult to distinguish from living ones at first sight. An airy necklace made of flowers and beads can be a great decoration for a solemn event. The necklace can be paired with a bracelet or earrings. This set will look great with an evening dress.


Beautiful polymer clay jewelry will certainly find a place in the jewelry box of a modern fashionista, especially if such products are made by hand.
Before you wonder how to make polymer clay jewelry, familiarize yourself with useful tips specialists:
- The first thing to do when deciding with my own hands create beautiful jewelry, choose the material. It can be expensive or cheap, on which the quality of finished products actually depends. Material presented different colors, it can be sold individually or in sets. Among the expensive polymer clay are the products of such imported companies as Fimo, Kato, Pardo. There is also a cheaper material of domestic production.
- Do not rush to immediately buy a lot of polymer clay, first buy 1 bar and check it in work - how it mixes with other plastics and colors, how finished products look. Be sure to bake the finished item, high-quality clay should not crack.
- For sculpting, you need primary colors that can be mixed during work to get others. color options. You will also need special tools and a small electric oven for baking.
- Polymer clay should be handled with care. In order not to lose color, work in rubber gloves and on clean surfaces.

If you have already purchased the necessary materials and tools, familiarized yourself with the basics of modeling, you can start creating polymer clay jewelry with your own hands.
How to make polymer clay jewelry: beautiful earrings


With the help of this master class, you will be able to make beautiful polymer clay jewelry in the shape of jars with bells.


You will need the following materials and tools:
- polymer clay in blue, white and yellow;
- liquid plastic;
- work surface - tiles, a sheet of paper;
- stack for drawing veins;
- stack with a ball;
- plastic blade;
- platypuses, pliers, side cutters (assembly tools);


The process of creating jewelry with your own hands looks like this:
- We begin work with the creation of blanks, they will serve as the basis for the bells. Cut the long bronze-colored pins into 15 mm lengths. Using platypus pliers, make loops on each segment by bending one of the sides. For these earrings, you will need 38 of these blanks.
- Now start creating the "pestles" for the bells. To do this, polymer clay yellow color roll up a tourniquet about 2 mm thick and cut it into small identical pieces.
- Form the petals from the segments and fasten them on the pin loops. Press the petals firmly so that they hold securely on the base, make their edges sharp.
- In the same way, make petals from blue clay. Make each petal flat by lightly pressing it with your finger against the work surface.
- Using a stack or other suitable object with a thin, sharp edge, vein the petals.
- Take the stack with the ball and lightly roll it on inside petal so that it turns out to be slightly concave, while bending its tip back a little.
- Now take a pestle on pins and grease each liquid plastic, glue the petals to it. For 1 pistil you will need 3-4 petals. Make 38 flowers in this way. Make a few bells in the form of closed buds.
- Place the bells in the oven, wait until they are baked, and then bend the pins, forming a small loop.
- When the bells are ready, jugs should be made for them. To do this, take white clay and roll out of it 2 identical balls of medium size. Roll it over your palm to make an oval, while on one side it should be a little wider. Flatten the narrower side with your hands to the work surface to make it flat.
- From the side flat surface roll up the neck and, using a stack with a ball, make a recess to “put” bells into the jug. Pierce the jug with a pin. Roll from white clay pinstripe, make a pen. Bake in the oven, if necessary, sand and polish, varnish.
- For one jug, divide the bells into 3 parts, assemble them into branches in chains, the central part should turn out to be slightly larger than the side ones.
- Collect the flowers on the pins, there should be 2 identical bouquets of bluebells. Insert them into jugs, fasten them, attach the earrings, and delicate spring earrings are ready.
Such an idea of polymer clay jewelry in the form of earrings is presented in these photos:


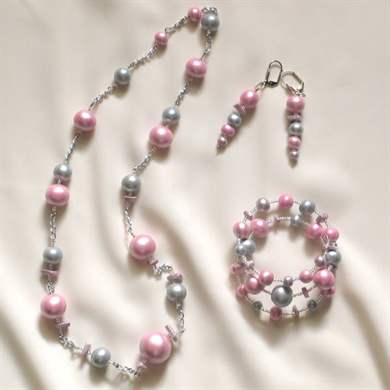
Wedding jewelry made of polymer clay: a set decorated with flowers


Wedding jewelry made of polymer clay will complete the gentle and romantic image of the bride.


To create a wedding set, represented by a bracelet and a ring decorated with flowers, you will need:
- polymer clay - white, white translucent, pink, light brown or beige, green;
- white acrylic paint;
- blade or clerical knife;
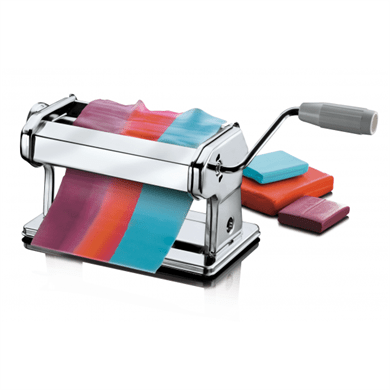
- plast machine or acrylic rolling pin;
- a stack with a ball and a stack with a needle (toothpick);
- wire with a diameter of 0.5 mm;
- round-nose pliers, side cutters;
- cutter round shape;
- veiner double-sided with leaf veins;
- foam sponge;
- thin white satin ribbon.
The process of making wedding jewelry looks like this:
- Soften the plastic in your hands and roll it in the pasta machine on setting No. 5. You should get a layer about 3 mm thick.
- Then, using a round cutter with a diameter of no more than 5 mm, cut out many small circles from clay. Lay them on a foam sponge and, using a stack with a ball, thin each element by slightly concave it inward.
- From the resulting convex small petals, collect flowers of different sizes. To make a bud, use 3 elements, and to create a beautiful blossoming rose, add to this bud another lower row, consisting of 5 petals.
- Make through holes in each flower and only then send it to the oven for baking.
- For flowers of larger sizes, clay of delicate pastel shades should also be used. To do this, roll up a layer 3-4 mm thick in the same way, then take a cutter or plastic cutting in the shape of a leaf and cut out a lot of teardrop-shaped parts.
- Place the resulting petal on the palm of your hand and press one of the sides with a stack with a ball so that the elements have uneven edges. With the same stack, make a small indentation in the center of the petal. It is not necessary to make the petals of the same color, you can use several delicate shades that will look harmonious with the bride's outfit.
- Now proceed to the formation of large flowers: take three petals with jagged edges and overlap each other to make a bud. The next row consists of 5 petals, which are attached in the same way using liquid plastic. You can make a third row, it should consist of 9 petals superimposed on each other. Beautiful flower arrangements obtained by making the middle of the flower a little darker.
- When the polymer clay flowers for wedding jewelry are already made, you can begin to form the stalks and leaves. To do this, use light green clay. If you don't have that color, mix green plastic with white. Roll the light green material on a plastic machine to make a sheet about 3 mm thick.
- Then take a plastic cutting in the form of a five-leaf flower and make a lot of elements from a light green clay layer. They will serve as stalks for flowers.
- Measure small pieces from the wire, about 5 cm, and cut as much as the stalks. Using round nose pliers, make small loops by bending one side of the wire.
- Pass the wire through the through holes in the buds and flowers so that the loop is inside.
- Put the flowers in the oven again for re-baking.
- Next, proceed to assemble the elements into decoration. To do this, string small flowers mixed with large flowers on the wire by twisting the wire. Attach a wire with a clasp for a necklace to the wire frame, and wrap the structure with a thin satin ribbon white color. It is desirable to do this in two or three approaches in order to be able to completely close the wire.
- Follow the same steps to create a wedding bracelet.
Ready-made wedding jewelry made of polymer clay with your own hands is shown in the photo below:


The most beautiful polymer clay jewelry: instructions for beginners


Such beautiful jewelry made of polymer clay in the form of a bracelet made of "cakes" and "gingerbread" will appeal to both children and adult fashionistas.


To make this polymer clay jewelry you will need:
- polymer clay;
- acrylic paints;
- pastel colors;
- base chain;
- toothpicks.


Choose the colors of polymer clay, acrylic and pastel paints at your discretion.


Follow these instructions for making polymer clay jewelry for beginners:
- Make blanks for "cookies". For this out of clay Brown color form two pancakes about 2 cm in diameter.
- Make notches along the edge of these blanks by pressing on them with toothpicks. From brown clay, make two such rings.
- From white clay, make a third, exactly the same element. Connect them all together, placing the white ring in the center. Use liquid plastic to connect the elements.
- Make a hole in the center for fastening, insert the wire and bend it with pliers, send it to the oven for baking. Decorate on top "sweetness" acrylic paints and pastels, creating an imitation of gingerbread or cookies.
- Make these 5 elements. When painting "gingerbread", try to apply contrast, alternating them through one.
- String decorative elements on the bracelet chain. Stylish decoration ready!
Other ideas for a master class on creating jewelry from polymer clay are presented in this video:
Designer jewelry is always highly valued in the fashion world. Polymer clay allows you to make any decoration with your own hands, putting your warmth, energy and imagination into it. Jewelry made of polymer clay is very popular among the fair sex.
Polymer clay

Polymer clay is a plastic material that resembles plasticine loved since childhood. When heated to certain temperatures, it hardens and becomes like plastic. You can make any jewelry from it: earrings, rings, necklaces, pendants, hairpins and much more.
A huge color palette allows you to choose any shade. Colors can be mixed to get new ones.

The material is considered non-toxic, therefore safe for health.
Fantasy, precision and creativity provide an excellent result and please the author with new products.

Polymer clay is produced by many manufacturers, different quality and different price ranges.
To get started, you can choose soft types clay, from which it will be easier to sculpt for a beginner.
You should not buy a whole package, first it is better to buy a separate color and try to make simple elements out of it and bake it. If the product has not cracked, has not changed color, then you can also purchase a set from this manufacturer.
Before sculpting, you need to hold the clay in your hands - it will heat up from the heat, and it will be easier to sculpt.
It is better to roll out clay in thin layers so that the resulting product is neat and elegant.

Carefully read the instructions on the package, which indicate the baking time and temperature regime. It must be observed exactly and in no case be increased, otherwise the product will deteriorate.
In addition to clay and an oven, you will need various accessories and tools.
Tools

- machine for rolling out clay;
- extruder;

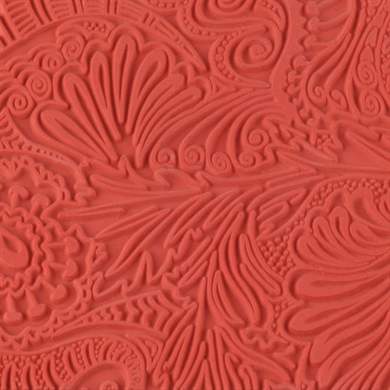
- texture sheets;
- glue;
- stationery knife;
- brushes of different sizes;
- stacks of wood;
- modeling surface;
- toothpicks.
graceful roses

This master class will tell you how to sculpt flowers from polymer clay.
Roses look very beautiful and natural. They can be used to decorate earrings, bracelets, hairpins.
Materials:
- polymer clay of any shade - red, pink, white, yellow for a flower;
- stack with a ball;
- clay rolling device.
- First you need to create blanks for the flower petals.
To do this, you need to make as many small balls as the flower will have petals. The sizes of the balls can be different, because a real flower has smaller petals inside than outside.
- Roll into balls and cut into halves.
- Create the center of the flower: for this, make a drop from one ball with your fingers.
- Then gradually form a bud, alternately attaching the petals to the center.
The splendor and size of the rose will depend on their number.
- Bake according to the time and temperature indicated on the package.
In the video below, all the stages of this master class are discussed in detail:
Earrings

Taking the technique of making a rose as a basis, it is not difficult to make earrings.
Materials:
- roses made of polymer clay;
- rings for fastening;
- earplugs.
Before you send the flowers to bake, you need to pierce a hole in the petal, into which you later insert a ring and attach it to the earring, and enjoy beautiful new earrings, such as in the photo:

beads
Beads made with your own hands look incomparable. They look very feminine and give originality to any image.

Materials:
- polymer clay in various pastel shades: beige, pearl, caramel, pink-brown, white.
- sequins;
- toothpicks;
- varnish for plastics (matte and glossy);
- cord or chain.

- crush the clay;
- divide into pieces, based on the size of the beads;
- form beads of different sizes;
- using a toothpick, make holes in them;
- add glitter to a few beads, to do this, dip your finger in sparkles and press it to the surface of the bead;
- bake;
- let the beads cool completely;
- cover part of the beads with glossy varnish, and the other part with matte;
- collect beads.
You can make any decoration that will complement your favorite dress, suit or blouse. It will be in harmony with the outfit or vice versa, it will become a bright accent in the image. Handmade polymer clay jewelry is a pleasure to present as a gift. For the author's work, you need quite a bit of free time, creativity and imagination.

Video selection:
Polymer clay jewelry is very popular today. Thanks to the many techniques of working with this material, the products are unusual. Among them are those that imitate known materials ( gems, metals). And there are fruits made of clay, vegetables very similar to real ones. But in any case, these decorations are beautiful and bright, attract attention, complement the image.
Kinds
Decoration is a harmonious addition to something in order to create a complete image or an aesthetically beautiful look.
As an object, decoration can be used to convey information, attract attention, disguise some defects, express protest or assert oneself.
Depending on the fashion trends decorations are divided into:
- jewelry;
- bijouterie;
- accessories;
- makeup;
- tattoo and piercing;
- nail art;
- fabric decoration with embroidery.
Polymer clay jewelry in this classification refers to costume jewelry. This material appeared recently and firmly took its place in the workshops of craftsmen. It is much easier to mold original things from it than from ordinary clay.
To work with this clay, it is enough to master basic knowledge. Later, in the course of working on each thing, modeling skills will improve.
Polymer clay jewelry
Each of these decorations is a product self made made with special technology. It is unique and inimitable. The material is so malleable that almost anything can be made from it: fruits, figures, flowers in any style and in any color. Working with this clay, you can imitate precious stones. A varied color palette will allow you to achieve unusual shades.
Jewelry made of polymer clay turns out to be very bright and catchy, due to the saturation of the colors of the source material. Products are very durable and at the same time light, which is explained by the structure of the clay itself. In addition, it goes well with other materials, which allows you to make real masterpieces. 
To understand what such products are, let's take a step-by-step look at how to make polymer clay jewelry.
Execution Technology
There are many techniques, or ways of sculpting such ornaments. Let's consider some of them.
Technique Millefiori, or "sausage". The name is translated from Italian as "thousand flowers". This method has been known since the fourteenth century. In the bar, along its entire length, a drawing is made in different colors, then the bar is pulled out, and the pattern is saved on each cut. Most often, vegetables, fruits, flowers, buttons, flat beads are made using this technique. 
stroppel cane technique. Its essence is that the remains of the previous sausage sticks are laid out tightly on a black layer. Then it is cut in half, the halves are connected and aligned with a rolling pin. Again cut, folded and leveled. The resulting block is cut into thin, 1.5-2 mm, plates, from which crafts are then made.
Technique "Brick". Two multi-colored sausages are made. Then they are cut into small pieces, which are laid out on a black layer in a checkerboard pattern. Then the layer is divided into two parts, which are folded together. Another black layer goes on top. Everything is trimmed with a rolling pin and cut into thin layers, from which the details of future products are then made.
These are just some of the ways to make polymer clay jewelry. Each of them allows you to get a very original product.
If you want to learn how to make polymer clay jewelry, then these tips will help you master this type of needlework:
- It is necessary to purchase all the necessary tools and materials. This will help to do the job correctly and avoid damage to products.
- When starting out with polymer clay, it is best to purchase only a few colors. With the development of this needlework color scheme can be expanded.
- It is necessary to work with gloves, as fingerprints remain on the clay. Then they will need to be hidden under a layer of varnish, and it is difficult for an inexperienced master to do this.
- Before you start sculpting, you need to gain knowledge. This will help the study of literature, the lessons of experienced masters.

Following these tips, you can quickly master this technique and learn how to sculpt beautiful things.
Master Class
Now let's take a closer look at how polymer clay jewelry is made. Master class "Sweet bracelet" shows all the subtleties of working with polymer clay.
To make jewelry, take the following materials and tools:
- polymer clay, acrylic paints and pastels of the desired colors;
- base chain;
- toothpicks.
At the first stage, we will make a blank for the future "cookie". To do this, we will fashion two pancakes with a diameter of 1.5-2 cm from brown clay. Now, along the edge, pressing with a toothpick, we make recesses. When both circles are ready, we make a third, contrasting in color, place it in the middle and connect all three together. It remains to make holes with a toothpick, insert a ring, for which we will then attach the "cookie" to the chain, decorate and bake.
You can make all the "cookies" the same or, conversely, different. Fantasy will tell you the best. 
When the individual elements are ready, all that remains is to attach them to the chain - and the elegant bracelet is ready. He will definitely draw attention to his owner, as he is original and bright.
Stylish gift
DIY polymer clay jewelry will please not only the master: they can become both a stylish gift and a means of earning money. These are things that are done manually, and therefore, one is unlike the other, even if they are made using the same technology.
Jewelry made from polymer clay are very interesting accessories. All fantasy and all creativity allow you to create things that exist only in one copy. This is what makes these products so good.
Working with polymer clay is very exciting. In addition, some techniques require attention and concentration. This allows you to escape from problems and surrender to the power of fantasy. And the end result makes you feel like a real artist.
Sculpting is a simple and very exciting hobby. It allows you to make many different things yourself - jewelry, toys, decorative crafts and sculptures. different forms. Finished products are the best suited for unusual interior design and can be wonderful gifts for almost any holiday. Where to get material for modeling, how to work with it correctly and what can be done from clay with your own hands?
Sculpting from polymer clay for beginners
Polymer clay is a synthetic material that is similar in properties to plasticine, but at the same time it is able to harden. It is called differently - plastic, thermoplasticine, thermoplastic, cernit. Novice craftsmen need to know that there are two main types of polymer clay - one hardens only when baked, and the other without firing. Before choosing what can be made from clay, it is worth deciding what type of material will be used (purchased clay or modeling mass own cooking).
How to make polymer clay at home
Those who do not wish to bear the cost of acquiring finished material for modeling, you can cook it yourself. It would be wrong to call homemade polymer clay because it is made using completely different components. However, the resulting material can be processed using standard polymer clay techniques. To make it, you need:
- 1 glass of white PVA glue;
- 1 glass cornstarch;
- 2 tablespoons of lemon juice;
- 1 tablespoon of vaseline;
- 1 tablespoon of any low-fat cream;
- glass bowl for mixing;
- stirring spoon;
- a substrate for kneading clay;
- polyethylene film.
The given amount of ingredients is enough to make about 350 g of plastic mass for modeling. The technique for making clay is simple: using a spoon, thoroughly mix PVA glue, starch and petroleum jelly in a bowl. Then add lemon juice to the mass and mix everything well again. Next, the bowl must be put in the microwave for 30 seconds at maximum power.

The surface on which the clay will be kneaded should be lubricated with hand cream. The microwaved and re-mixed mixture should be laid out on this surface and kneaded vigorously for 5 minutes, like a regular dough. As a result of all the work, an elastic and plastic material should be obtained. It must be rolled into a sausage shape and wrapped in a cloth to remove excess moisture. Clay will be ready for use immediately after cooling.
What is needed for sculpting
In the process of modeling, any improvised means are used that can facilitate the work with clay and help to give the material the desired shape. For beginners it is better not to stock up immediately large quantity professional tools, since many may not be useful. The minimum set of accessories and materials for working with polymer clay is represented by the following list:

- hard work surface
- cutting tools - a clerical knife, a razor blade for small jobs;
- rolling pins for rolling different sizes- any convenient items will do cylindrical shape;
- toothpicks or needles - with their help they make holes, thinly roll out small elements, fix parts;
- cutters - this is the name of special molds for cutting out figures, however, for the first time, any other devices will do instead of them, for example, caps from bottles of different sizes;
- wet wipes and gloves.
Sculpting techniques
When choosing what can be quickly made from clay, you need to learn a variety of modeling techniques that offer a novice master a lot of ideas for creativity. They are used both for the manufacture of clay products without firing, and when working with baked clay. Depending on the planned shape, color and design elements, polymer clay crafts can be made using the following popular techniques:

- Cane technique - rolled pieces of clay in different combinations of colors are laid out in layers and rolled up in the form of rolls, on the cut of which original multi-colored patterns are obtained.
- The technique of smooth color transition - polymer clay is mixed in different proportions, achieving the effect of transition from one color to another.
- Filigree technique - the workpiece is covered with very small pieces of clay, forming a beautiful openwork pattern.
- Kaleidoscope technique - layers of modeling material of different colors are rolled into rolls, and then they are given various geometric shapes by pressing them against a flat surface.
- "Salt" technique - beads or other elements are rolled in coarse salt, baked, and after cooling, the salt is washed with water, achieving a relief texture on the surface of the products.
How to sculpt with polymer clay
Self-hardening clay after hardening to the touch becomes like wood or plaster, so that the products can be processed with appropriate tools. Baked polymer material after exposure to high temperature is more solid and resembles plastic. You need to buy such clay in art and craft stores.

The first products from polymer clay should be made in the form of easily processed elements, using improvised tools and gradually mastering various simple modeling techniques. It is best to start work with flowers (roses or lilies), bouquets, jewelry. When choosing how to paint polymer clay, preference should be given to acrylic paints. If gouache is chosen for painting, a layer of waterproof varnish is applied over it, and before painting with nitro enamel, it is recommended to prime the surface with epoxy glue.
Flowers

To mold a rose, you first need to make a small ball and give it a teardrop shape - this will be the core of the flower. Then roll a few balls and flatten them with your fingers, turning them into thin petals. They should be wrapped one by one around the core, forming a bud. It is better to leave the first petals straight, and those that will be at the edges, bend outward.
Articulated doll

For manufacturing work articulated doll need foil. With its help, blanks of parts are formed on which a layer of polymer clay will be applied - the torso, head, legs and arms, as well as the hinges themselves for the hips, knees, forearms, elbows and hands. After drying, the parts are cut, and the foil is removed. Then they are undermined so that they fit each other better in size, glued at the cuts and connected with elastic laces.
jewelry

Decorations simple shapes- this is something that can be easily made from clay, even without good modeling skills. Any novice craftsman will be able to make a ring, earrings, bracelet or pendant using simple techniques. It is best to choose an easy version of the product for the first work, for example, to make simple beads or earrings. To do this, the clay is rolled out and equal squares are cut out in it, which are rolled into balls - so each bead will have the same size. Then you need to make holes in the beads with a needle.
Master class of polymer clay crafts for children
Modeling classes help the child to learn the world and develop fine motor skills. The possibilities for creativity here are endless, but when choosing what a child can make from clay, it is better to start working with things of the simplest forms that he can make on his own or with minimal help from an adult. For example, sculpt food for dolls with the baby or teach him to sculpt different animals.
Food

It will be easiest for a child to fashion such food for dolls as vegetables and fruits. Show him how to use a needle to make a “real” peel on an orange, to beautifully decorate a leaf on an apple by drawing veins on it, or to give correct form pear. master different ways and modeling techniques with a child should be gradual, and it is also important to take into account that children always want to see the result of work faster. So that the baby does not lose interest in modeling, it is better for him to explain in advance that the products will not be ready immediately.
Animals

For sculpting animals, it is best to use simple pictures where the animals are depicted schematically. Looking at them, it is easier to choose what to mold, and it is easier to figure out how to give the details the desired shape. For very small animals, it is allowed to use whole pieces of material, and larger figures are recommended to be made using the technique of hollow parts, using improvised molds for modeling. Beads are used to decorate the eyes and noses.
Clay products for molding and firing
How to prepare clay for modeling? Immediately before starting work, you need to knead it well with your hands - this way it becomes more plastic. When baking white or red clay is used, it is important to maintain the correct temperature when heating products. It should be in the range of 110–130 degrees, since with more high temperature the clay may lose its shape, darken, or even catch fire.
Can you make your own baked clay? Theoretically, this is possible, but, firstly, to create such a material, you need to find high-quality natural clay, and secondly, it will be difficult to burn it correctly at home without special equipment. It will be possible to independently produce such material for modeling only empirically, that is, by trial and error.
Vase

For the manufacture of thin and tall figures and sculptures, it is recommended to use a frame. When creating a vase, such a frame is best served plastic bottle beautiful shape. It must be cut into two parts, and then glued over each with rolled layers of self-hardening polymer clay. After hardening, both parts are carefully glued together and a finished vase is obtained.
figurines

When sculpting figures and sculptures, one cannot do without a base for modeling. To create it, various improvised materials can be used, for example, flexible wire. If a novice master is interested in how to mold a person from clay, then in this case it is better to resort to video tutorials that show the process of doing such hard work step by step.
Clay modeling video tutorials
In the video lessons on modeling, there are many necessary information for beginners: how to burn clay at home, how best to use certain techniques. Master classes in video format help to better study the intricacies of working with polymer material and quickly master independent production elements varying degrees difficulties.


